的確,能創造自己的widget真的很吸引人,但是,創造以後的維護,以及如何跟上最新版本更新的腳步,這些都是作為一個負責任的工程師需考量的地方。官方文件並不建議自行創造widget,但如果今天非得創造自己的widget不可,我們必須從Mendix的主要架構來思考widget的結構。
Mendix 前端主要使用的語言為JavaScript(當然,比較在乎type的人也可以使用TypeScript),框架使用React,有用過React的人應該都知道,React是一個類為基礎(class-based)的框架 。
import React, {Component} from ‘react’;

class MyApp extends Component {
	render(){
		return(
			<View>
       				 <Text>Hello, world!</Text>
   			</View>
			);
		}
}
export default MyApp;
Mendix 的widget都是建構在這個基礎之上,爾後使用API嵌入。因此,使用JavaScript編程時,我們可以自由的寫JSX或使用React框架中才有的Syntax。但要注意的是,在Mendix上使用TypeScript時會比較麻煩,因為很多type都已經在Mendix上默認設定好,隨意更改型別可能會遇到意外的錯誤,因此在Mendix上使用TypeScript時要格外小心。
在開始開發widget時,我們要先設定好需要的工具 (如果已有寫React基礎的人,這部分應該很熟悉,可以從4.開始看)
4.打開command prompt 在想要儲存的位置輸入npm install -g yo @mendix/generator-widget gulp
5. (command prompt)在指令輸入mkdir CustomWidgets,創建一個CustomWidgets資料夾,之後進入資料夾中cd CustomWidgets
6. (command prompt)輸入yo @mendix/widget yourName之後,開始widget的基礎設定
• Widget name: {Your widget name}
• Widget Description: {Your widget description}
• Organization Name: {Your organization name}
• Copyright: {Your copyright date}
• License: {Your license}
• Initial Version:{Your initial version number}
• Author: {Your author name}
• Mendix Project path: …/…/
• Programming language: TypeScript or JavaScript
• Widget type: For web and hybrid mobile apps
• Widget template: Empty widget (recommended for more experienced developers)
• Unit tests: No
• End-to-end tests: No
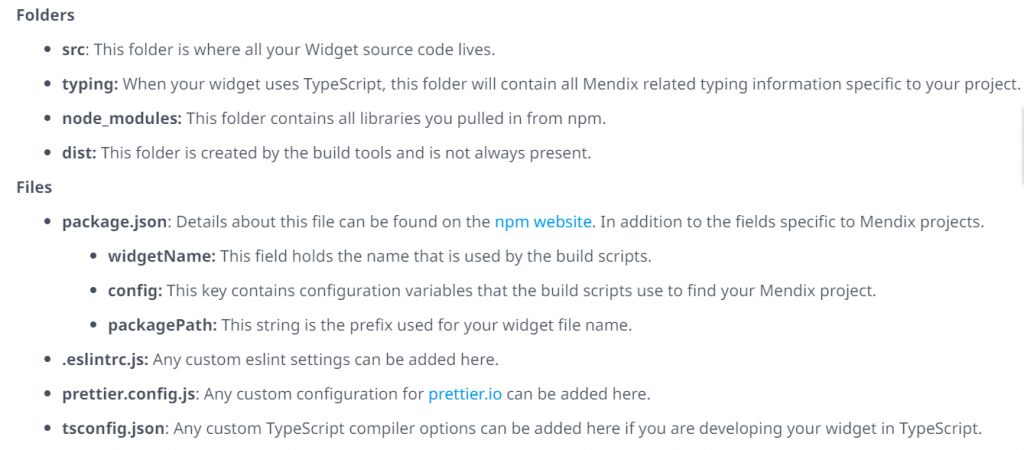
7.在IDE中開啟資料夾並檢查widget的資料夾中是否有下列檔案
我們要讓Mendix Studio Pro可以讀我們創作的widget內容,得將檔案存為xml檔。
例如: Widget.xml
<?xml version="1.0" encoding="utf-8" ?>
    <widget [attributes]>
      <name>{User friendly widget name}</name>
      <icon>{base64 encoded icon}</icon>
      <helpUrl>{url}</helpUrl>

      <properties>
        [properties]
      <properties>
     </widget>
在<properties/> 裡通常是一個section,包含一個<caption/> 和一個 <description/>,像這樣:
<properties>
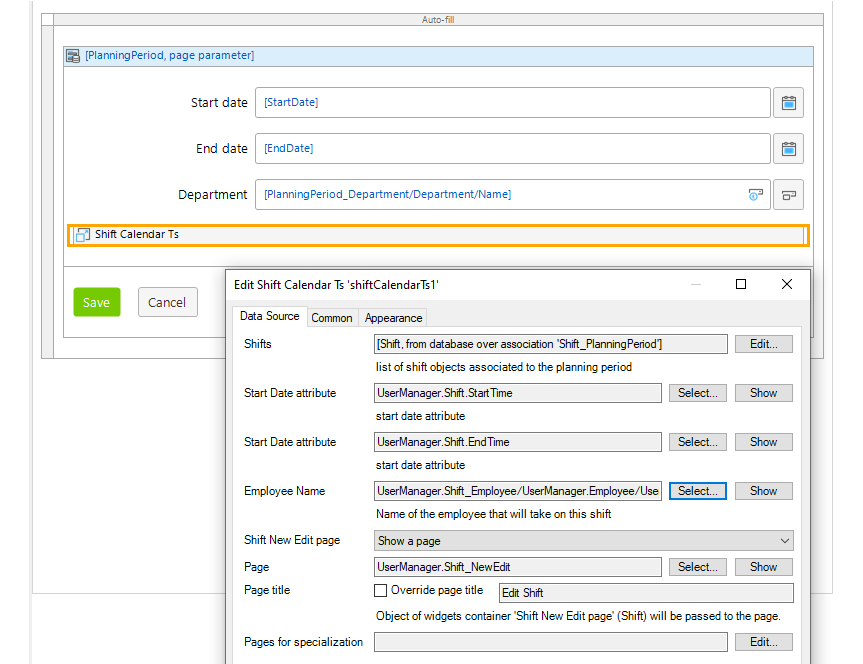
<property key="shifts" type="datasource" isList="true" required="true">
<caption>Shifts</caption>
<description>list of shift objects associated to the planning period</description>
</property>
</properties>
Property也可以組成<propertyGroup/>,像是這樣:
            <propertyGroup caption="Data Source">
                <property key="shifts" type="datasource" isList="true" required="true">
                    <caption>Shifts</caption>
                    <description>list of shift objects</description>
                </property>
                <property key="start" type="attribute" dataSource="shifts">
                    <caption>Start Date attribute</caption>
                    <description>start date attribute</description>
                    <attributeTypes>
                        <attributeType name="DateTime"/>
                    </attributeTypes>
                </property>
                <property key="end" type="attribute" dataSource="shifts">
                    <caption>End Date attribute</caption>
                    <description>end date attribute</description>
                    <attributeTypes>
                        <attributeType name="DateTime"/>
                    </attributeTypes>
                </property>
                <property key="employeeName" type="attribute" dataSource="shifts">
                    <caption>Employee Name</caption>
                    <description>Name of the employee that will take on this shift</description>
                    <attributeTypes>
                        <attributeType name="String" />
                    </attributeTypes>
                </property>
                <property key="editShift" type="action" dataSource="shifts">
                    <caption>Shift New Edit page</caption>
                    <description></description>
                </property>
                <property key="culture" type="enumeration" required="true" defaultValue="nl_NL">
                    <caption>Culture</caption>
                    <description></description>
                    <enumerationValues>
                        <enumerationValue key="nl_NL">The Netherlands</enumerationValue>
                        <enumerationValue key="nl_BE">Belgium (Dutch)</enumerationValue>
                        <enumerationValue key="fr_BE">Belgium (French)</enumerationValue>
                        <enumerationValue key="fr_FR">France</enumerationValue>
                        <enumerationValue key="de_DE">Germany</enumerationValue>
                        <enumerationValue key="en_US">America</enumerationValue>
                        <enumerationValue key="en_GB">United Kingdom</enumerationValue>
                    </enumerationValues>
                </property>
            </propertyGroup>
        </properties>
在xml檔案完成後,就可以再terminal中輸入npm run build,之後到Studio Pro裡按 F4,就可以有更新的widget內容。
接著就是使用JavaScript 或 TypeScript 搭配React框架來做Component了! 強烈建議,沒有學過React的人,可以先去了解基礎React知識,再繼續接下來的動作。這個部分可以依照學過的React方法寫出需要的Component。詳細內容範例可以參考官方網站的範例。
不管是選用JavaScript還是TypeScript,最後總會殊途同歸~
在Terminal 裡Studio Pro中按F4後,接著開啟Studio Pro,按照以下步驟操作
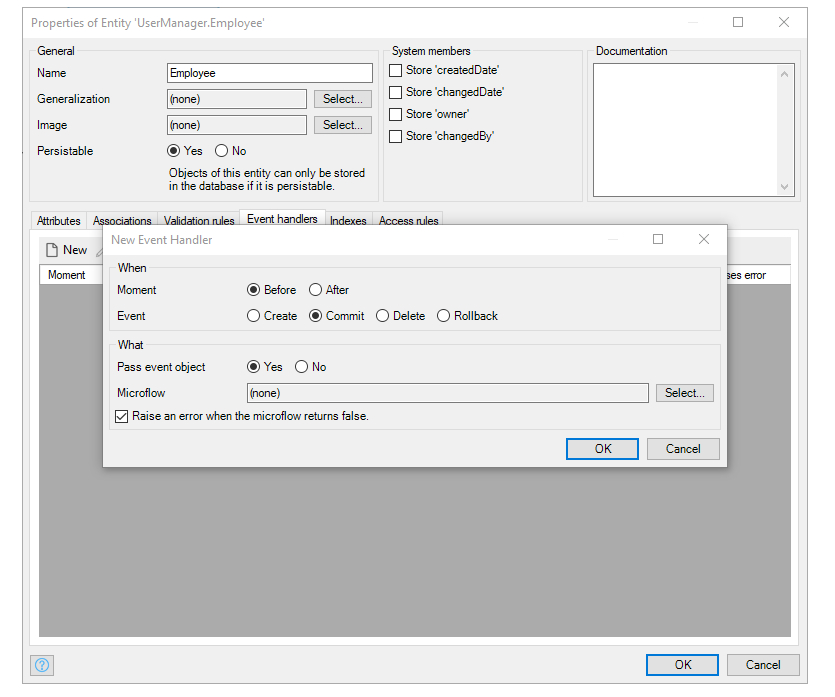
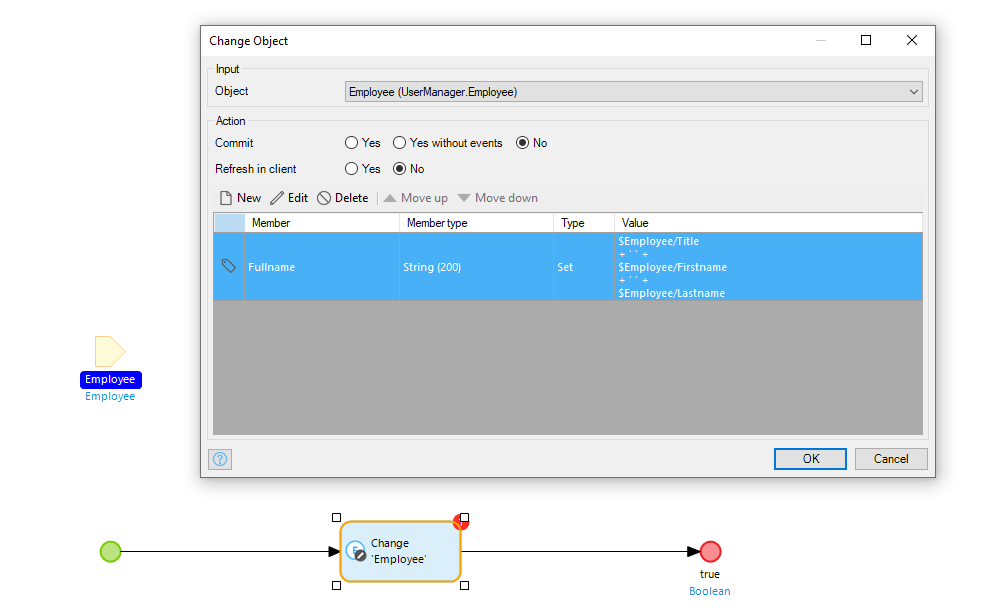
3.打開想要的頁面,將自創的widget嵌入


 iThome鐵人賽