表單驗證是很常見的需求,不論是前後端都會碰到,有一種設計模式很適合處理這類型的事情,就是 Pipe,透過 Pipe 將表單所有的資料驗證一遍,能確保 Controller 收到的資料是符合格式的,當不符合格式的時候,則拋出錯誤。它的運作原理跟 Guard 有點相似,都是在主流程之前發生,如下圖所示:
有一個功能強大的套件專門處理表單驗證,非常適合 Pipe Pattern,它叫做 express-validator,提供多元的驗證方法,安裝方式一樣透過 npm 進行:
npm install express-validator
而 express-validator 在各欄位個別檢查下每個驗證都是一個中介軟體,意思就是當有五個欄位時,就會產生五個中介軟體,為了減少 RouteModule 的負擔,我們應該將其抽離成獨立模組,這邊會以註冊帳號的部分當作範例,來實作 Pipe。
我們先設計 PipeBase,在 bases 資料夾新增 pipe.base.ts,並設計 transform 方法來獲得驗證器:
export abstract class PipeBase {

    public abstract transform(): any[];

}
在 main/auth/local 新增 local-auth.pipe.ts,並設計 LocalAuthSignupPipe:
import { body } from 'express-validator';

import { PipeBase } from '../../../bases/pipe.base';
import { EmailValidator } from '../../../validators';

export class LocalAuthSignupPipe extends PipeBase {

  public transform(): any[] {
    return [
      body('username')
        .isLength({ min: 3, max: 12 }).withMessage('使用者名稱需 3 ~ 12 字元')
        .matches(/^[A-Za-z0-9_]+$/).withMessage('使用者名稱只能含有大小寫英文字母、數字與底線')
        .notEmpty().withMessage('使用者名稱不得為空'),
      body('password')
        .isLength({ min: 8, max: 20 }).withMessage('密碼長度需 8 ~ 20 字元')
        .matches(/^[A-Za-z0-9]+$/).withMessage('密碼只能含有大小寫英文字母與數字')
        .notEmpty().withMessage('密碼不得為空'),
      body('email')
        .custom(value => EmailValidator(value)).withMessage('請確認是否符合 email 格式')
        .notEmpty().withMessage('email 不得為空'),
      this.validationHandler
    ];
  }

}
可以看到 express-validator 的驗證方法非常直覺,透過 body() 取得 req.body 中的相關欄位進行驗證,當有錯誤時透過 withMessage 給定錯誤訊息。
眼尖的各位應該發現了 this.validationHandler,這是設計於 PipeBase 的方法,它的功能就是整合錯誤訊息並拋出錯誤用的,程式碼如下:
import { Request, Response, NextFunction } from 'express';
import { validationResult } from 'express-validator';

import { HttpStatus } from '../types/response.type';

import { ResponseError } from '../common/response/response-error.object';

export abstract class PipeBase {

  public abstract transform(): any[];

  protected validationHandler(req: Request, res: Response, next: NextFunction) {
    const errors = validationResult(req);
    if (!errors.isEmpty()) {
      const arr = errors.array();
      throw new ResponseError(arr.map(err => err.msg), HttpStatus.UNPROCESSABLE);
    }
    next();
  }

}
可以從上方程式碼看到多了 ResponseError,這是自定義的錯誤類別,方便我們進行錯誤處理,在 common/response 新增 response-error.object.ts:
import { HttpStatus } from '../../types/response.type';

export class ResponseError extends Error {

  public status: HttpStatus;

  constructor(message: any = '', status = HttpStatus.INTERNAL_ERROR) {
    super(message);
    this.status = status;
  }

}
由於 Pipe 不會經由 responseHandler 包裝錯誤,所以要透過設計 Exception 來進行包裝,在 exceptions 新增 response-error.exception.ts:
import { ErrorRequestHandler } from 'express';
import { ResponseObject } from '../common/response/response.object';
import { ResponseError } from '../common/response/response-error.object';

export const ResponseErrorException: ErrorRequestHandler = (err, req, res, next) => {
  if ( err instanceof ResponseError ) {
    err = new ResponseObject({ status: err.status, message: err.message });
  }
  next(err);
};
在 index.ts 進行套用:
import { App } from './app';
import { JWTException } from './exceptions/jwt.exception';
import { DefaultException } from './exceptions/default.exception';
import { ResponseErrorException } from './exceptions/response-error.exception';

const bootstrap = () => {
  const app = new App();
  app.setException(ResponseErrorException);
  app.setException(JWTException);
  app.setException(DefaultException);
  app.launchDatabase();
  app.bootstrap();
};

bootstrap();
在 RouteBase 新增 usePipe 方法,讓 RouteModule 可以簡單使用各個 Pipe:
protected usePipe(prototype: any): any[] {
  const pipe = new prototype();
  return (pipe as PipeBase).transform();
}
在 LocalAuthRoute 進行實裝,方法非常簡單:
protected registerRoute(): void {
  this.router.post('/signup',
    express.json(),
    this.usePipe(LocalAuthSignupPipe),
    this.responseHandler(this.controller.signup)
  );
  this.router.post('/signin',
    express.json(),
    this.responseHandler(this.controller.signin)
  );
}
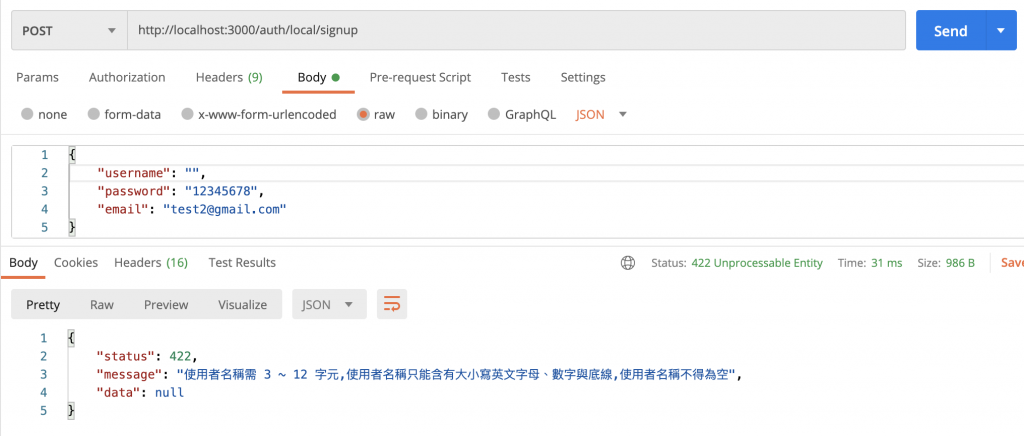
透過 Postman 進行一個不合格的註冊吧!
當前資料夾結構如下:
├── src
|   ├── index.ts                              //本篇修改
|   ├── app.ts
|   ├── app.routing.ts
|   ├── bases
|   |  ├── route.base.ts                      //本篇修改
|   |  ├── controller.base.ts
|   |  ├── dto.base.ts
|   |  └── pipe.base.ts                       //本篇新增
|   ├── common/resonse
|   |   ├── response.object.ts
|   |   └── response-error.object.ts          //本篇新增
|   ├── exceptions
|   |   ├── default.exception.ts
|   |   ├── jwt.exception.ts
|   |   └── response-error.exception.ts       //本篇新增
|   ├── main
|   |   ├── + api
|   |   └── auth
|   |       ├── auth.routing.ts
|   |       └── local
|   |           ├── local-auth.pipe.ts        //本篇新增
|   |           ├── local-auth.service.ts
|   |           ├── local-auth.controller.ts
|   |           └── local-auth.routing.ts     //本篇修改
|   ├── + models
|   ├── + repositories
|   ├── + dtos
|   ├── + types
|   ├── + environments
|   ├── + database
|   └── + validators
├── package.json
└── tsconfig.json
Pipe 與 Guard 有時候會讓人混淆他們的定位,Pipe 主要是對資料進行驗證與過濾,而 Guard 則是判斷該請求是否符合該資源所需的條件,相較於 Pipe,Guard 可以做出其他決策,而 Pipe 只要不符合驗證就是拋出錯誤。Pipe 的實作可以令應用多一層防護,有效阻絕錯誤的資料格式。

設計 PipeBase
我們先設計 PipeBase,在 bases 資料夾新增 pipe.dto.ts,並設計 transform 方法來獲> 得驗證器:
按照上下文,這裡應該是指 新增 pipe.base.ts
你好,感謝指正![]()