前言:
有時候我們會需要看我們給Server的request跟回傳的response時,
如果需要一個一個去Log,就會有點麻煩,這時候我們可以用 intercept來幫助我們
將request的訊息一覽無遺!
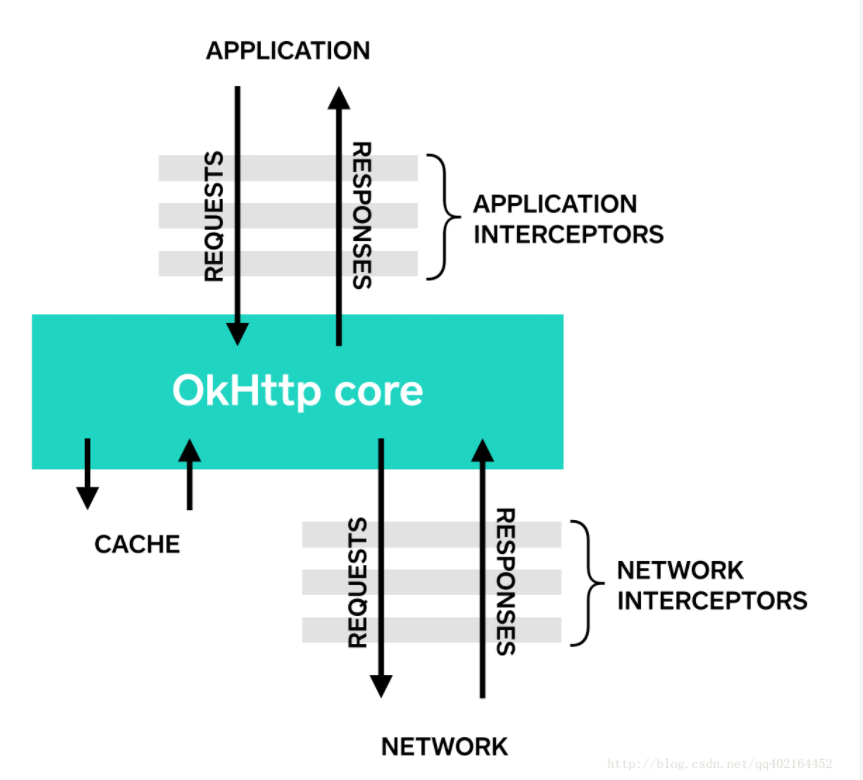
(圖片取自:https://blog.csdn.net/qq402164452)
參考一下圖片後,我們可以發現
首先先新增以下到 gradle
//intercept攔截器
implementation "com.squareup.okhttp3:logging-interceptor:4.9.1"

//okhttp
implementation 'com.squareup.okhttp3:okhttp:4.9.1'
再過來實例化 HttpLoggingInterceptor
val logging: HttpLoggingInterceptor =
        HttpLoggingInterceptor().setLevel(if(BuildConfig.DEBUG){HttpLoggingInterceptor.Level.BODY}else
        {HttpLoggingInterceptor.Level.NONE})
好的,我們可以看到後面有一個 setLevel,這邊有以下四個選項
(挑選自己想要看到的Log選擇Level,並且設定只有在DEBUG模式才可以看到Body)
再過來
1.實例化OkhttpClient
val client = OkHttpClient.Builder()
.build()
.addInterceptor(object : Interceptor{

override fun intercept(chain: Interceptor.Chain): okhttp3.Response{
val newRequest = chain.request().newBuilder()
.addHeader("Content-Type", "application/json")
.addHeader("Content-Type", "application/x-www-form-urlencoded")
.build()

return chain.proceed(newRequest)
    }
})
我們這邊用匿名內部類實例化繼承 Interceptor的 class ,並override intercept的 funtion,
並且擁有 chain.procedd(newRequest)的回傳值
val request = chain.request()
val newRequest = chain.request().newBuilder()
.addHeader("Content-Type", "application/json")
.addHeader("Content-Type", "application/x-www-form-urlencoded")
.build()
return chain.proceed(newRequest)
最後在另外新增一個 addInterceptor,並把剛剛實例化的HttpLoggingInterceptor放進去
.addInterceptor(logging)
參考文章:https://codertw.com/android-開發/348129/
完整的code 如下
object BookApi {

    private val BASE_URL = "your_base_url"

    private val moshi = Moshi.Builder()
        .add(KotlinJsonAdapterFactory())
        .build()


    val logging: HttpLoggingInterceptor =
        HttpLoggingInterceptor().setLevel(if(BuildConfig.DEBUG){HttpLoggingInterceptor.Level.BODY}else
        {HttpLoggingInterceptor.Level.NONE})


    val client = OkHttpClient.Builder()

        .addInterceptor(object : Interceptor {

            override fun intercept(chain: Interceptor.Chain): okhttp3.Response {

                val newRequest = chain.request().newBuilder()
                    .addHeader("Content-Type", "application/json")
                    .addHeader("Content-Type", "application/x-www-form-urlencoded")
                    .build()

                val request = chain.request()

                Timber.d("RequestNew $newRequest")
                Timber.d("Request $request")

                return chain.proceed(newRequest)
            }


        })
        .addInterceptor(logging)
        .build()


    private val retrofit = Retrofit.Builder()
        .addCallAdapterFactory(CoroutineCallAdapterFactory())
        .addConverterFactory(MoshiConverterFactory.create(moshi))
        .baseUrl(BASE_URL)
        .client(client)
        .build()


    val retrofitService = retrofit.create(BookApiService::class.java)


}
好的,那來看一下實際攔截到的資料吧
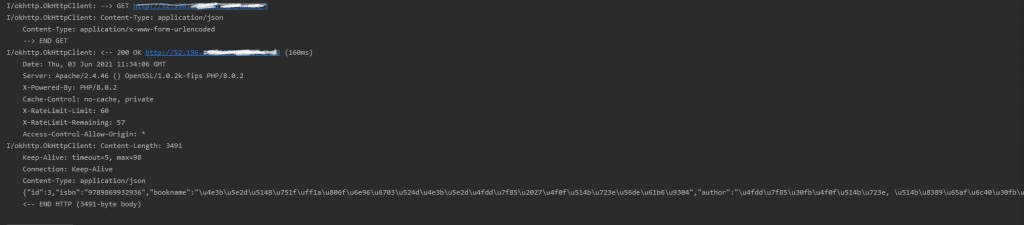
若有任何錯誤煩請告知!
 Tom
Tom
