在上一篇中介紹了 Angular 中 Module 的一部分,接著要繼續介紹還沒講完的部分,那就往下看吧

在上一張的 NgModule metadata 中提到了 bootstrap 這個 Property,設置他的主要目的是為了讓應用程式透過這個指定的這個 component 創建最基礎的 DOM 元素,插入這個 bootstrapped component 後會觸發一連串的子層 component 來填充這個應用程式的 component tree,而這個被指定的 component 就稱為 Entry components。
Entry components 是 Angular 按類型命令加載的 component,這意味者你不需要在任何 template 中引用他,可以通過 NgModule 中的 bootstrap 中這定他,也可以通過將它包含在 rooting 中來指定 Entry components。
所以 Entry components 主要可以分為兩種
bootstrapped component 是 Angular 在引導過程(應用程序啟動)期間加載到 DOM 的 Entry component,一個最基本的 bootstrapped component 就是在 app.module.ts 中設定的 Entry component
@NgModule({
  declarations: [
    AppComponent
  ],
  imports: [
    BrowserModule,
    FormsModule,
    HttpClientModule,
    AppRoutingModule
  ],
  providers: [],
  bootstrap: [AppComponent] // bootstrapped entry component
})
以上面的例子來說,Angular 會動態加載 root AppComponent,因為他被設置在 bootstrap 中。
@NgModule.bootstrap property 告訴編譯器這是一個 entry component,應該生成戴法來用這個 component 啟動應用程序,所以 bootstrapped component 必須要是 entry component,因為 bootstrapping 是一個命令式的過程,所唷需要一個 entry component。
第二種 entry component 會出現在 route 的定義中,比如
const routes: Routes = [
  {
    path: '',
    component: CustomerListComponent
  }
];
所有 router components 必須是 entry component,因為這需要在兩個地方(router 和 entryComponents) 添加 component,所以編譯器可以識別這是一個 router 定義並自動將它添加到 entryComponent 中。
雖然 @NgModule 裝飾器有一個 property 是 entryComponent 的陣列,但大多數不需要設置任何 entryComponent,因為 Angular 添加了 @NgModule.bootstrap 中添加的 component 和 route 定義中的那些自動進入的 component,儘管這兩種機制佔了大多數的 entry components,但如果你的應用程序需要引導或動態加載 component,則也可以將 component 添加到 entryComponent 中。
feature module 是用於組織程式的 NgModules,隨著應用程式著增長,可以將特定功能的相關程式組織在一起,這有助於增加應用程式中每個功能之間的邊界,使用 feature modules 將特定功能或相關的程式與其他部分拆開,這樣的分割有助於開發人員與團隊人員的合作,將不同的 feature modules 交由不同人進行維護與開發,可以更好的保障這個功能的完整性與安全性。
feature modules 是一種組織相關程式的最佳實踐,他與 Angular 核心的 API 概念相反,feature module 提供了一組內聚的功能,專注於特定的應用程式功能或需求,例如 form 或 routing 等等,雖然這些動作都可以在 root module 中做到,但使用 feature modules 可以幫助你將應用程式以功能而言劃分為不同的重點區域。
可以在應用程式中使用 Angular CLI 建立一個新的 feature module
ng generate module CustomerDashboard
輸入上面的 CLI Command 後 Angular 會建立一個名為 customer-dashboard 的資料夾,其中會包含一個名為 customer-dashboard.module.ts 的文件,文件內容會是
import { NgModule } from '@angular/core';
import { CommonModule } from '@angular/common';

@NgModule({
  declarations: [],
  imports: [
    CommonModule
  ]
})
export class CustomerDashboardModule { }
無論是 root module 或是 feature module 他們的 NgModule 結構都會是一樣的,在 CLI 產生的 feature module 中,在它的頂部 import 了兩個東西,第一個是導入 NgModule 他與 root module 一樣允許你使用 @NgModule 裝飾器,第二個導入的事 CommonModule 他用於提供與多常用的 directive,比如 ngIf 或 ngFor, feature module 導入的是 CommonModule 而不是像 root module 中引入 BrowserModule, 因為他只會被引入一次,CommonModule 只包含常見的 directive 而 BrowserModule 是會為瀏覽器配置 Angular 應用程式,這個過程只需要完成一次。
module 中的 declarations 陣列可以用來定義屬於這個 module 的 component、pipe 或 directive,要添加屬於這個 module 的 component 的話,可以使用下面的 CLI Command
ng generate component customer-dashboard/CustomerDashboard
或
ng generate component customer-dashboard --module customer-dashboard.module
都可以建立一個屬於 customer-dashboard.module 的 component
import { NgModule } from '@angular/core';
import { CommonModule } from '@angular/common';
import { CustomerDashboardComponent } from './customer-dashboard.component';

@NgModule({
  declarations: [
    CustomerDashboardComponent
  ],
  imports: [
    CommonModule
  ]
})
export class CustomerDashboardModule { }
CustomerDashboardComponent 會透過 Import 引入 module 中,並將它添加到 declarations 中,這樣會讓 Angular 知道這個 Component 與這個 module 有關聯。
要將其他的 feature modules 合併到應用程式中,需要讓 root module 知道這件事,可以看到 customer-dashboard.module 的最下方有使用 export 將此 module 導出,這樣可以讓其他 module 使用,要將其添加到 AppModule 中的 imports 中。
import { NgModule } from '@angular/core';
import { BrowserModule } from '@angular/platform-browser';

import { AppRoutingModule } from './app-routing.module';
import { AppComponent } from './app.component';
import { CustomerDashboardModule } from './customer-dashboard/customer-dashboard.module';

@NgModule({
  declarations: [
    AppComponent
  ],
  imports: [
    BrowserModule,
    AppRoutingModule,
    CustomerDashboardModule
  ],
  providers: [],
  bootstrap: [AppComponent]
})
export class AppModule { }
要在 AppComponent 中的 template 中使用 CustomerDashboardComponent 的 selector,首先需要將在 CustomerDashboardModule 中導出 CustomerDashboardComponent
import { NgModule } from '@angular/core';
import { CommonModule } from '@angular/common';
import { CustomerDashboardComponent } from './customer-dashboard.component';

@NgModule({
  declarations: [
    CustomerDashboardComponent
  ],
  imports: [
    CommonModule
  ],
  exports: [
    CustomerDashboardComponent
  ]
})
export class CustomerDashboardModule { }
將它導出後就可以在 AppComponent 中的 template 中使用這個 selector
<h1>{{title}}</h1>

<app-customer-dashboard></app-customer-dashboard>

provider 是 Dependency Injection 系統關於如何獲取 dependency 的指令。
可以使用 Angular CLI 建立一個新的 service
ng generate service User
用這個 CLI Command 創建出來的 servce.ts 會長成下面這樣
import { Injectable } from '@angular/core';

@Injectable({
  providedIn: 'root',
})
export class UserService {
}
有了這個 service 後就可以在應用程式的任何一個位置注入 UserService。
service 本身是由 Angular CLI 所建立出來的一個 class,他使用了 @Injectable() 進行修飾,默認情況下這個裝飾器有一個 property 名為 providedIn,他會為 service 創建一個 provider,在上面的例子中 provideIn: 'root' 代表它他是注入在 root injector 中,代表所有地方都可以將它注入並且使用。
當在 root module 中提供 service 時 Angular 會將它建立成一個單一的、共享的 service 實例,並注入到任何需要他的 class 中,除了這樣之外 Angular 還會將沒有被使用到的 service 移除進而優化整個應用程式,所以將 service provider 添加到 root module 後,代表所有地方都可以將它注入並且使用,這意味著如果兩個 module 都在使用這個 service 的內容時,他們使用的是相同的 service 實例(singleton pattern),所以記得當添加 service 到 root module 時,他會變成整個應用程式都可以使用,並且大家都是放問到同一個實例,除非 module 是使用延遲載入。
當有兩個不同 module 中(這邊舉例 AppModule 和 FeatureModule)的 component 使用同一個 service(這邊舉例 VoteService)所提供的服務時會發生以下的事件
token(相同的 service)的 provider,所以最上層的 AppModule 會獲勝,因為 Angular 所使用的 injector 系統在應用程式啟動後載入 root module 時,所有被導入的 module 中的 providers 都會被添加到 root injector 中。root injector 中找到了被創建實例的 VoteService,所以就會直接使用它而不會創建一個新的 VoteService 實例。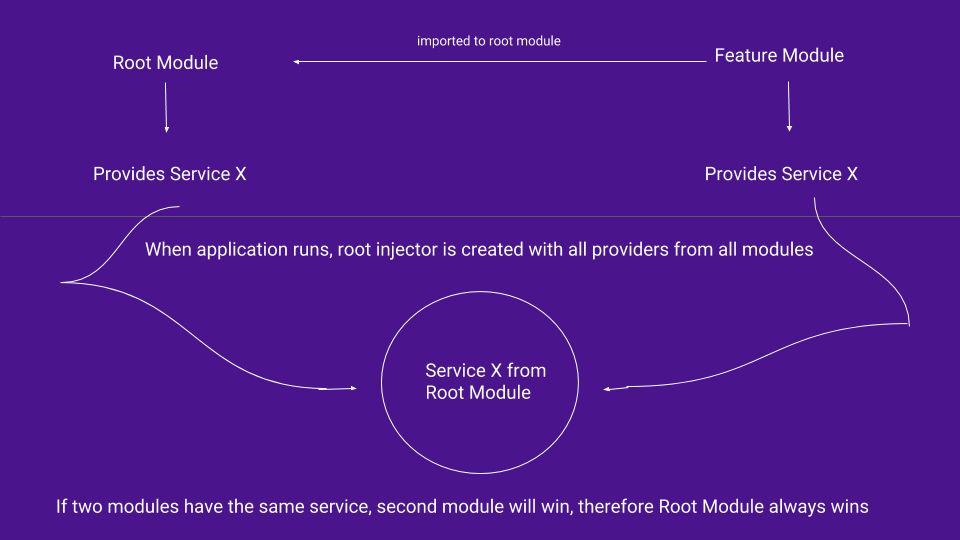
一般來說透過 Angular CLI 所建立的 Module 中都是被急切載入的,這意味著當應用程式啟動的話就會立馬加載這些 module,Angular 使用 injector 系統使 module 之間的 service 可以互相使用,但在急切加載的應用程式中 root injector 會讓所有 module 的 providers 在整個應用程式中可以使用,這意味著剛剛介紹的方法變得無法使用。
不過當你使用延遲加載的話就不會出現這種行為,延遲加載是指僅在需要的時候才載入某一個 Module,例如 route 變化的時候,他不會像急切加載一樣立即加載所有的 module,這意味著延遲載入的 module 中 providers 的 service 變得無法被其他地方使用,因為 root injector 不知知道這些 module( 尚未被載入 )。
當 router 延遲加載一個 module 時會創建一個新的 injector,這個 injector 是 root injector 的小孩,每一個延遲加載的 module 都會有一個 root injector 和 child injector,router 會將所有 providers 從 root injector 添加到 child injector,所以當 router 透過延遲加載的 module 創建 component 時,會將延遲加載的 module 的 providers 創建成 service 實例,可能有點抽象這邊舉個個例子
使用 Angular CLI 創建新的 service
import { Injectable } from '@angular/core';

@Injectable({
  providedIn: 'root'
})
export class VoteService {
  votes = 10;
  constructor() { }

  getVotes() {
    return this.votes;
  }
  setVotes(vote: number) {
     this.votes = vote;
  }
}
在 app.component 中注入 service 並將獲得的數據顯示在畫面中
import { Component, OnInit } from '@angular/core';
import { VoteService } from './vote.service';

@Component({
  selector: 'app-root',
  template: `
    app component - {{votes}}
    <button (click)="onClick()">get vote again</button>
    <button routerLink="/orders">Orders</button>
    <router-outlet></router-outlet>
  `
})
export class AppComponent implements OnInit {
  votes!: number;
  constructor(private voteService: VoteService) {}

  ngOnInit() {
    this.votes = this.voteService.getVotes();
    this.voteService.setVotes(25);
  }

  onClick() {
    this.votes = this.voteService.getVotes();
  }
}
接著使用 Angular CLI 創建一個延遲載入了 module 與他的 component
ng generate module customers --route customers --module app.module
這邊可能會有點看不懂,但沒關係之後會詳細介紹 Angular 的延遲載入 module
使用上的 CLI Command 後,在 order.component 中注入 VoteService,並將獲得的數據顯示在畫面上
import { Component, OnInit } from '@angular/core';
import { VoteService } from '../vote.service';

@Component({
  selector: 'app-orders',
  template: `
    <div>app-orders - {{vote}}</div>
  `
})
export class OrdersComponent implements OnInit {
  vote!: number;
  constructor(private voteService: VoteService) { }

  ngOnInit(): void {
    this.vote = this.voteService.getVotes();
  }
}

在 app.component 中已經將 VoteService 中的 votes 更改為 25,但是在 orders.component 中所獲得的依然是初始的 10,這代表 app.component 中所使用的 service 實例與 orders.component 中使用的 service 實例是不一樣的。
本章介紹了什麼是 Entry components,設置他的主要目的是為了讓應用程式透過這個指定的這個 component 創建最基礎的 DOM 元素,而設定這個 entry component 可以透過在 AppModule 中的bootstrap 中設定,也可以在 routed 中設定,這兩種方法都可以設定應用程式的 Entry components。
介紹了什麼是 Feature module 與該如何建立與使用,通常會因為應用程式著增長,而將特定功能的相關程式組織在一起,這有助於增加應用程式中每個功能之間的邊界。
最後介紹了 Providing dependencies,provider 是 Dependency Injection 系統關於如何獲取 dependency 的指令,而當在 root module 中提供 service 時 Angular 會將它建立成一個單一的、共享的 service 實例,所以當不同 module 中的 component 注入並且使用同一個 Service 時,其實他們是會使用同一個 Service 的實例,這就是 Angular 的 singleton pattern 模式。
但是如果是在延遲載入的 module 中使用相同的 Service 的話就會跟上面說的不一樣,延遲載入的 module 會為自己的 component 創建一個新的 Service 實例。
本章中利用延遲載入來測試延遲載入的 module 是否會跟其他立即載入的 module 共用同一個 service 實例,不過卻沒有詳細的講解這個方法,不過沒關係明天將會詳細的介紹 Angular 的延遲載入功能,那就明天見吧