前幾篇介紹了 Form 的基本操作與概念,也介紹了如何在表單中加入驗證,最後要來介紹 Angular Form 中一個我滿喜歡的功能,Control Value Accessor 簡稱 CVA,就像開發 component 一樣,當這個 component 太大的時候我們會選擇將這個大的 component 拆解成一個一個小的 component,這樣比較方便撰寫維護與測試,CVA 就有是這種概念,當要開發一個超大的表單時,每一個 FormControl 都有自己的設定和各自的 Validator funciton,這樣整個 component 都會充滿不同的表單設定,除了 component 之外 template 也會非常龐大,要找一個 formControlName 就會找半天,所以需要使用 CVA 將龐大的表單分割成一個一個小的 component,這樣可維護性與可測試性就會提高。

本篇會透過一個建立一個 CVA 的例子來講解如何從零開始建立屬於你的 CVA component,那麼就往下看吧。
首先先使用 Angular CLI 建立一個新的 component
ng generate component single-control-cva
接著在 single-control-cva.component.ts 中加入 CVA 的設定
import { Component, OnInit, forwardRef } from '@angular/core';
import { ControlValueAccessor, NG_VALIDATORS, NG_VALUE_ACCESSOR } from '@angular/forms';

@Component({
  selector: 'app-single-control-cva',
  templateUrl: './single-control-cva.component.html',
  styleUrls: ['./single-control-cva.component.css'],
  providers: [
    {                                                                   // (1)
      provide: NG_VALUE_ACCESSOR,
      useExisting: forwardRef(() => SingleControlCvaComponent),
      multi: true
    },
    {
      provide: NG_VALIDATORS,                                           // (2)
      useExisting: forwardRef(() => SingleControlCvaComponent),
      multi: true
    }
  ]
})
export class SingleControlCvaComponent implements OnInit {

  constructor() { }

  ngOnInit(): void {
  }
}
首先要先在 single-control-cva.component.ts 中建立 NG_VALUE_ACCESSOR 的設定,這樣當 Angular 在運行的時候會檢查這個 component 是否有這個設置,如果有就會將這個 component 視為一個 FormControl。
NG_VALUE_ACCESSOR 以 SingleControlCvaComponent 為模板創建一個實例,用於將這個 component 定義為 NG_VALUE_ACCESSOR,讓 Angular 將這個 component 當作 FormControl,而這邊使用 forwardRef 代表允許引用尚未定義的 referenceNG_VALIDATORS 以 SingleControlCvaComponent 為模板創建一個實例,用於建立這個 compoennt 的 validator接著要將 ControlValueAccessor 利用 implements 將它繼承給 SingleControlCvaComponent,將這個虛擬 interface 繼承給 component 後會需要在 component 中添加幾個 method 分別是:
接著將他們加入到 single-control-cva.component.ts 中
export class SingleControlCvaComponent implements OnInit, ControlValueAccessor {
  onChanged: any = () => {};
  onTouched: any = () => {};
  constructor() { }

  ngOnInit(): void {
  }

  writeValue(value: any) {};

  registerOnChange(fn: any) {
    this.onChanged = fn;
  }

  registerOnTouched(fn: any) {
    this.onTouched = fn;
  }

	validate(): ValidationErrors | null {
	  return this.form.valid ? null : { invalidValue: 'single-control-cva error' };
	}
}
設定好基本的 CVA 架構後,接著回到 app.component.ts 中建立最上層的表單結構
import { Component } from '@angular/core';
import { FormBuilder } from '@angular/forms';

@Component({
  selector: 'app-root',
  templateUrl: './app.component.html',
  styleUrls: ['./app.component.css']
})
export class AppComponent {
  form = this.fb.group({
    singleControlCva: ['']
  })

  constructor(private fb: FormBuilder) {}
}
在 app.component.ts 中利用 FormBuilder 建立一個 FormGroup,裡面有一個名為 singleControlCva 的 FormControl。
接著將這個 FormGroup 與 FormControl 綁定到 template 中
<!-- app.component.html -->

<form [formGroup]="form" class="content">
  <div class="item">
    <h2>Single Control CVA Component</h2>
    <app-single-control-cva formControlName="singleControlCva"></app-single-control-cva>
  </div>
</form>
綁定 FormGroup 的方法與之前一樣,不同的點在於之前的 formControlName 是綁定一個輸入元素 ( <input>, <select> ... ) 但是這邊卻不一樣,CVA 的特色就在這邊,他可以將一個 component 的 selector 當作一個輸入元素,因為在 CVA component 中設定了 NG_VALUE_ACCESSOR 那麼 Angular 就會將這個 component 看作一個 FormControl,所以可以達到上面這樣的效果。
設定完 CVA component 和綁定父層後,藉著來從父層傳遞新的值給 CVA component
form = this.fb.group({
  singleControlCva: ['Fandix']
})
傳遞數據非常簡單,就跟之前傳遞預設值給 FormControl 一樣,作為 FormControl 的第一個參數即可。
接著在 single-control-cva.component.ts 中建立屬於他的 FormControl 並在 writeValue() 中將獲得的值賦予給它
export class SingleControlCvaComponent implements OnInit, ControlValueAccessor {
  onChanged: any = () => {};
  onTouched: any = () => {};
  name = new FormControl('');                      // (1)

  constructor() { }

  ngOnInit(): void {
  }

  writeValue(value: any) {
    this.name?.setValue(value);                    // (2)
  };

  registerOnChange(fn: any) {
    this.onChanged = fn;
  }

  registerOnTouched(fn: any) {
    this.onTouched = fn;
  }

	validate(): ValidationErrors | null {
	  return this.name.valid ? null : { invalidValue: 'single-control-cva error' };
	}
}
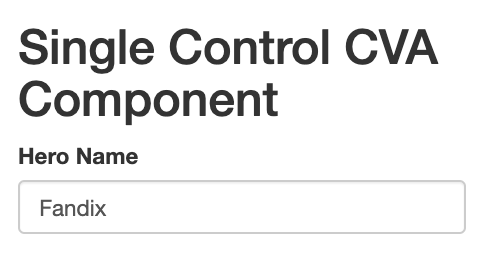
接著在 single-control-cva.component.html 中添加輸入元素並綁定 FormControl
<label for="name">Hero Name</label>
<input type="text" id="name" class="form-control" [formControl]="name" />
可以從父層獲得值並顯示在 CVA Component 的 template 中後,接著就要做到當 CVA Component 的 FormControl 內容發生改變時,也要將這個結果往上傳回給父層,這就需要用到 registerOnChange(fn: any) 了
import { Component, OnInit, forwardRef, OnDestroy } from '@angular/core';
import { ControlValueAccessor, FormControl, FormGroup, NG_VALIDATORS, NG_VALUE_ACCESSOR, ValidationErrors } from '@angular/forms';
import { Subscription } from 'rxjs';                                  // (1)

@Component({
  selector: 'app-single-control-cva',
  templateUrl: './single-control-cva.component.html',
  styleUrls: ['./single-control-cva.component.css'],
  providers: [
    ...
  ]
})
export class SingleControlCvaComponent implements OnInit, ControlValueAccessor, OnDestroy {
  onChanged: any = () => {};
  onTouched: any = () => {};
  subscription!: Subscription;                                         // (2)
  name = new FormControl('');

  constructor() { }

  ngOnInit(): void {
    this.subscription = this.name.valueChanges.subscribe((val) =>     // (3)
      this.onChanged(val)
    );
  }

  ngOnDestroy() {                                                     // (4)
    this.subscription.unsubscribe();
  }

  writeValue(value: any) {
    this.name?.setValue(value);
  };

  registerOnChange(fn: any) {
    this.onChanged = fn;
  }

  registerOnTouched(fn: any) {
    this.onTouched = fn;
  }

  validate(): ValidationErrors | null {
    return this.name.valid ? null : { invalidValue: 'single-control-cva error' };
  }
}
rxjs 中引入 Subscription
subscription
this.onChanged() 中,用於將值傳回父
上面介紹了如何使用 CVA Component,但你可能覺得有只傳一個 FormControl 有必要使用 CVA Component 嗎? 其實傳入 CVA Component 的值可以是 Object 或 Array,這樣就可以把 FormGroup 或 FormArray 寫在 CVA Component,保持最上層的 Form Model 都只有 FormControl,個舉個例子吧
首先新增一個新的 component
ng generate component group-control-cva
在 app.component.ts 中的 Form Model 中新增一個 FormControl 並將一個 Object 傳給他做為預設值
form = this.fb.group({
  singleControlCva: ['Fandix'],
  groupControlCva: [{ firstName: 'Lin', lastName: 'Hank' }]
})
在 app-group-control-cva.ts 中將 CVA component 的設定寫好,和上面的方式一樣
import { Component, OnInit, forwardRef, OnDestroy } from '@angular/core';
import {
ControlValueAccessor,
NG_VALIDATORS,
NG_VALUE_ACCESSOR,
ValidationErrors,
FormBuilder
} from '@angular/forms';
import { Subscription } from 'rxjs';
@Component({
selector: 'app-group-control-cva',
templateUrl: './group-control-cva.component.html',
styleUrls: ['./group-control-cva.component.css'],
providers: [
{
provide: NG_VALUE_ACCESSOR,
useExisting: forwardRef(() => GroupControlCvaComponent),
multi: true,
},
{
provide: NG_VALIDATORS,
useExisting: forwardRef(() => GroupControlCvaComponent),
multi: true,
},
],
})
export class GroupControlCvaComponent implements OnInit, ControlValueAccessor {
onChanged: any = () => {};
onTouched: any = () => {};
subscription!: Subscription;
form = this.fb.group({
firstName: [''],
lastName: ['']
})
constructor(private fb: FormBuilder) { }
ngOnInit(): void {
}
ngOnDestroy() {
this.subscription.unsubscribe();
}
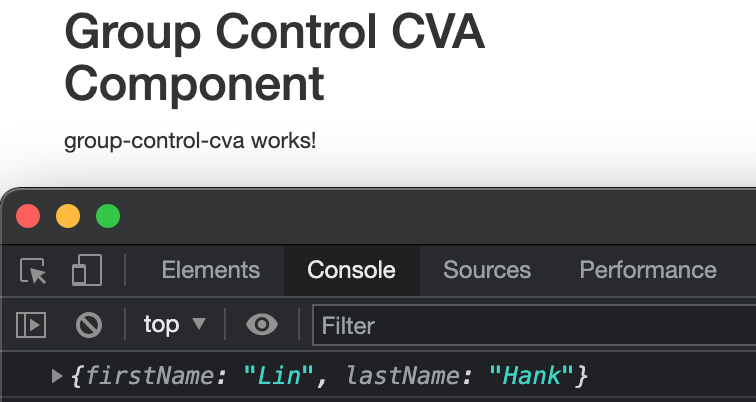
writeValue(value: any) {
console.log(value);
this.form?.setValue(value);
}
registerOnChange(fn: any) {
this.onChanged = fn;
}
registerOnTouched(fn: any) {
this.onTouched = fn;
}
validate(): ValidationErrors | null {
return this.form.valid
? null
: { invalidValue: 'group-control-cva error' };
}
}
在 writeValue() 中加上 console.log 後可以看到,父層傳遞的數據是一個 object

除了傳 object 之外還可以傳 Array 進去,將 FormArray 寫在 CVA Component 中,將 FormArray 的動態新增或刪除 FormControl 都寫在 CVA Componet 中,這樣的話就算你的表單同時有 5, 6 個 FormArray 也不用擔心會將最上層的 Component 寫爆,因為對於最上層的 Component 來說他只是 FormControl,而他們各自的邏輯寫在各自的 CVA Component 就好。
本章介紹了如何使用 CVA Component 將龐大的表單項開發 Component 一樣分成數個 CVA Component,在面對非常龐大的表單時就可以使用這種技巧,將每一個 FormControl 的邏輯寫在自己的 CVA Component 中,這樣對於維護還是測試都比較簡單。
本章是介紹 Angular Form 的最後一章,明天將會介紹 Angular 中提供的一種方便的工具 i18n,在這個越來越發達的網路世界中,國際化網站會越來越多,所以 Angular 提供了 i18n 讓我們可以開發支持多國語言的專案,詳細的內容就留到明天講解吧,那一樣明天見囉