今日的程式碼 => GITHUB
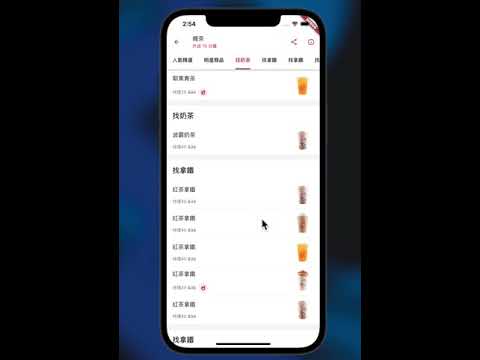
靈感來自於我在使用某某知名外送平台的時候,突然在想有這個畫面要怎麼做,因為我覺得我在 TabBar 的部分,印象也沒有相關的元件用,會做不出來,於是我就開始了實作這個畫面,並努力解決。
很容易的,一看就會知道他是一個 Sliver 的效果。
main
 - |myapp
     - |homepage
         - |FAppBar
             - |PromoText
             - |FlutterHead
             - |DiscountCard
             - |FIconButton
             - |HeaderClip
                 - |CustomShape
         - |CategorySection
下面我介紹一下屬性,我認為重要的屬性。
FlexibleSpaceBar 屬性
這邊設定一個通用的 Color,設定 13 種。
/// 一組13種顏色,可用於配置大多數元件的顏色屬性
const ColorScheme scheme = const ColorScheme(
  background: Color(0xFFF6F6F6),
  surface: Color(0xFFFFFFFF),
  primary: Color(0xFFC63065),
  secondary: Color(0xFF1E1E1E),
  onBackground: Color(0xFF1E1E1E),
  onSurface: Color(0xFF1E1E1E),
  onPrimary: Color(0xFFFFFFFF),
  onSecondary: Color(0xFFFFFFFF),
  primaryVariant: Color(0xFFC63065),
  secondaryVariant: Color(0xFF000000),
  error: Color(0xFFE74C3C),
  onError: Color(0xFFFFFFFF),
  brightness: Brightness.light,
);
什麼事 StruStyle?
相信大家看完這一篇文章就會懂了 => https://medium.com/@najeira/control-text-height-using-strutstyle-4b9b5151668b
/// text 的樣式
class Helper {
  Helper._internal();

  static StrutStyle buildStrutStyle(TextStyle? textStyle) {
    return StrutStyle(
      forceStrutHeight: true,
      fontWeight: textStyle?.fontWeight,
      fontSize: textStyle?.fontSize,
      fontFamily: textStyle?.fontFamily,
      fontStyle: textStyle?.fontStyle,
      fontFamilyFallback: textStyle?.fontFamilyFallback,
      debugLabel: textStyle?.debugLabel,
    );
  }
}
這邊我就直接來介紹會用到的資料有哪一些。因為程式碼有點長,所以物件的宣告我沒有列出來。
完整的程式碼 => 假資料
class ExampleData {
  ExampleData._internal();
  /// 飲料的圖片
  static List<String> images = [
    "https://d1sag4ddilekf6.cloudfront.net/compressed/items/6-CYXCTZAEEEECJE-CZAYA3CERF5ETJ/photo/b44c9b4be5044923b3f5b8f8f6e7e55b_1581506444759847068.jpg",
    "https://d1sag4ddilekf6.cloudfront.net/compressed/items/6-CY21EXXWSEV2E2-CZKKV8MFGPUTMA/photo/321adfd29ded4d9eae3488848ecfbb05_1592997965388846905.jpg",
    "https://d1sag4ddilekf6.cloudfront.net/compressed/items/6-CY4ETPUKCCCYTX-CZAYA3BKLEN2KE/photo/8d2d5939ec5a42269a0d8ec3c0a97e44_1581506429557055566.jpg",
    "https://d1sag4ddilekf6.cloudfront.net/item/6-CY21EXXWUFW1CN-CZAYA25ZSEUJV6/photos/c3f51cd36f2344e28abae3a91b94ef9b_1581506376835073709.jpg",
    "https://d1sag4ddilekf6.cloudfront.net/compressed/items/6-CZADR6NJMB3UL6-CZADR6UYL65GSE/photo/d4e13ca45a4747b78364dcf643095124_1580377235610503360.jpg",
  ];
  /// 全部的資料
  static PageData data = PageData(
    title: " 癮茶",
    deliverTime: "外送 15 分鐘",
    bannerText:
        "指定地區使用線上支付,滿\$150現折\$30,輸入優惠碼【AUT30】,秋高Chill爽立即點!",
    backgroundUrl:
        "https://www.browncoffee.com.kh/uploads/ximg/item_menus/20210515062936c2531deff29845101d3f6f5691943c98.jpg",
    rate: 4.2,
    rateQuantity: 331,
    optionalCard: OptionalCard(
      title: "折扣 30%",
      subtitle: "On the entire menu",
    ),
    categories: [
      category1,
      category2,
      category3,
      category4,
      category4,
      category4,
      category3,
    ],
  );
  /// 每一個 section 的資料
  static Category category1 = Category(
    title: "人氣精選",
    subtitle: "大家都點這些 ? 手刀點起來",
    isHotSale: true,
    foods: List.generate(
      5,
      (index) {
        return Food(
          name: "冰淇淋紅茶",
          price: "40",
          comparePrice: "\$35",
          imageUrl: images[index % images.length],
          isHotSale: index == 3 ? true : false,
        );
      },
    ),
  );

  static Category category2 = Category(
    title: "明星商品",
    subtitle: null,
    isHotSale: false,
    foods: List.generate(
      3,
      (index) {
        return Food(
          name: "耶果青茶",
          price: "35",
          comparePrice: "\$30",
          imageUrl: images[index % images.length],
          isHotSale: index == 2 ? true : false,
        );
      },
    ),
  );

  static Category category3 = Category(
    title: "找奶茶",
    subtitle: null,
    isHotSale: false,
    foods: List.generate(
      1,
      (index) {
        return Food(
          name: "波霸奶茶",
          price: "40",
          comparePrice: "\$35",
          imageUrl: images[index % images.length],
          isHotSale: false,
        );
      },
    ),
  );

  static Category category4 = Category(
    title: "找拿鐵",
    subtitle: null,
    isHotSale: false,
    foods: List.generate(
      5,
      (index) {
        return Food(
          name: "紅茶拿鐵",
          price: "40",
          comparePrice: "\$35",
          imageUrl: images[index % images.length],
          isHotSale: index == 3 ? true : false,
        );
      },
    ),
  );
}
這邊的話,我在程式碼裡面都寫很清楚了,想要補充的點是 onCollapsed 和 onTap 是兩個 callBack,
利用 callback 轉換傳遞現在的 isCollapsed、index 給 HomePage 知道。
WidgetsBinding.instance?.addPostFrameCallback((timeStamp) {}); 此時如果立刻執行下面的代碼,是獲取不到 BuildContext,因為 widget 還沒有完成繪製,addPostFrameCallback 是 StatefulWidget 渲染結束的回調,只會被調用一次,之後 StatefulWidget 需要刷新 UI 也不會被調用
/// SliverAppBar
class FAppBar extends SliverAppBar {
  final PageData data;
  final BuildContext context;
  final bool isCollapsed;
  final double? expandedHeight;
  final double collapsedHeight;
  final TabController tabController;
  final void Function(bool isCollapsed) onCollapsed;
  final void Function(int index) onTap;

  FAppBar({
    required this.data,
    required this.context,
    required this.isCollapsed,
    required this.expandedHeight, // 展開的高度。
    required this.collapsedHeight,
    required this.onCollapsed,
    required this.onTap,
    required this.tabController,
  }) : super(
            elevation: 4.0,
            pinned: true,
            forceElevated: true,
            expandedHeight: expandedHeight);

  /// super() 是用來繼承父親 Widget 裡面的屬性 or function
  @override
  Color? get backgroundColor => scheme.surface;

  /// SliverBar 的 leading
  @override
  Widget? get leading {
    return FIconButton(
      iconData: Icons.arrow_back,
      onPressed: () {},
    );
  }

  /// SliverAppBar 的 actions
  @override
  List<Widget>? get actions {
    return [
      FIconButton(iconData: Icons.share_outlined, onPressed: () {}),
      FIconButton(iconData: Icons.info_outline, onPressed: () {}),
    ];
  }

  /// SliverAppBar Title 慢慢出現的動畫,只有在縮小才看得到,subTitle 也寫在這。
  @override
  Widget? get title {
    var textTheme = Theme.of(context).textTheme;
    // AnimatedOpacity => https://api.flutter.dev/flutter/widgets/AnimatedOpacity-class.html
    return AnimatedOpacity(
      // 0 == invisible, 1 == visible
      opacity: this.isCollapsed ? 0 : 1, // 判斷 SliverAppBar 是展開還是縮小。
      duration: const Duration(milliseconds: 250),
      child: Column(
        crossAxisAlignment: CrossAxisAlignment.start,
        children: [
          Text(
            "癮茶",
            style: textTheme.subtitle1?.copyWith(color: scheme.onSurface),
            strutStyle: Helper.buildStrutStyle(textTheme.subtitle1),
          ),
          const SizedBox(height: 4.0),
          Text(
            data.deliverTime,
            style: textTheme.caption?.copyWith(color: scheme.primary),
            strutStyle: Helper.buildStrutStyle(textTheme.caption),
          ),
        ],
      ),
    );
  }

  /// AppBar 的 bottom 不會被縮小。
  @override
  PreferredSizeWidget? get bottom {
    return PreferredSize(
      preferredSize: const Size.fromHeight(48),
      child: Container(
        color: scheme.surface,
        child: TabBar(
          isScrollable: true,
          // 是否可以滾動
          controller: tabController,
          // https://api.flutter.dev/flutter/material/TabController-class.html
          indicatorPadding: const EdgeInsets.symmetric(horizontal: 16.0),
          indicatorColor: scheme.primary,
          // tabBar 下面一條線的顏色
          labelColor: scheme.primary,
          // 被選到標籤顏色
          unselectedLabelColor: scheme.onSurface,
          // 為被選到的顏色
          indicatorWeight: 3.0,
          // 下面標籤的高度
          tabs: data.categories.map((e) {
            return Tab(text: e.title);
          }).toList(),
          // 想要把 list 裡面的 data 轉換成 Widget
          onTap: onTap,
        ),
      ),
    );
  }

  /// 只有展開才看得到的 FlexibleSpaceBar 屬性
  @override
  Widget? get flexibleSpace {
    return LayoutBuilder(
      builder: (
        BuildContext context,
        BoxConstraints constraints,
      ) {
        // 現在整塊 flexibleSpace 的高度
        final top = constraints.constrainHeight();
        final collapsedHight =
            MediaQuery.of(context).viewPadding.top + kToolbarHeight + 48;
        // 尚未展開的 flexibleSpace 高度。
        WidgetsBinding.instance?.addPostFrameCallback((timeStamp) {
          // 此時如果立刻執行下面的代碼,是獲取不到 BuildContext,因為 widget 還沒有完成繪製
          // addPostFrameCallback 是 StatefulWidget 渲染結束的回調,只會被調用一次,之後 StatefulWidget 需要刷新 UI 也不會被調用
          onCollapsed(collapsedHight != top); // 利用 callback 轉換傳遞現在的 isCollapsed
        });

        return FlexibleSpaceBar(
          collapseMode: CollapseMode.pin, // 展開模式
          background: Column(
            children: [
              Stack(
                children: [
                  PromoText(title: data.bannerText), // 粉紅色部分(有點類似廣告)(宣傳文字)
                  FlutterHead(), // flutter 頭像
                  Column(
                    children: [
                      HeaderClip(data: data, context: context),
                      // 餐廳上方圖片,有形狀的那個。
                      SizedBox(height: 90),
                    ],
                  ),
                ],
              ),
              DiscountCard(
                title: data.optionalCard.title,
                subtitle: data.optionalCard.subtitle,
              ),
            ],
          ),
        );
      },
    );
  }
}
其他的元件將會在後面兩天補充講完。

 iThome鐵人賽