macOS 的預設終端機為 Terminal.app ,對於使用終端頻率較少的一般使用者是十分足夠的,但對於開發者而言,它依然有許多可以改進的地方,像是執行效率、配置方式等。
為了提升開發時使用終端機時的效率,因此我們需要一個適合開發的終端。

Alacritty 是個執行速度極快的跨平台終端機,它專注在終端機本身的功能上,因此像是許多終端機都內置的分頁功能, Alacritty 是沒有的,取而代之的是建議使用者整合其他專注特定功能的工具來使用(例如分頁與視窗功能可以藉由整合 Tmux 達成)。
因為其實作的功能單純,因此使得它擁有高效率與高擴展的特性,成為合適開發者使用的終端機之一。
使用 Homebrew 安裝 Alacritty :
brew install alacritty
接著在「啟動台」內按下 Alacritty 啟動應用程式。
Alacritty 的配置依賴一個 Yaml 檔,預設並不會產生這個配置檔,需要自行去下載。
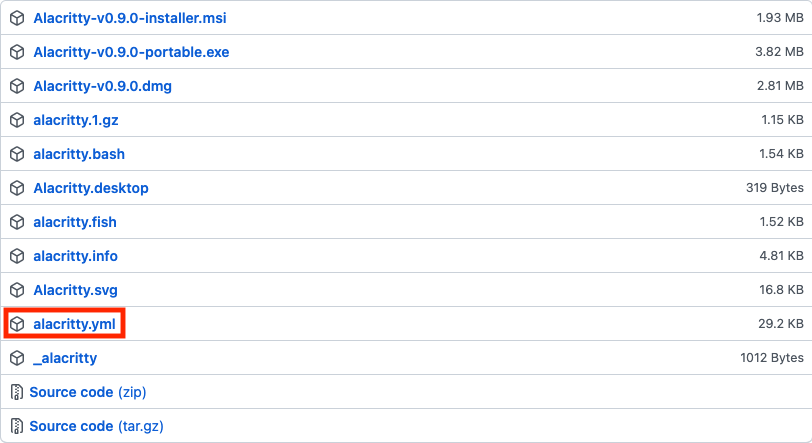
在 GitHub 的發布頁中可以找到名為 alacritty.yml 的檔案,這就是 Alacritty 配置檔的內容。請依照安裝的版本,下載對應的檔案。
這個配置檔可以放於:
$XDG_CONFIG_HOME/alacritty/alacritty.yml
$XDG_CONFIG_HOME/alacritty.yml
$HOME/.config/alacritty/alacritty.yml
$HOME/.alacritty.yml
Alacritty 會依序由第一個往下找各個路徑,如果都沒有設置,則會使用預設的配置。
在放置好後,打開配置檔,會看到有各個設定屬性及說明,全部的屬性都會是註解的狀態,如果要做設定,請將屬性反註解,部分屬性需重啟 Alacritty 才會顯現效果,說明上會有提示,可以依照說明來決定是否重啟。
舉個例子,如果我現在想要把上方列給除去的話,我可以將 window.decorations 值改為 buttonless :
window:
  # Window dimensions (changes require restart)
  #
  # Window decorations
  #
  # Values for `decorations`:
  #     - full: Borders and title bar
  #     - none: Neither borders nor title bar
  #
  # Values for `decorations` (macOS only):
  #     - transparent: Title bar, transparent background and title bar buttons
  #     - buttonless: Title bar, transparent background and no title bar buttons
  decorations: buttonless
依照指示 window 相關的屬性變更都需要重啟 Alacritty ,重啟後就可以看到配置生效後的效果了。
接著介紹幾個常用的配置。
window:
  # 動態調整邊緣與內容的間距,避免切到內容
  dynamic_padding: true

  # 隱藏視窗上方的 Bar
  decorations: buttonless

  # 開啟時的初始模式
  startup_mode: Maximized
font:
  normal:
    family: Hack Nerd Font Mono
    style: Regular
  bold:
    family: Hack Nerd Font Mono
    style: Bold
  italic:
    family: Hack Nerd Font Mono
    style: Italic
  bold_italic:
    family: Hack Nerd Font Mono
    style: Bold Italic

  # 字元大小
  size: 16.0

  offset:
    x: 0
    # 行間距
    y: 8

  glyph_offset:
    x: 0
    # 保持 offset 的一半,確保字元會在行的正中間
    y: 4

  use_thin_strokes: true
字型來源是 NERD FONTS ,可以使用 Homebrew 安裝
# Colors (One Dark)
colors:
  # Default colors
  primary:
    background: '0x1e2127'
    foreground: '0xabb2bf'

  # Normal colors
  normal:
    black: '0x1e2127'
    red: '0xe06c75'
    green: '0x98c379'
    yellow: '0xd19a66'
    blue: '0x61afef'
    magenta: '0xc678dd'
    cyan: '0x56b6c2'
    white: '0xabb2bf'

  # Bright colors
  bright:
    black: '0x5c6370'
    red: '0xe06c75'
    green: '0x98c379'
    yellow: '0xd19a66'
    blue: '0x61afef'
    magenta: '0xc678dd'
    cyan: '0x56b6c2'
    white: '0xffffff'
顏色主題參考 eendroroy/alacritty-theme 的 One Dark 。
在啟動終端機時,如果有想要自動執行的指令,可以使用 shell 屬性來設置。
# 啟動時執行的指令
shell:
  program: /bin/zsh
  args:
    - -l
    - -c
    - 'tmux attach || tmux'
上面的設定會在啟動 Alacritty 時自動執行 Tmux 。
完整的配置可以參考 peterhpchen/dotfiles 。
alacritty.yml 。