單純以node.js與Ruby.rb檔案測試。
參考官方文件,只列出必填。
{
  "amount" : "與V2同",
  "currency" : "與V2同",
  "orderId" : "必須 uniq 不一定要用UUID",
  "packages" : [ //與V2相比,明顯較像完整購物車。
    {
      "id" : "uniq of this package 不一定要用UUID",
      "amount" : "Integer 需與外面的amount同值",
      "name" : "選填 但不能取代id",
      "products" : [
        {
          "id" : "選填 商家商品ID",
          "name" : "商品名",
          "quantity" : "Integer 數量",
          "price ": "Integer 單價"  //需注意自己程式碼金額是否都對得上。
        }
      ]
    }
  ],
  "redirectUrls" : {
    "confirmUrl": "使用者授權付款後,跳轉到該商家URL",
    "cancelUrl" : "使用者通過LINE付款頁,取消付款後跳轉到該URL"
  }
}
其它關於checkout選項如昨日所說,有興趣可以去官方文件看。
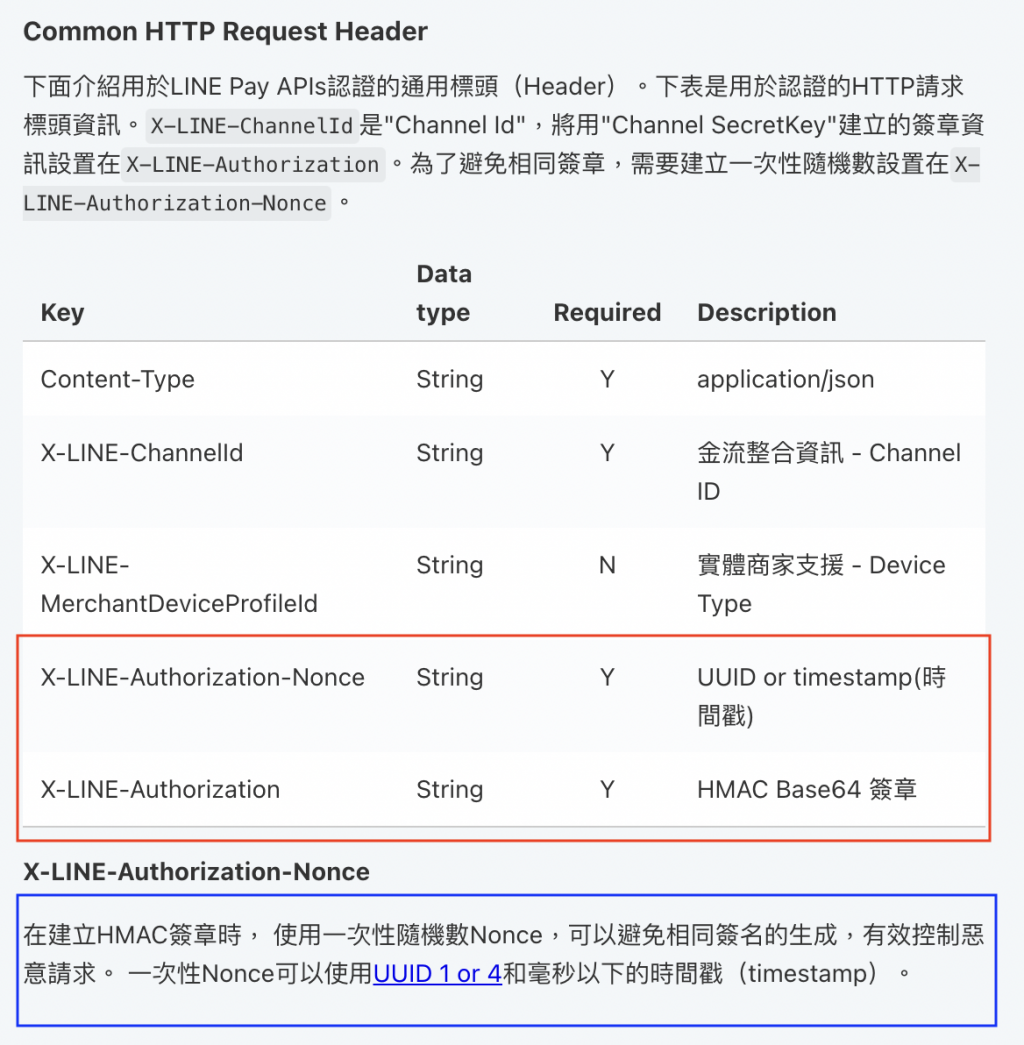
紅色部份即為不同處。
X-LINE-Authorization-Nonce : UUID(1 or 4) or timestamp(時間戳)
UUID: Universally Unique Identifier,通用唯一辨識碼。對於不是本科生的我來說,就是很難重複的一組隨機生成密碼。
X-LINE-Authorization : HMAC Base64 簽章,HMAC加密演算法一種,非可逆。
Base64
The Base64 Content-Transfer-Encoding is designed to represent arbitrary sequences of octets in a form that need not be humanly readable.
以下是所需內容。
Signature = Base64(HMAC-SHA256(Your ChannelSecret, (Your ChannelSecret + URI + RequestBody + nonce)))
v3最難的部分,解決後就簡單了。
Your ChannelSecret : your Channel Secret Key。URI : 我們要先測Request,所以是"/v3/payments/request"。RequestBody : 訂單內容。nonce : UUID
Your ChannelSecret:只要KEY就好。
node.js檔案內容。
const axios = require('axios') //這邊作為發送請求用,請記得安裝套件。
const uuid = require('uuid4')  //生成uuid套件,請記得安裝套件。
const crypto = require('crypto-js') //加密套件,請記得安裝套件。


let key = 'your ChannelSecret'
let nonce = uuid()
let uri = '/v3/payments/request'
let body = {
  amount : 500,
  currency : 'TWD',
  orderId : 'order20210921003',
  packages : [
    {
      id : "20210921003",
      amount : 500,
      products : [
        {
          name : "買不起的iphone13pro",
          quantity : 1,
          price : 500
        }
      ]
    }
  ],
  redirectUrls : {
    confirmUrl: "http://127.0.0.1:3000/confitmUrl",
    cancelUrl : "http://127.0.0.1:3000/cancelUrl"
  }
}

let encrypt = crypto.HmacSHA256(key + uri + JSON.stringify(body) + nonce, key)
//這邊蠻特別的,與官方文件相反,應該是此套件的原因。
let hmacBase64 = crypto.enc.Base64.stringify(encrypt)

let configs = {
  headers: {
    'Content-Type': 'application/json',
    'X-LINE-ChannelId': your ChannelId,
    'X-LINE-Authorization-Nonce': nonce,
    'X-LINE-Authorization': hmacBase64
  }
}

axios.post('https://sandbox-api-pay.line.me/v3/payments/request', body, configs).then(res => {
  console.log(res.data)
})
$ node test
正確就會得到如V2與在postman上一樣的訊息,以web來完成一樣動作,一樣在後台就可以看到這筆資訊了喔。
{
  returnCode: '0000',
  returnMessage: 'Success.',
  info: {
    paymentUrl: {
      web: 'https://sandbox-web-pay.line.me/web/payment/wait?transactionReserveId=UldUZmpTZ2krMjVZQUxlQWtBZTZEemVGeXh2ZXNvWlM1SUVHMklsRWt5NURnU2xXTUU5VHNJNDA4SzVIL29uTQ',
      app: 'line://pay/payment/UldUZmpTZ2krMjVZQUxlQWtBZTZEemVGeXh2ZXNvWlM1SUVHMklsRWt5NURnU2xXTUU5VHNJNDA4SzVIL29uTQ'
    },
    transactionId: 2021092100690434300,
    paymentAccessToken: '995830200615'
  }
}
Ruby部分。
require 'securerandom'
require 'base64'
require 'OpenSSL'
require 'net/http'
require 'uri' #在irb不用引入。
require 'json'
#上面都為內建,Rails內都不用引入。

secrect = "請換成你的key"
nonce = SecureRandom.uuid
signature_uri = "/v3/payments/request"
body = {
  amount: 500,
  currency: "TWD",
  orderId: "order20210921005",
  packages: [
    {
      id: "nauosika0105",
      amount: 500,
      products: [
        {
          name: "買不起的iphone13pro",
          quantity: 1,
          price: 500
        }
      ]
    }
  ],
  redirectUrls: {
    confirmUrl: "http://127.0.0.1:3000/confitmUrl",
    cancelUrl: "http://127.0.0.1:3000/cancelUrl"
  }
}

#由於之後會重複利用,乾脆建立方法了。
def get_signature(secrect, signature_uri, body, nonce)
  message = "#{secrect}#{signature_uri}#{body.to_json}#{nonce}"
  hash = OpenSSL::HMAC.digest(OpenSSL::Digest.new('sha256'), secrect, message)
  Base64.strict_encode64(hash)
end

signature = get_signature(secrect, signature_uri, body, nonce)

header = {"Content-Type": "application/json",
          "X-LINE-ChannelId": "請換成你的測試ID", #node是數字,Ruby用字串。
          "X-LINE-Authorization-Nonce": nonce,
          "X-LINE-Authorization": signature
}

uri = URI.parse("https://sandbox-api-pay.line.me/v3/payments/request")
http = Net::HTTP.new(uri.host, uri.port)
http.use_ssl = true #一定要開喔,使用https傳輸。

request = Net::HTTP::Post.new(uri.request_uri, header)
request.body = body.to_json
#這兩行是帶資料進去,可以發現跟js很不同。

response = http.request(request)
puts response.body
#發送請求及印出。
$ ruby filename.rb
ok!,但如回傳是1106或其他就看一下是哪邊沒填寫正確吧。
串API有一件事很單純,就是它要什麼,我們給什麼,還有我們要把它回傳的抓出來。
單純以Ruby檔練習後,明天就用Rails串接看看request部分。
補充:
*覺得用net/http與Ruby本身的加密程式較囉唆,也是有httparty與其他加密gem可以使用。
*nonce改用時間戳較適當,最好是uuid+時間戳。時間戳與uuid產生所花時間,時間戳較快一點點點。
*Net::HTTP是Ruby的函式庫之一,主要在建構HTTP使用者代理,若只是單純只需要GET其實用不到這一個函示庫。
更多用途請看文件: https://ruby-doc.org/stdlib-3.0.2/libdoc/net/http/rdoc/Net/HTTP.html
