該系列是為了讓看過Vue官方文件或學過Vue但是卻不知道怎麼下手去重構現在有的網站而去規畫的系列文章,在這邊整理了許多我自己使用Vue重構很多網站的經驗分享給讀者們。
使用過Vue的朋友都一定都有聽過 Slots 這個功能,但是有通過不一定有使用過,就讓我來稍微介紹一下我常在專案裡面使用Slots 的時機與案例。
我們先來看一下以下的例子

我們在製作網站的時候很常會有像是這樣的 title,我們會看到除了內容不一樣以外,旁邊的 icon 跟 style 都是一樣的,所以理所當然地會把這個 title給拆出組件來重複使用,這邊我來示範一個我最常看到的做法。
首先我會新增一個 TitleBar.vue 的組件
<script>
export default {
  props: {
    content: {
      type: String,
      default: "",
    },
  },
  setup(props) {
    return {
      props,
    };
  },
};
</script>
<template>
  <h1>
    <img class="icon" src="../assets/icon.png" alt="" />
    {{ props.content }}
  </h1>
</template>
然後這個組件會透過 props 來傳遞 title 的文字內容,然後我只要在上層去傳入 props,title 的內容就會不一樣,像下面這樣子。
<TitleBar :content="'最新消息'" />
<TitleBar :content="'關於我們'" />
<TitleBar :content="'熱門商品'" />
<TitleBar :content="'你也感興趣的'" />
codesandbox 範例: https://codesandbox.io/s/vue-slot-title-1-7roh7
這樣的做法雖然可行,但是卻不直覺,我們可以搭配 Slots 把這個組件當作是一個 html tag 一樣使用,變成是下面這樣
<TitleBar>最新消息</TitleBar>
<TitleBar>關於我們</TitleBar>
<TitleBar>熱門商品</TitleBar>
<TitleBar>你也感興趣的</TitleBar>
要怎麼做才能這樣? Slots到底是什麼?
我們來看一下官網的這張圖
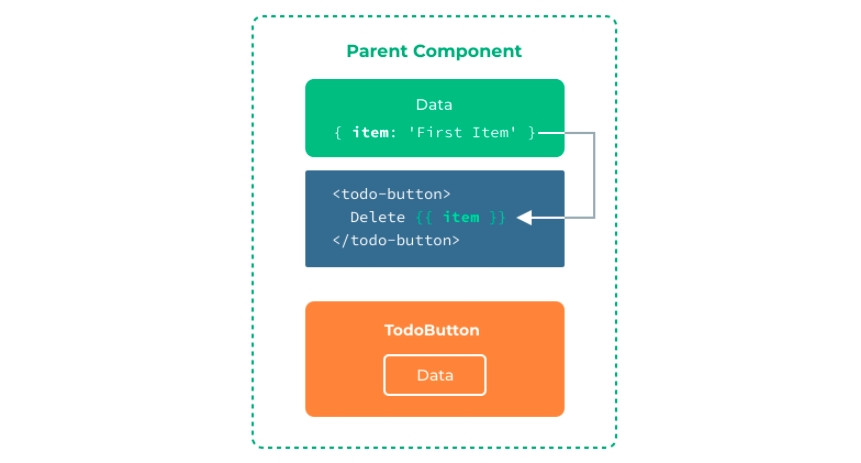
這張圖其實就已經說明完了 Slots 的整個概念「渲染作用域」。
我們可以在我們的 component 裡面去定義一個 <slot></slot> 的作用域,只要上層有放入內容,就會把這個內容給 Render 到你 <slot></slot> 的區域內,我們來看一下改過後的範例,我們刪除掉 TitleBar.vue 裡面所有的 props,然後在原本的內容位置塞入 <slot></slot>。
TitleBar.vue
<template>
  <h1>
    <img class="icon" src="../assets/logo.png" alt="" />
    <slot></slot>
  </h1>
</template>
App.vue
<TitleBar>最新消息</TitleBar>
<TitleBar>關於我們</TitleBar>
<TitleBar>熱門商品</TitleBar>
<TitleBar>你也感興趣的</TitleBar>
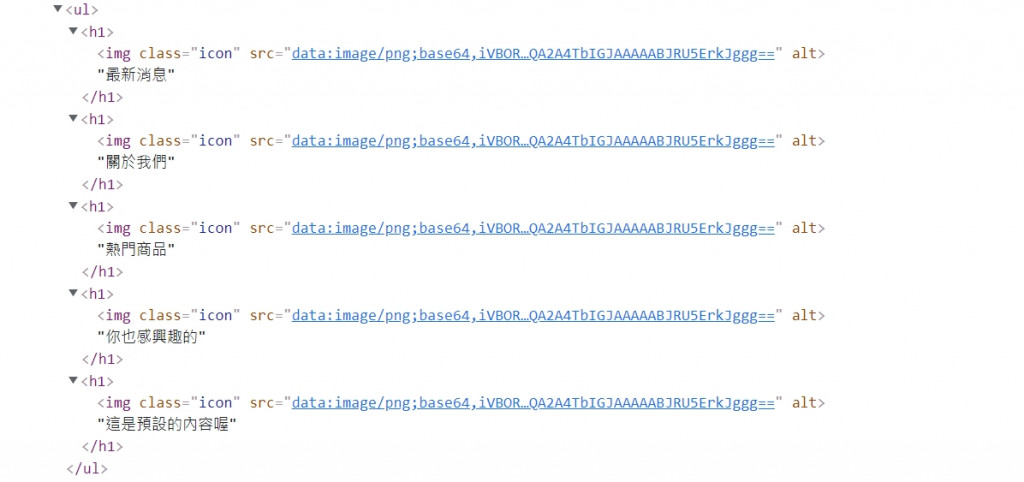
我使用的時候就可以像是 html tag 一樣使用,這樣在看code的時候會比較明確,也減少不必要的 props,你也可以對 slot 插入預設的內容,當今天如果你沒有在上層插入你的內文,就會直接Render你的預設的內容。
<template>
  <h1>
    <img class="icon" src="../assets/logo.png" alt="" />
    <slot>這是預設的內容喔</slot>
  </h1>
</template>
<!-- 不帶內容進去 -->
<TitleBar></TitleBar>

codesandbox 範例:https://codesandbox.io/s/vue-slot-title-2-jywyl
關於 Slots 官方還有很多的使用方式,例如下面我列出來的幾個,但是這些給你們自己慢慢看就好了,我不想把文件內容整個複製貼上來一次。
Slots 官方文件 : https://v3.vuejs.org/guide/component-slots.html
之前也有針對 slots 開一場直播,有興趣的朋友可以看一下,雖然是Vue2的
以剛剛我們舉的例子,我的 TitleBar.vue 是用h1來放我的文字內容,然後旁邊有一個 icon,這是現在的設計,但是如果我今天有一個 ul、li 的結構,然後這個 li 也要跟我現在這個 TitleBar.vue 的設計一樣,會改變內文,但是 icon 不變,或是甚至是可以選擇這個 icon 圖片能不能客製,那這樣的需求我能不能直接拿 TitleBar.vue 來用呢?
<ul>
    <TitleBar>最新消息</TitleBar>
    <TitleBar>關於我們</TitleBar>
    <TitleBar>熱門商品</TitleBar>
    <TitleBar>你也感興趣的</TitleBar>
    <TitleBar></TitleBar>
</ul>
你這樣使用畫面的呈現當然可以,但是你的 HTML 規範就完全的不行了。
天啊! 簡直一團糟 !
於是我靈光一閃,如果我可以跟 vue-router 中的 router-link一樣可以自己決定我這個組件的 html tag的話,也就是支援動態改變html tag,那該有多好~ 想用在那個地方就用在哪個地方,把這個組件能客製化的地方最大化 !!!
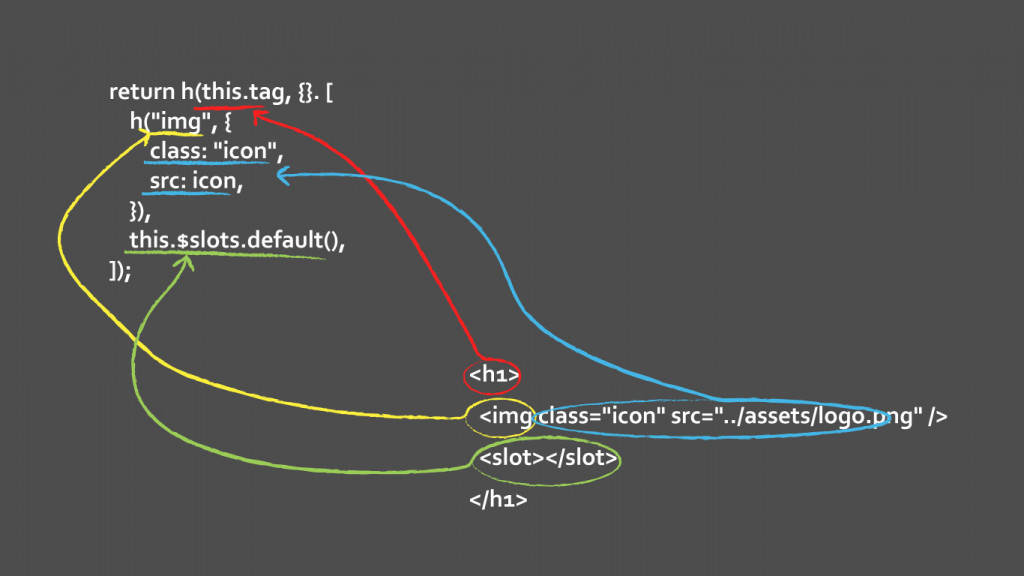
那我們現在來實際來改一下,首先如果要動態的改變我們的 html tag的話,不能用原本的 template 的方式來寫 html,我們需要透過 Render Functions的方式來 Render 我們的DOM元素,我先砍掉原本的 template ,然後加上了 props,然後要用一個我們平常比較少用到的函式 render()來渲染我們的 DOM。
<script>
import { h } from "vue";
import icon from "../assets/icon.png";
export default {
  props: {
    tag: {
      type: String,
      default: "h1",
    },
  },
  render() {
    return h(this.tag, {}. [
      h("img", {
        class: "icon",
        src: icon,
      }),
      this.$slots.default(),
    ]);
  },
};
</script>
這個時候你只要在使用 <TitleBar>的時候帶入一個名叫 tag 的 props,它就會去替換它裡面的 html tag,進而達到動態改變的效果。
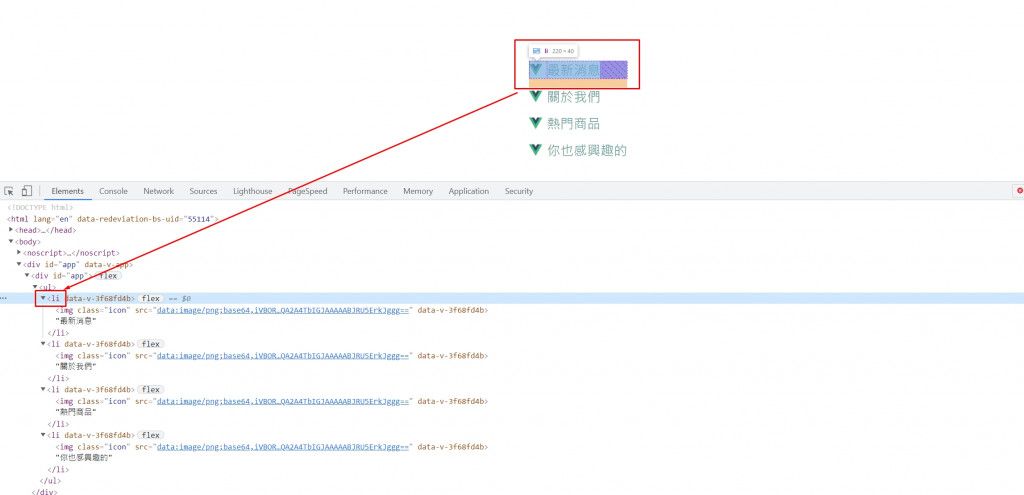
<ul>
    <TitleBar :tag="'li'">最新消息</TitleBar>
    <TitleBar :tag="'li'">關於我們</TitleBar>
    <TitleBar :tag="'li'">熱門商品</TitleBar>
    <TitleBar :tag="'li'">你也感興趣的</TitleBar>
</ul>
你可能突然頭會很痛,看到又是 h 又是 render,想說 WTF...
h() ???h() 函式是一個用於創造 VNode( virtual node 虛擬節點 ) 的方法,但由於太頻繁的使用且基於語法簡潔的考量,它被稱為 h() 。
h()可以帶入三個參數:
tag name - { String } (必填) : html 的標籤名稱。attribute - { Object } (非必填) : html 身上的屬性,像是 src、class、alt 等等。VNodes - { String | Array | Object } (非必填) : 所以要放入這個 DOM 內部的 vNode 及 Slots 的內容。我們要可以在 render 函式內取得 slots 的內容,可以用下面的方式來取得。
this.$slots.default()
所以剛剛範例的那段 code 我們再回來看一次
render() {
    return h(this.tag, {}. [
        h("img", {
            class: "icon",
            src: icon,
        }),
        this.$slots.default(),
    ]);
},
h 函式放入了我從 props 傳入的 tag 名稱 this.tag,如果沒有傳入,那就是預設的 h1 tag。tag 並沒有要放入其他 attribute,所以給一個空物件。img 以及 slots 的內容,所以我這邊用 Array 來帶入。Array[0] 用 h()來創建一個 img 的 virtual DOM,這次因為要塞入 src 跟 class 這兩個 attribute,所以我第二個參數的 Object 裡面就有帶入這兩個 attribute 要塞入的內容。Array[1] 塞入接下來的 slots 的內容。現在這樣看起來沒啥問題,但是如果你上層不帶入任何內容的話就會報錯,所以我們現在要來處理預設內容的部分
<!-- 現在不帶內容進去會出錯 -->
<TitleBar :tag="'li'"></TitleBar>
我們可以先在 render 函式內去做判斷
render() {
    const slotsContext = Object.keys(this.$slots).length === 0 ? "這是預設內容" : this.$slots.default();
    return h(this.tag, {}, [
        h("img", {
            class: "icon",
            src: icon,
        }),
        slotsContext,
    ]);
},
如果今天沒有帶入內容的話 this.$slots就會是一個空的 Object,所以我們去檢查它是不是空的,如果是空的就給它一個預設的內容。
以下就完成了可以動態去改變 html tag 的 component ,阿如果要可以改變 icon 的話自己在寫一個 props 去帶入 src 的部分即可,我就不特別示範了。
<script>
import { h } from "vue";
import icon from "../assets/logo.png";
export default {
  props: {
    tag: {
      type: String,
      default: "h1",
    },
  },
  render() {
    const slotsContext =
      Object.keys(this.$slots).length === 0
        ? "這是預設內容"
        : this.$slots.default();

    return h(this.tag, {}, [
      h("img", {
        class: "icon",
        src: icon,
      }),
      slotsContext,
    ]);
  },
};
</script>
關於Vue DOM的文件 : https://v3.cn.vuejs.org/api/options-dom.html#template
Render Functions 的文件 : https://v3.vuejs.org/guide/render-function.html#render-functions
codesandbox 範例 : https://codesandbox.io/s/vue-slot-title-3-e3fl1
Slots 在很多地方其實都非常的好用,除了幫我減少不必要的 props 以外,還可以幫我在需多重複性功能太多的 component 上面做一個整合,今天示範的不管是Slots 或是 Render Functions 的東西都只有其中一部分,還不是全部,它其實還有很多東西我沒有講到,不過我們先把這些基本的使用方式熟悉的之後,再去慢慢往後延伸了解也不遲,好啦~那我們明天見。

Ps. 購買的時候請登入或註冊該平台的會員,然後再使用下面連結進入網站點擊「立即購課」,這樣才可以讓我獲得更多的課程分潤,還可以幫助我完成更多豐富的內容給各位。
我有開設了一堂專門針對Vue3從零開始教學的課程,如果你覺得不錯的話,可以購買我課程來學習
https://hiskio.com/bundles/9WwPNYRpz?s=tc
那如果對於JS基礎不熟的朋友,我也有開設JS的入門課程,可以參考這個課程
https://hiskio.com/bundles/b9Rovqy7z?s=tc
Mike 的 Youtube 頻道
Mike的medium
MIke 的官方 line 帳號,好友搜尋 @mike_cheng\