終於來到第三十天了~~~~!不過其實本系列不會在今天結束,我們的前端 app 醜得要命,也還沒佈署到 VM 上,目前都只在本機自 high,筆者一定不忘初衷,會堅持到把所有的東西都做完!(不過過完 30 天可能會慢一點發文,筆者累到快掛了XD)
因為 Angular 是單頁應用(single page application, SPA)的框架,在單一個頁的框架下要做到換頁的效果,Angular 就必須根據使用者目前所巡覽的位址來動態替換畫面上的原件。截至目前,我們已經有了 4 個 component
之前都是暫時用註解/解開 selector 來顯示不同的頁面,今天,我們就來加上 routing(路由),之後就可以直接用 url 來控制頁面的顯示了。
我們自從在 Day24 提過這個模組之後,就再也沒關心過他,現在它終於要派上用場了。這個檔案裡的程式碼也非常簡單,只有三個部分
要加入 routing 規則很簡單,只要在上面的 routes 中加入 routing 規則的物件陣列就可以了,例如
const routes: Routes = [
  { path: '', redirectTo: '/ironman-list', pathMatch: 'full' },
  { path: 'ironman/:id', component: IronmanComponent },
  { path: 'ironman-list', component: IronmanListComponent },
  { path: 'ironman-add', component: IronmanFormAddComponent },
  { path: '**', component: IronmanListComponent }
];
上面的 redirectTo 是轉址的規則設定,而且我們指定要完全符合才做轉跳(pathMatch: 'full'); path: '**' 是 Wildcard Route (萬用路由),任何匹配不到的 url 都會顯示 IronmanListComponent。請注意萬用路由要放最後面,否則它後面的 routing 規則永遠不會被用到。
如果我們巡覽的 url 有匹配到 routes 的定義,那麼 Angular 就會把指定的 component 拿來塞進 app.component.html 中的 <router-outlet></router-outlet> 位置上,例如
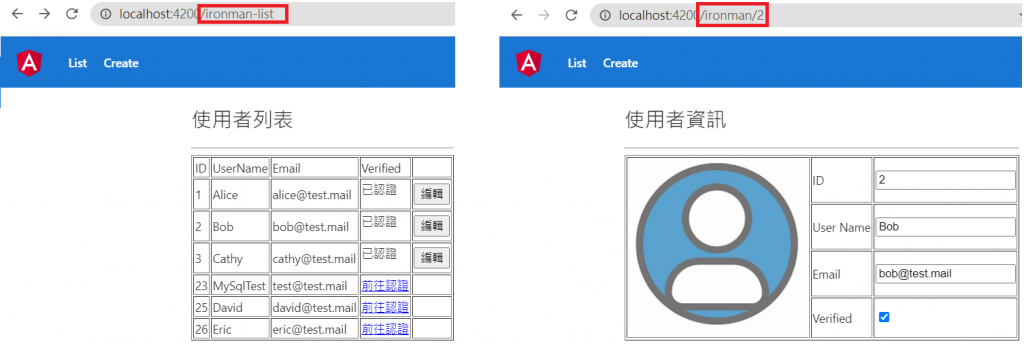
設定好 routes 之後,我們就可以把之前寫死在 app.component.html 的 component selector(<app-ironman>、<app-ironman-list>)都刪掉,留下<router-outlet></router-outlet>就好。嘗試在網址的地方輸入不同的位址,可以看到我們的 app 會根據 routing 設定更換顯示的 component
在上面的範例 routing 規則中,有一個比較特別、帶了參數的規則{ path: 'ironman/:id', component: IronmanComponent },它代表了我們的 url 還帶了一個名為 id 的參數,我們可以透過 Angular 的 ActivedRoute 類別幫我們取得這個參數,好讓我們知道使用者要取得哪一筆資料,作法也非常簡單,只要到 component.ts 引用並注入這個類別
// ironman.component.ts
// ...
import { ActivatedRoute } from '@angular/router';
// ...
  constructor(private route: ActivatedRoute, private ironmanService: IronmanService) { }
接著就能用 route.paramMap 來取得 url 所帶的參數值
this.route.paramMap.subscribe(map => {
    const uid = map.get('id');
    if (uid) {
        this.ironmanService.getUserDetail(+uid) // 用加號把字串轉成數字
          .subscribe(resp => {
            this.userInfo = resp;
          });
    }
});
上面的程式中,this.route.paramMap 也是一個 Observable 物件,所以我們必須訂閱它,才能從它裡面即時拿到參數的值。取得 id 的值之後用 id 查詢使用者資料,然後換訂閱 ironmanService 回傳的 Observable,最後才把取得的資訊放到 userInfo 變數,讓內嵌繫結幫我們顯示資訊。
雖然我們可以用手 key 網址直接到我們想要的頁面,但是我們當然還是要提供方便一點的連結啦,現在我們就來介紹最簡單的 routerLink。routerLink 這個 Directive 可以讓宿主元素(host element)直接變成一個可以點的連結,所以只要用這個 directive,我們就不用限定一定要用 HTML 的 a tag,也不用自己寫 JS/TS 用點擊事件作超連結。不過,雖然它可以點、可以轉跳頁面,但是滑鼠指標不會變手指,所以要自己改一下 XD
<!-- app.component.html -->
<span routerLink="/ironman-list" routerLinkActive="router-link-active"
    class="ironman-link-item">
    List
</span>
<span routerLink="/ironman-add" routerLinkActive="router-link-active"
    class="ironman-link-item">
    Create
</span>
/* app.component.css */
.ironman-link-item {
  cursor: pointer;
  margin: 0px 10px 0px 10px;
}

.router-link-active {
  font-weight: 700;
  font-size: large;
  text-decoration: underline;
}
上面的程式中,routerLink 這個 Directive 設定當這宿主容器被點擊時,要巡覽到哪一個路徑,而 routerLinkActive 則是用來指定當這個 routing 被啟用的時候,這個宿主元素要套用什麼樣的 CSS 樣式。
除了使用靜態的頁面連結,我們也可以透過程式來讓我們的 app 轉跳到其他頁面,例如我們之前使用者列表的頁面中,當使用者的 verified 屬性是 1/true 的時候,我們會在表格中顯示一個「編輯」按鈕,我們可以讓這個按鈕觸發一個事件,再用 Router 類別的 navigate() 方法,幫我們轉跳到編輯這個使用者的頁面
<!-- ironman-list.component.html -->
<!-- ... -->
    <tr *ngFor="let user of userListFromApi">
      <!-- ... -->
      <td>
        <button *ngIf="user.verified == 1" (click)="onEditUser(user.userId)">編輯</button>
      </td>
    </tr>
<!-- ... -->
// ironman-list.component.ts
// ...
import { Router } from '@angular/router';
// ...
// 在建構式注入 Router
constructor(private ironmanService: IronmanService, private router: Router) { }
// ...
onEditUser(id: number) {
    this.router.navigate(['/ironman', id]);
}
// ...
改完~收工~我們的網站雖然醜,但是基本該有的功能都有得差不多了。
本系列不會在此結束,會堅持到把 Day01 提到的東西都做完(但可能會比發比較慢,已經累到要吃藥了XD),竟請各位邦友持續關注!
