昨天我們完成了 service 的部分,已經可以用程式碼打 API 來做 CRUD,但是我們還沒有準備表單的 component,今天,我們就要來幫我們的 Angular app 補上表單的頁面。
Angular 的表單有兩種,一種叫 templae driven form(範本驅動表單),另一種叫 reactive form (響應式表單)。template driven form 主要在 HTML 中使用範本語法、簡單易學;而reactive form 主要用 component.ts 裡的程式控制表單的樹狀物件,比較進階,但是速度快、且更適合用來製作複雜的表單。由於本系列只介紹入門款,所以我們今天只會介紹 template driven form,若想學習 reative form 可以參考這篇文章,文章寫得非常詳細,雖然它是 Angular 5 的,但大部分觀念與語法都通用。
首先我們一樣新增一個表單的 component,這邊筆者命名為 ironman-form-add。
要在我們的 component 中使用 template driven form 很簡單,只需要以下幾個步驟
首先,我們到 app.module.ts 中引入 FromsModule
// app.module.ts
// ...
import { FormsModule } from '@angular/forms';
// ...
  imports: [
    // ...
    FormsModule,
    // ...
  ]
接著,到 component.ts 建立要用來儲存資料的 data model,然後寫一下提交表單時的處理邏輯
// ironman-form-add.component.ts
userModel: IronmanUser = {
    userId: 0,
    userName: '',
    email: '',
    verified: false
};
// ...
// ...
onSubmit(form: NgForm): void {
    if (form.valid) { // 驗證 OK 才打 API
      this.ironmanService
          .addUser(this.userModel)
          .subscribe(resp => {
            this.submitted = true;
          });
    }
}
再來到 component.html 中建立表單,然後給一個範本參考變數、以及處理資料的繫結
<!-- ironman-form-add.component.html -->
<form (ngSubmit)="onSubmit(formInstance)" #formInstance="ngForm">
    <label for="userName">UserName</label>
    <input type="text" id="userName" [(ngModel)]="userModel.userName" name="userName">
    <br>
    <label for="email">Email</label>
    <input type="email" id="email" [(ngModel)]="userModel.email" name="email">
    <br>
    <button type="submit">新增</button>
</form>
這裡稍微說明一下上面的程式
簡單的幾行程式碼,我們就完成新增使用者的表單了~~
剛剛一切從簡,目的只在用最少的程式碼讓我們的前端 app 動起來,不過像剛剛那樣陽春的表單當然是不合格,因為我們什麼東西都沒驗證,隨便亂打都能把資料打給 API,錯了自己都不知道。所以現在我們要來介紹一下簡單的表單驗證。
用 Angular 做基礎的驗證也非常簡單,只要在 html input 再加上代表驗證規則的屬性(attribute)就可以,Angular 會在使用者輸入資料的時候自動幫我們做驗證。
    <input type="text" id="userName" [(ngModel)]="userModel.userName" name="userName"
        required minlength="2"> <!-- 加了「必填」和「最小長度」的驗證 -->
    <input type="email" id="email" [(ngModel)]="userModel.email" name="email"
        required email> <!-- 加了「必填」和「email 格式」的驗證 -->
僅僅是加了這幾個簡單的驗證屬性,我們就能從 NgForm 實體中看到是否有錯誤發生
內建的驗證規則與它們所觸發的 error 屬性名稱請參閱官方文件
就如我們剛剛提到的,這個代表 Angular 表單的範本參考變數,可以在同個 component.html 的任何地方存取,所以我們就可以用他搭配 *ng-if 來顯示錯誤提示
 <div *ngIf="formInstance.invalid && formInstance.dirty">
      <p *ngIf="formInstance.form.controls.userName.errors?.required">
        使用者名稱為必填
      </p>
      <p *ngIf="formInstance.form.controls.userName.errors?.minlength">
        使用者名稱最少需要{{formInstance.form.controls.userName.errors?.minlength.requiredLength}}字元
      </p>
      <p *ngIf="formInstance.form.controls.email.errors?.required">
        email 為必填
      </p>
      <p *ngIf="formInstance.form.controls.email.errors?.email">
        email 格式錯誤
      </p>
    </div>
上面的程式雖然已經能夠運作,但是在驗證那塊的程式碼實在有點太長,看起來很醜。如果我們要讓這個驗證看起來簡潔一些,可以為 html input 也宣告一個範本參考變數,然後把 ngModel 賦值給這個變數,這樣這個變數就會指向一個 FormControl (表單控制項,組成 Angular 表單的元件),我們再從這個 FormControl 取得錯誤資訊。
修改後的程式碼如下
<form (ngSubmit)="onSubmit(formInstance)" #formInstance="ngForm">
<label for="userName">UserName</label>
<input type="text" id="userName" [(ngModel)]="userModel.userName" name="userName"
required minlength="2"
#userInput="ngModel">
<br>
<label for="email">Email</label>
<input type="email" id="email" [(ngModel)]="userModel.email" name="email"
required email #emailInput="ngModel">
<div *ngIf="formInstance.invalid && formInstance.dirty">
<p *ngIf="userInput.errors?.required">
使用者名稱為必填
</p>
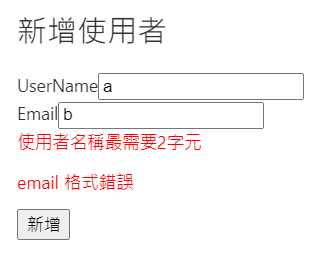
<p *ngIf="userInput.errors?.minlength">
使用者名稱最需要{{userInput.errors?.minlength.requiredLength}}字元
</p>
<p *ngIf="emailInput.errors?.required">
email 為必填
</p>
<p *ngIf="emailInput.errors?.email">
email 格式錯誤
</p>
</div>
<button type="submit">新增</button>
</form>
輕輕鬆鬆~我們就完成 Angular 的表單跟驗證,雖然他很陽春,但是只要掌握這些基礎,視情況對我們的表單做擴充,就能滿足一半以上的需求。明天我們會簡單介紹一下 Angular 的路由(routing),讓我們根據使用者巡覽的位址顯示不同的 component。


 iThome鐵人賽