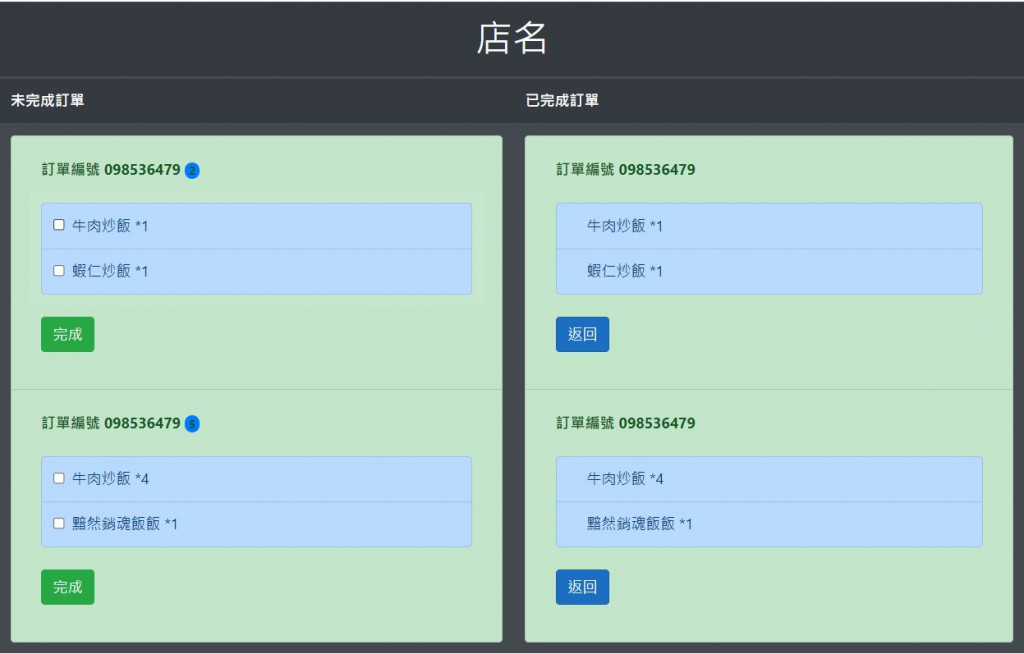
我們先將清單分成多個不同小塊來設計,最後再將它們組起來
<ul class="list-group ">
    <li class="list-group-item  justify-content-between align-items-center list-group-item-success">
        //訂單1
    </li>
    <li class="list-group-item  justify-content-between align-items-center list-group-item-success">
        //訂單2
    </li>
</ul>
我們在訂單內容這邊多提供一個小小的數字,用來提示老闆該訂單未完成的項目
<table class="table table-borderless list-group-item-success">
    <thead>
        <tr>
            <th>
                訂單編號 098536479
                <span class="badge bg-primary rounded-pill">2</span>
            </th>

        </tr>
    </thead>
    <tbody>
        <tr>
            <td>
                //訂單內容
            </td>
        </tr>
    </tbody>
    <tfoot>
        <tr>
            <td>
                <button id="done" type="button" class="btn btn-success">
                    完成
                </button>
            </td>
        </tr>
    </tfoot>
</table>
為了讓使用者在操作上比較方便,所以我們用Lable包起來,
讓使用者要勾選完成的餐點項目時,比較容易。
<label class="list-group-item list-group-item-primary">
 
<input class="form-check-input me-1" type="checkbox" value="">
牛肉炒飯 *1
</label>
Proprietor.cshtml
<table id="orderlist"
class="table table-hover table-dark">
<thead>
<tr class="">
<th colspan="3" class="text-center "><h1>店名</h1></th>
</tr>
<tr class="">
<th data-field="undo">未完成訂單</th>
<th data-field="done">已完成訂單</th>
</tr>
</thead>
<tbody id="orderlist_body">
<tr>
@*未完成清單*@
<td>
<ul class="list-group ">
<li class="list-group-item justify-content-between align-items-center list-group-item-success">
<table class="table table-borderless list-group-item-success">
<thead>
<tr>
<th>
訂單編號 098536479
<span class="badge bg-primary rounded-pill">2</span>
</th>
</tr>
</thead>
<tbody>
<tr>
<td>
<div class="list-group">
<label class="list-group-item list-group-item-primary">
 
<input class="form-check-input me-1" type="checkbox" value="">
牛肉炒飯 *1
</label>
<label class="list-group-item list-group-item-primary">
 
<input class="form-check-input me-1" type="checkbox" value="">
蝦仁炒飯 *1
</label>
</div>
</td>
</tr>
</tbody>
<tfoot>
<tr>
<td>
<button id="done" type="button" class="btn btn-success">
完成
</button>
</td>
</tr>
</tfoot>
</table>
</li>
<li class="list-group-item justify-content-between align-items-center list-group-item-success">
<table class="table table-borderless list-group-item-success">
<thead>
<tr>
<th>
訂單編號 098536479
<span class="badge bg-primary rounded-pill">5</span>
</th>
</tr>
</thead>
<tbody>
<tr>
<td>
<div class="list-group">
<label class="list-group-item list-group-item-primary">
 
<input class="form-check-input me-1" type="checkbox" value="">
牛肉炒飯 *4
</label>
<label class="list-group-item list-group-item-primary">
 
<input class="form-check-input me-1" type="checkbox" value="">
黯然銷魂飯飯 *1
</label>
</div>
</td>
</tr>
</tbody>
<tfoot>
<tr>
<td>
<button id="done" type="button" class="btn btn-success">
完成
</button>
</td>
</tr>
</tfoot>
</table>
</li>
</ul>
</td>
@*已完成清單*@
<td>
<ul class="list-group ">
<li class="list-group-item justify-content-between align-items-center list-group-item-success">
<table class="table table-borderless list-group-item-success">
<thead>
<tr>
<th>
訂單編號 098536479
</th>
</tr>
</thead>
<tbody>
<tr>
<td>
<div class="list-group">
<label class="list-group-item list-group-item-primary">
 
牛肉炒飯 *1
</label>
<label class="list-group-item list-group-item-primary">
 
蝦仁炒飯 *1
</label>
</div>
</td>
</tr>
</tbody>
<tfoot>
<tr>
<td>
<button id="done" type="button" class="btn btn-primary">
返回
</button>
</td>
</tr>
</tfoot>
</table>
</li>
<li class="list-group-item justify-content-between align-items-center list-group-item-success">
<table class="table table-borderless list-group-item-success">
<thead>
<tr>
<th>
訂單編號 098536479
</th>
</tr>
</thead>
<tbody>
<tr>
<td>
<div class="list-group">
<label class="list-group-item list-group-item-primary">
 
牛肉炒飯 *4
</label>
<label class="list-group-item list-group-item-primary">
 
黯然銷魂飯飯 *1
</label>
</div>
</td>
</tr>
</tbody>
<tfoot>
<tr>
<td>
<button id="done" type="button" class="btn btn-primary">
返回
</button>
</td>
</tr>
</tfoot>
</table>
</li>
</ul>
</td>
</tr>
</tbody>
<tfoot>
</tfoot>
</table>

在寫清單或是表單這種數據格式相同的畫面時,
可以將他先整理分成一塊一塊的元件/組件來完成,
最後再將其組合起來。這樣一來可以簡單化問題,
二來也更容易做成樣板的方式。
另外Bootstrap也有提供 摺疊的元件,
如果希望畫面可以美觀一點,不要一次顯示這麼多資訊的話,可以透過摺疊,
來收納我們的一些內容。
