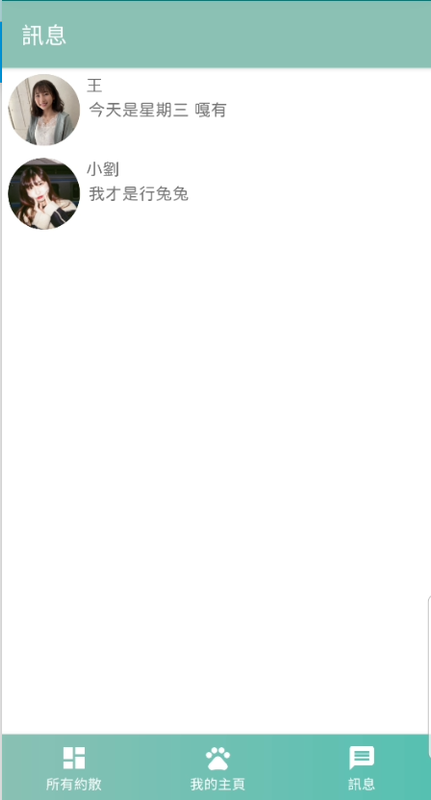
我們今天先來介紹如何拿到資料,我們既然已經有看到了我們的個別聊天畫面了,那當然我們需要有地方可以看到我們所有的聊天對象的畫面啦,不然如果今天邀約的頁面刷新後,或是我們的邀約下架後,那我們不就不能找到了嗎!!?
先上畫面

realTime可以讓我們簡單用last()來拿到最後一筆資料,但是我們會需要有一個完整的dataclass讓我們可以顯示時間、訊息、該顯示的圖片、改顯示的名稱
data class LastMessage(

    val display_name: String = "",
    val display_image: String = "",
    val display_id: String = "",
    val message: String = "",
    //我們這邊直接傳Long
    val send_time: Long? = 0
)
我們把LastMessage跟原本的Message分開,讓我們以後再顯示NotificationFragment的時候,就直接找這個地方就可以了!
    //一樣傳入message,裡面有寄訊息的人&收訊息的人的一些資訊
    fun saveLastMessage(message: Message,time: Long){

        //這個是我們要顯示在寄件者的地方的資訊
        val lastMessageForAccept = LastMessage(
            message = message.message!!,
            display_name = message.accept_user_name!!,
            display_image = message.accept_user_image!!,
            display_id = message.accept_user_id!!,
            send_time = time
        )

        //這個是我們要顯示在收件者的地方的資訊
        val lastMessageForSend = LastMessage(
            message = message.message!!,
            display_name = message.send_user_name!!,
            display_image = message.send_user_image!!,
            display_id = message.send_user_id!!,
            send_time = time
        )

val lastMessageRef = FirebaseDatabase.getInstance().reference.child(Constant.LAST_MESSAGE)

        lastMessageRef.child(message.send_user_id!!).child(message.accept_user_id!!).setValue(lastMessageForAccept)


        lastMessageRef.child(message.accept_user_id!!).child(message.send_user_id!!).setValue(lastMessageForSend)

    }
不知道大家看起來會不會有點複雜,我是覺得有點複雜啦,但是目前想不到其它更簡單的方法?
大致概念是:
Tom寄訊息給Judy
Tom→Judy→LastMessage(因為目前是在Tom的帳號,所以當然聊天列表要出現Judy的名稱/Image)
並同時新增
Judy→Tom→LastMessage(因為目前在Judy的帳號,所以要顯示Tom的名稱/Image)
所以我們一樣在發送message的時候一併呼叫這個funtion
我們在ChatRoomFragment裡面的 sendMessaage的地方更改一下funtion的名稱,並呼叫剛剛的funtion
    private fun sendMessageAndSaveLastMessage(){

        val message = Message(
            user_name = accountViewModel.userDetail.value!!.name,
            message = binding.edChatRoomInputMessage.text.toString().trim(),
            send_user_id = accountViewModel.userDetail.value!!.id,
            accept_user_id = matchingViewModel.selectedInvitation.value!!.user_id,
            send_user_image = accountViewModel.userDetail.value!!.image,
            send_user_name = accountViewModel.userDetail.value!!.name,
            time = ServerValue.TIMESTAMP,
            accept_user_image = matchingViewModel.selectedInvitation.value?.user_image,
            accept_user_name = matchingViewModel.selectedInvitation.value?.user_name
        )
        chatViewModel.sendMessage(message,matchingViewModel.selectedInvitation.value!!)
        //這邊我們新增time,好讓我們之後排序
        val time = System.currentTimeMillis()
        chatViewModel.saveLastMessage(message,time)
        binding.edChatRoomInputMessage.setText("")

    }
這時候我們已經可以看到我們的最新的訊息啦,只差把它叫出來。
    private val _lastMessageList = MutableLiveData<List<LastMessage>>()
    val lastMessageList: LiveData<List<LastMessage>>
    get() = _lastMessageList


   fun getLastMessage(user_id: String){

        //我們傳入userId,來拿到我們的所有的當前user跟其他user的聊天最後的紀錄
        FirebaseDatabase.getInstance().reference.child(Constant.LAST_MESSAGE).child(user_id)
            .addValueEventListener(object : ValueEventListener{
                override fun onDataChange(snapshot: DataSnapshot) {
                    val newList: MutableList<LastMessage> = mutableListOf()
                    for (eachPerson in snapshot.children){
                        val lastMessage = eachPerson.getValue(LastMessage::class.java)
                        lastMessage?.let {
                            newList.add(it)
                        }

                    }
                    //這邊根據時間去排序,用遞減
                    newList.sortByDescending{ it -> it.send_time}
                    _lastMessageList.postValue(newList)

                }

                override fun onCancelled(error: DatabaseError) {
                }
            })
    }
並且我們也要在onViewCreated來呼叫我們的funtion
chatViewModel.getLastMessage(accountViewModel.getCurrentUID()!!)
讀取的方法都做出來啦,現在只差用Recyclerview把它顯示出來而已!! 加把勁!
首先,我們需要itemList來顯示我們的Recyclerview啦
<?xml version="1.0" encoding="utf-8"?>


<layout
    xmlns:android="http://schemas.android.com/apk/res/android"
    xmlns:tools="http://schemas.android.com/tools">


    <data>
        <variable
            name="message"
            type="com.example.petsmatchingapp.model.Message" />


    </data>


<LinearLayout
    android:layout_width="match_parent"
    android:layout_height="match_parent"
    android:padding="5dp"
    android:orientation="horizontal">

    <LinearLayout
        android:layout_width="60dp"
        android:layout_height="60dp">

        <ImageView
            android:id="@+id/iv_last_message_image"
            android:layout_width="match_parent"
            android:layout_height="match_parent"/>

    </LinearLayout>

    <LinearLayout
        android:layout_width="match_parent"
        android:layout_height="60dp"
        android:orientation="vertical"
        android:layout_marginStart="5dp">

        <com.example.petsmatchingapp.utils.JFTextView
            android:id="@+id/tv_message_name"
            android:layout_width="wrap_content"
            android:layout_height="wrap_content"
            android:textStyle="bold"
            android:text="@{message.accept_user_name}"
            tools:text = "王大明"/>


        <com.example.petsmatchingapp.utils.JFTextView
            android:id="@+id/tv_message_text"
            android:layout_width="wrap_content"
            android:layout_height="wrap_content"
            android:padding="2dp"
            android:ellipsize="end"
            android:maxLines="2"
            android:text="@{message.message}"
            tools:text = "我是王大明我今天有很多話,有關於小明的話"/>


    </LinearLayout>


</LinearLayout>
</layout>
並且我們需要建立Adapter,並且把剛剛的LastMessage傳進去就好啦!
package com.example.petsmatchingapp.ui.adapter

import android.view.LayoutInflater
import android.view.ViewGroup
import androidx.recyclerview.widget.DiffUtil
import androidx.recyclerview.widget.ListAdapter
import androidx.recyclerview.widget.RecyclerView
import com.example.petsmatchingapp.databinding.LastMessageItemListBinding
import com.example.petsmatchingapp.model.LastMessage
import com.example.petsmatchingapp.model.Message
import com.example.petsmatchingapp.utils.Constant
import timber.log.Timber

class NotificationAdapter():ListAdapter<LastMessage,NotificationAdapter.MyViewHolder>(DiffCallback) {


    companion object DiffCallback: DiffUtil.ItemCallback<LastMessage>(){
        override fun areItemsTheSame(oldItem: LastMessage, newItem: LastMessage ): Boolean {
            return oldItem === newItem
        }

        override fun areContentsTheSame(oldItem: LastMessage , newItem: LastMessage ): Boolean {

            return oldItem == newItem
        }
    }

    class MyViewHolder(val binding:LastMessageItemListBinding):RecyclerView.ViewHolder(binding.root){
        fun bind(item: LastMessage){
            binding.lastMessage = item
            Constant.loadUserImage(item.display_image,binding.ivLastMessageImage)

        }
    }

    override fun onCreateViewHolder(parent: ViewGroup, viewType: Int): MyViewHolder {
        return MyViewHolder(LastMessageItemListBinding.inflate(LayoutInflater.from(parent.context)))
    }

    override fun onBindViewHolder(holder: MyViewHolder, position: Int) {
        val model = getItem(position)
        holder.bind(model)
        holder.itemView.setOnClickListener{

        }
    }
}
接下來回到NotificationFragemtn把recyclerview初始化,就完成啦!
  private fun setAdapter(){
    notificationAdapter = NotificationAdapter()
    binding.rvAllMessage.adapter = notificationAdapter
    binding.rvAllMessage.layoutManager =   LinearLayoutManager(requireContext())

  }
最後~ 最後別忘了需要觀察我們的livedata,並把資料放到adapter喔!
 chatViewModel.lastMessageList.observe(viewLifecycleOwner, Observer {
      notificationAdapter.submitList(it)
    })
開花開花~