前幾天我們做完layout後,我們發現如果透過讓view顯示or不顯示的方式,會讓我們的整個布局稍顯難看! 那怎麼辦呢? 我們可以選擇用其它Layout例如LinearLayout,但是我們就是任性,已經寫完的code,我們就不要改 (打自己嘴吧,前面狂改超多),那我們這邊就可以用動態的方式修改我們的layout啦
依舊使用昨天的imagePicker!
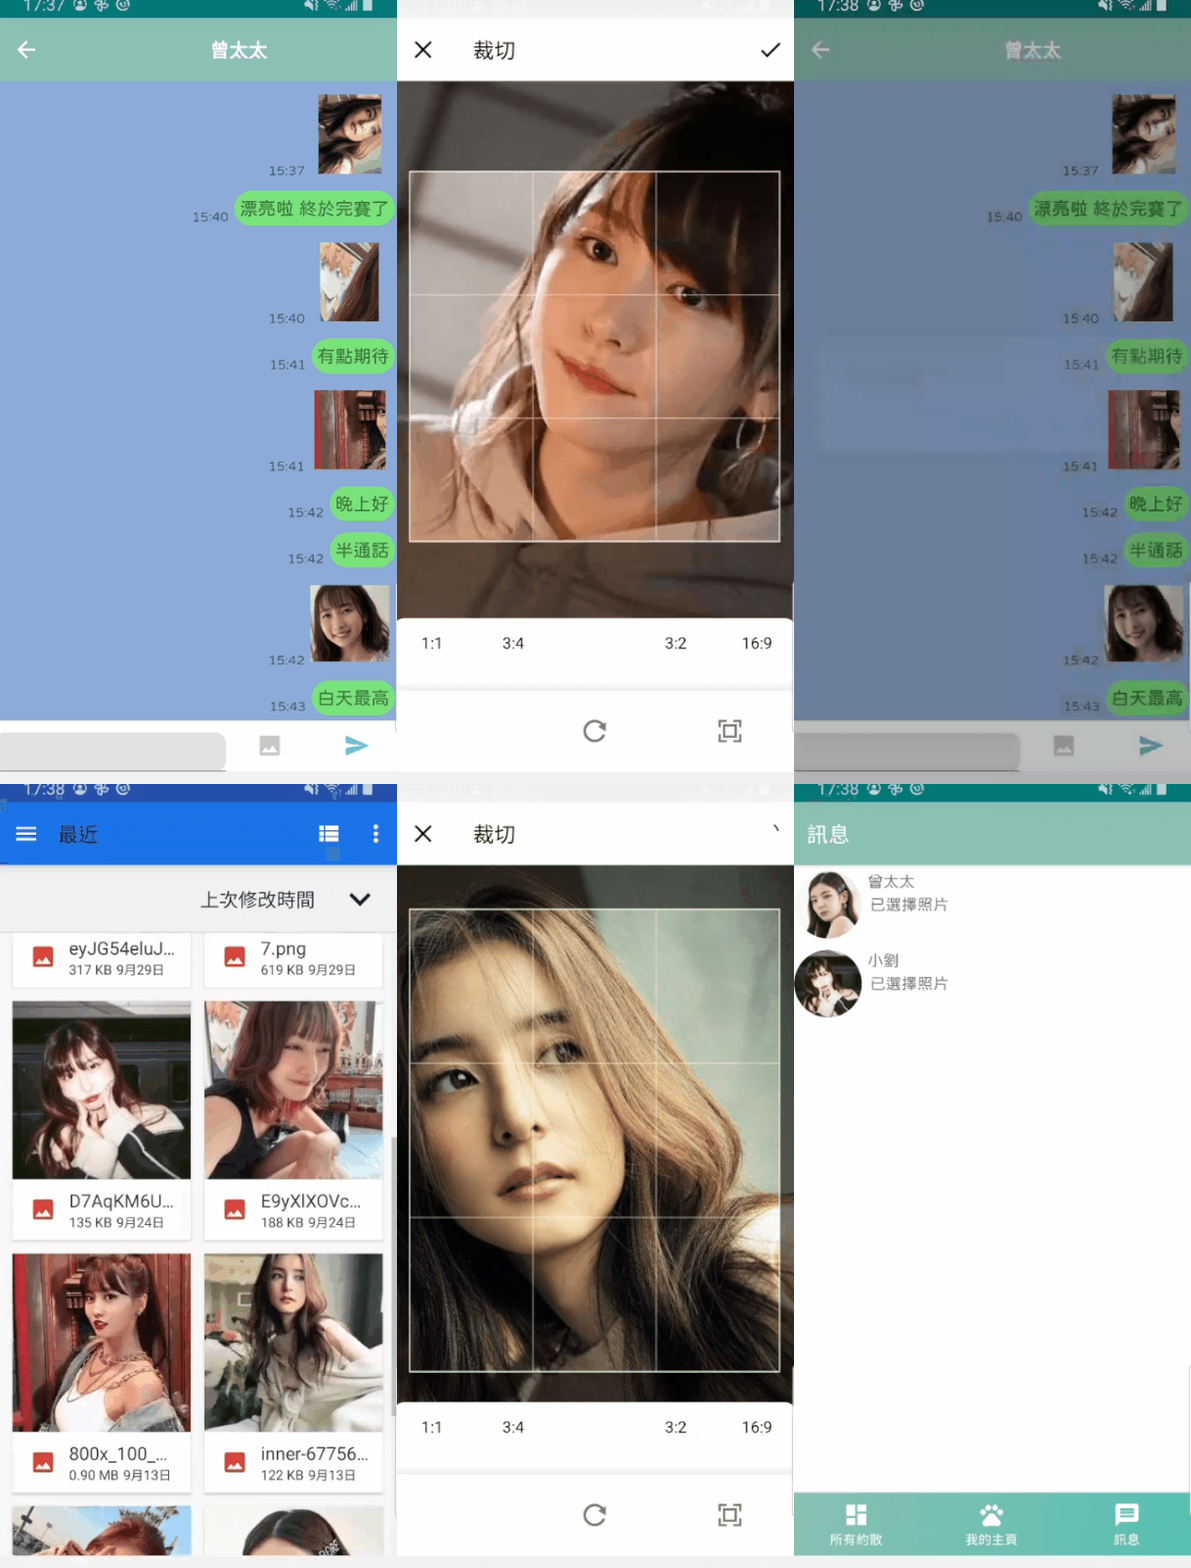
我們要把畫面修得更漂亮,當今天使用者從Gallery選擇照片後,我們就要給它先顯示在我們的畫面上,讓使用者確定要傳的照片是否正確,不然原本要傳狗狗的照片,結果傳到你在吃的咖哩飯就尷尬了~
我們把原本在這邊上傳到storage的步驟,改到後面使用者按上送出後,我們才上傳~ 稍微有點不同的是,我們因為file型態的Uri,每次從getFileExtension回傳的值都是null,所以我們這邊要用抓字串的方式,來拿到我們的type
原本的getType
fun getFileExtension(activity: Activity, uri: Uri): String?{
        return MimeTypeMap.getSingleton().getExtensionFromMimeType(activity.contentResolver.getType(uri))
    }
改成透過String來抓後面的字串
private var selectedUri: Uri? = null
private lateinit var type: String


private val resultLauncher = registerForActivityResult(ActivityResultContracts.StartActivityForResult()) { uri ->
        if (uri.resultCode == Activity.RESULT_OK) {
            selectedUri = uri.data?.data
            selectedUri?.let { it ->
                Constant.loadPetImage(it, binding.ivChatRoomSelectedPhoto)
                val filePath = selectedUri?.path
                filePath?.substring(filePath?.lastIndexOf(".") + 1) ?.let {
                    type = it
                }

				//把我們的照片隱藏
                binding.btnCamera.visibility = View.GONE
				//顯示照片的imageView
                binding.ivChatRoomSelectedPhoto.visibility = View.VISIBLE
                //在有照片的情形,我們不讓使用者打字
					binding.edChatRoomInputMessage.apply {
                    setText(resources.getString(R.string.already_selected_photo))
                    isEnabled = false
                }
            }
        }
    }
★這邊我們的imageview,ivChatRoomSelectedPhoto等等會新增
再過來我們要開啟imagePicker
這邊基本上跟昨天一樣,我們要壓縮+裁減
binding.btnCamera.setOnClickListener{
            ImagePicker.with(this)
                .crop()
                .compress(1024)
                .createIntent { intent ->
                resultLauncher.launch(intent)
                }
        }
我們這邊在Fragment拿到資料後,我們來判斷是否 selectedUri為null,如果是null,就代表我們使用者是傳message,那我們就直接傳啦~ 那如果我們的selectedUri不是null,那我們就要上傳照片,並且把message的資訊跟uri都傳進去saveImageToFireStorage()
private fun sendMessageAndSaveLastMessage() {

        var message :Message

        if (chatViewModel.fromDetail.value == true){
            message = Message(
                user_name = accountViewModel.userDetail.value!!.name,
                message = binding.edChatRoomInputMessage.text.toString().trim(),
                send_user_id = accountViewModel.userDetail.value!!.id,
                accept_user_id = matchingViewModel.selectedInvitation.value!!.user_id,
                send_user_image = accountViewModel.userDetail.value!!.image,
                send_user_name = accountViewModel.userDetail.value!!.name,
                time = ServerValue.TIMESTAMP,
                accept_user_image = matchingViewModel.selectedInvitation.value?.user_image,
                accept_user_name = matchingViewModel.selectedInvitation.value?.user_name,
            )
        }else{
            message = Message(
                user_name = accountViewModel.userDetail.value!!.name,
                message = binding.edChatRoomInputMessage.text.toString().trim(),
                send_user_id = accountViewModel.userDetail.value!!.id,
                send_user_image = accountViewModel.userDetail.value!!.image,
                send_user_name = accountViewModel.userDetail.value!!.name,
                accept_user_name = accountViewModel.selectedUserDetail.value!!.name,
                accept_user_image = accountViewModel.selectedUserDetail.value!!.image,
                accept_user_id = accountViewModel.selectedUserDetail.value!!.id,
                time = ServerValue.TIMESTAMP,

            )
        }

        if (selectedUri == null){
            chatViewModel.sendMessage(message)
            chatViewModel.saveLastMessage(message)
        }else{
            chatViewModel.saveImageToFireStorage(type, selectedUri!!,message)
		        //別忘了要把uri改成null喔,不然下次又回傳送一樣的照片
				selectedUri = null
		        //回覆原本的UI
            binding.btnCamera.visibility = View.VISIBLE
            binding.ivChatRoomSelectedPhoto.visibility = View.GONE
            binding.edChatRoomInputMessage.isEnabled = true
        }
        binding.edChatRoomInputMessage.setText("")

    }
跟之前一樣,當我們照片傳送成功的時候,我們就呼叫 sendMessage()跟saveLastMessage()這兩個funtion,也別忘記,我們拿到的Uri要轉成String喔
private val _imageFail = MutableLiveData<String>()
val imageFail: LiveData<String>
get() = _imageFail


fun saveImageToFireStorage(type: String, uri: Uri,message: Message) {


            val sdf: StorageReference = FirebaseStorage.getInstance().reference.child(
                Constant.CHAT_IMAGE + "_" + System.currentTimeMillis() + "_" + type
                )


            sdf.putFile(uri)
                .addOnSuccessListener { it ->
                    it.metadata?.reference?.downloadUrl
                        ?.addOnSuccessListener { Uri ->
                            val newMessage =  Message(
                                user_name = message.user_name,
                                message = message.message,
                                send_user_id = message.send_user_id,
                                send_user_image = message.send_user_image,
                                send_user_name = message.send_user_name,
                                accept_user_name = message.accept_user_name,
                                accept_user_image = message.accept_user_image,
                                accept_user_id = message.accept_user_id,
                                time = ServerValue.TIMESTAMP,
                                image = Uri.toString()
                                )
                            sendMessage(newMessage)
                            saveLastMessage(newMessage)
                        }
                        ?.addOnFailureListener {
                            _image_state.postValue(it.toString())
                        }


                }
                .addOnFailureListener {
                    _image_state.postValue(it.toString())
                }
        }


fun resetImageFail(){
        _imageFail.postValue(null)
    }
然後,我們還要去UI來觀測它
chatViewModel.imageFail.observe(viewLifecycleOwner, Observer {
            showSnackBar(it,true)
            chatViewModel.resetImageFail()
        })
顯示AlertDialog,並且若取消,則回覆原本的UI
private fun setAlertDialog(){
        val builder = AlertDialog.Builder(requireContext())
        builder.apply {
            setTitle("取消選取")
            setPositiveButton("取消選取",object : DialogInterface.OnClickListener{
                override fun onClick(dialog: DialogInterface?, which: Int) {
                    binding.btnCamera.visibility = View.VISIBLE
                    binding.ivChatRoomSelectedPhoto.visibility = View.GONE
                    binding.edChatRoomInputMessage.isEnabled = true
                    binding.edChatRoomInputMessage.setText("")
                    selectedUri = null
                    dialog?.dismiss()
                }

            })
            setNegativeButton("讓我再想一下",object : DialogInterface.OnClickListener{
                override fun onClick(dialog: DialogInterface?, which: Int) {
                    dialog?.dismiss()
                }
            })
        }

      val alertDialog = builder.create()
      alertDialog.show()
    }
然後在onClick呼叫它即可!
binding.ivChatRoomSelectedPhoto.setOnClickListener {
            setAlertDialog()
        }
<?xml version="1.0" encoding="utf-8"?>

<layout xmlns:android="http://schemas.android.com/apk/res/android"
    xmlns:tools="http://schemas.android.com/tools"
    xmlns:app="http://schemas.android.com/apk/res-auto">

<androidx.constraintlayout.widget.ConstraintLayout
    android:layout_width="match_parent"
    android:layout_height="match_parent"
    android:background="@color/chat_room_background"
    tools:context=".ui.fragment.ChatRoomFragment">


    <androidx.appcompat.widget.Toolbar
        android:id="@+id/toolbar_chat_room_fragment"
        android:layout_width="match_parent"
        android:layout_height="?attr/actionBarSize"
        android:background="@color/light_pewter_blue"
        app:layout_constraintStart_toStartOf="parent"
        app:layout_constraintTop_toTopOf="parent">


    <TextView
        android:id="@+id/tv_chat_room_accept_user_name"
        android:layout_width="match_parent"
        android:layout_height="match_parent"
        android:gravity="center"
        android:textColor="@color/white"
        android:textSize="@dimen/toolbar_textSize"
        android:textStyle="bold">

    </TextView>

    </androidx.appcompat.widget.Toolbar>

    <androidx.recyclerview.widget.RecyclerView
        android:id="@+id/rv_chat_room"
        android:layout_width="match_parent"
        android:layout_height="0dp"

        app:layout_constraintStart_toStartOf="parent"
        app:layout_constraintEnd_toEndOf="parent"
        app:layout_constraintBottom_toTopOf="@id/ll_chat_room_ed_word"
        app:layout_constraintTop_toBottomOf="@id/toolbar_chat_room_fragment">

    </androidx.recyclerview.widget.RecyclerView>


    <LinearLayout
        android:id="@+id/ll_chat_room_ed_word"
        android:layout_width="match_parent"
        android:layout_height="45dp"
        app:layout_constraintBottom_toBottomOf="parent"
        app:layout_constraintStart_toStartOf="parent"
        android:orientation="horizontal"
        android:gravity="start"
        android:background="@color/white">


        <com.google.android.material.textfield.TextInputLayout
            android:layout_width="0dp"
            android:layout_weight="7"
            android:layout_gravity="bottom"
            android:layout_height="wrap_content">

            <com.example.petsmatchingapp.utils.JFEditText
                android:id="@+id/ed_chat_room_input_message"
                android:layout_width="match_parent"
                android:layout_height="wrap_content"
                android:layout_gravity="bottom"
                android:paddingTop="3dp"
                android:background="@drawable/chat_edit_background">


            </com.example.petsmatchingapp.utils.JFEditText>


        </com.google.android.material.textfield.TextInputLayout>

        <ImageButton
            android:id="@+id/btn_camera"
            android:layout_weight="1"
            android:layout_width="wrap_content"
            android:layout_height="wrap_content"
            android:backgroundTint="@color/white"
            android:src="@drawable/ic_baseline_insert_photo_24">

        </ImageButton>

        <ImageView
            android:id="@+id/iv_chat_room_selected_photo"
            android:layout_weight="1"
            android:visibility="gone"
            android:layout_width="wrap_content"
            android:layout_height="match_parent"/>


            <ImageButton
                android:id="@+id/btn_send"
                android:layout_weight="1"
                android:layout_width="wrap_content"
                android:backgroundTint="@color/white"
                android:layout_height="wrap_content"
                android:src="@drawable/ic_baseline_send_24">

            </ImageButton>


    </LinearLayout>


</androidx.constraintlayout.widget.ConstraintLayout>
</layout>
<?xml version="1.0" encoding="utf-8"?>


<layout xmlns:android="http://schemas.android.com/apk/res/android"
    xmlns:app="http://schemas.android.com/apk/res-auto"
    xmlns:tools="http://schemas.android.com/tools">

    <data>
        <variable
            name="message"
            type="com.example.petsmatchingapp.model.Message" />

    </data>


    <RelativeLayout
        android:id="@+id/rl_message_item_list_layout"
        android:padding="5dp"
        android:layout_width="wrap_content"
        android:layout_height="wrap_content">


            <com.example.petsmatchingapp.utils.JFTextView
                android:id="@+id/tv_item_message_me_time"
                android:layout_width="wrap_content"
                android:layout_height="wrap_content"
                android:layout_toStartOf="@id/tv_item_message_me_message"
                android:layout_alignBottom="@id/tv_item_message_me_message"
                android:layout_alignWithParentIfMissing="false"
                android:layout_marginEnd="5dp"
                android:textSize="12sp"
                tools:text = "13:00">


            </com.example.petsmatchingapp.utils.JFTextView>

            <com.example.petsmatchingapp.utils.JFTextView
                android:id="@+id/tv_item_message_me_message"
                android:layout_width="wrap_content"
                android:layout_height="wrap_content"
                android:text="@{message.message}"
                android:layout_alignParentEnd="true"
                android:padding="5dp"
                android:textSize="16sp"
                android:maxWidth="250dp"
                android:background="@drawable/message_background_me"
                tools:text = "你今天吃飽了嗎?">


            </com.example.petsmatchingapp.utils.JFTextView>

            <ImageView
                android:id="@+id/iv_item_list_me"
                android:layout_width="80dp"
                android:layout_height="80dp"
                android:layout_alignParentEnd="true"
                android:visibility="gone"
                android:padding="5dp">

            </ImageView>


    </RelativeLayout>
</layout>
<?xml version="1.0" encoding="utf-8"?>

<layout xmlns:android="http://schemas.android.com/apk/res/android"
    xmlns:app="http://schemas.android.com/apk/res-auto"
    xmlns:tools="http://schemas.android.com/tools">


    <data>
        <variable
            name="message"
            type="com.example.petsmatchingapp.model.Message" />


    </data>

    <RelativeLayout

        android:layout_width="wrap_content"
        android:layout_height="wrap_content"
        android:padding="5dp">


        <ImageView
            android:id="@+id/iv_item_message_other_image"
            android:layout_width="40dp"
            android:layout_height="40dp"
            android:layout_alignParentStart="true"
            tools:src = "@drawable/icon_dog"/>


        <com.example.petsmatchingapp.utils.JFTextView
            android:id="@+id/item_message_other_message"
            android:layout_width="wrap_content"
            android:layout_height="wrap_content"
            android:layout_marginStart="5dp"
            android:text="@{message.message}"
            android:padding="5dp"
            android:maxWidth="250dp"
            android:textSize="16sp"
            android:layout_toEndOf="@id/iv_item_message_other_image"
            android:layout_alignTop="@id/iv_item_message_other_image"
            android:background="@drawable/message_backgorund_other"
            tools:text = "今天我吃飽了喔,我想應該也還沒吃飽啦"/>

        <ImageView
            android:id="@+id/iv_list_item_other_image"
            android:layout_width="80dp"
            android:layout_height="80dp"
            android:layout_marginStart="5dp"
            android:padding="5dp"
            android:visibility="gone"
            android:layout_toEndOf="@id/iv_item_message_other_image"
            android:layout_alignTop="@id/iv_item_message_other_image"/>


        <com.example.petsmatchingapp.utils.JFTextView
            android:id="@+id/item_message_other_time"
            android:layout_width="wrap_content"
            android:layout_height="wrap_content"
            android:layout_toEndOf="@id/item_message_other_message"
            android:layout_alignBottom="@id/item_message_other_message"
            android:layout_marginStart="5dp"
            tools:text="03:05 pm"
            android:textSize="12sp"
            app:layout_constraintStart_toEndOf="@id/item_message_other_message">

        </com.example.petsmatchingapp.utils.JFTextView>


    </RelativeLayout>

</layout>
這時候,機智的朋友們就發現啦,如果今天我們的message的textView我們讓它gone的話,那原本依靠它的time的textView不就沒辦法抓相對位置了嗎!!
這時候,我們就可以透過動態的方式來修改啦!
我們直接在adapter來修改布局,因為我們可以在adapter的viewHolder來判斷我們的資料是否有包含image,有的話就修改布局
來到 ChatRoomAdapter的MyMessageViewHolder,我們直接新增
if (item.image != null) {
                //先拿到view的布局
                val time = RelativeLayout.LayoutParams(binding.tvItemMessageMeTime.layoutParams)
                //把原本的start_of的屬性拿掉
				time.removeRule(RelativeLayout.START_OF)
				//新增屬性,第一個參數是屬性,第二個填要對齊的Id
                time.addRule(RelativeLayout.START_OF, binding.ivItemListMe.id)
                time.addRule(RelativeLayout.ALIGN_PARENT_BOTTOM, binding.ivItemListMe.id)
                //在把布局賦予給view即可
				binding.tvItemMessageMeTime.layoutParams = time
            }
這樣就可以啦!! 簡單粗暴
而Other的一樣是
if (item.image != null){
                    val time = RelativeLayout.LayoutParams(binding.itemMessageOtherTime.layoutParams)
                    time.removeRule(RelativeLayout.END_OF)
                    time.addRule(RelativeLayout.END_OF,binding.ivListItemOtherImage.id)
                    time.addRule(RelativeLayout.ALIGN_BOTTOM,binding.ivListItemOtherImage.id)
                    binding.itemMessageOtherTime.layoutParams = time

                }
成品如下!!
太棒啦!!!!!!!!
我們的30天挑戰賽完成了,跟到這一步的您,應該對於Firebase資料庫的使用有一點點的收穫了吧! 而接下來的時間內,我也會來修正它,修正完就會上架它啦!! 也希望有看到這篇文章的小夥伴們,能在這條路上順順利利,工作/家庭/愛情三得意~
