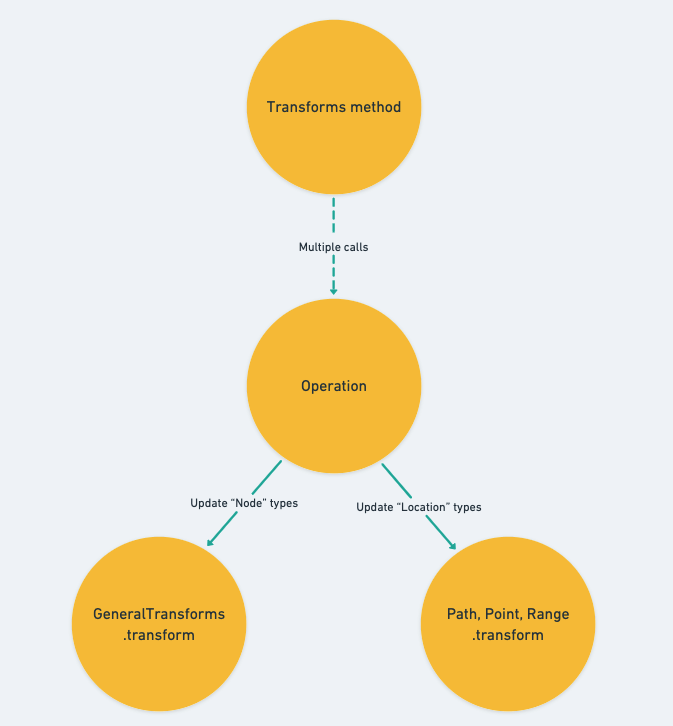
上一篇文章我們深入瞭解了 Operation 的 transform function 是如何實作針對各種不同的 Operation types 的更新功能的,並略過了一切關於 Location type 的更新相關的內容。包含 selection 的主要更新邏輯也一樣,我們只提到了它們是交由各自對應到的 transform method api 來處理,它們分別是:
Path.transform
Point.transform
Range.transform
我們在 Day 18 時就有先剪短提到過這幾個 methods 的功用了,它們同時負責 Location value 的更新以及確保存在於編輯器裡的 Locations 都是 Immutable 的。
基本上整個編輯器就是仰賴前一篇介紹的 transform function 以及今天的這三個 transform method apis 作為資料更新最底層的功能,就像是蓋房子一樣,其他如 Operations 或是最 high-level 的 Transform methods 都只是基於它們再向上搭建另外一層功能而已
前一篇是介紹 Node types 的更新,相信今天的任務是什麼就不用多贅述了 ?
Path.transform這個 method 主要需要傳入兩個參數,分別是 path 、 operation 。
path :主要傳入接受更新的路徑資料,會因應傳入的 operation 回傳相對應更新過後的 Immutable value 。operation :執行的 Operation 資料,下方的內容會很常取出在 operation.path alias 為 op 使用,之後在這個小節看到 op 代表的就是 operation.path 的 value 。還有一個 options.affinity ,我們在後續遇到它的使用情境時再介紹它的功用
/**
 * Transform a path by an operation.
 */
transform(
  path: Path,
  operation: Operation,
  options: { affinity?: 'forward' | 'backward' | null } = {}
): Path | null {
	return produce(path, p => {
		// ... Path.transform implementation
	});
}
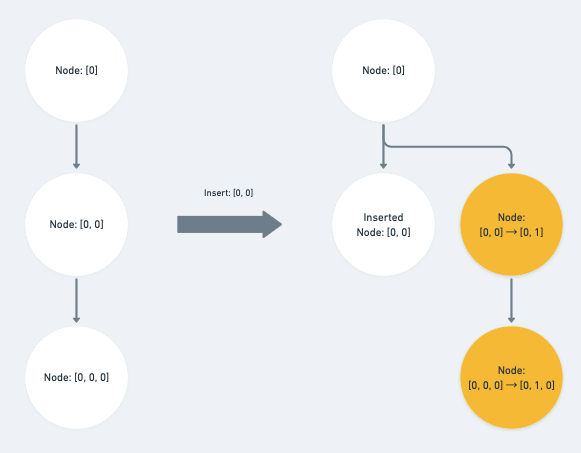
insert_node會受到『插入節點』所影響的路徑就只有三種:
做的操作一樣都是將 path 陣列裡與 op index 同層的值 + 1
case 'insert_node': {
  const { path: op } = operation

  if (
    Path.equals(op, p) ||
    Path.endsBefore(op, p) ||
    Path.isAncestor(op, p)
  ) {
    p[op.length - 1] += 1
  }
  break
}
就稍嫌 tricky 一點了,注意到它指定 + 1 的陣列 index 是 op 的 index 值,所以如果今天插入的節點路徑是位於 path 上方的祖先時,我們會將與 op index 同層的值 + 1 ,因為是它祖先那一層被異動到
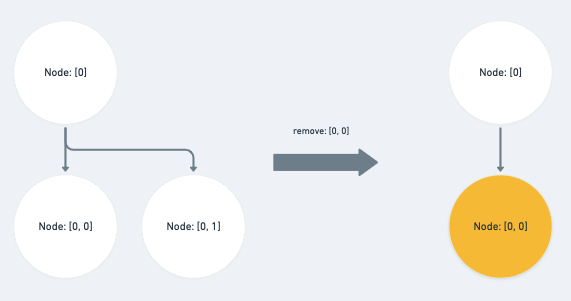
remove_node將與『被刪除的節點』相同,或位於它子層的路徑直接刪除。
case 'remove_node': {
  const { path: op } = operation

  if (Path.equals(op, p) || Path.isAncestor(op, p)) {
    return null
  }

	// ... else if statement

  break
}
如果被刪除的節點路徑位於 path 之前的 sibling 的話則將 index 的值 - 1
else if (Path.endsBefore(op, p)) {
    p[op.length - 1] -= 1
}
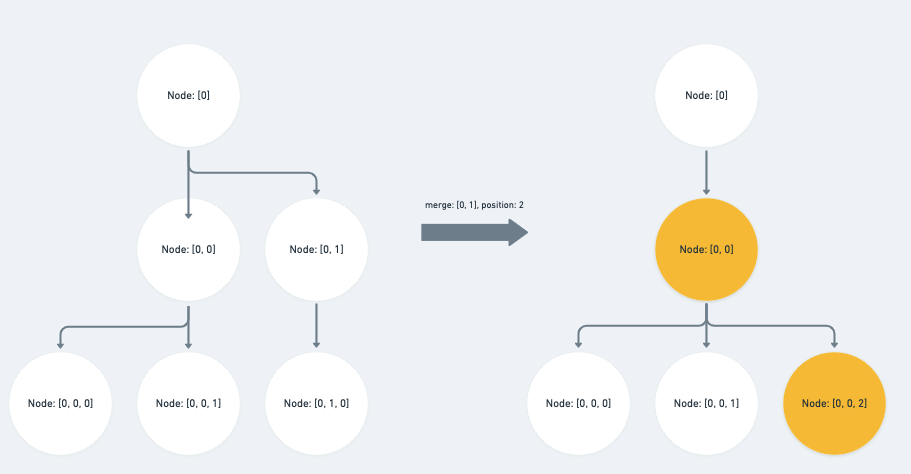
merge_node『合併節點』可以分為兩種情形:
op 與 path 相等,或為 path 之前的 sibling :
直接將 path 對應的 index 值 - 1
case 'merge_node': {
  const { path: op, position } = operation

  if (Path.equals(op, p) || Path.endsBefore(op, p)) {
    p[op.length - 1] -= 1
  }

	// ... else if statement

  break
}
op 為 path 的祖先路徑:
除了將對應的 index 值 -1 之外,我們還需要子層的 index 值去加上 position ,也就是它前一個 sibling 的 index 值
else if (Path.isAncestor(op, p)) {
  p[op.length - 1] -= 1
  p[op.length] += position
}
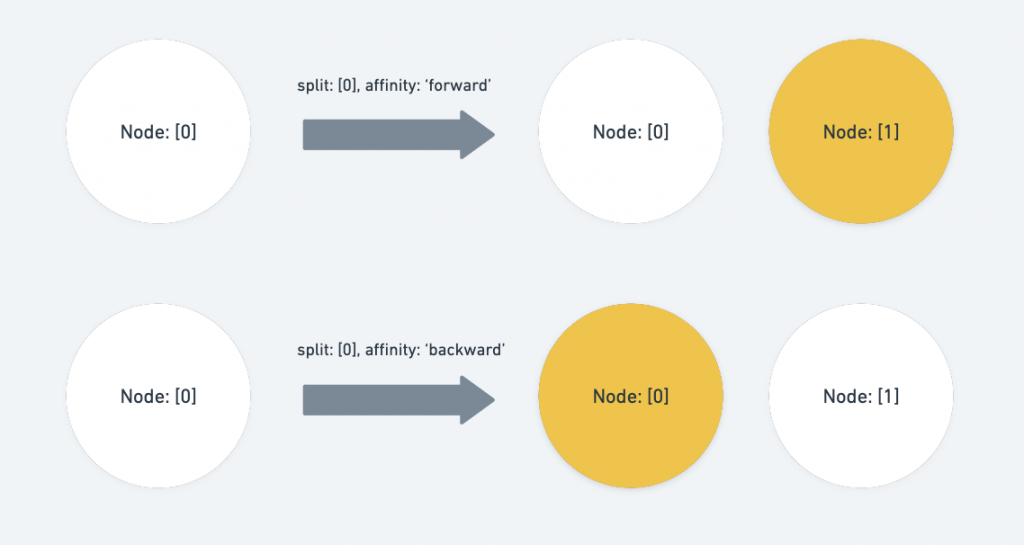
split_node『拆分節點』可以分為三種情形:
op 與 path 相等
這裡就會受到 options.affinity 所影響了, affinity 在這裡代表的是將原始的 path 指向的節點向後( forward )或是向前( backward )做拆分,如果是向後拆分則將原始路徑的 index + 1 ,向前則不需要做任何操作。
case 'split_node': {
  const { path: op, position } = operation

  if (Path.equals(op, p)) {
    if (affinity === 'forward') {
      p[p.length - 1] += 1
    } else if (affinity === 'backward') {
      // Nothing, because it still refers to the right path.
    } else {
      return null
    }
  }

  // ... other statements

  break
}
op 與 path 同層,並位於 path 前面的 sibling
直接將 path 的 index 值 + 1 。
else if (Path.endsBefore(op, p)) {
  p[op.length - 1] += 1
}
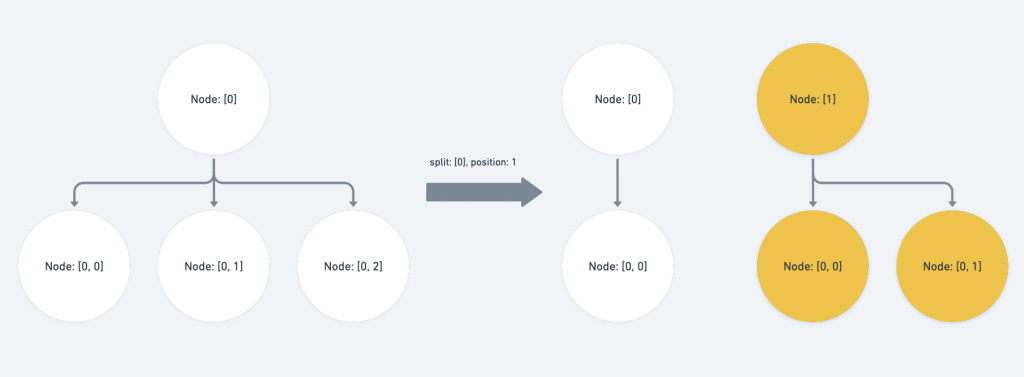
op 為 path 的祖先,且 op index 的子層對應到的 path index 位於 position 的後方:
同層的 index 值 + 1 ,同時子層節點扣除掉拆分的 position offset
else if (Path.isAncestor(op, p) && path[op.length] >= position) {
  p[op.length - 1] += 1
  p[op.length] -= position
}
move_node首先擋掉了 no-op ,也就是不用執行任何操作,新舊路徑皆相等的情形
case 'move_node': {
  const { path: op, newPath: onp } = operation

  // If the old and new path are the same, it's a no-op.
  if (Path.equals(op, onp)) {
    return
  }

	// ... If else implementations

  break
}
接著拆分成四種情形去探討:
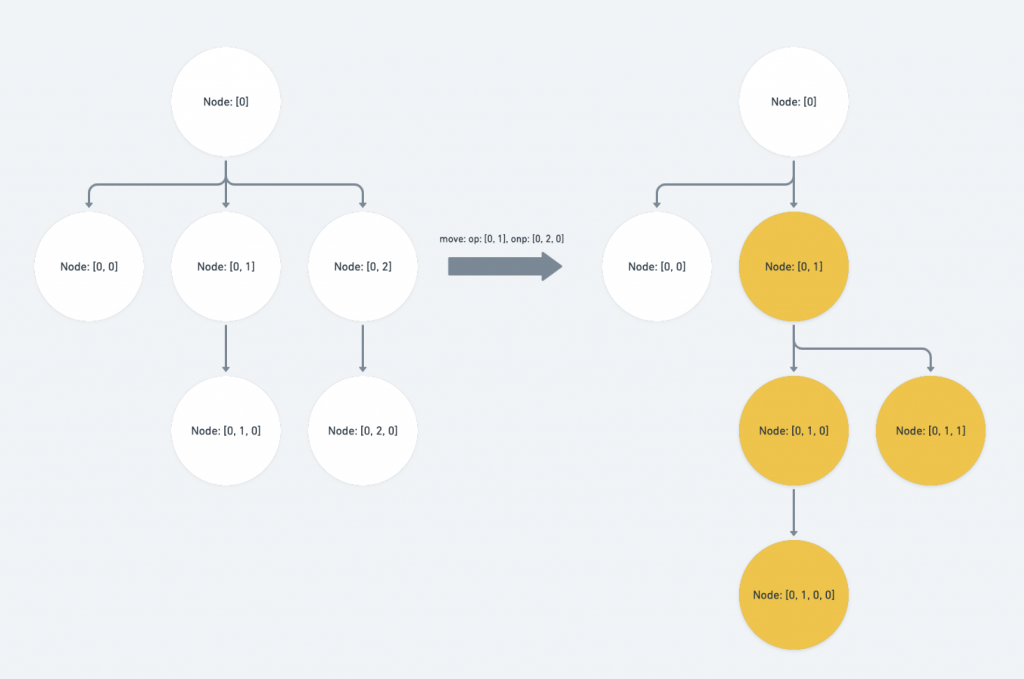
op ( Operation 裡欲移動的舊路徑 )為 p 的祖先或 op 與 p 的路徑相等:
此時的 p 被包含在 Operation 的搬遷範圍內,我們要將 onp ( Operation 裡欲移動到的新路徑 )補上 op index 之後、 p 所涵蓋到的子層。
if (Path.isAncestor(op, p) || Path.equals(op, p)) {
  const copy = onp.slice()

  // ... if statement for the edge case

  return copy.concat(p.slice(op.length))
}
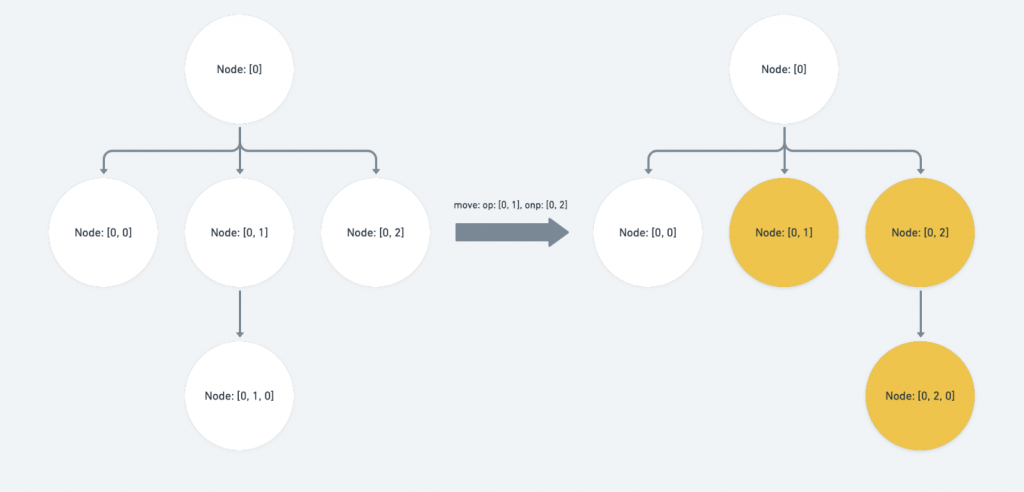
上圖的結果就是:[0, 2] 會向前調動到 [0, 1] ,而 [0, 1] 的整個 branch 則會一起向後移動一個 sibling 。
再來這個情形還有一個 edge case 是需要注意的,也就是當 op 位於 onp 之前,同時為 onp 的上層路徑。
此時我們會需要調整 onp 於 op 層的 index value 將它 -1 ,因為 op 會遭到移除
if (Path.endsBefore(op, onp) && op.length < onp.length) {
  copy[op.length - 1] -= 1
}
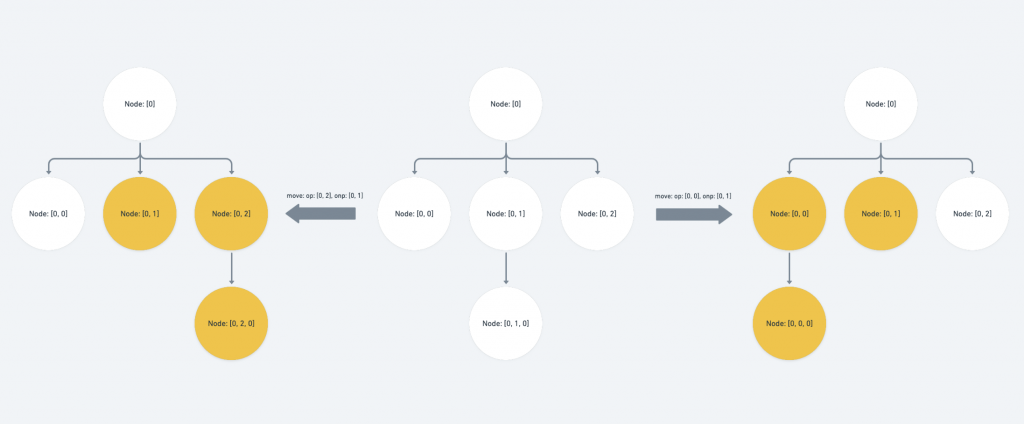
op 與 onp 同層,且 onp 為 p 的祖先或 onp 與 p 的路徑相等:
此時我們需要調整 p 於 op index 層的 value 。如果 op 位於 p 之前,代表移動後 value 會因為該層前面的 sibling 遭到拔除因而需要 -1 ;反之則代表該層會有新的 sibling 被移動到前面因而需要 +1
else if (
  Path.isSibling(op, onp) &&
  (Path.isAncestor(onp, p) || Path.equals(onp, p))
) {
  if (Path.endsBefore(op, p)) {
    p[op.length - 1] -= 1
  } else {
    p[op.length - 1] += 1
  }
}
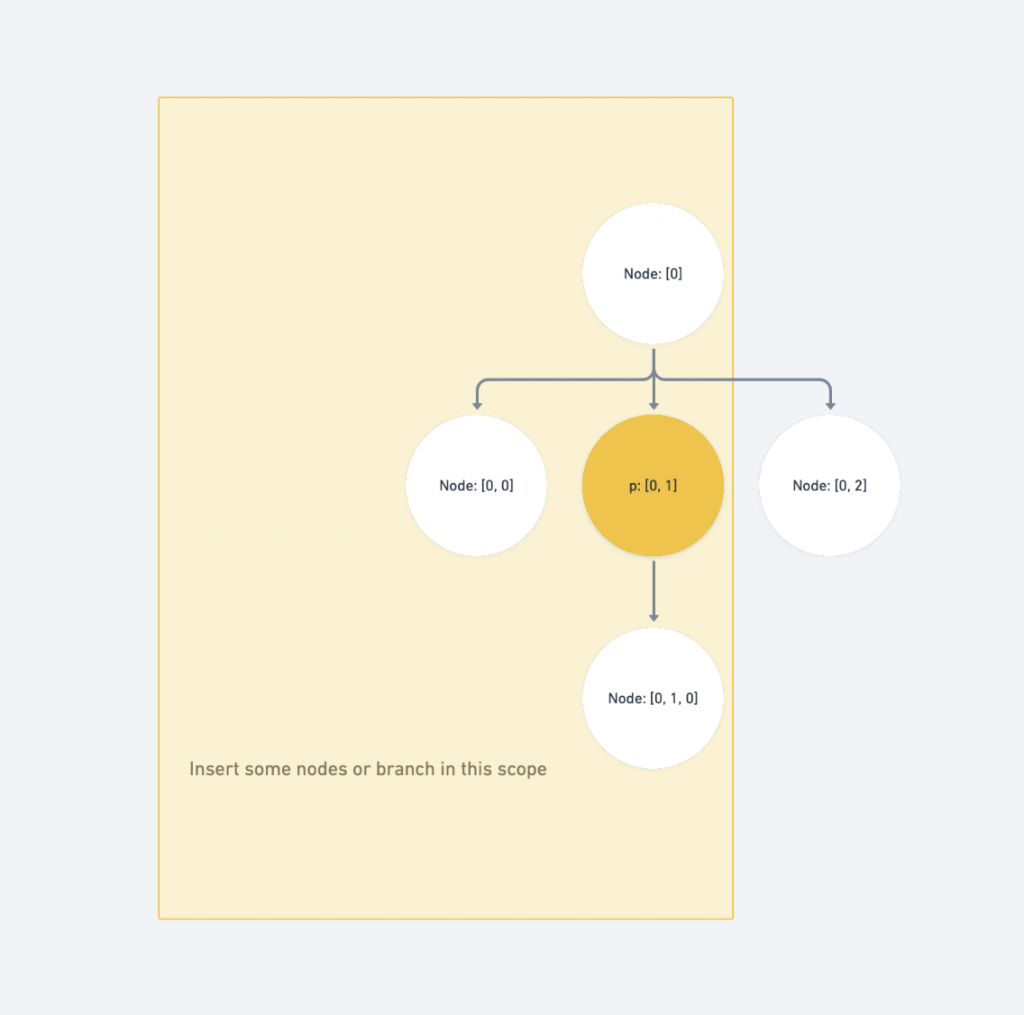
onp 位於 p 之前,或 onp 與 p 相等,或 onp 為 p 之祖先:
代表我們要將某一組路徑搬遷到 p 之前,因此我們需要將 p 於 onp index 層的 value +1
else if (
  Path.endsBefore(onp, p) ||
  Path.equals(onp, p) ||
  Path.isAncestor(onp, p)
) {
  // ... if statement for the edge case

  p[onp.length - 1] += 1
}
需要注意的 edge case 為:如果要搬遷的 op 位於 p 之前,代表會有一組路徑從 p 之前的位置受到搬遷,我們需要扣除 p 於 op 層的 index value
if (Path.endsBefore(op, p)) {
  p[op.length - 1] -= 1
}
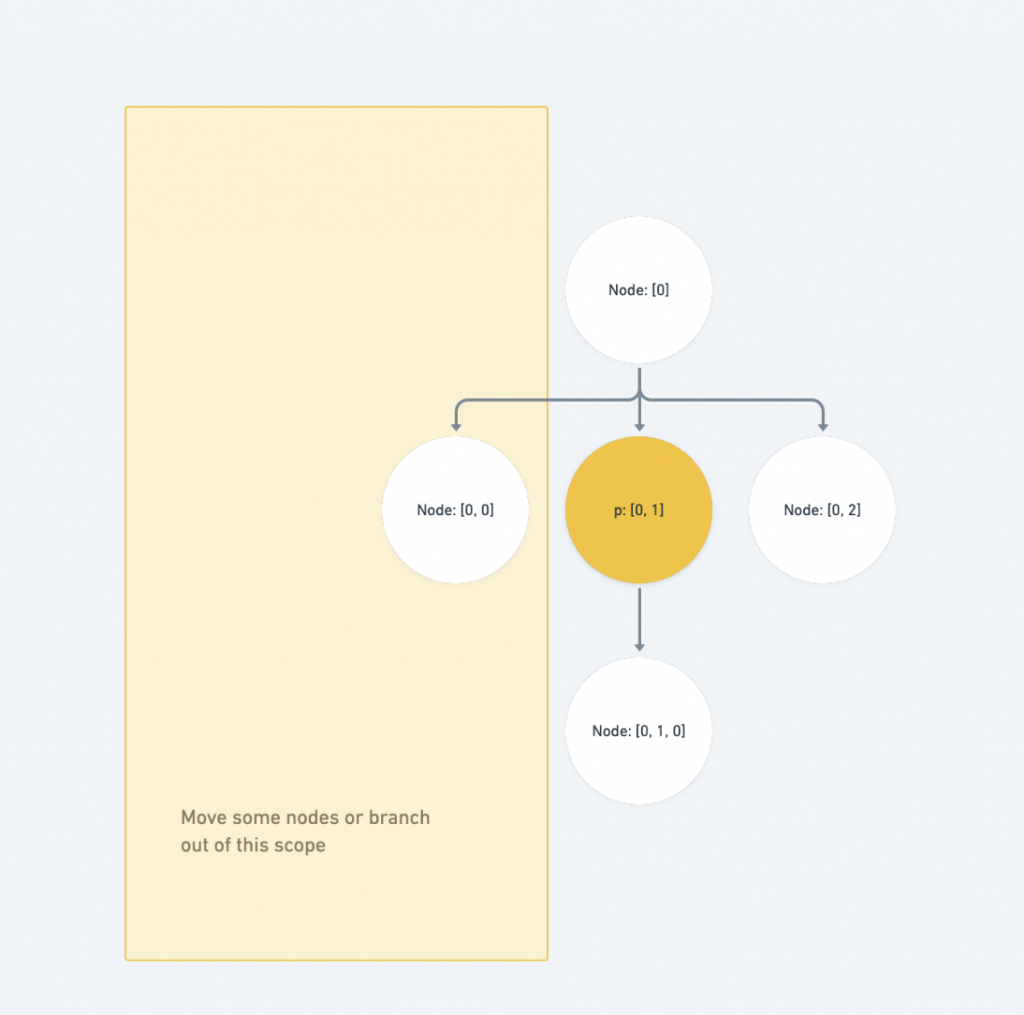
op 位於 p 之前:
代表我們要將某一組路徑從 p 之前搬遷走,因此我們需要將 p 於 op index 層的 value -1
else if (Path.endsBefore(op, p)) {
  if (Path.equals(onp, p)) {
    p[onp.length - 1] += 1
  }

  p[op.length - 1] -= 1
}
Path.equals(onp, p) 應該已經在前一組 else if 中被篩掉了才對。歡迎在下方留言補充!Point.transform主要需要傳入兩個參數,分別是 point 、 op 。
point :主要傳入接受更新的 Point 資料,會因應傳入的 operation 回傳相對應更新過後的 Immutable value 。op :執行的 Operation 資料 。還有一個 options.affinity ,我們一樣在後續遇到它的使用情境時再介紹它的功用
/**
 * Transform a point by an operation.
 */
transform(
  point: Point,
  op: Operation,
  options: { affinity?: 'forward' | 'backward' | null } = {}
): Point | null {
	return produce(point, p => {
		const { affinity = 'forward' } = options
        const { path, offset } = p
		// ... Point.transform implementation
	});
}
insert_node & move_node因為不會異動到 offset 的值所以實作上非常的 simple ,就只是呼叫 Path.transform 把參數都丟進去而已。
case 'insert_node':
case 'move_node': {
  p.path = Path.transform(path, op, options)!
  break
}
insert_text如果 path 與 op.path 為同一路徑,且 op.offset 小於等於 offset ,則代表插入的文字位於欲更新的 Point 之前,因此將 p.offset 增加 op.text 的長度。
case 'insert_text': {
  if (Path.equals(op.path, path) && o <= offset) {
    p.offset += op.text.length
  }

  break
}
merge_node當 op.path 與 path 為同一個路徑時,將 position 加進 offset 裡,再將 path 丟入 Path.transform
case 'merge_node': {
  if (Path.equals(op.path, path)) {
    p.offset += op.position
  }

  p.path = Path.transform(path, op, options)!
  break
}
remove_text要移除的文字 op.offset 位於 offset 之前,代表刪除的文字位於欲更新的 Point 之前,因此扣除掉兩個 offset 之間的長度,最長扣除到 op.text 的長度
case 'remove_text': {
  if (Path.equals(op.path, path) && op.offset <= offset) {
    p.offset -= Math.min(offset - op.offset, op.text.length)
  }

  break
}
remove_node如果 op.path 與 path 為相同路徑,或為它的祖先,則直接設為 null ,否則則丟入 Path.transform
case 'remove_text': {
  if (Path.equals(op.path, path) && op.offset <= offset) {
    p.offset -= Math.min(offset - op.offset, op.text.length)
  }

  break
}
split_node我們能先區分成兩種情形: op.path 與 path 是否為相同的路徑,如果不同則不會異動到 offset value ,直接將 path 丟入 Path.transform 就好
case 'split_node': {
    if (Path.equals(op.path, path)) {
      // Implementation
    } else {
      p.path = Path.transform(path, op, options)!
    }

    break
  }
}
這裡的 options.affinity 用途與 Path 段落介紹的 split_node 裡的一樣,代表著節點向後( Forward )或向前( Backward )做拆分。
如果是預設的向後拆分則將在其前面被拆走的 offset 扣掉並一樣丟入 Path.transform
if (op.position === offset && affinity == null) {
  return null
} else if (
  op.position < offset ||
  (op.position === offset && affinity === 'forward')
) {
  p.offset -= op.position

  p.path = Path.transform(path, op, {
    ...options,
    affinity: 'forward',
  })!
}
affinity: null 在這邊做的事情跟 Path.transform 的 null affinity 一樣,將與 Operation 操作相同的 Path 或 Point 節點直接移除,回傳 null 。但筆者不太確定它的使用情境就是了,一樣歡迎下方留言補充!Range.transform這裡頭主要都是針對 affinity 參數的控制,最後將 range 的 anchor 與 focus point 丟入 Point.transform 進行轉換並回傳新的 Immutable Range :
/**
 * Transform a range by an operation.
 */

transform(
  range: Range,
  op: Operation,
  options: {
    affinity?: 'forward' | 'backward' | 'outward' | 'inward' | null
  } = {}
): Range | null {
  // ... affinity statement control

  return produce(range, r => {
    const anchor = Point.transform(r.anchor, op, { affinity: affinityAnchor })
    const focus = Point.transform(r.focus, op, { affinity: affinityFocus })

    if (!anchor || !focus) {
      return null
    }

    r.anchor = anchor
    r.focus = focus
  })
},
這裡的 affinity 除了 'forward' 與 'backward' 與前面在 Path 與 Point 提到的用法一樣,是決定節點的拆分( split_node )方向之外,還有 'inward' (向內)以及 'outward' (向外)額外兩種情形。中間的判斷式就是拿來決定 Range 裡的 anchor 與 focus point 要分別以哪種 affinity 進行 transform 的
const { affinity = 'inward' } = options
let affinityAnchor: 'forward' | 'backward' | null
let affinityFocus: 'forward' | 'backward' | null

if (affinity === 'inward') {
  if (Range.isForward(range)) {
    affinityAnchor = 'forward'
    affinityFocus = 'backward'
  } else {
    affinityAnchor = 'backward'
    affinityFocus = 'forward'
  }
} else if (affinity === 'outward') {
  if (Range.isForward(range)) {
    affinityAnchor = 'backward'
    affinityFocus = 'forward'
  } else {
    affinityAnchor = 'forward'
    affinityFocus = 'backward'
  }
} else {
  affinityAnchor = affinity
  affinityFocus = affinity
}
Operation 章節到這邊總算告一個段落了,這個章節的後兩篇我們非常深入地去探討了 Operation 底層的程式碼是如何運作的,希望這能讓讀者在以 slate 為基礎開發編輯器時能更清楚在每一個操作的背後,編輯器實際上都是如何更新的。
下一篇開始我們要來探討 slate 是如何做骯髒標記與完成資料正規化的。
Normalization 在 slate 中也是一個非常重要的功能,它也支援開發者加入自定義的 Normalizing constraints 。
除了探討其中的運作方式,我們也會介紹有哪些原始存在的 constraints 、他們的存在意義以及如何自定義 constaints 。
明天新的篇章見囉~