轉發器與聚合器模式, 在每個application也佈署一個fluent bit(Forwarder), 只負責抓取日誌並轉發出去給Aggregator.
Aggregator再來負責Filter跟輸出處理.
適合用在需要輸出到多個存儲地方上, 像上圖的Splunk, S3等等的.
pros:
cons:

其實就是上面的簡化,
將aggregator的角色, 濃縮進去上面的forwarder.
使之成為一個agent, 負責把處理好的日誌給輸出到存儲地方.
這個模式跟上面的架構怎取捨呢?
就是這裡只適合只有一個輸出的存儲地方, 且有把握短期內都不會改變了XD
pros:
cons:

主要針對各種網路設備或是syslog的抓取.
關於syslog的抓取收集, 其實有Rsyslog這工具
能看fluent bit這裡的示範
Rsyslog to fluent bit
---參考
Fluent bit Blog - 3 COMMON ARCHITECTURE PATTERNS WITH FLUENTD AND FLUENT BIT
這次講這麼多, 來用Day19介紹的Docker Compose快速搭建環境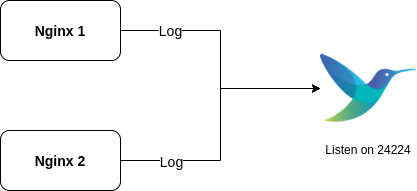
先安裝一個基本的fluent bit, 開啟24224 port, 這是input plugin裡的Forwar所監聽的預設port
更多細節在Input套件再說.
示範的是有2個nginx container, 會把log寫到指定的fluentd, 然後fluent bit就能收到log了
然後看到conf/fluent-bit.conf這檔案的filter, 順便演示了昨天講的Filter能添加資料的作用.
Output則是把格式轉成JSON.
最終將收到處理完的日誌, 給輸出到stdout上
目錄夾下需要有以下兩個檔案docker-compose.yml
version: '3'
services:
  fluentd:
    image: fluent/fluent-bit
    volumes:
        - ./conf:/fluent-bit/etc
    ports:
      - "24224:24224"
      - "24224:24224/udp"
    hostname: fluentd
    logging:
      driver: "json-file"
      options:
          max-size: 100m
          max-file: "5"
  nginx:
    logging:
      driver: fluentd
      options:
        fluentd-address: localhost:24224
        tag: nginx
    image: nginx
    ports:
        - "8080:80"
    depends_on:
      - fluentd
    hostname: nginx
  nginx2:
    logging:
      driver: fluentd
      options:
        fluentd-address: localhost:24224
        tag: nginx
    image: nginx
    ports:
        - "8081:80"
    depends_on:
        - fluentd
    hostname: nginx2
conf/fluent-bit.conf
[SERVICE]
    flush 1
    Daemon off
    log_level error
    http_server on
    http_listen 0.0.0.0
    storage.metrics on

[INPUT]
    name forward
    listen 0.0.0.0
    port 24224

[FILTER]
    Name record_modifier
    Match *
    Record hostname ${HOSTNAME}

[OUTPUT]
    Name stdout
    Format json
ps fluent bit conf格式很像INI, 但它的indent是用4個space, 而不是tab
然後執行docker compose啟動這Project
docker-compose up -d
接著打開瀏覽器, 輸入http://localhost:8080/ 和輸入http://localhost:8081//
應該要能成功看到Nginx畫面,
然後
docker-compose logs -f fluentd
應該會看到這樣的訊息被輸出到stdout
fluentd_1  | [{"date":1633714237.0,"log":"172.27.0.1 - - [08/Oct/2021:17:30:37 +0000] \"GET / HTTP/1.1\" 200 612 \"-\" \"Mozilla/5.0 (X11; Linux x86_64) AppleWebKit/537.36 (KHTML, like Gecko) Chrome/91.0.4472.114 Safari/537.36\" \"-\"","container_id":"bb3ba777a382ec03129096a684206639701ea77d7a017cad7447274925a4f35f","container_name":"/demo2_nginx_1","source":"stdout","hostname":"fluentd"}]

fluentd_1  | [{"date":1633714590.0,"log":"172.27.0.1 - - [08/Oct/2021:17:36:30 +0000] \"GET / HTTP/1.1\" 200 612 \"-\" \"Mozilla/5.0 (X11; Linux x86_64) AppleWebKit/537.36 (KHTML, like Gecko) Chrome/91.0.4472.114 Safari/537.36\" \"-\"","container_id":"efd839534da8051add32a05a35a7faaafcb9287ebb090482b5dece7999ff6126","container_name":"/demo2_nginx2_1","source":"stdout","hostname":"fluentd"}]
可以看到格式是JSON, 這是Output轉出來的格式.
其中hostname這是我自己在filter加上的
然後log裡面可以看到另外兩個容器透過logging driver傳過來的log, 還幫我們帶上container_id和container_name,