好一陣子沒寫單元測試與整合測試了,大家是否覺得有些生疏了呢?
之前的測試都寫得很簡單,正好昨天好好地寫了搜尋輸入框還有呼叫 API ,可以藉由撰寫這個功能的測試來分享一些小技巧給大家。
小提醒:昨天的程式碼大家可以從 Github - Branch: day24 上 Clone 或者是 Fork 下來。
這次要撰寫測試的檔案比較多,有三個 Pipe 、 一個 Service 與一個 Component 的測試需要撰寫。
不過雖然檔案比較多,但要撰寫的測試其實不會比較難,相反地,由於我們昨天在開發的時候有把邏輯切到各個 Pipe 與 Service ,因此凡而在撰寫測試上會顯得更加地好寫。
首先,我們來看看最簡單的 BooleanInZhTwPipe ,其程式碼如下:
export class BooleanInZhTwPipe implements PipeTransform {

  transform(value: boolean, ...args: unknown[]): string {
    return value ? '是' : '否';
  }

}
BooleanInZhTwPipe 只有一個函式 transform ,因此我們只要驗證:
value 為 true 時,則回傳 是 。value 為 false 時,則回傳 否 。夠簡單了吧?
測試程式碼如下:
describe('BooleanInZhTwPipe', () => {
  let pipe: BooleanInZhTwPipe;
  beforeEach(() => {
    pipe = new BooleanInZhTwPipe();
  });

  it('create an instance', () => {
    expect(pipe).toBeTruthy();
  });

  describe('transform', () => {
    describe('when the first parameter is `true`', () => {
      it('should return "是"', () => {
        // Arrange
        const firstParameter = true;
        const expectedResult = '是';
        // Acc
        const actualResult = pipe.transform(firstParameter);
        // Assert
        expect(actualResult).toBe(expectedResult);
      });
    });

    describe('when the first parameter is `false`', () => {
      it('should return "否"', () => {
        // Arrange
        const firstParameter = false;
        const expectedResult = '否';
        // Acc
        const actualResult = pipe.transform(firstParameter);
        // Assert
        expect(actualResult).toBe(expectedResult);
      });
    });
  });
});
測試結果:

GoogleMapLinkPipe 的部份也很簡單,其程式碼如下:
export class GoogleMapLinkPipe implements PipeTransform {

  transform({ PositionLat, PositionLon }: StationPosition, ...args: unknown[]): string {
    return `https://www.google.com/maps?q=${PositionLat},${PositionLon}&z=7`;
  }

}
而其驗證項目只需要驗證將傳入的第一個參數的 PositionLat 跟 PositionLong 是否有與 URL 相結合即可。
其測試程式碼如下:
describe('GoogleMapLinkPipe', () => {
  let pipe: GoogleMapLinkPipe;
  beforeEach(() => {
    pipe = new GoogleMapLinkPipe();
  });

  it('create an instance', () => {
    expect(pipe).toBeTruthy();
  });

  describe('transform', () => {
    describe('when the first parameter is `true`', () => {
      it('should return "https://www.google.com/maps?q=2.34567,12.34567&z=7"', () => {
        // Arrange
        const firstParameter: StationPosition = {
          PositionLon: 12.34567,
          PositionLat: 2.34567,
          GeoHash: 'abcdefg'
        };
        const expectedResult = 'https://www.google.com/maps?q=2.34567,12.34567&z=7';
        // Acc
        const actualResult = pipe.transform(firstParameter);
        // Assert
        expect(actualResult).toBe(expectedResult);
      });
    });
  });
});
測試結果:

最後一個 Pipe ─ LocationStringPipe 的程式碼如下:
export class LocationStringPipe implements PipeTransform {

  transform({ PositionLat, PositionLon }: StationPosition, ...args: unknown[]): string {
    return `${PositionLat}, ${PositionLon}`;
  }

}
其驗證項目只需要驗證將傳入的第一個參數的 PositionLat 跟 PositionLong 是否有變成字串並在其中加上逗號即可。
其測試程式碼如下:
describe('LocationStringPipe', () => {
  let pipe: LocationStringPipe;
  beforeEach(() => {
    pipe = new LocationStringPipe();
  });

  it('create an instance', () => {
    const pipe = new LocationStringPipe();
    expect(pipe).toBeTruthy();
  });

  describe('transform', () => {
    describe('when the first parameter is `true`', () => {
      it('should return "2.34567, 12.34567"', () => {
        // Arrange
        const firstParameter: StationPosition = {
          PositionLon: 12.34567,
          PositionLat: 2.34567,
          GeoHash: 'abcdefg'
        };
        const expectedResult = '2.34567, 12.34567';
        // Acc
        const actualResult = pipe.transform(firstParameter);
        // Assert
        expect(actualResult).toBe(expectedResult);
      });
    });
  });
});
測試結果:

至此, Pipe 的部份就全測完了,相信大家這部份一定沒什麼問題。
而大家應該也有發現,我們在今天在驗 Pipe 的時候跟在驗 Component 的時候有一個滿明顯的不同,那就是我們今天沒有 TestBed 。
其實這是因為我們的這幾個 Pipe 很乾淨,沒有依賴任何其他的 Class ,所以在撰寫測試時,其實就把它當成一般的 Class ,用 new xxxPipe() 的方式產生出實體就行了。
剛剛前面的 Pipe 只是先讓大家熱熱身,抓抓手感,接下來我們要為 ReactiveFormsAutoCompleteSearchingService 撰寫測試,算是今天的重頭戲之一。
雖然 ReactiveFormsAutoCompleteSearchingService 的程式碼也很簡單,但為什麼會是今天的重頭戲呢?
這是因為 ReactiveFormsAutoCompleteSearchingService 有用到我們之前沒有用過的 httpClient 。
先來看看它的程式碼:
export class ReactiveFormsAutoCompleteSearchingService {

  constructor(private httpClient: HttpClient) { }

  searchStation(stationName: string): Observable<MetroStationDTO[]> {
    let url = 'https://ptx.transportdata.tw/MOTC/v2/Rail/Metro/Station/TRTC?$format=JSON';
    if (stationName) {
      url += `&$filter=contains(StationName/Zh_tw,'${stationName}')`;
    }
    return this.httpClient.get<MetroStationDTO[]>(url);
  }
}
ReactiveFormsAutoCompleteSearchingService 跟上面的 Pipe 一樣,都只有一個函式,不過在這個函式裡我們會需要驗兩個情境,四個案例:
searchStation 所帶入的參數是空字串時
Observable (單元測試)
httpClient 的 get 函式,並帶入參數 https://ptx.transportdata.tw/MOTC/v2/Rail/Metro/Station/TRTC?$format=JSON (整合測試)
searchStation 所帶入的參數是有效字串時
Observable (單元測試)
httpClient 的 get 函式,並帶入參數 https://ptx.transportdata.tw/MOTC/v2/Rail/Metro/Station/TRTC?$format=JSON&$filter=contains(StationName/Zh_tw,'xxx') (整合測試)
開始撰寫測試之前,我們一樣先把 ReactiveFormsAutoCompleteSearchingService 所依賴的項目準備好:
beforeEach(() => {
  TestBed.configureTestingModule({
    imports: [HttpClientTestingModule],
    providers: [ReactiveFormsAutoCompleteSearchingService]
  });
  service = TestBed.inject(ReactiveFormsAutoCompleteSearchingService);
});
準備好依賴項目之後,就可以開始撰寫測試程式囉。
看仔細噢!原本 Service 要使用
HttpClient的話,正常要在模組內引入HttpClientModule。但在撰寫測試時,我們要引入的是
HttpClientTestingModule這個 Angular 幫我們準備好專門給撰寫測試所要引入的 Module 。
我的測試程式碼如下:
describe('searchStation', () => {
  describe('When the stationName is a empty string', () => {
    const stationName = '';
    it('should return a Observable', () => {
      // Act
      const result = service.searchStation(stationName);
      // Assert
      expect(result).toBeInstanceOf(Observable);
    });

    it('should call function "get" of the "HttpClient" with the correct API\'s URL', () => {
      // Arrange
      const apiUrl = 'https://ptx.transportdata.tw/MOTC/v2/Rail/Metro/Station/TRTC?$format=JSON';
      const httpClient = TestBed.inject(HttpClient);
      spyOn(httpClient, 'get');
      // Act
      service.searchStation(stationName);
      // Assert
      expect(httpClient.get).toHaveBeenCalledWith(apiUrl);
    });
  });

  describe('When the stationName is a valid string', () => {
    const stationName = 'Leo';
    it('should return a Observable', () => {
      // Act
      const result = service.searchStation(stationName);
      // Assert
      expect(result).toBeInstanceOf(Observable);
    });

    it('should call function "get" of the "HttpClient" with the correct API\'s URL', () => {
      // Arrange
      const apiUrl = 'https://ptx.transportdata.tw/MOTC/v2/Rail/Metro/Station/TRTC?$format=JSON&$filter=contains(StationName/Zh_tw,\'Leo\')';
      const httpClient = TestBed.inject(HttpClient);
      spyOn(httpClient, 'get');
      // Act
      service.searchStation(stationName);
      // Assert
      expect(httpClient.get).toHaveBeenCalledWith(apiUrl);
    });
  });
});
測試結果:

最後要測的是 ReactiveFormsAutoCompleteSearchingComponent ,由於是 Component 的關係,基本上除了 Class 本身之外,我們還要來驗證 Template 的部份。
先來看看 Class 的程式碼:
export class ReactiveFormsAutoCompleteSearchingComponent {

  searchingInputControl = new FormControl();
  stations$ = this.searchingInputControl.valueChanges.pipe(
    startWith(''),
    debounceTime(500),
    switchMap(value => this.service.searchStation(value))
  );

  constructor(private service: ReactiveFormsAutoCompleteSearchingService) { }

}
這個 Component 要驗的情境有:
searchingInputControl 是不是 FormControl
stations$ 是不是 Observable
stations$ 被訂閱時, ReactiveFormsAutoCompleteSearchingService 的函式 searchStation 會不會被呼叫並傳入空字串searchingInputControl 的值變動時, ReactiveFormsAutoCompleteSearchingService 的函式 searchStation 會不會被呼叫並傳入 searchingInputControl 的值searchingInputControl 的值快速變動兩次時,ReactiveFormsAutoCompleteSearchingService 的函式 searchStation 是否只被呼叫一次searchingInputControl 的值變動兩次的間隔時間超過 500 毫秒時,ReactiveFormsAutoCompleteSearchingService 的函式 searchStation 是否被呼叫兩次開始測試前,一樣先把依賴的項目準備好:
describe('ReactiveFormsAutoCompleteSearchingComponent', () => {
  let component: ReactiveFormsAutoCompleteSearchingComponent;
  let fixture: ComponentFixture<ReactiveFormsAutoCompleteSearchingComponent>;

  beforeEach(async () => {
    await TestBed.configureTestingModule({
      declarations: [ReactiveFormsAutoCompleteSearchingComponent],
      providers: [
        {
          provide: ReactiveFormsAutoCompleteSearchingService,
          useValue: {
            searchStation: () => EMPTY
          }
        }
      ]
    })
    .compileComponents();

    fixture = TestBed.createComponent(ReactiveFormsAutoCompleteSearchingComponent);
    component = fixture.componentInstance;
    fixture.detectChanges();
  });

  it('should create', () => {
    expect(component).toBeTruthy();
  });
});
從上述程式碼中,大家可能會發現以前從來沒看過的程式碼:
{
  provide: ReactiveFormsAutoCompleteSearchingService,
  useValue: {
    searchStation: () => EMPTY
  }
}
而這也是我們今天文章的主軸, DI 抽換 。
DI ,也就是 Dependency Injection ,依賴注入。
這點大家應該知道,而 DI 抽換是 Angular 提供的一個很有趣的功能,讓我們可以用以下三種方式替換掉想替換的 Provider :
useClass ─ 提供一個繼承於想替換掉的 Provider 的 Class ,然後用新的 Class 取代原本的 Provider
像是:
class MyRouter extends Router {
  // ...
}

@NgModule({
  // ...
  providers: [
    {
      provide: Router,
      useClass: MyRouter
    }
  ]
})
export class AbcModule { }
useValue ─ 像剛剛在測試程式碼裡所寫的那樣,直接用物件抽換掉想換掉的 Provider
useFactory ─ 用函式來抽換,像是:
const abcServiceFactory = () => {
  return new AbcService();
}

@NgModule({
  // ...
  providers: [
    {
      provide: AbcService,
      useClass: abcServiceFactory
    }
  ]
})
export class ABCModule { }
關於這部份,真的要講很細的話可以寫一整篇,不過我今天只是想讓大家知道我們可以透過 DI 抽換的方式,把不可控的依賴變成可控的,這樣才能寫出優秀的測試。
關於 DI 抽換的部分,如果想了解更多可以參考官方的 Dependency providers
文件。
知道 DI 抽換是什麼概念之後,我們就來開始撰寫測試案例吧!
我的測試程式碼如下:
describe('Property searchingInputControl', () => {
it('should be a instance of FormControl', () => {
// Assert
expect(component.searchingInputControl).toBeInstanceOf(FormControl);
});
});
describe('Property stations$', () => {
it('should be a instance of FormControl', () => {
// Assert
expect(component.stations$).toBeInstanceOf(Observable);
});
describe('when it be subscribed', () => {
let service: ReactiveFormsAutoCompleteSearchingService;
beforeEach(() => {
service = TestBed.inject(ReactiveFormsAutoCompleteSearchingService);
spyOn(service, 'searchStation').and.returnValue(of([]));
});
it('should call function "searchStation" of the service with empty string', (done) => {
// Act
component.stations$.subscribe(() => {
// Assert
expect(service.searchStation).toHaveBeenCalledOnceWith('');
done();
});
});
describe('when the input value changes', () => {
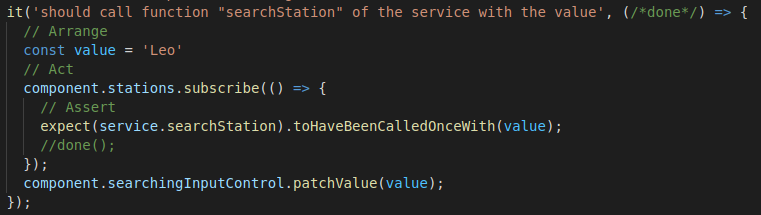
it('should call function "searchStation" of the service with the value', (done) => {
// Arrange
const value = 'Leo'
// Act
component.stations$.subscribe(() => {
// Assert
expect(service.searchStation).toHaveBeenCalledOnceWith(value);
done();
});
component.searchingInputControl.patchValue(value);
});
});
describe('when the input value changes twice quickly', () => {
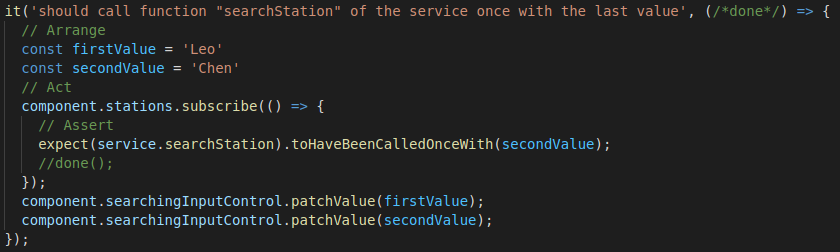
it('should call function "searchStation" of the service once with the last value', (done) => {
// Arrange
const firstValue = 'Leo'
const secondValue = 'Chen'
// Act
component.stations$.subscribe(() => {
// Assert
expect(service.searchStation).toHaveBeenCalledOnceWith(secondValue);
done();
});
component.searchingInputControl.patchValue(firstValue);
component.searchingInputControl.patchValue(secondValue);
});
});
describe('when the input value changes twice slowly', () => {
it('should call function "searchStation" of the service twice', fakeAsync(() => {
// Arrange
const firstValue = 'Leo'
const secondValue = 'Chen'
// Act
component.stations$.subscribe();
component.searchingInputControl.patchValue(firstValue);
tick(600);
component.searchingInputControl.patchValue(secondValue);
tick(600);
// Assert
expect(service.searchStation).toHaveBeenCalledTimes(2);
expect(service.searchStation).toHaveBeenCalledWith(firstValue);
expect(service.searchStation).toHaveBeenCalledWith(secondValue);
}));
});
})
});
測試結果:

在上述的測試程式碼中,我們可以看到今天要分享給大家的最後一個技巧:非同步測試。
在驗證非同步事件處理邏輯如 Promise 與 Observable 時,最簡單的方式當然就是直接 then 或是 subscribe 之後再驗證。
而這時我們會在傳入 it 的函式裡,多一個名為 done 的參數 (你要取名為別的名字也可以) ,如此我們就可以讓測試知道我們要等非同步事件完成後再行驗證。
像這樣:
it('description', (done) => {
  observable.subscribe(() => {
    done();
  });
});
但除了這個方式外,Angular 還有提供另一個方式是是永 fakeAsync 與 tick 的組合。
使用方式是將原本要傳入 it 裡的函式傳入 fakeAsync() 裡並用它來做替代,接著就可以在 it 裡面使用 tick() 這個函式來代表時間的流逝。
例如:
it('description', fakeAsync(() => {
  // Do A

  tick(300) // ms

  // Assert A
}));
而且這個時間的流逝是假的,又或者是說,有種「時間加速器的概念」。
假設 Do A 到 Assert A 之間相隔十年,用了 tick(10年) 之後,瞬間就過完了十年,厲害吧!
簡直媲美薩諾斯收集完無限寶石之後,一彈指就讓全宇宙的一半人口都灰飛湮滅的帥度
今天差不多就到這邊,訊息量應該滿大的,至於剩下 Template 的測試沒什麼太特別的地方,就讓大家練習做做看囉!
今天的重點:
new XXX() 來產生實體即可( Component 除外)HttpClientTestingModule ,而不是 HttpClientModule
以上技巧會在大家實際撰寫測時非常大量的使用,記得要多加練習才會熟能生巧噢!
今天的程式碼會放在 Github - Branch: day25 上供大家參考,建議大家在看我的實作之前,先按照需求規格自己做一遍,之後再跟我的對照,看看自己的實作跟我的實作不同的地方在哪裡、有什麼好處與壞處,如此反覆咀嚼消化後,我相信你一定可以進步地非常快!
如果有任何的問題或是回饋,還請麻煩留言給我讓我知道!
Hi Leo,
在後面幾個測試時有用到callback的方式製造異步測試的效果,不過是否可以拿掉callback的done呢(如圖)?因為這次測試的物件能夠subscribe,這樣就不用callback來製造異步了,拿掉後測試的結果也都是正確的
示意圖: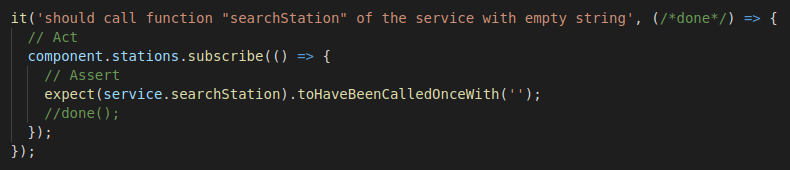
還有一個問題是 : 如果我在最一開始的beforeEach使用fixture.detectChanges(),如圖,會導致callback異步的測試方式失敗,fakeAsync的方式仍會成功,不太曉得為何會有這樣的差異?
示意圖: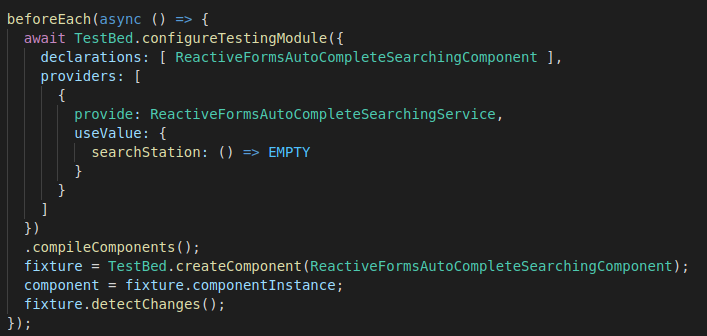

在後面幾個測試時有用到callback的方式製造異步測試的效果,不過是否可以拿掉callback的done呢(如圖)?因為這次測試的物件能夠subscribe,這樣就不用callback來製造異步了,拿掉後測試的結果也都是正確的
不建議拿掉。
由於非同步的關係,所以需要 done 來讓測試程式知道該案例是否已經結束。有時候雖然看似結果正常,但可能只是剛好、或湊巧而已。
還有一個問題是 : 如果我在最一開始的beforeEach使用fixture.detectChanges(),如圖,會導致callback異步的測試方式失敗,fakeAsync的方式仍會成功,不太曉得為何會有這樣的差異?
程式碼不夠完整,不太清楚你的問題點在哪裡@@
不建議拿掉。
由於非同步的關係,所以需要 done 來讓測試程式知道該案例是否已經結束。有時候雖然看似結果正常,但可能只是剛好、或湊巧而已。
原來如此~確實這樣才能確保裡面的東西有執行完成
程式碼不夠完整,不太清楚你的問題點在哪裡@@
漏說明程式碼與範例相同,會失敗的程式碼只跟範例差在最初的BeforeEach裡有呼叫fixture.detectChanges(),其餘一樣,我的問題是在於fixture.detectChanges()這句應該只是初始渲染畫面而已,但加入後會導致失敗,從錯誤訊息來看好像會影響到spyOn的執行,不過fixture.detectChanges()也比spyOn先執行,為何會影響到也我蠻好奇的(⊙_⊙)?
示意圖:
(component.spec.ts)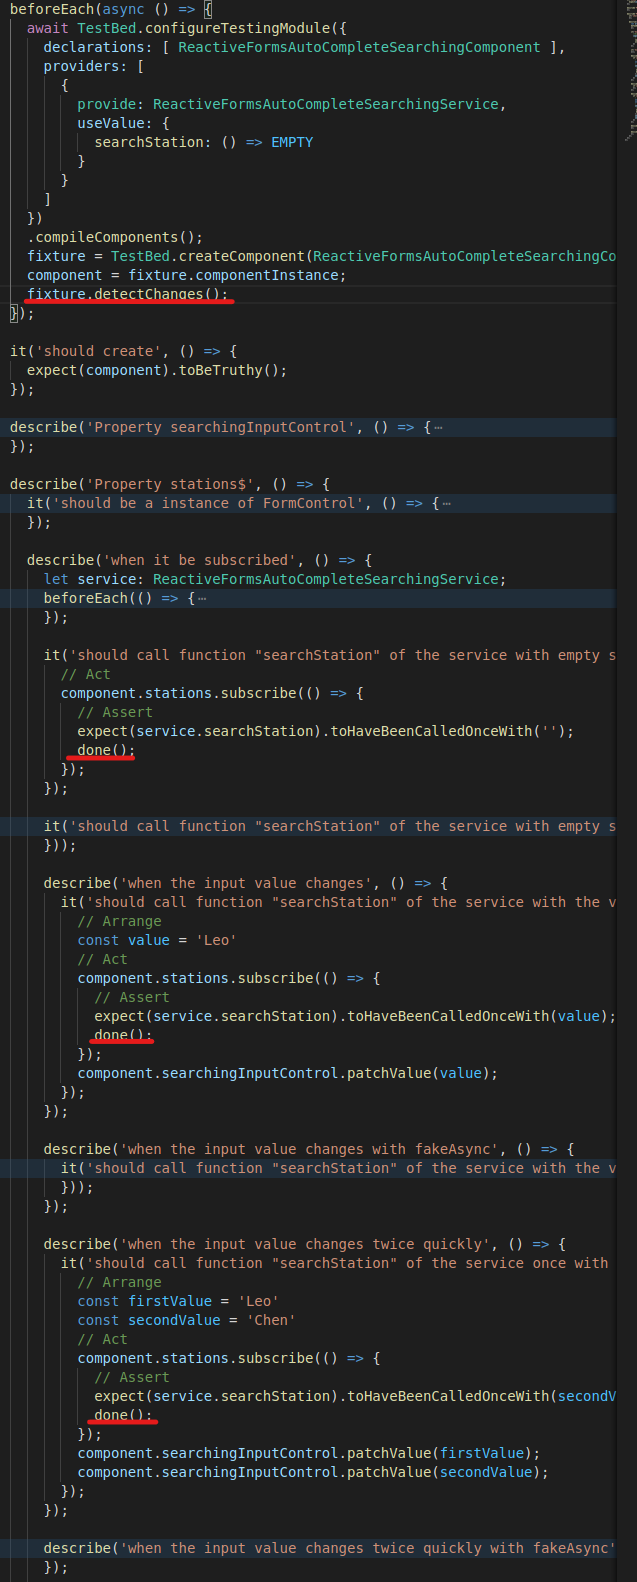
就是因為 fixture.detectChanges() 比 spyOn 先執行,所以已經先執行原本的程式導致出錯喔
就是因為 fixture.detectChanges() 比 spyOn 先執行,所以已經先執行原本的程式導致出錯喔
所以圖中所報出來的錯誤訊息是指說呼叫了兩次的意思嗎?一次fixture.detectChanges(),一次測試範例,這樣說對嗎?突然想起前面介紹beforeEach執行順序的重要性XD
示意圖:
不過如果我將那些使用callback異步測試(done)的方法改成fakeAsync就不會受到一開始fixture.detectChanges()的影響,是因為fakeAsync會重新取代一次,譬如spyOn已經先取代component的函式並收到fixture.detectChanges()的呼叫(次數一次),但進到fakeAsync後重新模擬spyOn的行為,所以次數會歸零,不確定這樣想對不對?
示意圖:
所以圖中所報出來的錯誤訊息是指說呼叫了兩次的意思嗎?一次fixture.detectChanges(),一次測試範例,這樣說對嗎
對~
不過如果我將那些使用callback異步測試(done)的方法改成fakeAsync就不會受到一開始fixture.detectChanges()的影響,是因為fakeAsync會重新取代一次,譬如spyOn已經先取代component的函式並收到fixture.detectChanges()的呼叫(次數一次),但進到fakeAsync後重新模擬spyOn的行為,所以次數會歸零,不確定這樣想對不對?
這部份我倒是不怎麼確定,我只確定使用 fakeAsync 的行為就像在 code 裡使用 await/async 一樣@@"
感謝筆者的回答~終於快要完成30天的內容了XD