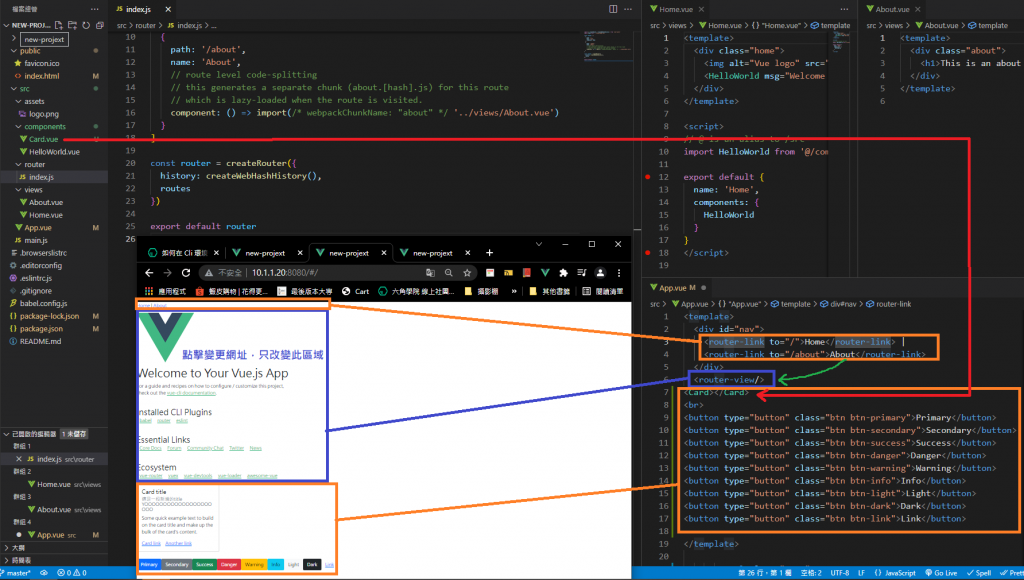
多一個#前端所管理的路由,只會渲染部分區域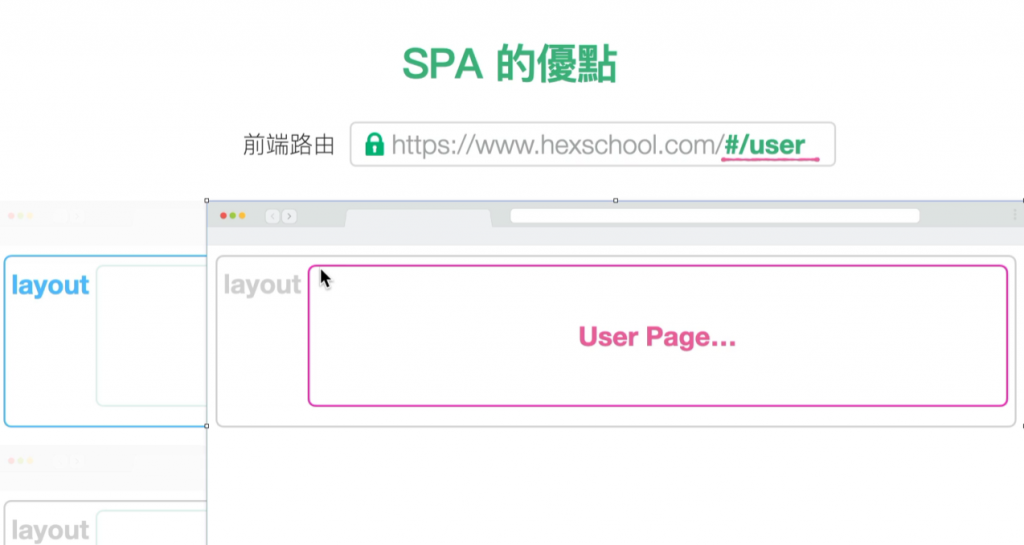
參考 Gulp 課程:https://courses.hexschool.com/p/gulp 安裝流程的部分均可直接預覽 (1-3, 1-4)
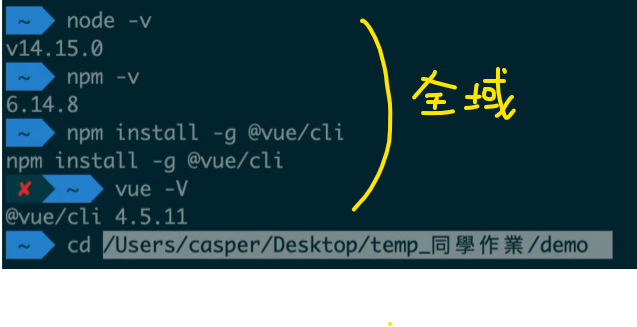
Nodejs 官方網站連結: https://nodejs.org/en/
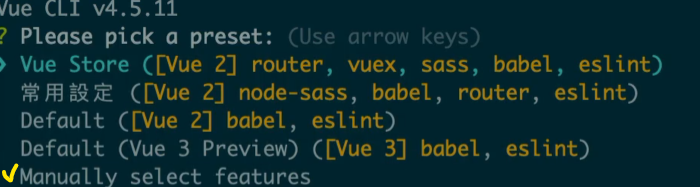
Vue Cli
英文:https://cli.vuejs.org/
中文:https://cli.vuejs.org/zh/guide/
Vue Cli 4.x 同時可建立 Vue 2.x 及 Vue 3.x 的環境,無論你是要開發 2 or 3 都僅需要安裝當前版本的 Vue Cli 即可。
其它相關連結
以下為課程中會用到的相關連結
Vue Router https://next.router.vuejs.org/zh/index.html
Axios https://github.com/axios/axios
Vue Axios https://www.npmjs.com/package/vue-axios
課程中運用到的指令
建立專案 vue create {{ 專案名稱 }}
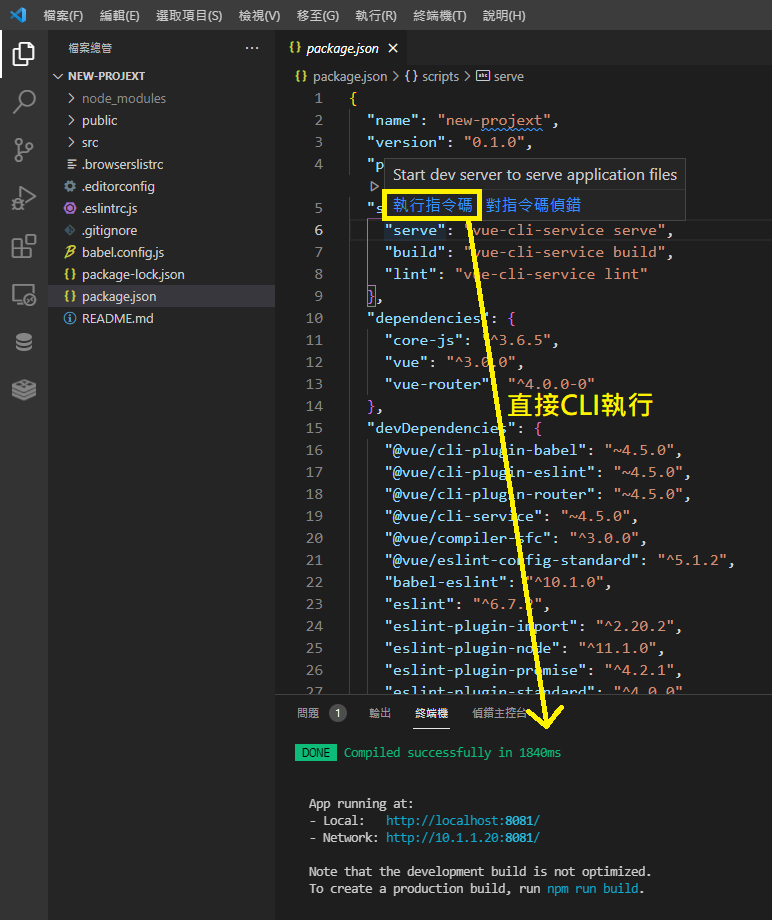
運行 Vue 開發環境 npm run serve
編譯 Production 版本 npm run build
CLI 常用指令
通用指令 (Mac, Windows 共用)
Nodejs 版本
node -v
npm 版本
npm -v
Windows 指令
回到資料夾頂端
cd\
回到上一層
cd..
進入資料夾路徑
cd {{ 資料夾路徑 }}
中斷目前操作
ctrl + c
vue create new-projext(專案名稱)
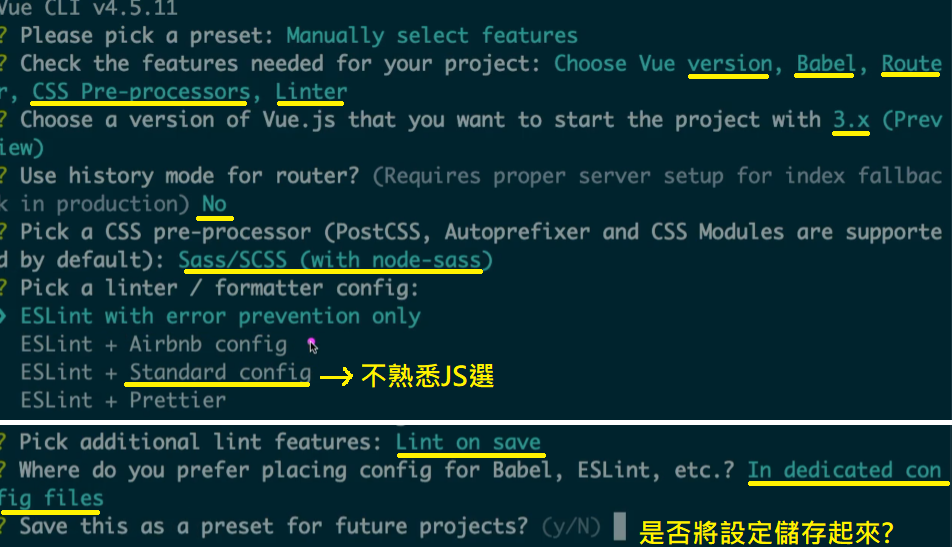
npm run serve
npm run build
Cli 製作專案時,node/SASS.js + MAC 衝突
版本v-16尚未支援,需降版本安裝
(1) 先刪除node.js https://iter01.com/254694.html
(2) 至官方下載v-14版本 https://nodejs.org/en/download/releases/
下載pkg檔 (節點-v14.18.3.pkg)
等同 > npm run serve
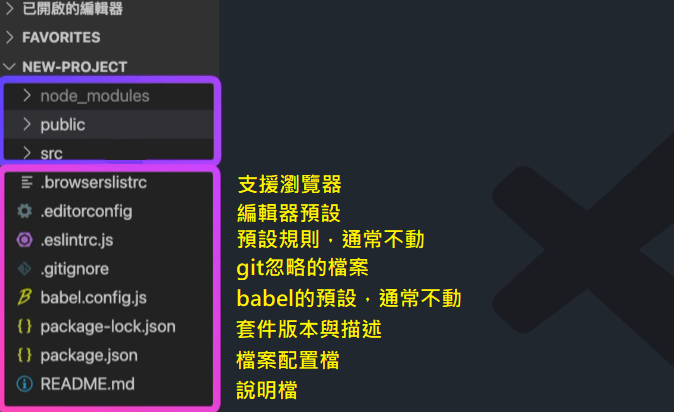
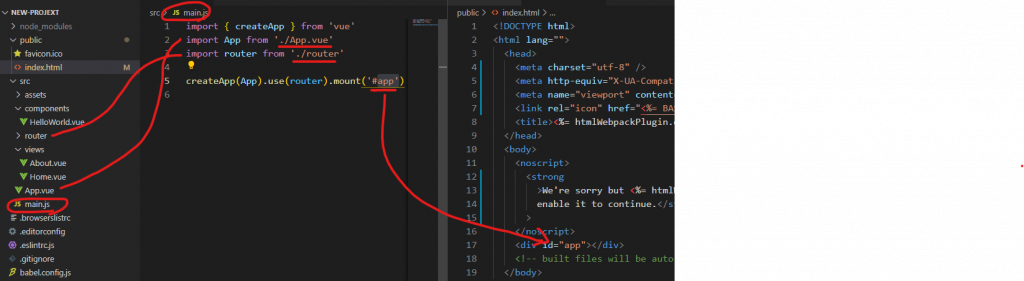
src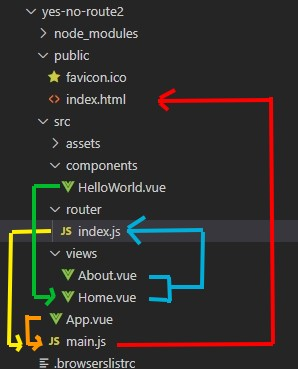
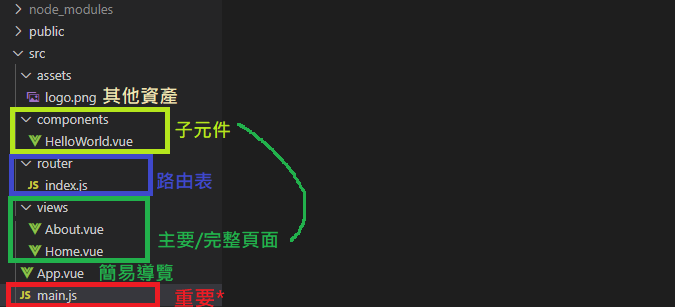
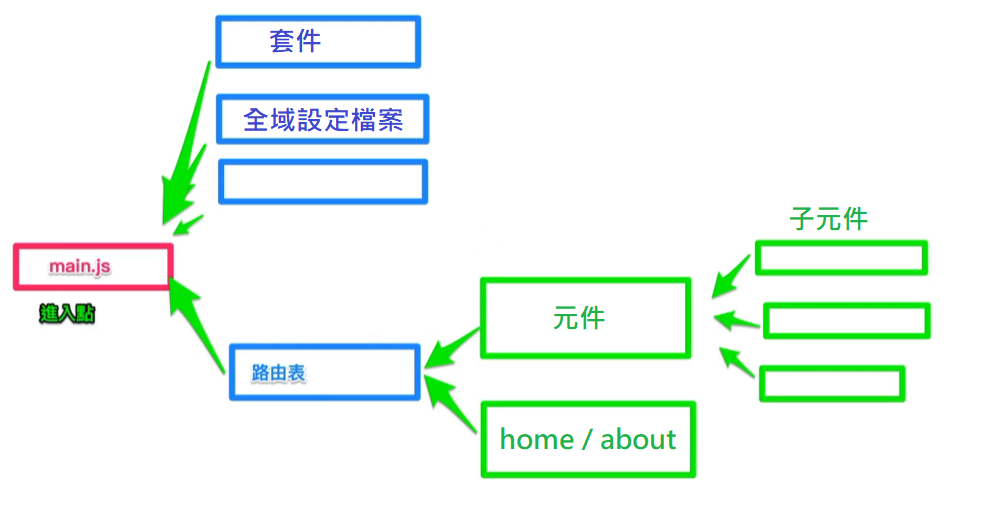
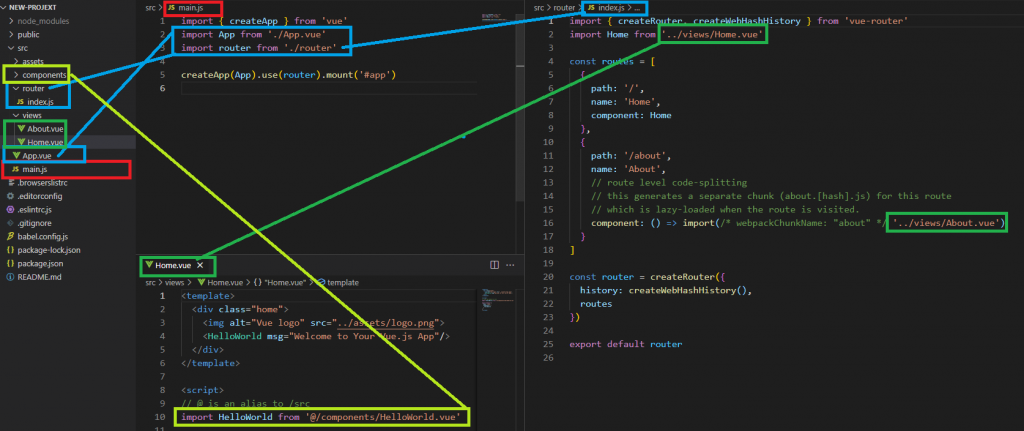
public、node_modules
(1)Crtl + ~ 打開終端機,並開啟GUI介面
vue ui
(2)設定
記得路徑選權限小的地方(上次直接在C槽下無法建立)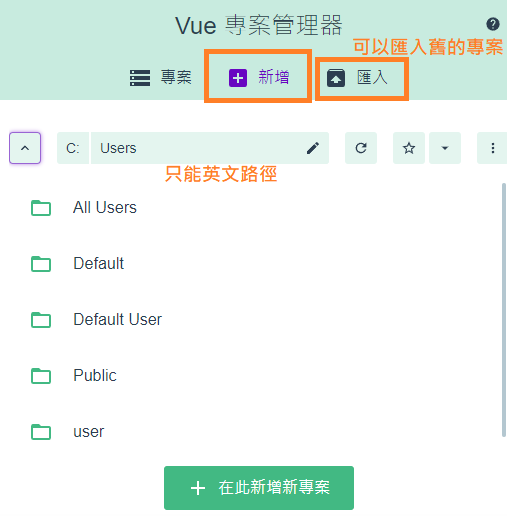
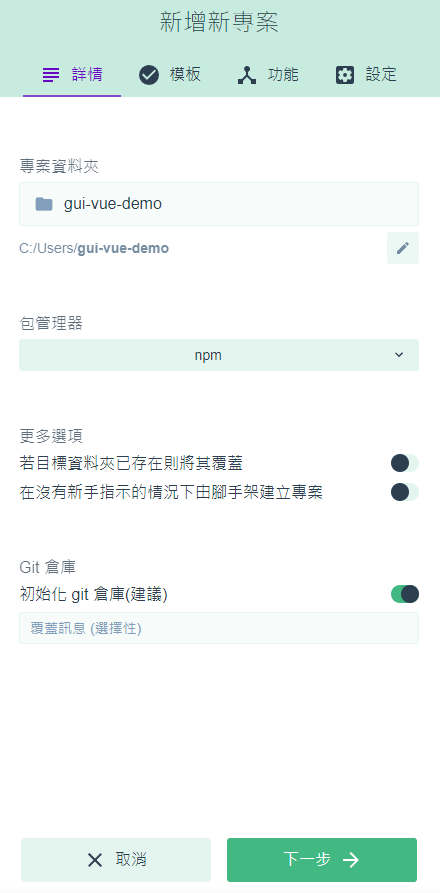

選項接下來跟前述相同
(3)插件
影響整體運作,通常建立專案就確定好了
(4)依賴
輔助套件,點擊右上搜尋欲安裝的套件
bootstrap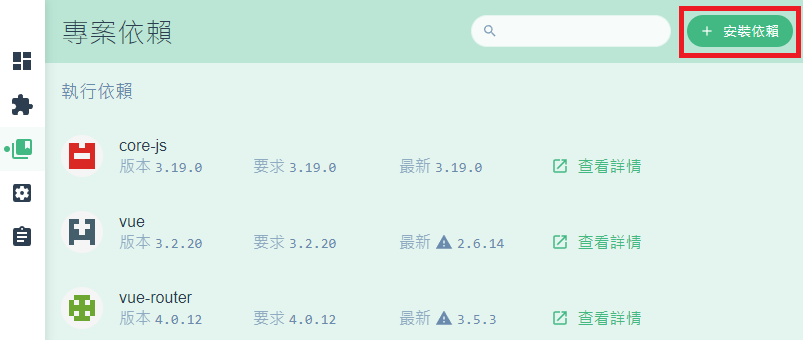
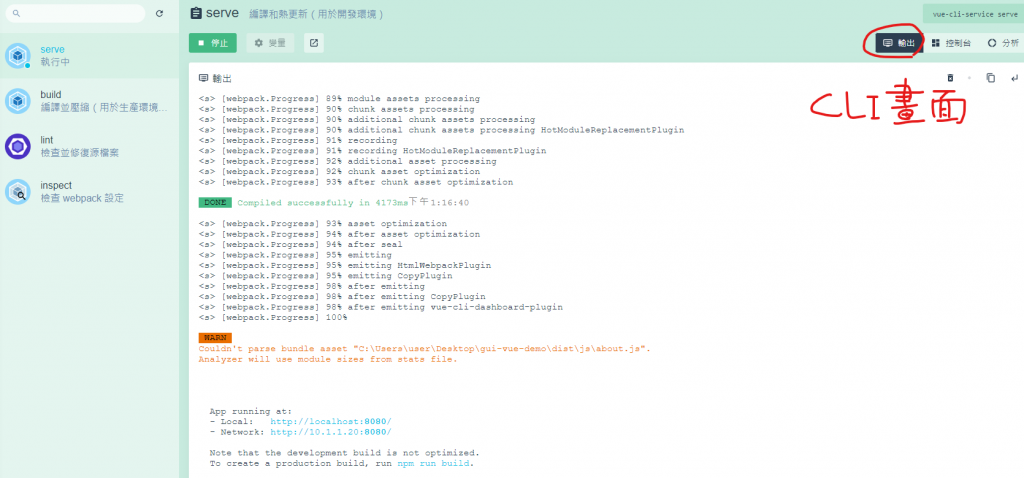
(5)任務 - serve
等同 npm run serve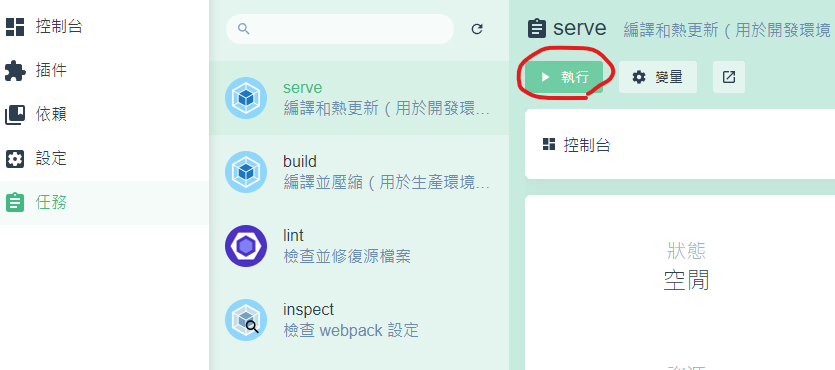
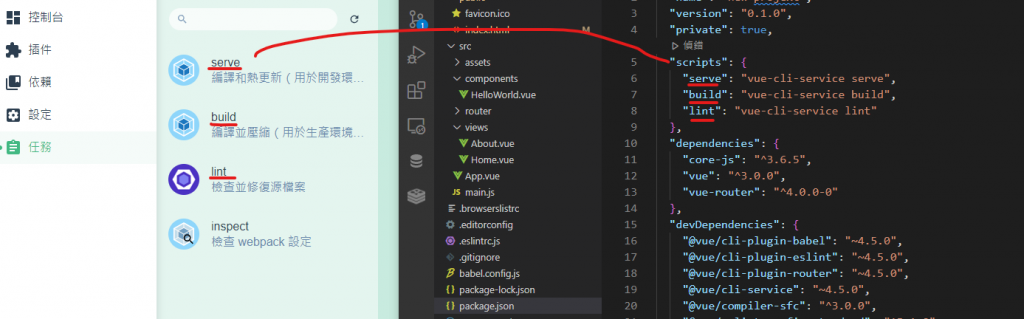
(5)任務 - build 編譯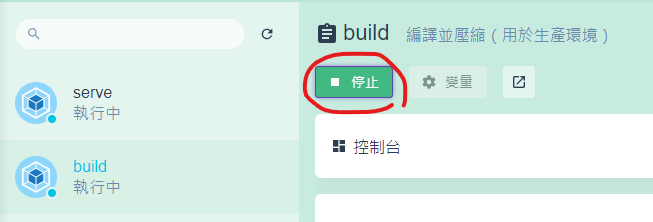
會出現dist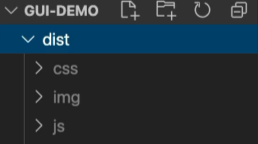
--------------------------------------------
### 5.如何在 Cli 環境中加入 Vue 元件
同頁面的增加
(1)抓Bs
https://getbootstrap.com/
> npm install bootstrap
若serve正在跑的話 要先停止(ctrl+C)
(2)運行serve
> npm run serve
(3) App.vue更改style 將Bs匯入
```
<style lang="scss">
@import "bootstrap";
</style>
```
(4)並加入Bs的button,就會有樣式了
```
<button type="button" class="btn btn-primary">Primary</button>
<button type="button" class="btn btn-secondary">Secondary</button>
<button type="button" class="btn btn-success">Success</button>
<button type="button" class="btn btn-danger">Danger</button>
<button type="button" class="btn btn-warning">Warning</button>
<button type="button" class="btn btn-info">Info</button>
<button type="button" class="btn btn-light">Light</button>
<button type="button" class="btn btn-dark">Dark</button>
<button type="button" class="btn btn-link">Link</button>
```
跨頁面的增加(新增在page頁面上)
(1)在compoenent內新增Card.vue元件
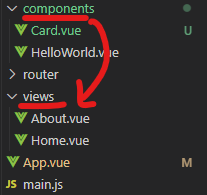
**元件,開頭大寫注意
(2)製作Bs Card的元件
https://getbootstrap.com/docs/5.1/components/card/
```
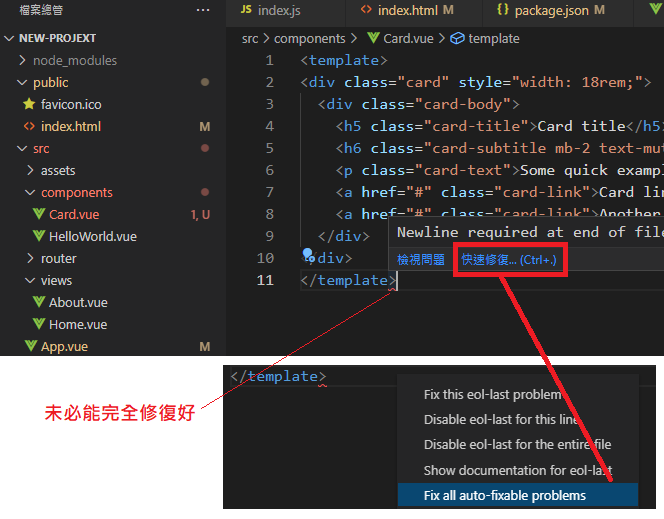
<template>
<div class="card" style="width: 18rem;">
<div class="card-body">
<h5 class="card-title">Card title</h5>
<h6 class="card-subtitle mb-2 text-muted">Card subtitle</h6>
<p class="card-text">Some quick example text to build on the card title and make up the bulk of the card's content.</p>
<a href="#" class="card-link">Card link</a>
<a href="#" class="card-link">Another link</a>
</div>
</div>
</template>
```
快速修復(滑鼠指向,等一下,無須按按鍵)
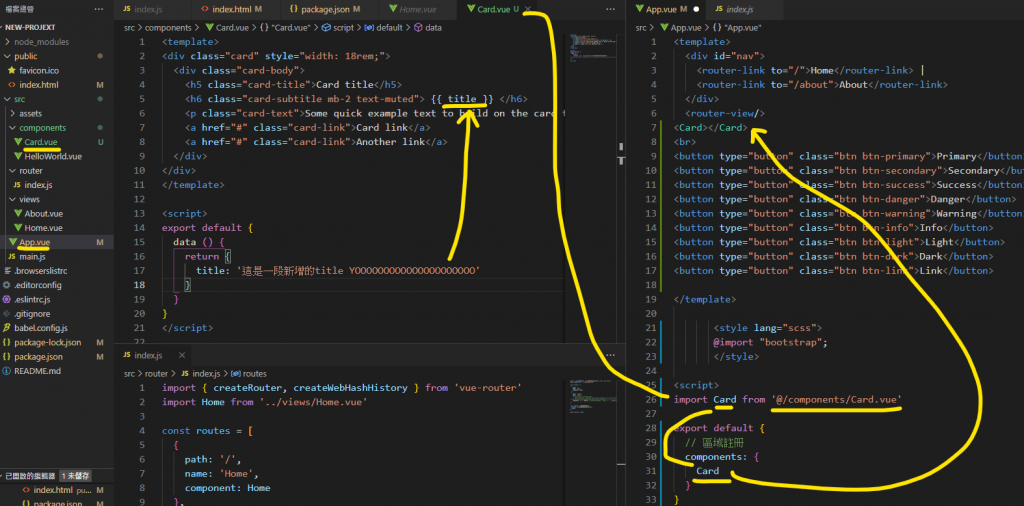
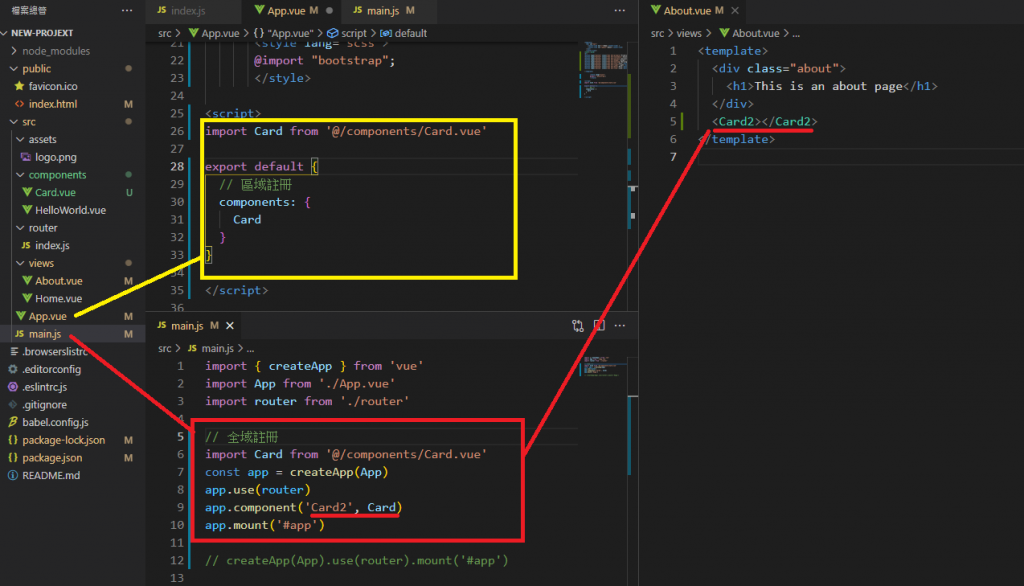
(3)App.vue 把卡片元件匯入,完成
@ = src
```
<Card></Card>
```
```
<script>
import Card from '@/components/Card.vue'
export default {
// 區域註冊
components: {
Card
}
}
</script>
```
以下試試看元件內增加data
(4)Card.vue
```
<h6 class="card-subtitle mb-2 text-muted"> {{ title }} </h6>
```
```
<script>
export default {
data () {
return {
title: '這是一段新增的title YOOOOOOOOOOOOOOOOOOOOO'
}
}
}
</script>
```
***伺服器運作方式***
--------------------------------------------
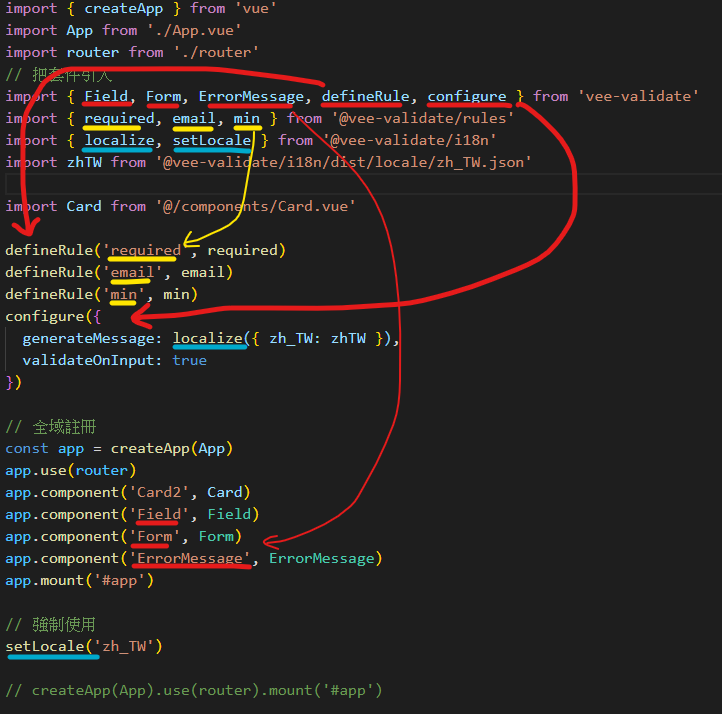
### 6.註冊元件
區域 vs. 全域
--------------------------------------------
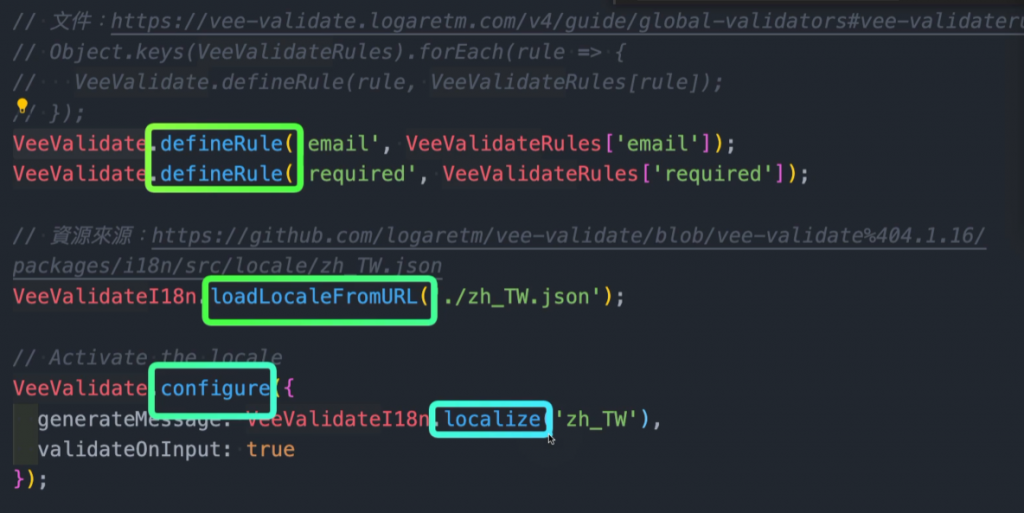
### 7. Cli 中引入外部套件vee-validate
用途:檢查表單內容是否有誤
https://vee-validate.logaretm.com/v4/
同CDN
```
<!-- 步驟 1:加入 VeeValidation 相關資源 -->
<script src="https://cdnjs.cloudflare.com/ajax/libs/vee-validate/4.1.17/vee-validate.min.js"> </script>
<!-- 語言包 -->
<script src="https://cdn.jsdelivr.net/npm/@vee-validate/i18n@4.1.17/dist/vee-validate-i18n.min.js"></script>
<!-- 規則們 -->
<script src="https://cdn.jsdelivr.net/npm/@vee-validate/rules@4.1.17/dist/vee-validate-rules.min.js"></script>

```
(1-1)安裝vee-validate套件
> npm install vee-validate@next --save
若serve正在跑的話 要先停止(ctrl+C)
(1-2)安裝vee-validate套件
https://vee-validate.logaretm.com/v4/guide/global-validators#vee-validaterules
> npm install @vee-validate/rules
(1-3)安裝vee-validate套件
https://vee-validate.logaretm.com/v4/guide/i18n#using-vee-validatei18n
> npm install @vee-validate/i18n
(2)可以直接匯入
```
import { Field, Form, EorrorMessage, defineRule, configure } from 'vee-validate'
import { required, email, min } from '@vee-validate/rules'
import { localize, setLocale } from '@vee-validate/i18n'
import zhTW from '@vee-validate/i18n/dist/locale/zh_TW.json'
//製作
defineRule('required', required)
defineRule('email', email)
defineRule('min', min)
configure({
generateMessage: localize({ zh_TW: zhTW }),
validateOnInput: true
})
setLocale('zh_TW')
```
(3)運行serve
> npm run serve
(4)home.vue
把之前的表單驗證放進來
並把v-from、v-field標籤改成Form、Field
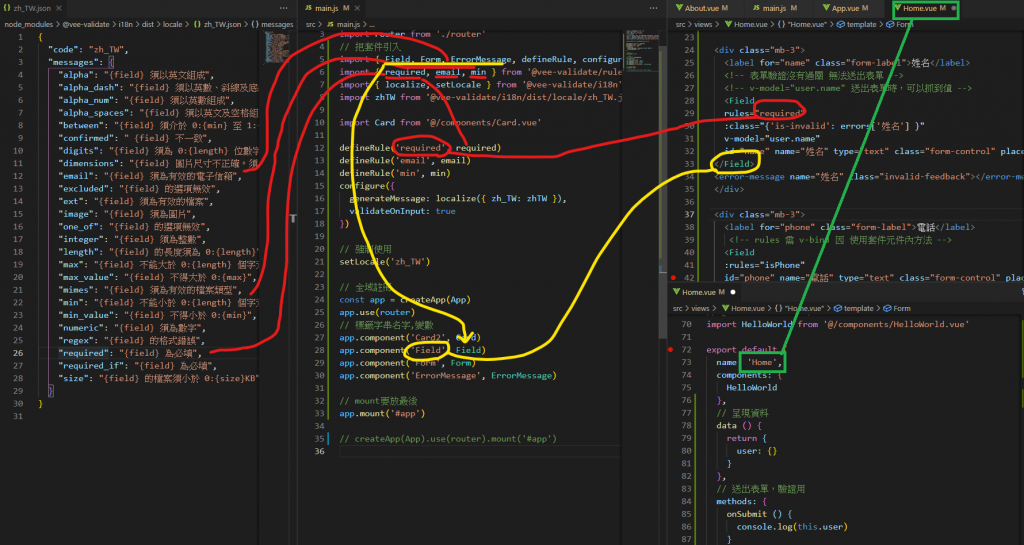
完成
-------------------------------------------
### 8. Vue Cli 中環境變數基礎觀念
https://cli.vuejs.org/zh/guide/mode-and-env.html#%E6%A8%A1%E5%BC%8F
```
.env # 在所有的環境中被載入
.env.local # 在所有的環境中被載入,但會被 git 忽略
.env.[mode] # 只在指定的模式中被載入
.env.[mode].local # 只在指定的模式中被載入,但會被 git 忽略
```
(1).env
```
VUE_APP_NAME=嘿嘿吼吼吼
```
(2)App.vue 匯入
```
{{name}}
export default {
data () {
return {
name: process.env.VUE_APP_NAME
}
},
}
```
-------------------------------------------
### 9.Vue Cli 編譯設定檔,變更網頁顯示路徑
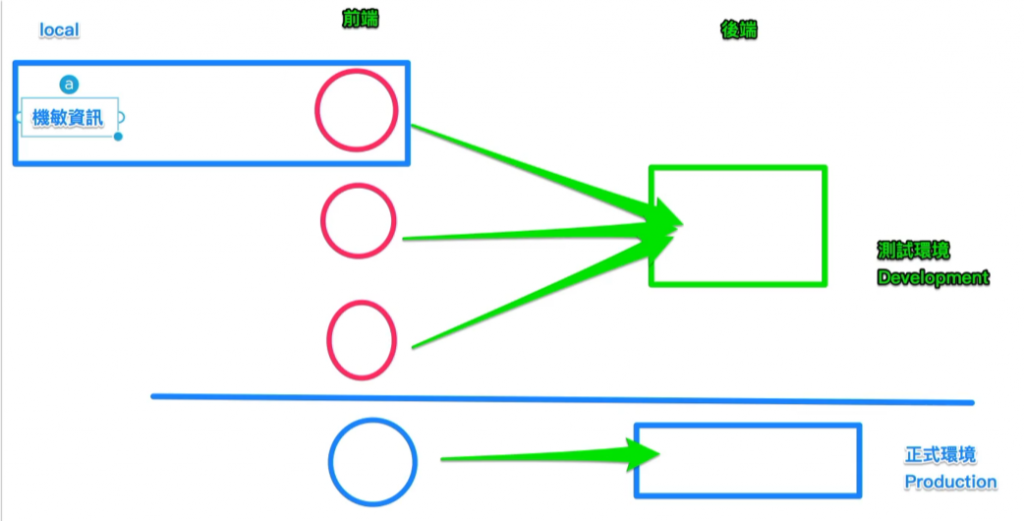
使用時機:
1.專案完成後,交給後端部屬
2.部屬在Github Pages
Github Pages 教學影片:https://www.youtube.com/watch?v=njlABvVRB68 59:34、1:04 開始
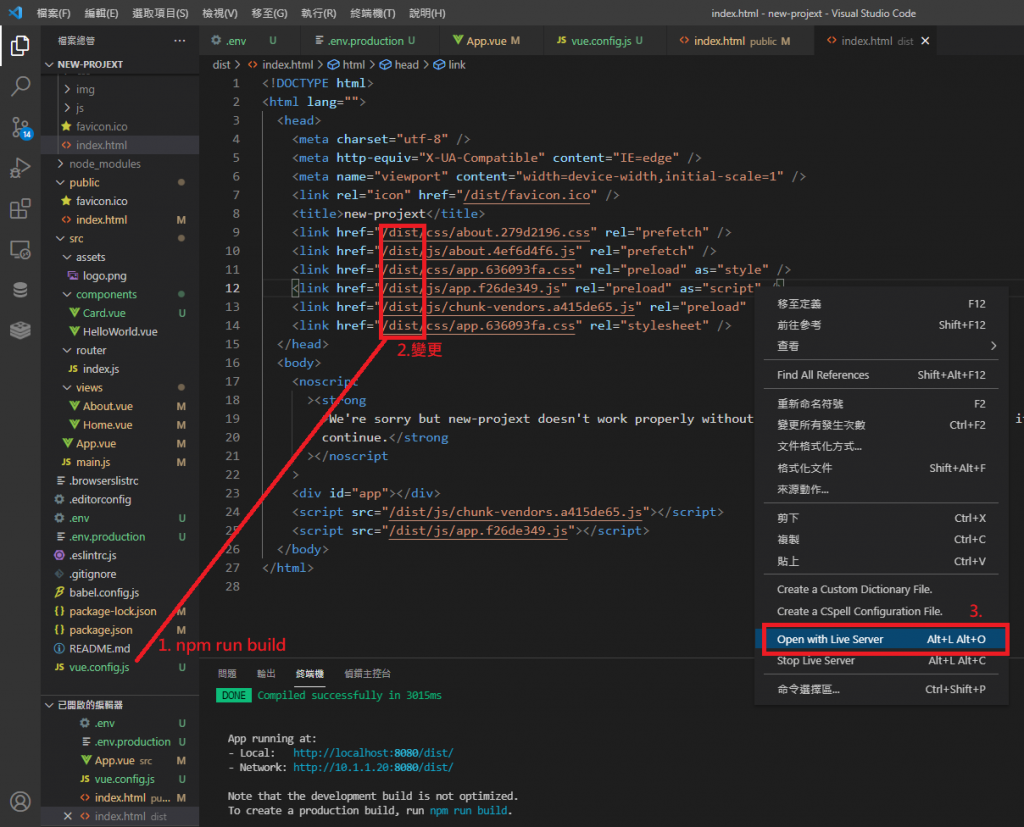
(1)編譯
> npm run build
(2)dist > index.html
用VScode打開dist目錄,可以開啟index.html
(3)新增對外伺服器的變數 .env.production
> VUE_APP_NAME=對外伺服器的變數
(4)重新編譯
此時請記得要關閉其他VScode視窗,有時視窗打開會寫不進去
> npm run build
(5)dist > index.html
用VScode打開dist目錄,可以開啟index.html
變更

https://crashoxo.github.io/Vue-git-demo/dist/index.html#/
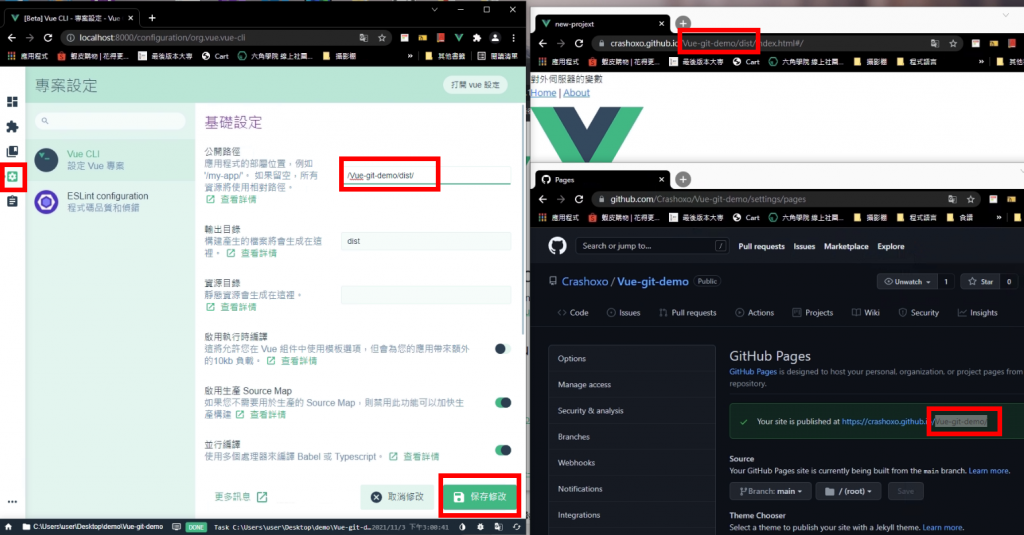
(6)設定對外開放的網頁路徑(從App.vue改為 dist > index.html)
可以直接使用以下方式改,前段為解釋
6-1. 使用GUI介面
> vue ui
6-2. 設定
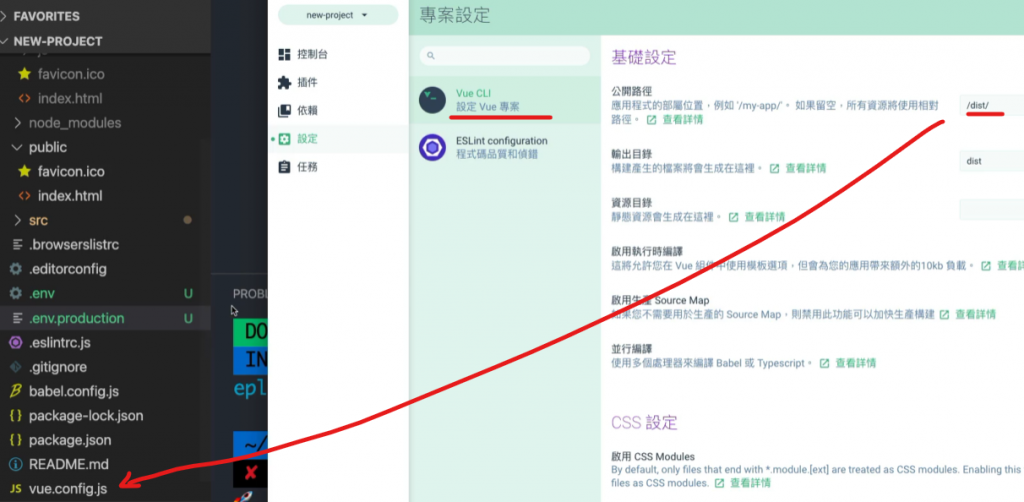
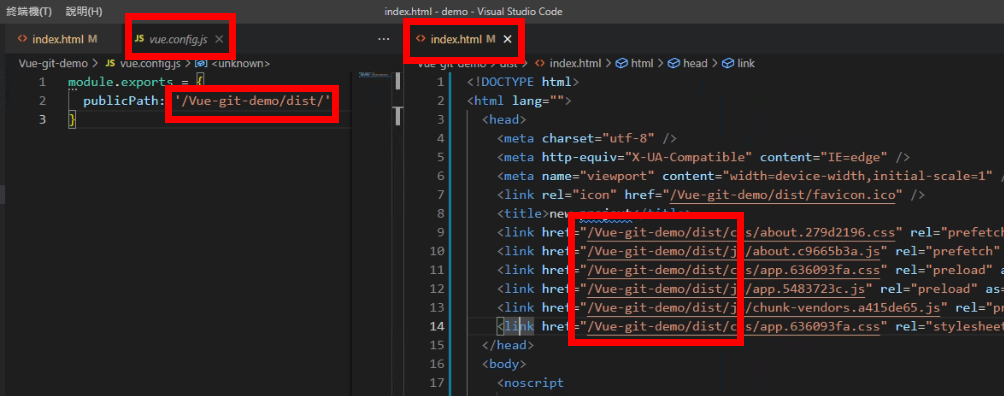
或自行手動寫該vue.config.js檔案
```
module.exports = {
publicPath: '/dist/'
}
```
6-3. 重新編譯
此時請記得要關閉其他VScode視窗,有時視窗打開會寫不進去
> npm run build
6-4 此時可以直接對dist > index.html 右鍵開啟往右,並發現 對外伺服器的變數

-------------------------------------------
### 10.部屬在Github Pages
1.專案下.gitignore修改git阻擋的檔案
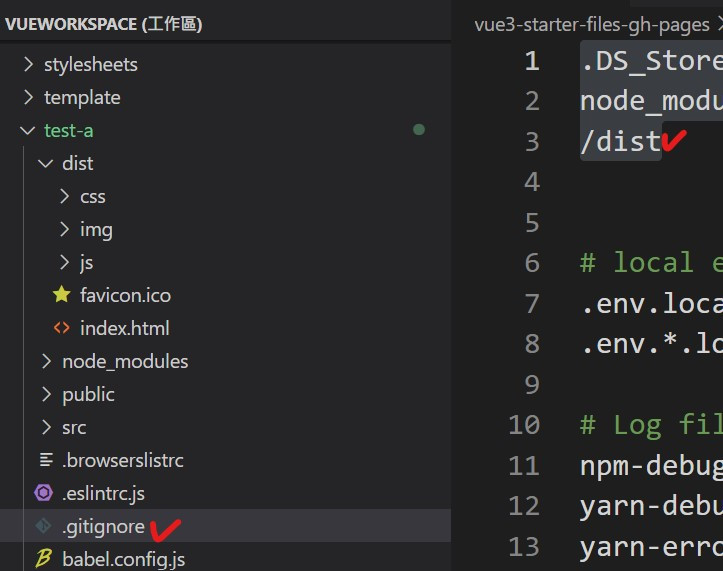
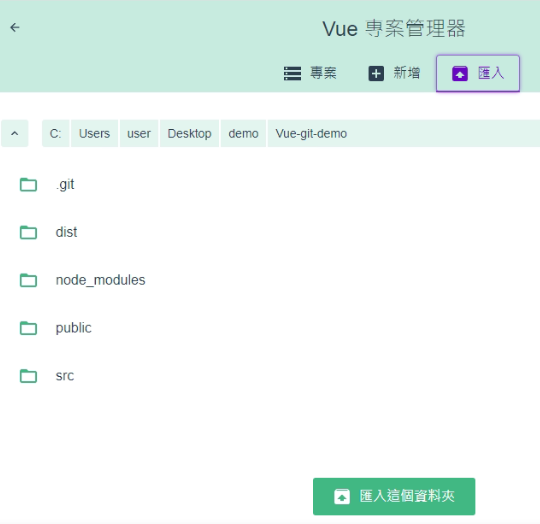
2.使用VUE GUI修改讀取路徑
2-1 匯入專案
2-2 更改路徑
注意github路徑
目前只須 專案名稱/dist/
因main.js
```
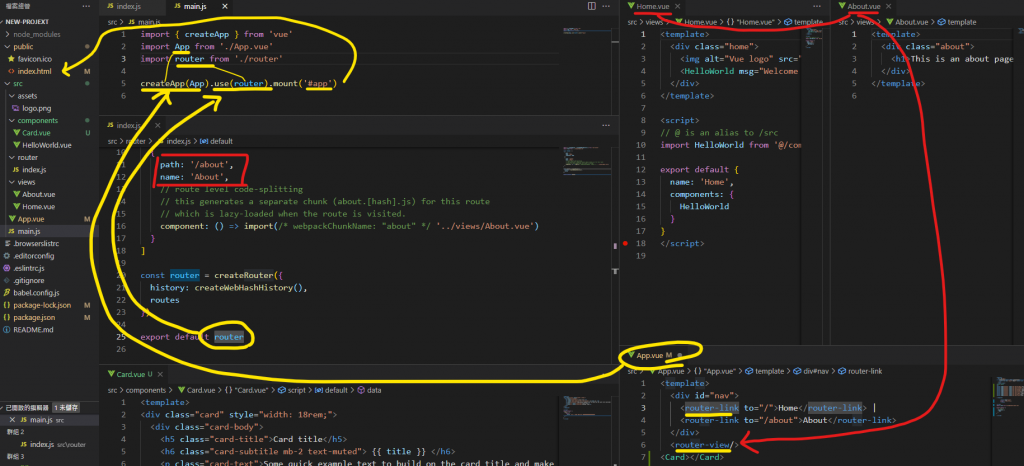
const router = createRouter({
history: createWebHashHistory(), //# 模擬後端路徑
routes,
});
```
及 所有的網頁都須透過 public > index.html渲染
```
<div id="app"></div>
```
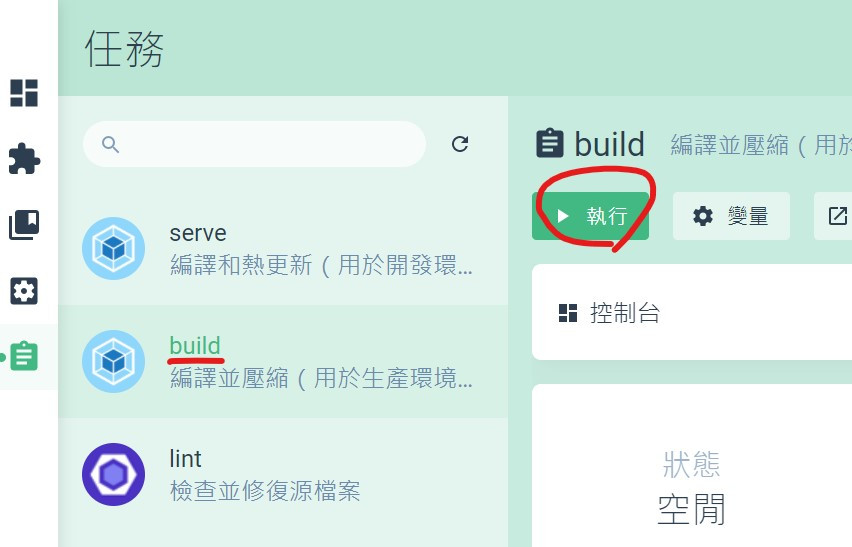
2-3 部屬build
同 > npm run build
會變更為
2-4 git上github
CLI內輸入以下,讓github與專案綁定

並上傳
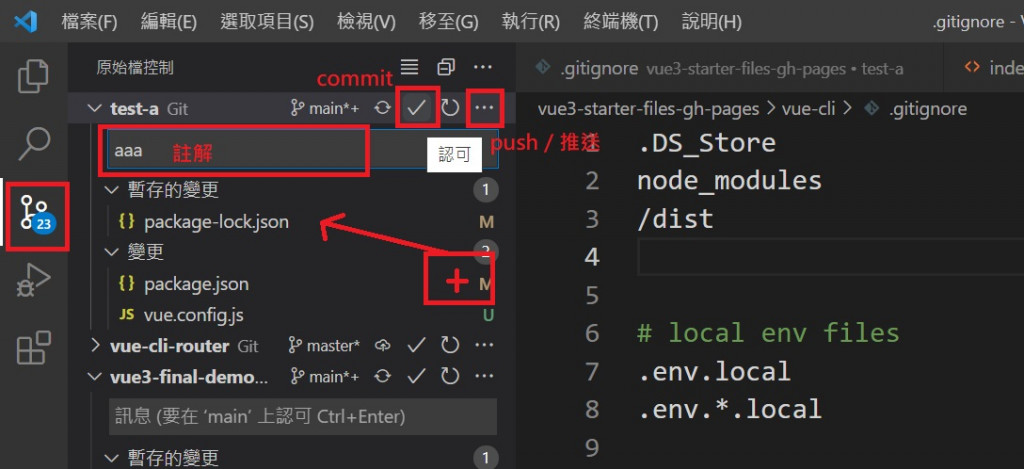
https://crashoxo.github.io/Vue-git-demo/dist/index.html#/
完成
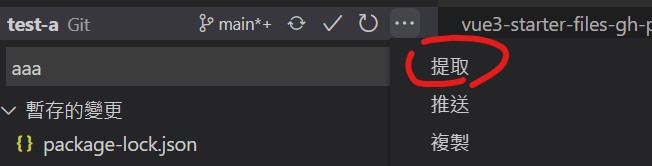
if合作時,從git抓取檔案
Github的結論
9.為推倒過程,可以只看10.
1.跑Vue ui > 更改CLI路徑 XXX(專案名稱)/dist/ 並且 命名為dist > build
2.GitHub Desktop
3.路徑出來後 通常後面+ /dist/#/ 就是路徑
之後上傳只需
1. npm run build
2. git
-------------------------------------------
### 11. Cli 常見指令
#### (1) 如果套件裝不下,使用sudo輸入蘋果電腦密碼後安裝
權限需求
> sudo npm install [模組名稱]
#### (2) 全域安裝 -g
> npm install [模組名稱] -g
(少用,通常都放各專案內)
(路徑為 /user/local/lib/node_modules )
#### (3) production、development
production (上線)依賴模組:
ex:Vue
> npm install [模組名稱] --save
development (開發)依賴模組:
ex:webpack
> npm install [模組名稱] --save-dev
#### (4) 移除 uninstall
> npm uninstall [模組名稱]
> npm uninstall [模組名稱] -g
#### (5) 更新套件:npm update 模組名稱
> npm update [模組名稱]
-------------------------------------------
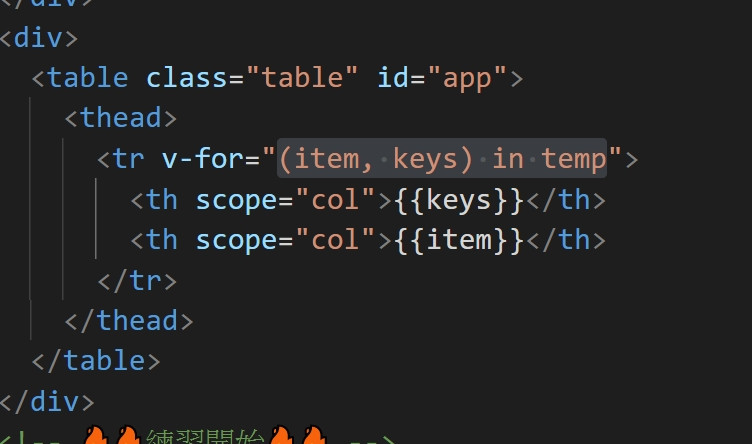
### 12. 陣列[] vs 物件{}
陣列[]
(item, keys) in temp
item=vaule ,keys=index
物件{}
(item, keys) in temp
keys=屬性名稱 item=屬性值
ex: askPrice: "63248.86000000"
 rouoxo
