申請並匯入商品
vue create new-project(專案名稱)
npm run serve

連接資料庫用
VUE_APP_API=
VUE_APP_PATH=rouoxo
view > home.vue
export default {
  name: "Home",
  components: {
    HelloWorld,
  },
  created() {
    //連接資料庫
    console.log(process.env.VUE_APP_API);
    console.log(process.env.VUE_APP_PATH);
  },
};
https://bootstrap.hexschool.com/
npm install bootstrap@
https://bootstrap.hexschool.com/docs/4.2/getting-started/theming/
2-1 自定義 sass
App.vue
<style lang="scss">
@import "~bootstrap/scss/bootstrap";
</style>
npm run serve
2-2 客製化樣式
assets 下新增 all.scss
assets 下新增 helpers資料夾 下新增 _variables.scss(_不會被辨識到)
並將原本的BS內 variables.scss 資料貼至 _variables.scss 內
2-3 自定義匯入
assets > all.scss
@import "~bootstrap/scss/functions";
@import "./helpers/variables";
@import "~bootstrap/scss/mixins";

@import "~bootstrap/scss/bootstrap";
App.vue
<style lang="scss">
@import "./assets/all";
</style>
多嘗試幾次
https://www.npmjs.com/package/vue-axios
npm install --save axios vue-axios
main.js
import axios from 'axios'
import VueAxios from 'vue-axios'

app.use(VueAxios, axios);
https://github.com/hexschool/vue3-course-api-wiki/wiki/%E8%AA%B2%E7%A8%8B%E9%83%A8%E5%88%86%E6%A8%A1%E6%9D%BF
View 新增 Login.vue
Router > index.js
  {
    path: "/login",
    name: "Login",
    component: () =>
      import("../views/Login.vue"),
  },
https://github.com/hexschool/vue3-course-api-wiki/wiki/%E7%99%BB%E5%85%A5%E5%8F%8A%E9%A9%97%E8%AD%89
登入成功顯示範例
"uid": "XX4VbV87lRRBXKhZKT7YX6zhsuO2",
"token": "xxx"
"expired": "1234567890"
https://developer.mozilla.org/zh-CN/docs/Web/API/Document/cookie
https://github.com/axios/axios#global-axios-defaults
document.cookie = "doSomethingOnlyOnce(名稱自訂)=true(值);
expires(到期日)=Fri,31 Dec 9999 23:59:59 GMT; SameSite=None; Secure";
目標:將token存進Cookie
const {token, expired} = res.data //token、expired = data內的token、expired
console.log(token ,expired)
document.cookie = `hexToken=${token}; expired=${new Date(expired)}`
成功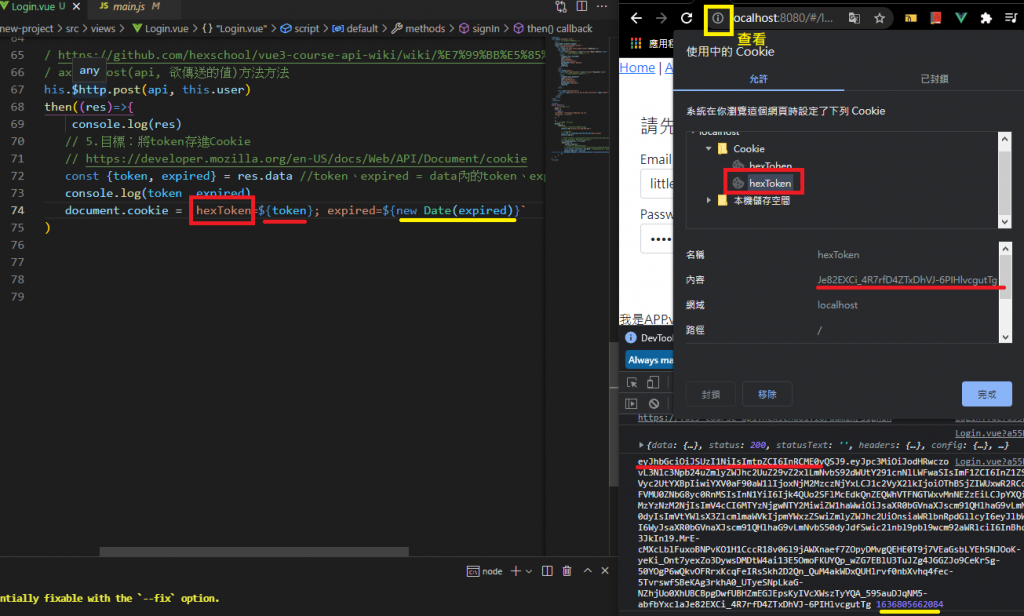
API
https://github.com/hexschool/vue3-course-api-wiki/wiki/%E7%99%BB%E5%85%A5%E5%8F%8A%E9%A9%97%E8%AD%89
https://developer.mozilla.org/zh-CN/docs/Web/API/Document/cookie
1-1 製作元素頁面
Dashboard.vue
  created() {
    const token = document.cookie.replace(
        // hexToken cookie名稱
      /(?:(?:^|.*;\s*)hexToken\s*=\s*([^;]*).*$)|^.*$/,
      "$1"
    );
    console.log(token);
  },
};
1-2 綑綁路由
index.js
  {
    path: "/dashboard",
    name: "Dashboard",
    component: () =>
      import("../views/Dashboard.vue"),
  },
https://github.com/axios/axios
Dashboard.vue
this.$http.default.headers.common["Authorization"] = token;
Dashboard.vue
https://github.com/hexschool/vue3-course-api-wiki/wiki/%E7%99%BB%E5%85%A5%E5%8F%8A%E9%A9%97%E8%AD%89
    const api = `${process.env.VUE_APP_API}api/user/check`;
    console.log(api);
    this.$http.post(api, this.user).then((res) => {
      console.log(res);
    });
登入成功
如果把cookie的hexToken刪除
登入失敗
Login.vue如果登入成功轉Dashboard.vue頁面
        this.$http.post(api, this.user).then((res) => {
        // 如果登入成功轉跳Dashboard.vue頁面
        if (res.data.success) {
          this.$router.push("/dashboard");
        }
      });
如果登入失敗Dashboard.vue會轉回Login.vue
      if (!res.data.success) {
        this.$router.push("/login");
      }
顯示App.vue
<router-view />
刪除
<router-link />
index.js
  {
    path: "/dashboard",
    name: "Dashboard",
    component: () => import("../views/Dashboard.vue"),
    // 多個,陣列
    children: [
      {
        path: "products",
        component: () => import("../views/Products.vue"),
      },
    ],
  },
this.$router.push("/dashboard/products");
把Navbar拆出來做成一個小元件
7-1. 新增 components > Navbar.vue
並把Dashboard.vue 的 BS Navbar 剪下貼上
7-2 Dashboard.vue下註冊該 Navbar.vue 元件 並放入
    <Navber></Navber>

    import Navber from "../components/Navbar.vue";

    export default {
      // 註冊元件
      components: {
          Navber
      },
https://github.com/hexschool/vue3-course-api-wiki/wiki/%E7%99%BB%E5%85%A5%E5%8F%8A%E9%A9%97%E8%AD%89
Navbar.vue
    <a class="nav-link" href="#" v-on:click.prevent="logout">登出</a>

    methods: {
    logout() {
      // 製作登出方法
      const api = `${process.env.VUE_APP_API}logout`;
      console.log(api);

      // axios post(api, 欲傳送的值)方法方法
      this.$http.post(api, this.user).then((res) => {
        //
        if (res.data.success) {
          console.log(res);
          // 轉跳登入頁面
          this.$router.push("/login");
        }
      });
     },
    },
成功,F12檢查
data: {success: true, message: '已登出'}
完成圖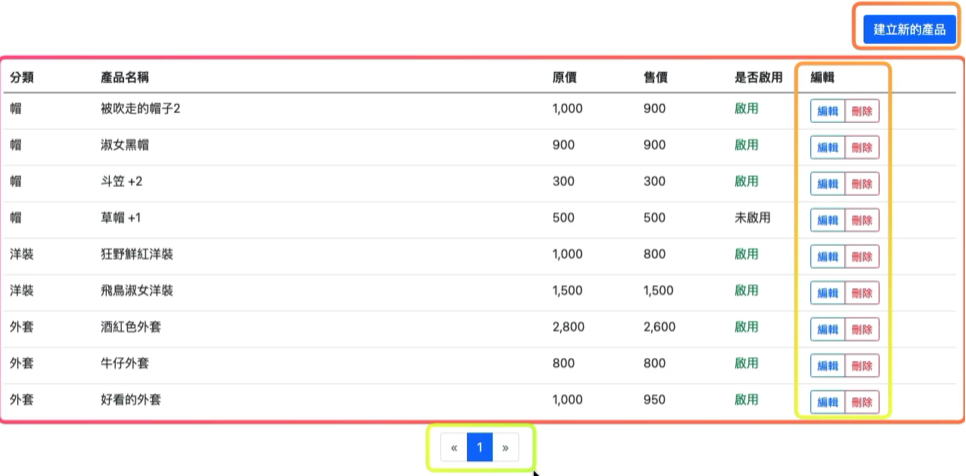
  <!-- 讓版面不要太貼齊周邊 BS樣式 -->
  <div class="container-fluid">
    <router-view />
  </div>
檢查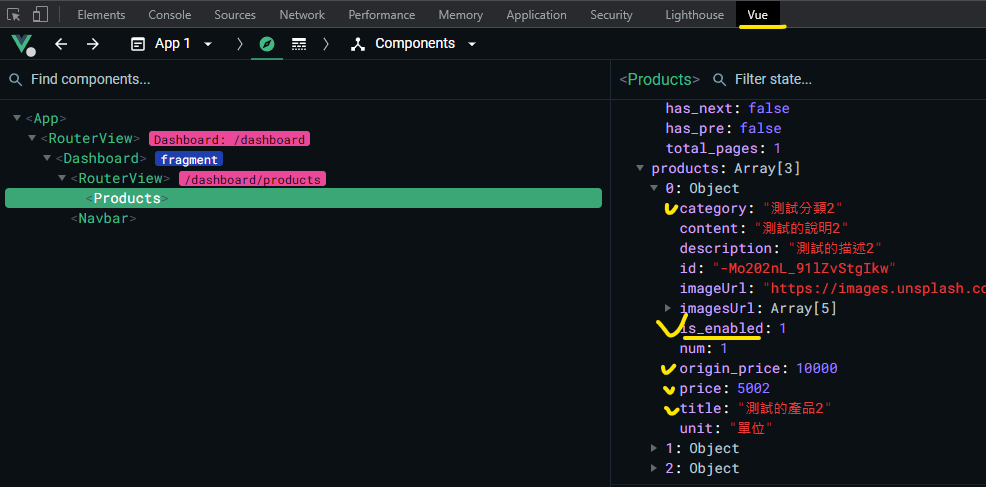
目標:新增Bs Modal 彈跳視窗
https://bootstrap.hexschool.com/docs/4.2/components/modal/
BS的Modal,可以用JS呼叫出來使用~
components > ProductModal.vue
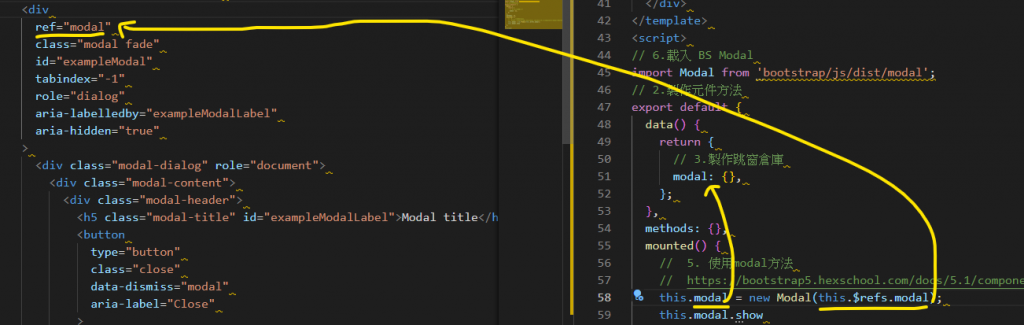
    <ProductModal></ProductModal>

    import ProductModal from "../components/ProductModal.vue";

    components: {
      // 區域註冊元件
      ProductModal,
    },
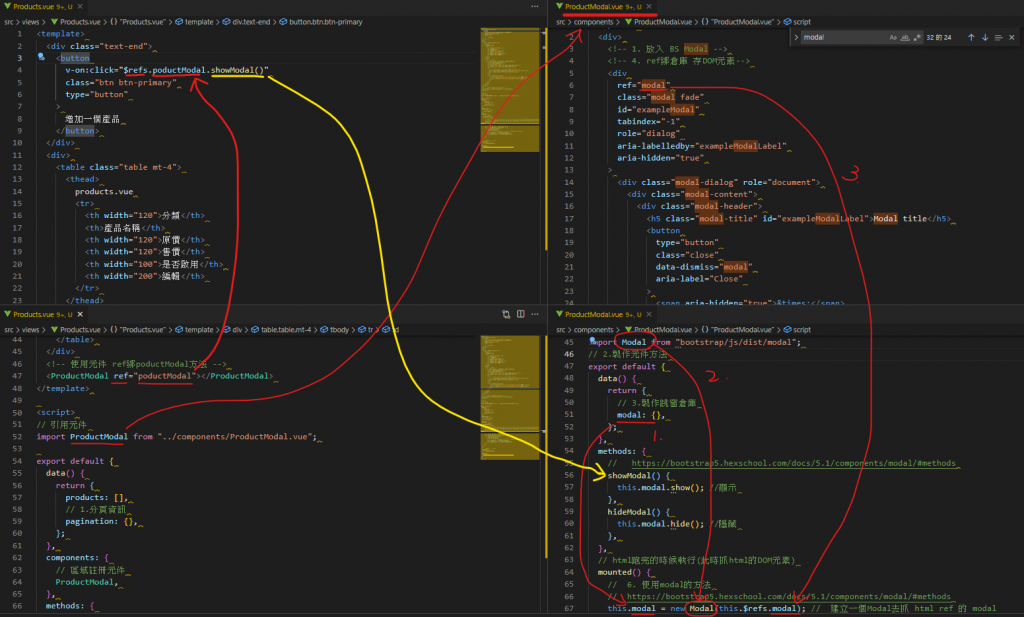
Modal元件已經放入,剩下寫判斷式讓按按鈕後 Modal跳出
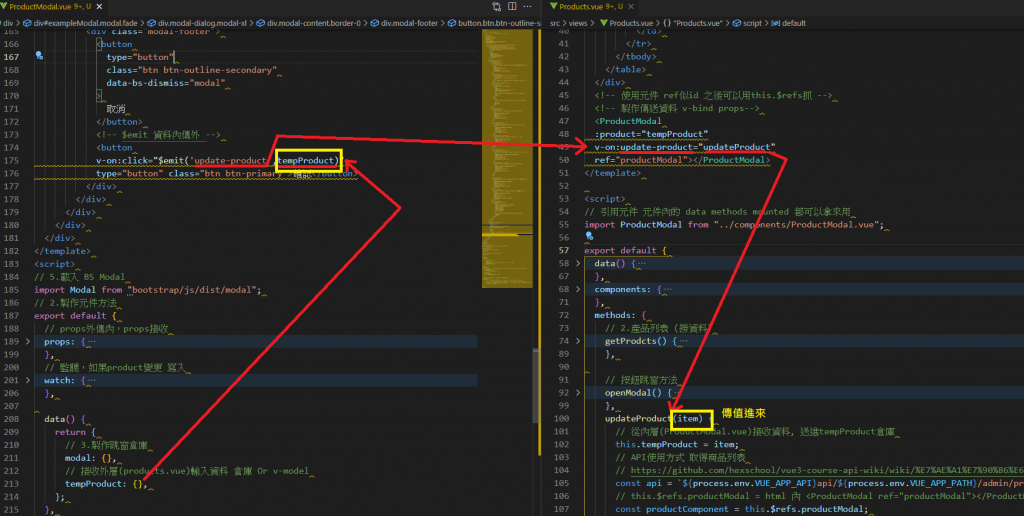
Products.vue
  <!-- 使用元件 ref似id 之後可以用this.$refs抓 -->
  <ProductModal ref="poductModal"></ProductModal>

      <button
      v-on:click="$refs.poductModal.showModal()"
      class="btn btn-primary"
      type="button"
    >
      增加一個產品
    </button>
目標:彈出視窗的元件,輸入完資料後,資料推進產品列表元件內
邏輯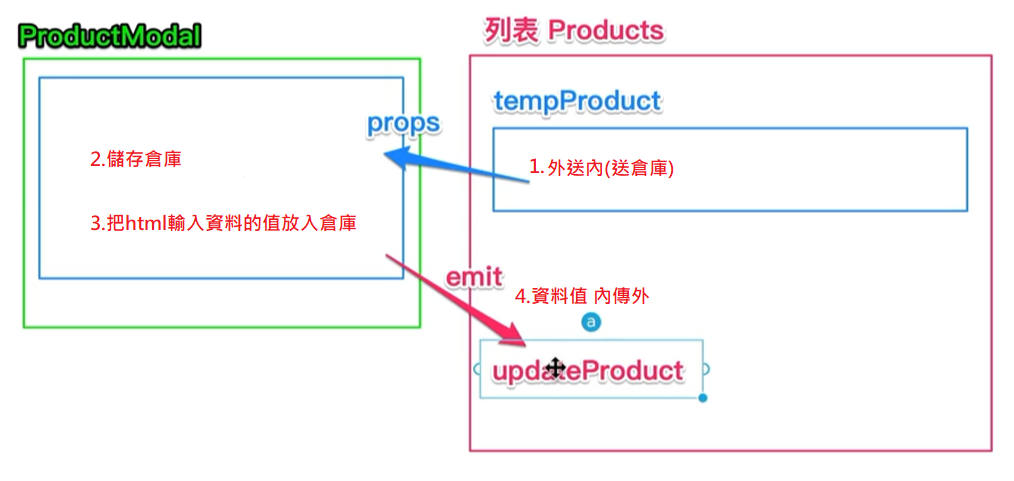
API 取得商品列表
https://github.com/hexschool/vue3-course-api-wiki/wiki/%E7%AE%A1%E7%90%86%E6%8E%A7%E5%88%B6%E5%8F%B0-%5B%E9%9C%80%E9%A9%97%E8%AD%89%5D#%E5%95%86%E5%93%81%E5%BB%BA%E7%AB%8B
模板 增加 Bootstrap Modal
https://github.com/hexschool/vue3-course-api-wiki/wiki/%E8%AA%B2%E7%A8%8B%E9%83%A8%E5%88%86%E6%A8%A1%E6%9D%BF
    openModal() {
      this.tempProduct = {};
      const productComponent = this.$refs.productModal;
      productComponent.showModal();
    },
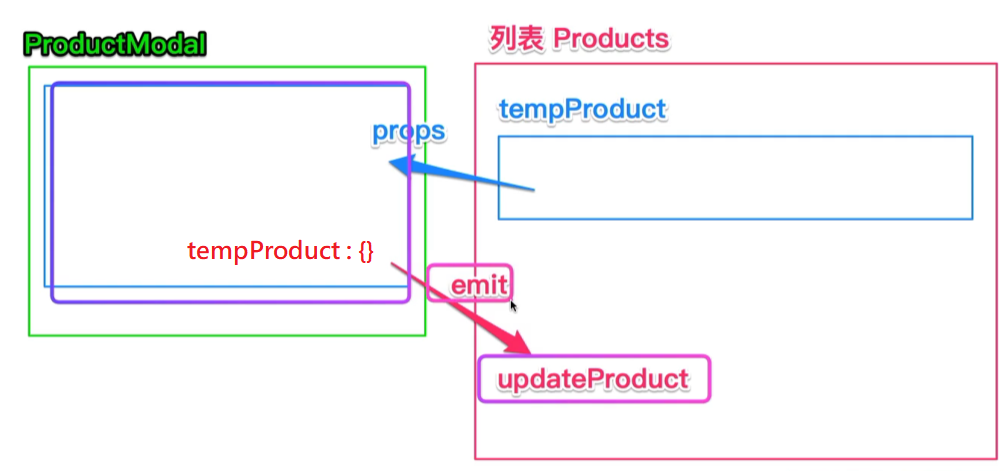
emit內傳外
ProductModal.vue
emit送出去
            v-on:click="$emit('update-product',tempProduct)"
            type="button" class="btn btn-primary">確認</button>
products.vue
接收
    <ProductModal
    v-on:update-product="updateProduct"
    ref="productModal">
    </ProductModal>


    updateProduct(item) {
      // 從內層(ProductModal.vue)接收資料, 送進tempProduct倉庫
      this.tempProduct = item;
      this.$http.post(api, { data: this.tempProduct })
      .then((res)=>{
        // then 成功
        console.log(res);
        // 執行 ProductModal.vue 的 hideModal()
        productComponent.hideModal();
        // 執行
        this.getProducts();
      })
title(String)
category(String)
unit(String)
origin_price(Number)
price(Number) 為必填欄位
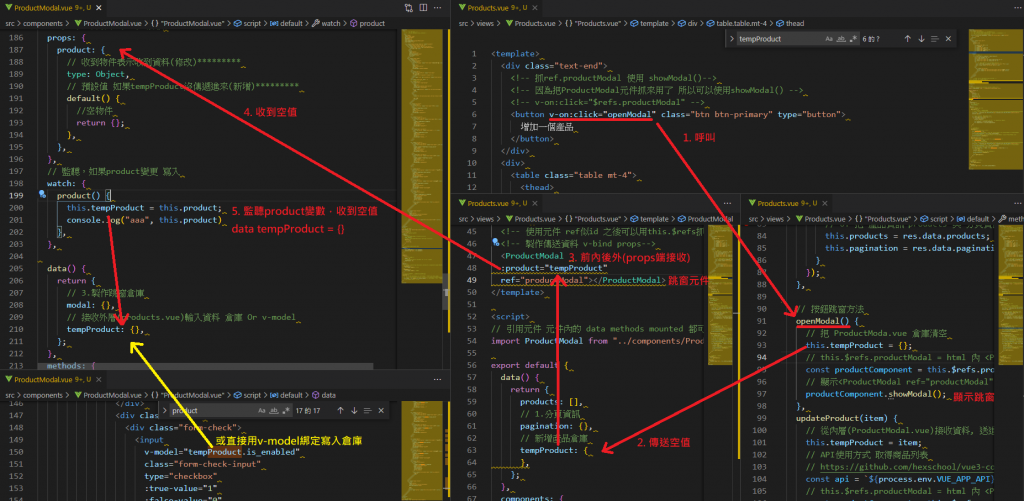
products.vue
  data() {
    return {
      isNew: false,
    };
true = 點此按鈕時要新增商品
v-on:click="openModal(true)"
false = 點此按鈕時非新增商品 = 編輯商品
item = v-if="item.is_enabled" 的 item
v-on:click="openModal(false,item)"
有夠方便。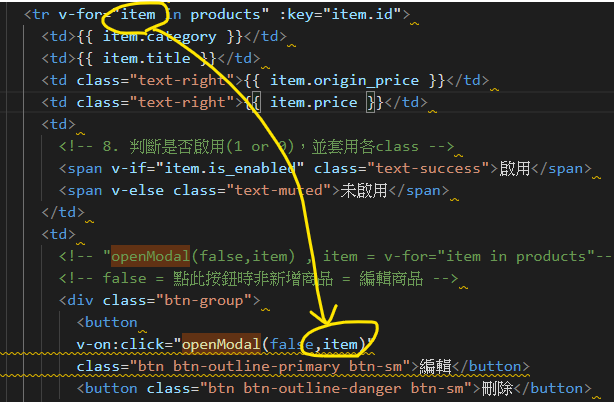
此時判斷 新增商品 or 編輯商品
    openModal(isNew, item) {
      // if isNew = true
      if(isNew){
        // 新增商品
        this.tempProduct ={};
      }else{
        // 編輯商品
        // ... 展開舊的item
        this.tempProduct ={...item};
      }

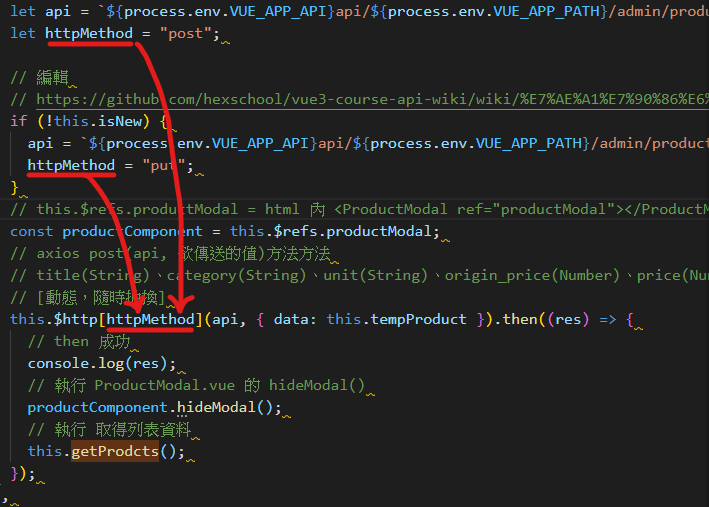
updateProduct(item) {
      // 從內層(ProductModal.vue)接收資料, 送進tempProduct倉庫
      this.tempProduct = item;

      // 新增
      // API使用方式 取得商品列表
      let api = `${process.env.VUE_APP_API}api/${process.env.VUE_APP_PATH}/admin/product`;
      let httpMethod = "post";

      // 編輯
      if (!this.isNew) {
        api = `${process.env.VUE_APP_API}api/${process.env.VUE_APP_PATH}/admin/product/${item.id}`;
        httpMethod = "put";
      }
      // this.$refs.productModal = html 內 <ProductModal ref="productModal"></ProductModal>
      const productComponent = this.$refs.productModal;

      this.$http[httpMethod](api, { data: this.tempProduct }).then((res) => {
        // then 成功
        console.log(res);
        // 執行 ProductModal.vue 的 hideModal()
        productComponent.hideModal();
        // 執行 取得列表資料
        this.getProducts();
      });
    },
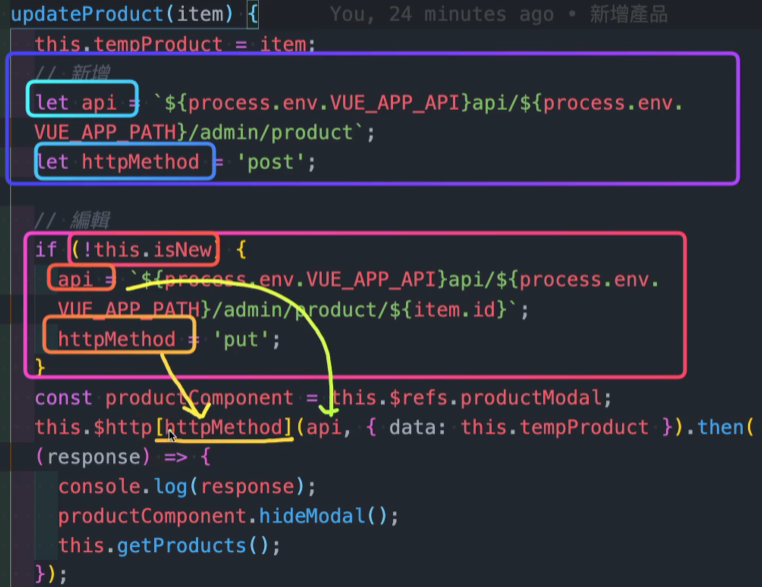
為何使用[]?
如果 $http.httpMethod(xxxx) 會被判定成function
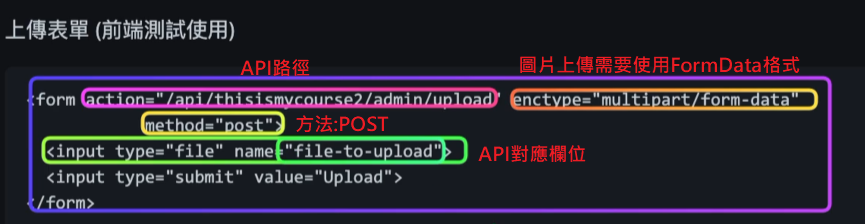
目標:點擊新增產品內上傳圖片,可上傳圖片進資料庫
取出檔案,並改成FormData格式
ProductModal.vue
v-on:change="uploadfile"
ref="fileInput"
抓files[0]
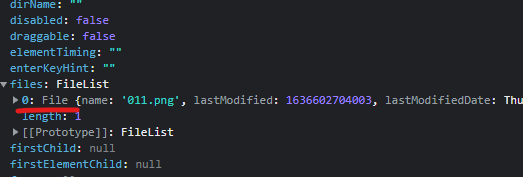
uploadfile() {
// 抓取檔案
// this.$refs.fileInput = ref="fileInput"
const uploadfile = this.$refs.fileInput.files[0];
console.dir(uploadfile);
// 製作成FormData格式
const formData = new FormData(); //Js
formData.append("file-to-upload", uploadfile); // "file-to-upload" API接收格式
},
    uploadfile() {

      //API收圖片 表單傳送 action
      const url = `${process.env.VUE_APP_API}api/${process.env.VUE_APP_PATH}/admin/upload`;
      //  axios post(api, 欲傳送的值)方法方法
      this.$http.post(url, formData).then((response) => {
        console.log(response.data);
        if (response.data.success) {
          this.tempProduct.imageUrl = response.data.imageUrl;
        }
      });
    },

DelModal.vue
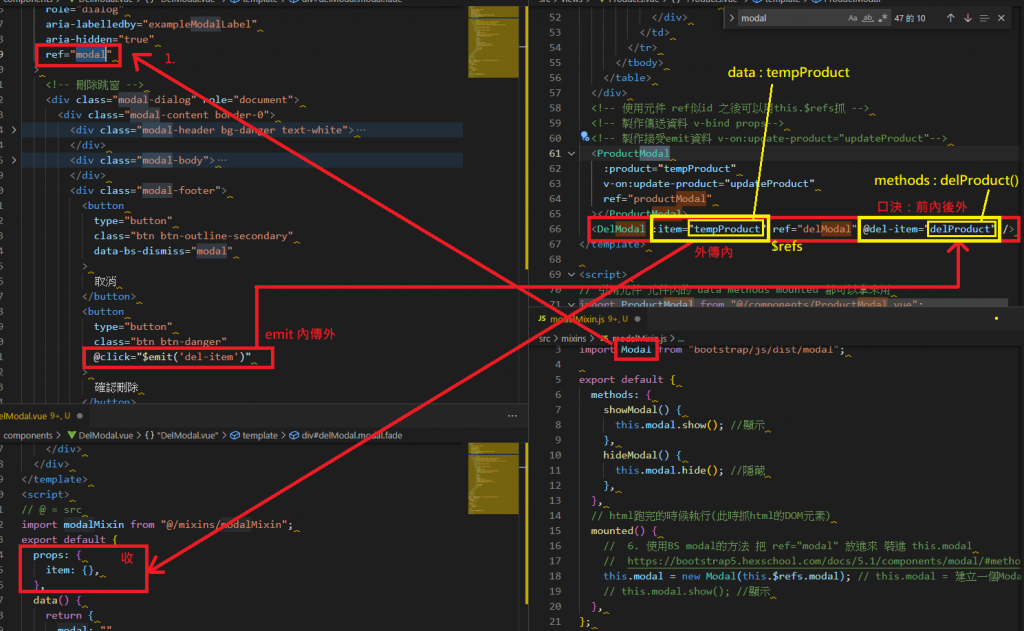
(1)src > 新增mixins 資料夾 > 新增 modalMixin.js
(2)把重複的資料放進去
(3)放到需要用到的元件內
 import modalMixin from "@/mixins/modalMixin";

 mixins: [modalMixin],
https://www.npmjs.com/package/vue3-loading-overlay
npm install vue3-loading-overlay
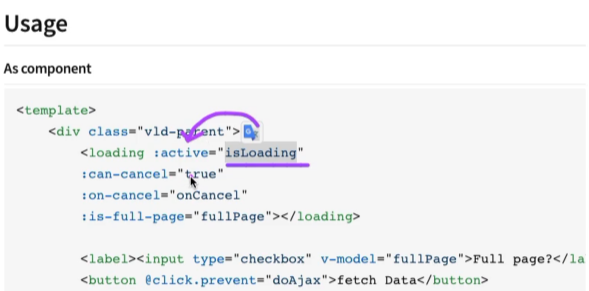
// 讀取動畫套件
// Import component
import Loading from "vue3-loading-overlay";
// Import stylesheet
import "vue3-loading-overlay/dist/vue3-loading-overlay.css";

// 全域註冊
app.component('Loading', Loading)
Products.vue、Login.vue
active = true才會轉圈圈
 <Loading :active="isLoading"></Loading>


  data() {
    return {
      // 判斷是否要loading轉圈圈 倉庫
      isLoading: false,
    };
  },


    getProdcts() {
      const api = `${process.env.VUE_APP_API}api/${process.env.VUE_APP_PATH}/admin/products`;
      // 撈到資料前有loding
      this.isLoading = true;
      console.log(api);

      this.$http.get(api).then((res) => {
        // 撈到資料loding圈圈關閉
        this.isLoading = false;
        if (res.data.success) {
        }
      });
    },
目標:編輯或新增商品錯誤時,跳出錯誤訊息(BS樣式 吐司)通知
Toast分好幾個放的優點:可以產生多次、獨立的生命周期等...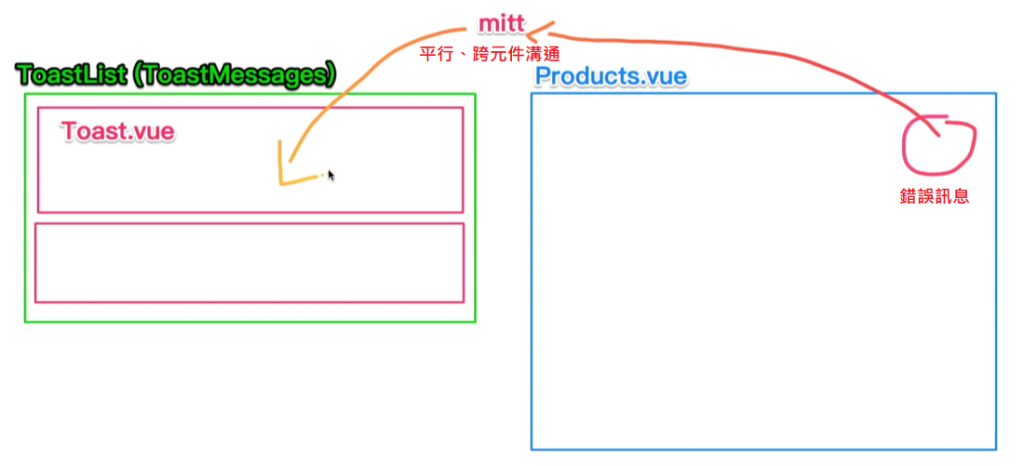
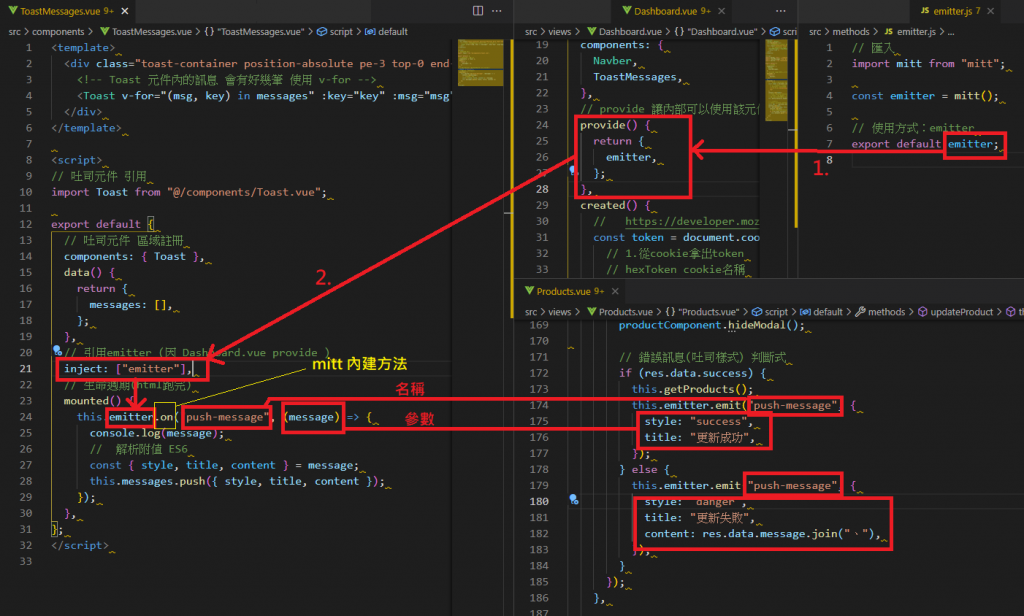
npm i mitt
src > 新增methods資料夾 > 新增 emitter.js檔案
emitter.js
// 匯入
import mitt from "mitt";

const emitter = mitt();

// 使用方式:emitter
export default emitter;
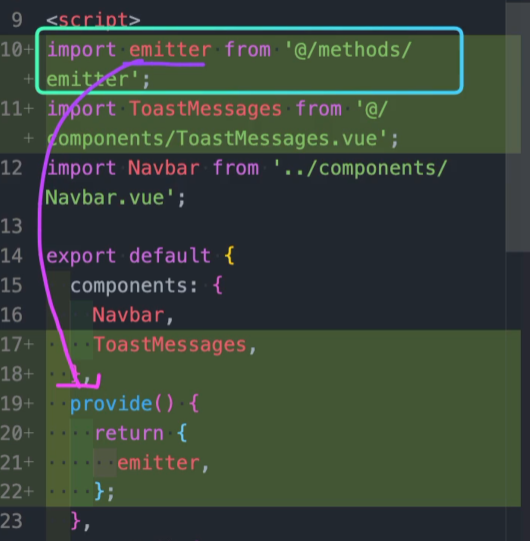
讓內層都可以引用外層功能 provide
import emitter from '@/methods/emitter';

  provide() {
    return {
      emitter,
    };
  },

index.js
    path: "/dashboard",
    name: "Dashboard",
    component: () => import("../views/Dashboard.vue"),
    // 多個,陣列
    children: [
      {
        // http://localhost:8080/#/dashboard/products
        path: "products",
        component: () => import("../views/Products.vue"),
      },
    ],
  },
];
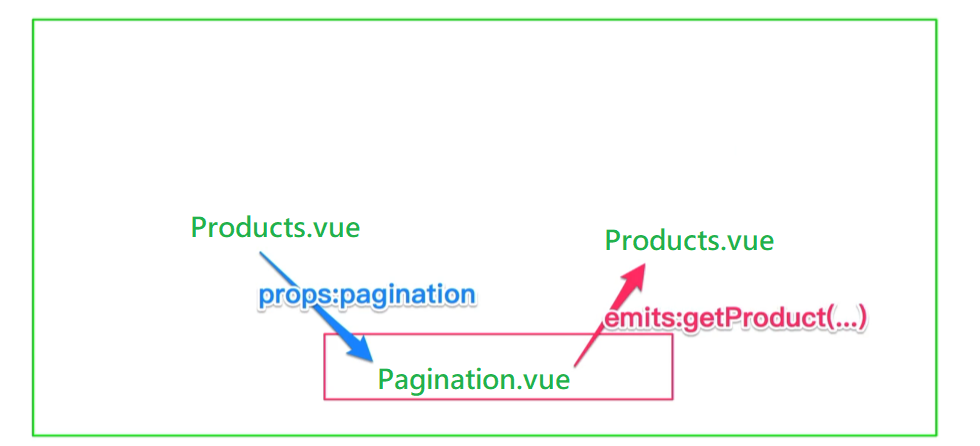
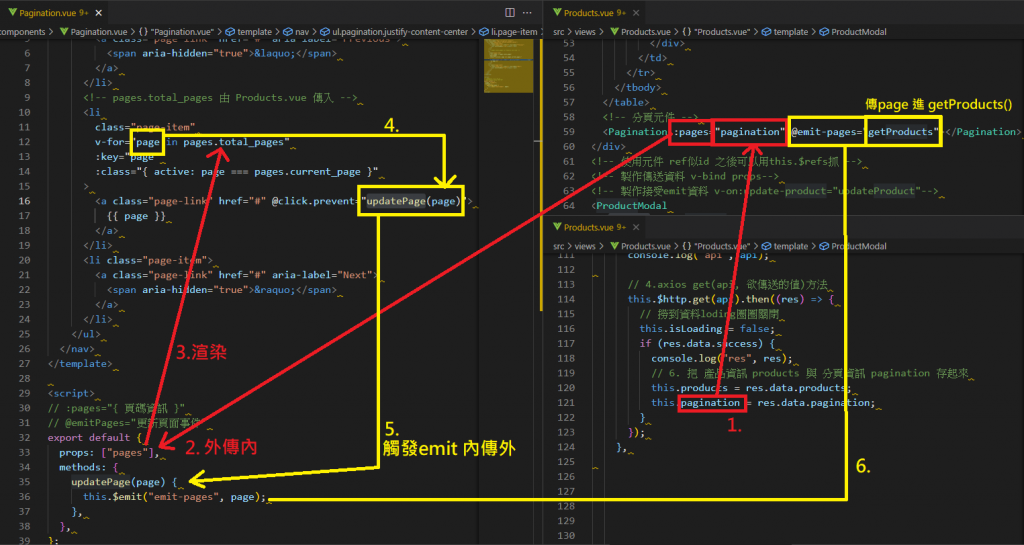
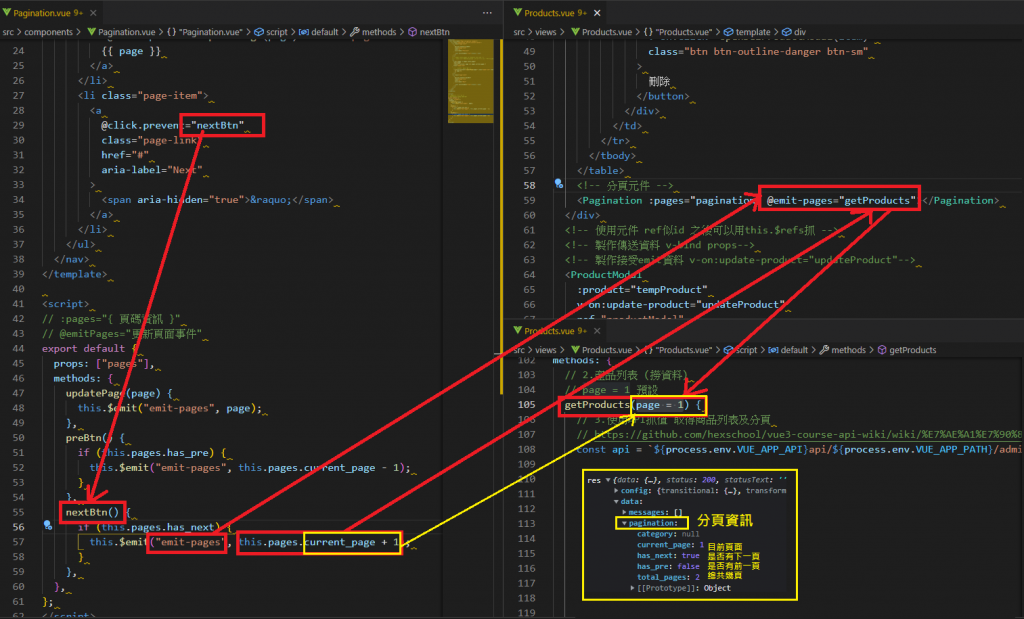
Products.vue
    getProducts( page = 1 ) {
      // 3.使用API抓值 取得商品列表
      const api = `${process.env.VUE_APP_API}api/${process.env.VUE_APP_PATH}/admin/products/?page=${page}`;
      this.$http.get(api).then((res) => {

        if (res.data.success) {
          console.log("res", res);

components > Pagination.vue
區域方法
src > methods > 新增filters.js
export function currency(num) {
  const n = parseInt(num, 10);
  return `${n.toFixed(0).replace(/./g, (c, i, a) => (i && c !== '.' && ((a.length - i) % 3 === 0) ? `, ${c}`.replace(/\s/g, '') : c))}`;
}
Products.vue
  import { currency } from "../methods/filters.js";

  methods: {
    // 千分號 方法引用
    currency,
Products.vue
   <td class="text-right">{{ currency(item.origin_price) }}</td>
   <td class="text-right">{{ currency(item.price) }}</td>
https://v3.cn.vuejs.org/api/application-config.html#globalproperties
// foo 自定義 通常 = function才好用 如 下例
app.config.globalProperties.foo = 'bar'

app.component('child-component', {
  mounted() {
    console.log(this.foo) // 'bar'
  }
})
src > methods > 新增filters.js
export function currency(num) {
  const n = parseInt(num, 10);
  return `${n.toFixed(0).replace(/./g, (c, i, a) => (i && c !== '.' && ((a.length - i) % 3 === 0) ? `, ${c}`.replace(/\s/g, '') : c))}`;
}
main.js
import { currency } from "./methods/filters.js";

// 全域定義 方法
// https://v3.cn.vuejs.org/api/application-config.html#globalproperties
app.config.globalProperties.$filters = {
  // 轉千位數 及 時間方法
  currency,
};
Products.vue
<td class="text-right">{{ $filters.currency(item.price) }}</td>
src/methods/pushMessageState.js 錯誤訊息吐司 判斷式 給Coupons.vue & Orders.vue
Products.vue 內 吐司錯誤訊息程式碼 會因為點擊越來越多,故拆開 製作成另一方法
因此 methods > pushMessageState.js
並 全域匯入 給 Coupons.vue & Orders.vue 用
邏輯:因為直接用全域方法(main.js)只會有全域一個倉庫(提升效能),但區域方法就會到處都有倉庫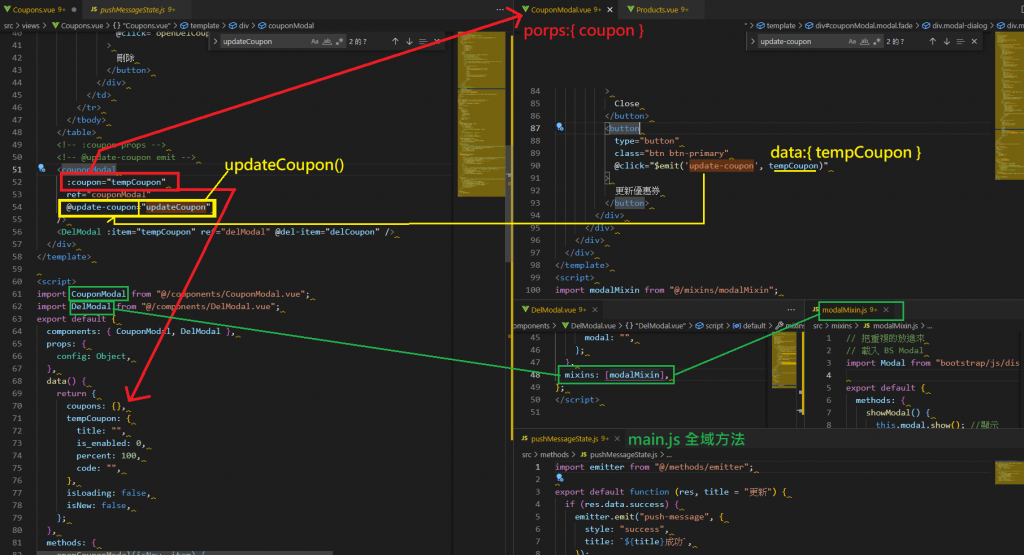
src/views/Orders.vue 訂單頁面
src/views/Coupons.vue 優惠頁面
src/components/orderModal.vue
src/components/CouponModal.vue
src/components/Navbar.vue 連結樣板
src/router/index.js 連結製作
src/main.js 全域匯入pushMessageState = $httpMessageState
mounted()
html標籤跑完後執行
寫在mounted就是防止抓不到dom元素 或抓不到html標籤的問題產生
ex:Bootstrap Modal、吐司等等..
created()用在一開始要抓值時
ex: API資料
Products.vue(外)
   import DelModal from "@/components/DelModal.vue";

   // 口決:前內後外
   <DelModal :item="tempProduct"/>

     data() {
       return {
         tempProduct: {},
       };
     },
DelModal.vue(內)
     props: {
       item: {},
     },
     data() {
       return {
         modal: "",
       };
Products.vue(外)
   import DelModal from "@/components/DelModal.vue";

   // 口決:前內後外
   <DelModal @del-item="delProduct" />

    delProduct() {
      const url = `${process.env.VUE_APP_API}api/${process.env.VUE_APP_PATH}/admin/product/${this.tempProduct.id}`;
      this.isLoading = true;
      this.$http.delete(url).then((response) => {
        this.isLoading = false;
        console.log(response.data);
        const delComponent = this.$refs.delModal;
        delComponent.hideModal();
        this.getProdcts();
      });
    },
DelModal.vue(內)
@click="$emit('del-item')"
emitter.js
// 匯入
import mitt from "mitt";
const emitter = mitt();
// 使用方式:emitter
export default emitter;
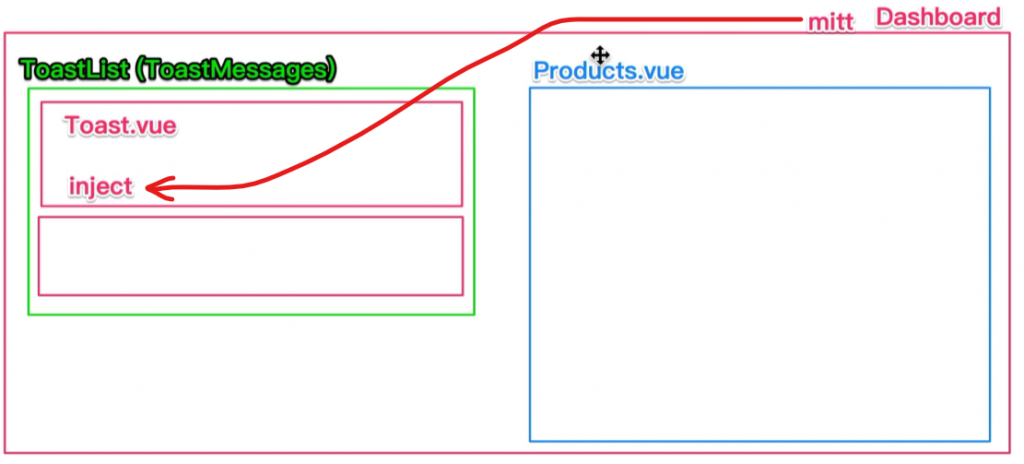
Dashboard.vue(父)
import emitter from "@/methods/emitter";
provide() {
return {
emitter,
};
},
ToastMessages.vue(子)
// 引用emitter (因 Dashboard.vue provide )
inject: ["emitter"],
父、子層區分
index.js
    path: "/dashboard",
    name: "Dashboard",
    component: () => import("../views/Dashboard.vue"),
    // 多個,陣列
    children: [
      {
        // http://localhost:8080/#/dashboard/products
        path: "products",
        component: () => import("../views/Products.vue"),
      },
    ],
  },
];
let myApple = '123T456';
let arr = myApple.split("T");
consolog(arr) // [123,456]
let myApple2 = '1,2,3,4';
let arr2 = myApple.split(",");
consolog(arr) // [1,2,3,4]
 rouoxo