上一張介紹了如何 build 一個客製化的 image 與 build image 未遇到的問題與步驟,接著要來 build 一個真正的專案,雖然說是真正的專案但也只是一個簡易版的 NodeJS Web Server,不過方法與流程都大同小異,所以可以透過這個步驟創建出各種不同的 image。
首先先創建一個新的資料夾並命名為 simpleNodeServer 並進到資料夾中
mkdir simpleNodeServer
cd simpleNodeServer
接著創建一個 package.json file,並對他進行編輯
touch package.json
vim package.json
{
	"devDependencies": {
    "@types/express": "^4.17.13",
    "@types/node": "^17.0.23",
    "nodemon": "^2.0.15",
    "ts-node": "^10.7.0",
    "typescript": "^4.6.3",
		"express": "^4.17.3"
  },
	"scripts": {
    "start": "nodemon index.ts"
  },
}
接著創建一個 index.ts file 並輸入預設的內容以創建一個基本的 nodeJS Server
touch index.ts
vim index.ts
import express from 'express';

const app = express();
const port = 3000;
app.get('/', (req, res) => {
  res.send('The server is working!');
});
app.listen(port, () => {
  console.log(`server is listening on ${port} !!!`);
});
設定完基礎的 NodeJS Server 後,接著來設定 Dockerfile
touch Dockerfile
vim Dockerfile
FROM alpine

RUN npm install

CMD ["npm", "start"]
base image 創建一個新的 Image以上面的例子來說,會利用 apline 這個 base image 創建一個 Image,接著在創建 Image 的過程中需要執行 npm install 這個命令,最後當利用這個 Image 創建一個 Container 時會預設執行 npm start 這個指令。
接著使用 docker build . 來將這個 NodeJS Server Image build 起來
docker build .
接著可以看到我們的終端機中出現了錯誤,主要是因為 npm: not found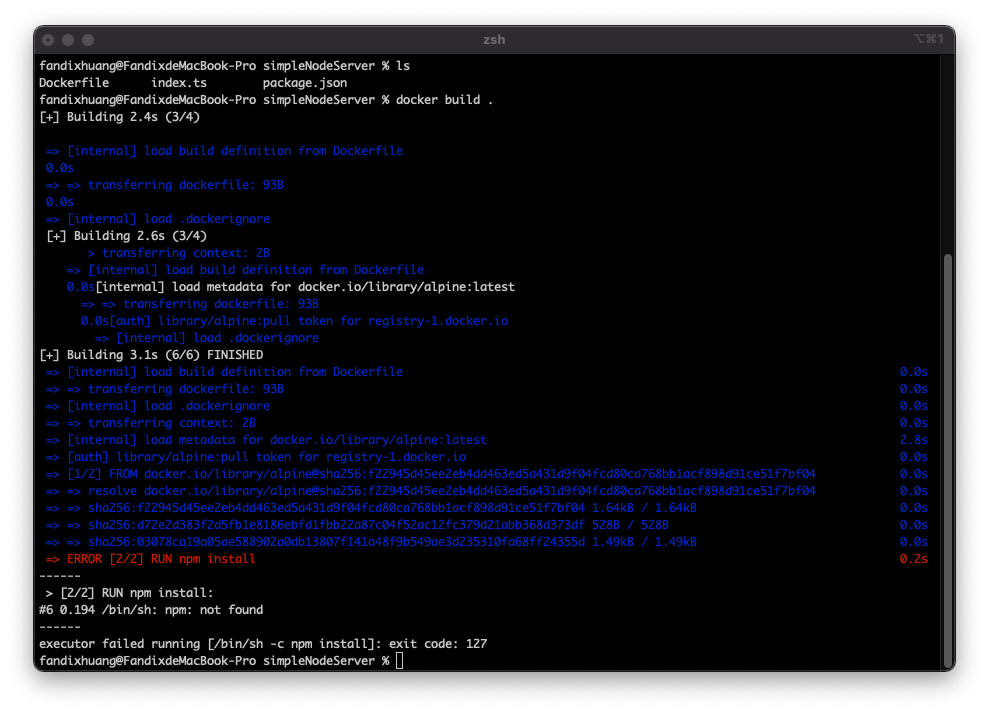
會造成這樣的原因是因為我們使用的 base image 是一個非常小的 Image,所以他並不包含能夠執行 npm install 的內容,所以應該要使用帶有可以執行 npm install 的 base image
FROM node:14-alpine

RUN npm install

CMD ["npm", "start"]
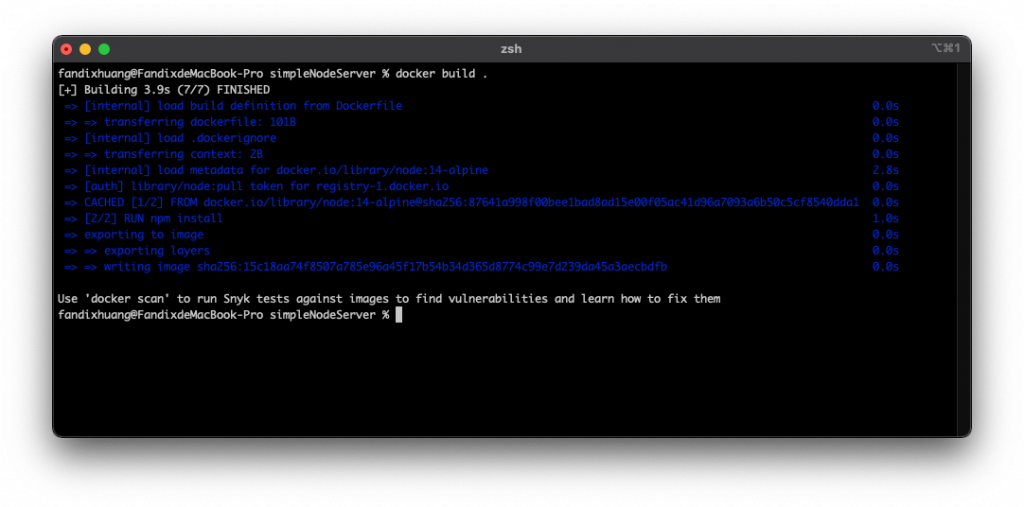
透過使用可以執行 npm install 的 base image 便可以將 NodeJS Server build 出來,接著利用 image id 創建一個 Container 吧。
docker run -it 15c18aa74f8507a785e96a45f17b54b34d365d8774c99e7d239da45a3aecbdfb
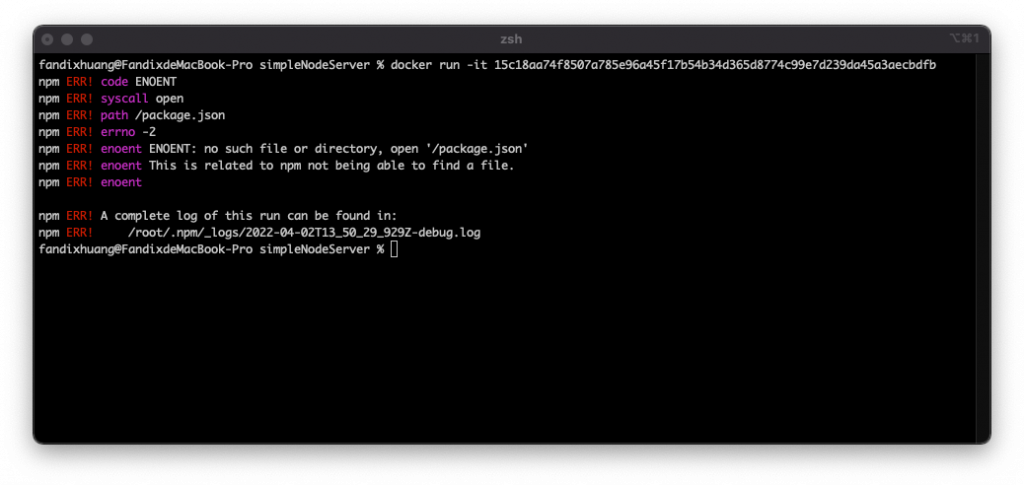
還是出錯了!這次出錯的問題在於當在創建 image 時所執行的 npm install 他需要有 package.json 才能夠正常執行,而我們創建的 image 中並沒有 package.json file,所以導致錯誤。
所以我們需要將我們需要附加在的檔案加在 Image 中,這樣在創建 Image 時才能夠完整的執行指令,這時就需要利用 COPY 指令複製檔案到 Image 中。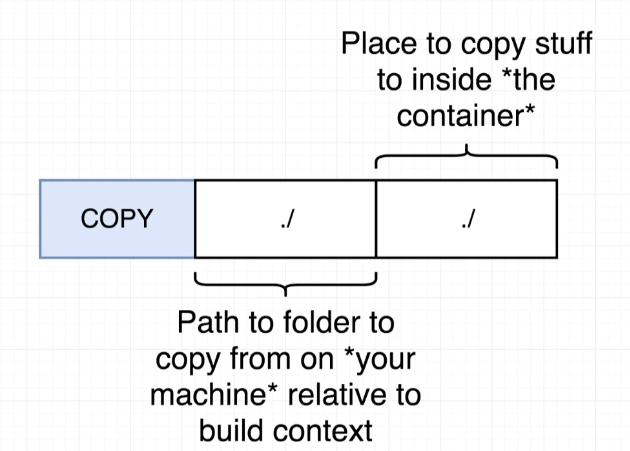
利用 COPY 指令將我們機器上面的某個檔案(相對路徑)複製到 Container 中的某個位置上,所以我們需要將我們機器中的所有檔案都複製到 Container 中
FROM node:14-alpine

COPY ./ ./
RUN npm install

CMD ["npm", "start"]
這樣的話當我們使用 image 創建 Container 時就有 package.json file 可以提供給 npm install 指令使用。
docker build .
## [+] Building 9.8s (9/9) FINISHED
## => [internal] load build definition from Dockerfile                                                                              0.0s
## => => transferring dockerfile: 112B                                                                                              0.0s
## => [internal] load .dockerignore                                                                                                 0.0s
## => => transferring context: 2B                                                                                                   0.0s
## => [internal] load metadata for docker.io/library/node:14-alpine                                                                 2.5s
## => [auth] library/node:pull token for registry-1.docker.io                                                                       0.0s
## => [internal] load build context                                                                                                 0.1s
## => => transferring context: 684B                                                                                                 0.1s
## => CACHED [1/3] FROM docker.io/library/node:14-alpine@sha256:87641a998f00bee1bad8ad15e00f05ac41d96a7093a6b50c5cf8540dda1b65a6    0.0s
## => [2/3] COPY ./ ./                                                                                                              0.0s
## => [3/3] RUN npm install                                                                                                         6.7s
## => exporting to image                                                                                                            0.3s
## => => exporting layers                                                                                                           0.3s
## => => writing image sha256:09de30e6003ab9adb4de287dbf8ffa72201941bf537681c10f5c5742e2c427c6                                      0.0s

## Use 'docker scan' to run Snyk tests against images to find vulnerabilities and learn how to fix them

docker run -it 09de30e6003ab9adb4de287dbf8ffa72201941bf537681c10f5c5742e2c427c6
## > @ start /
## > nodemon index.ts

## [nodemon] 2.0.15
## [nodemon] to restart at any time, enter `rs`
## [nodemon] watching path(s): *.*
## [nodemon] watching extensions: ts,json
## [nodemon] starting `ts-node index.ts`
## server is listening on 3000 !!!
接著我們到網頁中看看 localhost: 3000 是否有東西
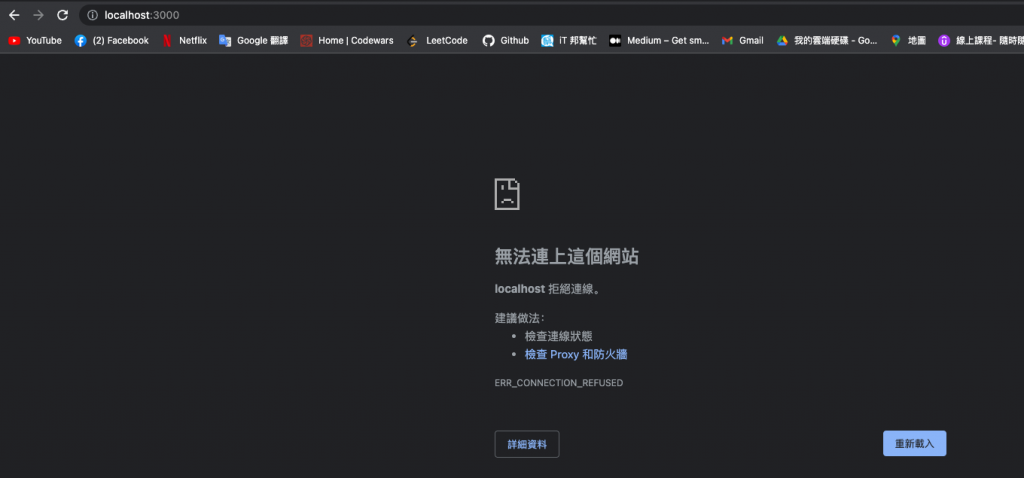
簡單來說我們在 Container 中執行了 npm start 確實是有在 [localhost](http://localhost) 3000 成功創建一個 Server,但這個 localhost 3000 是在 Container 中的 Port ,所以我們本機的 localhost 無法成功連結到 Container 的 localhost。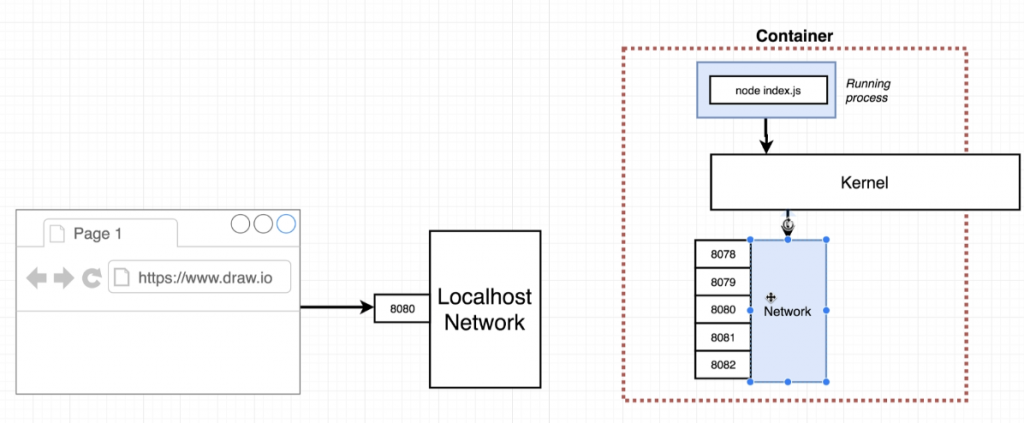
所以我們要做的就是將我們本機的 Port 3000 連結到 Container 內部的 Port 3000,這樣都瀏覽器向 localhost: 3000 發出請求時,就可以連接到 Container 中的 Port 3000。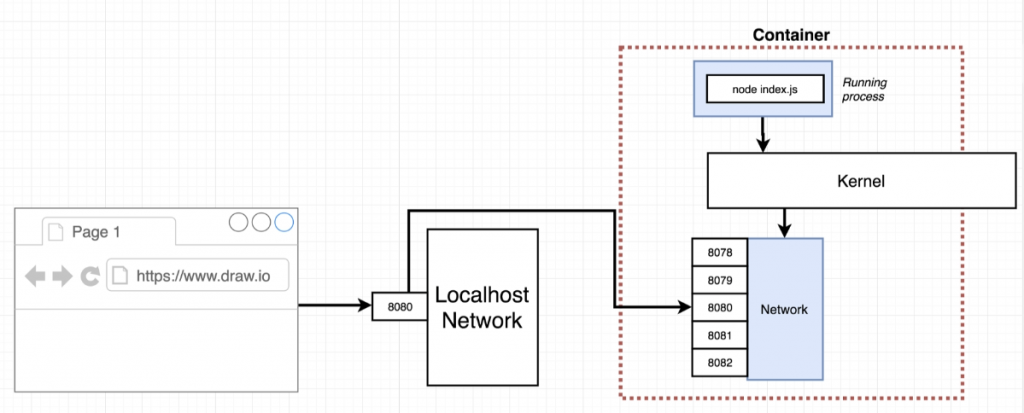
所以可以使用 docker run 中的其中一個 Option
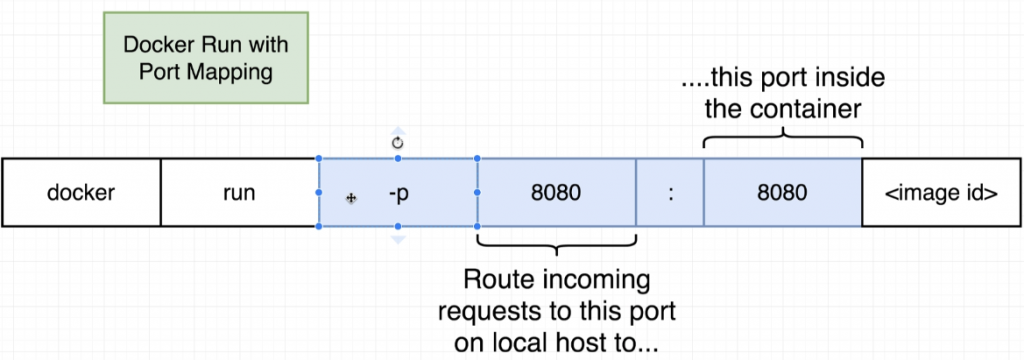
利用 -p option 將本機指定的 Port 連接到 Container 中指定的 Port
docker run -it -p 3000:3000 09de30e6003ab9adb4de287dbf8ffa72201941bf537681c10f5c5742e2c427c6

這樣就可以順利連結到 localhost: 3000 了,由於是將本機的 Port 連接到 Container 的 Port,所以也可以
docker run -it -p 8080:3000 09de30e6003ab9adb4de287dbf8ffa72201941bf537681c10f5c5742e2c427c6
這樣就會變成本機的 Port 8080 連接到 Container 的 Port 3000。
我們可以開啟另一個終端機看一下透過 NodeJS Server Image 創建的 Container 裏面的結構
docker ps
## CONTAINER ID   IMAGE          COMMAND                  CREATED         STATUS         PORTS                    NAMES
## b38d0ae47f41   09de30e6003a   "docker-entrypoint.s…"   3 minutes ago   Up 3 minutes   0.0.0.0:3000->3000/tcp   practical_jepsen

docker exec -it 00302f0de178 sh
/ # ls
## Dockerfile         index.ts           opt                run                usr
## bin                lib                package-lock.json  sbin               var
## dev                media              package.json       srv
## etc                mnt                proc               sys
## home               node_modules       root               tmp
透過 ls 指令可以看到我們利用 COPY 指令複製的所有檔案都放在 Container 的根目錄,這樣對於大型的 Docker Project 來說會很難管理,所以可以利用 WORKDIR 指令決定要將複製的檔案放在哪一個資料夾。
FROM node:14-alpine

WORKDIR /usr/app

COPY ./ ./
RUN npm install

CMD ["npm", "start"]
這將就可以將複製的檔案通通存放在 /usr/app 當中了。
在我們 build image 的時候可以多添加一個 option -t ,主要的目的是可以將這個 Image 新增一個 tag,這樣當要 run 這個 image 時就可以使用這個 tag 而不用使用 image id。
docker build -t fandix/image/1 .

docker run -it -p 3000:3000 fandix/image/1
## > @ start /usr/app
## > nodemon index.ts

## [nodemon] 2.0.15
## [nodemon] to restart at any time, enter `rs`
## [nodemon] watching path(s): *.*
## [nodemon] watching extensions: ts,json
## [nodemon] starting `ts-node index.ts`
## server is listening on 3000 !!!
接著開啟另一個終端機觀看一下 Container 的內部狀況
docker ps
## CONTAINER ID   IMAGE            COMMAND                  CREATED          STATUS          PORTS                    NAMES
## 4e6932d216d7   fandix/image/1   "docker-entrypoint.s…"   39 seconds ago   Up 38 seconds   0.0.0.0:3000->3000/tcp   romantic_khayyam

docker exec -it 4e6932d216d7 sh
## /usr/app
ls
## Dockerfile         index.ts           node_modules       package-lock.json  package.json
當我們使用 sh 進入 Container 的 shell 之後,預設的路徑是剛剛利用 WORKDIR 指令設定的 /usr/app 而不是一開始的根目錄,透過 ls 指令可以看到所有裡用 COPY 指令複製的檔案都存放在這裡,當我們移動到 Container shell 的根目錄時可以看到變得非常乾淨
## /usr/app
cd /
ls
## bin    etc    lib    mnt    proc   run    srv    tmp    var
## dev    home   media  opt    root   sbin   sys    usr
當我們要更改 index.ts 中的內容時,就需要重新 rebuild 一次 image,而 build 每次 image 就需要
一直重複的執行 npm install 指令,但明明我們的 package.json 並沒有更改,所以沒有必要每次都重新執行 npm install ,這時可以將 build image 的過程分為兩部分。
由於只有執行 RUN npm install 這個命令才會需要使用 package.json,所以沒有必要在 RUN npm install 之前把所有的檔案複製一次,所以在執行 RUN npm install 之前只需要複製 package.json 就好,那麼 Dockerfile 就可以更改為
COPY ./package.json ./
RUN npm install
接著在做完 RUN npm install 這個指令後,再將其他的檔案複製回 Container 中就好,這樣就可以確保當更改其他檔案的時候,並不會影嚮到 package.json 導致需要重新執行 npm install。
COPY ./package.json ./
RUN npm install
COPY ./ ./
