今天來講點與手機相機互動的方法,先在雖然這種做法比較不常見,但這種互動的概念還是很值得提一下的。
還又今天的程式碼比較特別是用Kotlin的,畢竟是寫安卓,Kotlin身為android開發語言的一員,了解一下也是無訪,席官Java的同學不用太擔心,今天的程式不會和Java差上太多。
<?xml version="1.0" encoding="utf-8"?>
<androidx.constraintlayout.widget.ConstraintLayout xmlns:android="http://schemas.android.com/apk/res/android"
    xmlns:app="http://schemas.android.com/apk/res-auto"
    xmlns:tools="http://schemas.android.com/tools"
    android:layout_width="match_parent"
    android:layout_height="match_parent"
    tools:context=".MainActivity">

    <Button
        android:id="@+id/imagePicker_btn"
        android:layout_width="wrap_content"
        android:layout_height="wrap_content"
        android:text="選擇照片"
        app:layout_constraintBottom_toBottomOf="parent"
        app:layout_constraintEnd_toStartOf="@+id/guideline2"
        app:layout_constraintStart_toStartOf="parent"
        app:layout_constraintTop_toTopOf="@+id/guideline3" />

    <androidx.constraintlayout.widget.Guideline
        android:id="@+id/guideline2"
        android:layout_width="wrap_content"
        android:layout_height="wrap_content"
        android:orientation="vertical"
        app:layout_constraintGuide_percent="0.50" />

    <androidx.constraintlayout.widget.Guideline
        android:id="@+id/guideline3"
        android:layout_width="wrap_content"
        android:layout_height="wrap_content"
        android:orientation="horizontal"
        app:layout_constraintGuide_percent="0.80" />

    <Button
        android:id="@+id/camera_btn"
        android:layout_width="wrap_content"
        android:layout_height="wrap_content"
        android:layout_marginTop="4dp"
        android:text="拍照"
        app:layout_constraintBottom_toBottomOf="parent"
        app:layout_constraintEnd_toEndOf="parent"
        app:layout_constraintStart_toStartOf="@+id/guideline2"
        app:layout_constraintTop_toTopOf="@+id/guideline3" />

    <ImageView
        android:id="@+id/picture_img"
        android:layout_width="0dp"
        android:layout_height="0dp"
        app:layout_constraintBottom_toTopOf="@+id/guideline4"
        app:layout_constraintEnd_toEndOf="parent"
        app:layout_constraintStart_toStartOf="parent"
        app:layout_constraintTop_toTopOf="@+id/guideline7" />

    <androidx.constraintlayout.widget.Guideline
        android:id="@+id/guideline4"
        android:layout_width="wrap_content"
        android:layout_height="wrap_content"
        android:orientation="horizontal"
        app:layout_constraintGuide_percent="0.5" />

    <androidx.constraintlayout.widget.Guideline
        android:id="@+id/guideline5"
        android:layout_width="wrap_content"
        android:layout_height="wrap_content"
        android:orientation="vertical"
        app:layout_constraintGuide_percent="0.11" />

    <androidx.constraintlayout.widget.Guideline
        android:id="@+id/guideline6"
        android:layout_width="wrap_content"
        android:layout_height="wrap_content"
        android:orientation="vertical"
        app:layout_constraintGuide_percent="0.9" />

    <androidx.constraintlayout.widget.Guideline
        android:id="@+id/guideline7"
        android:layout_width="wrap_content"
        android:layout_height="wrap_content"
        android:orientation="horizontal"
        app:layout_constraintGuide_percent="0.02872777" />

    <Button
        android:id="@+id/save_btn"
        android:layout_width="wrap_content"
        android:layout_height="wrap_content"
        android:text="儲存"
        app:layout_constraintBottom_toTopOf="@+id/guideline3"
        app:layout_constraintEnd_toEndOf="parent"
        app:layout_constraintStart_toStartOf="parent"
        app:layout_constraintTop_toTopOf="@+id/guideline4" />

</androidx.constraintlayout.widget.ConstraintLayout>
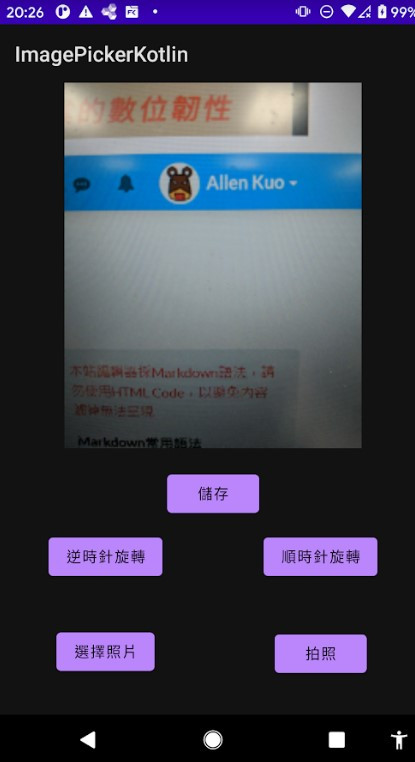
ImageView用來顯示拍照結果和顯示圖片讀取結果。
2. 實例化和啟動相機及選擇檔案管理
lateinit var imagePicker_btn:Button
lateinit var camera_btn:Button
override fun onCreate(savedInstanceState: Bundle?) {
        super.onCreate(savedInstanceState)
        setContentView(R.layout.activity_main)

        imagePicker_btn = findViewById(R.id.imagePicker_btn)
        camera_btn = findViewById(R.id.camera_btn)
        picture_img = findViewById(R.id.picture_img)

        imagePicker_btn.setOnClickListener(View.OnClickListener {
            //開啟檔案管理Intent.ACTION_PICK
            val intent = Intent(Intent.ACTION_PICK)
            intent.type = "image/*"
            imagePickerLauncher.launch(intent)

        })

        camera_btn.setOnClickListener(View.OnClickListener {
            //開啟相機
            val intent = Intent(MediaStore.ACTION_IMAGE_CAPTURE)
            cameraLauncher.launch(intent)
        })
}
因為選擇圖片和開啟相機都將離開此app,稍後才帶結果返回。
//圖片選擇的回調
private val imagePickerLauncher = registerForActivityResult(ActivityResultContracts.StartActivityForResult()) { activityResult ->
        if (RESULT_OK == activityResult.resultCode) {
            val resolver = this.contentResolver
            //將選擇的照片轉成Bitmap
            bitmap = MediaStore.Images.Media.getBitmap(resolver, activityResult.data?.data)
            //imageView顯示結果
            picture_img.setImageBitmap(bitmap)
        }
    }
//照相機拍照後的回調
private val cameraLauncher = registerForActivityResult(ActivityResultContracts.StartActivityForResult()){result ->
        if(RESULT_OK == result.resultCode) {
            //將拍攝的照片轉成Bitmap,透過"data"獲得
            bitmap = result.data?.extras?.get("data") as Bitmap
            //imageView顯示結果
            picture_img.setImageBitmap(bitmap)
        }
    }
此方法如同比較常見的onActivityResult,不過onActivityResult已被棄用,但作用是差不多的,使用onActivityResult也是可以達到此效果的。
3. 儲存按鈕
lateinit var save_btn:Button

override fun onCreate(savedInstanceState: Bundle?) {
    ...
    save_btn = findViewById(R.id.save_btn)
    save_btn.setOnClickListener(View.OnClickListener {
        try {
            //檔名
            val fileName:String = System.currentTimeMillis().toString()+".jpg"
            // 新增資料夾Camera,並尋找fileName
            val file =File(Environment.getExternalStoragePublicDirectory(
                                  Environment.DIRECTORY_DCIM).path+"/Camera/",fileName)
            //輸出流
            val out = FileOutputStream(file)
            bitmap.compress(Bitmap.CompressFormat.JPEG,100,out)
            out.flush()
            //關閉輸出流
            out.close()

            //通知其掃描新建的圖片檔案,這樣新拍的照片儲存後才找的到
            val uri: Uri = Uri.fromFile(file)
            sendBroadcast(Intent(Intent.ACTION_MEDIA_SCANNER_SCAN_FILE, uri))
            Toast.makeText(mContext,"儲存成功",Toast.LENGTH_SHORT).show()
        }catch (e:Exception){
            Toast.makeText(mContext,"儲存失敗",Toast.LENGTH_SHORT).show()
        }
    })
}
這樣就完成拍照和儲存的功能,要注意的是儲存的位置需要注意(能否讀取等),否則會看不到儲存的效果。

今天就先講解到這邊,主要是希望各位能知道如何與其他程式互動,並接受回傳的資料。(重點知識:registerForActivityResult和onActivityResult可以去研究一下喔!)


 iThome鐵人賽