每個 row 基本都有先附帶了 Show、Edit、Delete 三個基本的 Action,但如果還想要更多呢?那就必須要用到自定義的 Action 了,今天資訊量很大,安全帶繫好要出發了。
這次的範例會以設定 Product 與 Actor 的關聯來示範,首先先用指令建立 Action
php artisan admin:action
後面會遇到一些選項,依序設定
Which type of action would you like to make?
 [2] grid-row
Please enter a name of action class:
ProductActorAction
Please enter the namespace of action class [App\Admin\Actions\Grid]:
直接按下 Enter 不用改變
應該沒有人把上面這行字複製貼上吧?
完成之後裡面會有蠻多 Method 的,留下 handle 即可,其餘的先移除暫時先不會用到
補上兩個 use,功能後面會解釋
use App\Admin\Forms\ProductActorForm;
use Dcat\Admin\Widgets\Modal;
修改 title 屬性protected $title = '<i class="fa fa-eye"></i> 演員設定';
i tag 是讓 action 有圖示
修改 handle Method
public function handle(Request $request)
{
    return $this->response();
}
新增 rendor Method
public function render()
{
    $form = ProductActorForm::make()->payload(['id' => $this->getKey()]);

    return Modal::make()
        ->lg()
        ->title('演員設定')
        ->body($form)
        ->button($this->title);
}
rendor Method 是讓點選 action 之後渲染出一個跟使用者互動的彈窗介面
payload 會讓 product_id 可以帶入到 form 來使用
接著要先增 ProductActorForm 這個 Classphp artisan admin:form ProductActorForm
這個 Class 的內容較多直接貼 Code
<?php

namespace App\Admin\Forms;

use App\Models\Actor;
use App\Models\ProductActor;
use Dcat\Admin\Widgets\Form;
use Dcat\Admin\Traits\LazyWidget;
use App\Admin\Renderable\ActorTable;
use Dcat\Admin\Contracts\LazyRenderable;
use Symfony\Component\HttpFoundation\Response;

class ProductReltationForm extends Form implements LazyRenderable
{
    use LazyWidget;
    /**
     * Handle the form request.
     *
     * @param array $input
     *
     * @return Response
     */
    public function handle(array $input)
    {

         $productActor = ProductActor::where('product_id', $this->payload['id'])->delete();

        foreach ($input['actor_id'] as $actor_id) {
            ProductActor::create([
                'product_id' => $this->payload['id'],
                'actor_id' => $actor_id,
            ]);
        }
    }

    /**
     * Build a form here.
     */
    public function form()
    {
        $this->multipleSelectTable('actor_id', '演員')
            ->title('演員')
            ->dialogWidth('75%')
            ->from(ActorTable::make())
            ->model(Actor::class, 'id', 'name')
            ->required();
    }

    /**
     * The data of the form.
     *
     * @return array
     */
    public function default()
    {
        return [

        ];
    }
}
要注意有用到 implements LazyRenderable 及 trait LazyWidget
接著手動先增一個 ProductTable Classmkdir app/Admin/Renderabletouch app/Admin/Renderable/ActorTable.php
Code 如下
<?php

namespace App\Admin\Renderable;

use App\Models\Actor;
use Dcat\Admin\Grid;
use Dcat\Admin\Grid\LazyRenderable;

class ActorTable extends LazyRenderable
{
    public function grid(): Grid
    {
        return Grid::make(new Actor(), function (Grid $grid) {
            $grid->column('id');
            $grid->column('name', '演員名稱');
        });
    }
}
接著回去修改 Product Controller 的 Grid Method
移除 $grid->setActionClass(Grid\Displayers\Actions::class);
移除這個 setting 會讓原本直接橫列的 action 被收在點點裡
新增 $grid->actions(new ProductActorAction());
新增一個自定義的 ProductActorAction 到 action 列表
完成後即可在 List 看到 Action 有不同的內容了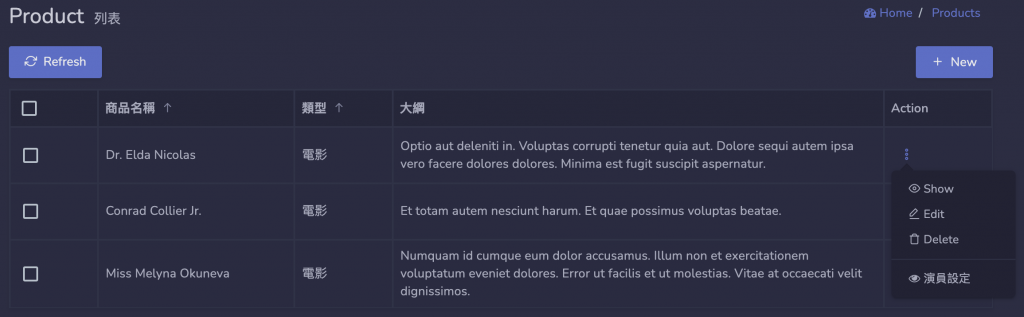


今天花了大量的在實作,壓縮到了打文章的時間,但時間快到了必須交稿,只好明天再補充說明