今天是第 10 天,已經完成 1 / 3 了!(鼓掌)
今天接續昨天整理的 Pseudo-elements 偽元素 ~~
應用在 ::before 與 ::after 來產生內容
content: normal|none|counter|attr|string|open-quote|close-quote|
         no-open-quote|no-close-quote|url|initial|inherit;
默認值,表示無
表示無
字串,可以使用 Unicode 編碼來表示 ( W3cshools、oinam )
.example1 p::before {
  content: "123456789";
  color: green;
}

.example1 p.fav-fruit::before {
  content: normal;
}

.example1 p.fav-color::before {
  content: none;
}
我把 3 個 <p> 都加上 ::before,並在第 2 跟第 3 個的 content 設定 normal 與 none,下圖可以看到偽元素沒有出現

指定計數器當前數值
常使用在 List 清單的 <list-style-type>
<counter-reset>、 <counter-increment>
首先,這是 ul、li 的結構,使用 ::before 來取代 li 前面的圓點
.example2 ul {
  list-style-type: none;
  counter-reset: ex2 -1; /* name、起始值(若空白則為 0) */
}

.example2 li::before {
  content: counter(ex2) ". ";
  counter-increment: ex2 2; /* name、累加的間隔數值 */
}

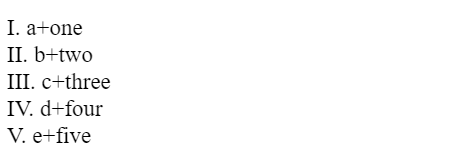
也可以使用 <div> ,counter 函數可以不只一個,並使用空格來增加內容
.example3 > div {
  counter-reset: ex3;
}

.example3 > div div::before {
  content: counter(ex3, upper-roman) ". " counter(ex3, lower-alpha) "+";
  counter-increment: ex3;
}

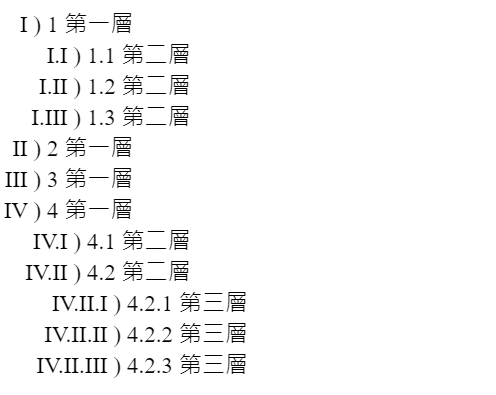
如果是巢狀結構,
  <ol>
    <li> 第一層
      <ol>
        <li>第二層</li>
        <li>第二層</li>
        <li>第二層</li>
      </ol>
    </li>
    <li>第一層</li>
    <li>第一層</li>
    <li>第一層
      <ol>
        <li>第二層</li>
        <li>第二層
          <ol>
            <li>第三層</li>
            <li>第三層</li>
            <li>第三層</li>
          </ol>
        </li>
      </ol>
    </li>
  </ol>
就可以設定這樣,其中還可以使用 ::marker 來選取圓點
.example4 ol {
  counter-reset: ex4;
}

.example4 li {
  counter-increment: ex4;
}

.example4 li::marker {
  content: counters(ex4, ".", upper-roman) " ) ";
}

.example4 li::before {
  content: counters(ex4, ".") " ";
}

取得 HTML 目標元素屬性的值(字串型別)為內容
如果選到不存在的屬性,則返回空字串
我建立了 <a> 元素,並加了 data-note 屬性
<a href="https://www.w3schools.com/cssref/pr_gen_content.asp" target="_blank" data-note="會另開視窗">https://www.w3schools.com/cssref/pr_gen_content.asp</a>
a::after {
  content: " (" attr(data-note) ")";
  color: orange;
}
在 <a> 新增 ::after,使用 attr() 取得 data-note 的內容,也就是 "會另開視窗",改變其文字顏色,如下圖

我設定了巢狀結構,
<div class="example6-8">
  <span>第一層
    <span>第二層</span>
    <span>第二層</span>
  </span>
  <span>第一層
    <span>第二層
      <span>第三層</span>
      <span>第三層</span>
    </span>
  </span>
</div>
請先看基本套用,open-quote 與 close-quote
.example6 span {
  quotes: "<" ">";
}

.example6 span::before {
  content: open-quote;
}

.example6 span::after {
  content: close-quote;
}
open-quote 會套用到 quotes 的 "<",close-quote 會套用到 quotes 的 ">"

quotes 也可以設定多個字符
.example7 span {
  quotes: "<" ">" "(" ")" "[" "]";
}

.example7 span::before {
  content: open-quote;
}

.example7 span::after {
  content: close-quote;
}

上圖中可以看到第一層套用到 quotes 的前兩個字符 "<" ">",第二層套用到中間兩個字符 "(" ")",以此類推
再來是 no-open-quote 與 no-close-quote
.example8 span {
  quotes: "<" ">";
}

.example8 span::before {
  content: open-quote;
}

.example8 span::after {
  content: close-quote;
}

.example8 span:first-child::before {
  content: no-open-quote;
}

.example8 span:first-child::after {
  content: no-close-quote;
}
我先全部設定 quotes,再設定每一層的第一個元素不要使用

指定外部資源,例如圖片、聲音、影片
.example9::before {
  content: url(https://mozorg.cdn.mozilla.net/media/img/favicon.ico);
}

可以使用空格來相加內容
在 MDN 有一個範例很酷,使用 ::after、attr()、data-* 來建立工具提示,不用 JavaScript 喔!與大家分享
<div class="example10">
  <p>Contrary to
    <span tabindex="0" data-descri="liked, admired, or enjoyed by many people or by a particular person or group.">popular</span>
    belief, Lorem Ipsum is not
    <span tabindex="0" data-descri="
in a straightforward or plain manner.">simply</span>
    random text.
  </p>
</div>
.example10 span[data-descri] {
  position: relative;
  text-decoration: underline;
  color: gray;
  cursor: help;
}

.example10 span[data-descri]:hover::after,
.example10 span[data-descri]:focus::after {
  content: attr(data-descri);
  /*  框框位置  */
  position: absolute;
  left: 0;
  top: 100%;
  /*  框框樣式  */
  min-width: 180px;
  color: black;
  font-size: 12px;
  background-color: #ffffcc;
  border: 1px solid gray;
  border-radius: 5px;
  padding: 10px;
  z-index: 1;
}

滑鼠滑過去或是使用 Tab 鍵就會出現提示,如下圖

以上是今天跟大家分享的 content 屬性
參考資料:
W3C - The 'content' property
W3schools - CSS content Property
MDN:content、::after、counter
oxxostudio - CSS 偽元素 ( content 與 counter )文章同步更新於 medium
