分析完要撰寫的任務步驟後,我們來開始撰寫 ColorCodeTag 的後端程式。
本章節以 Code 實踐為主,若主要職能非實踐後端的讀者可以直接快轉往下到有圖片的地方。
在使用 Eclipse 創建專案前,有幾個小步驟要注意:
以上是 Eclipse 比較需容易忘記的小步驟,關於基礎的 Spring Boot Starter 專案建立則不詳細說明,使用其他 IDE 的夥伴參考即可,而專案建構時需引入以下三個依賴:
<dependency>
    <groupId>org.springframework.boot</groupId>
    <artifactId>spring-boot-starter-web</artifactId>
</dependency>

<dependency>
    <groupId>org.springframework.boot</groupId>
    <artifactId>spring-boot-devtools</artifactId>
	<scope>runtime</scope>
	<optional>true</optional>
</dependency>

<dependency>
	<groupId>org.projectlombok</groupId>
	<artifactId>lombok</artifactId>
	<optional>true</optional>
</dependency>
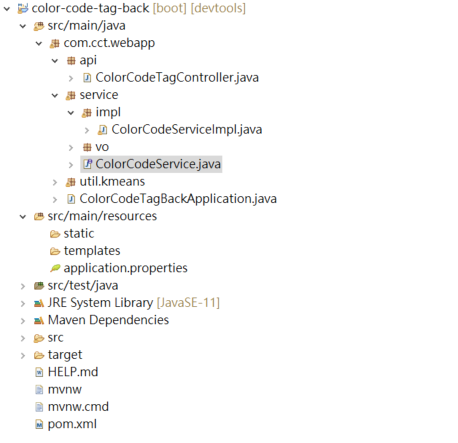
ColorCodeTag follow Controller, Service, Repository 的三層式架構,如上圖所示,ColorCodeTag 的核心方法由 ColorCodeService interface 定義,並由 ColorCodeServiceImpl 實踐。另外礙於篇幅關係,則不特別展示 Kmeans 的實踐方法。
application.properties 內定義了許多的參數,Spring Boot Start 專案創建後 properties 內部會為空,事實上是啟用了預設的參數,如 tomcat 預設的 port 為 8080,可以在 properties 重新設定,後續對 DB 的 url 等都會放置於此。
server.port=8081
#設定接收檔案大小最大為 15MB
spring.servlet.multipart.enabled=true
spring.servlet.multipart.max-file-size= 15728640
spring.servlet.multipart.max-request-size= 15728640
public interface ColorCodeService {

	/**
	 * 解析照片並取的顏色色碼
	 * @param picture
	 * @return
	 */
	public List<String> getColorCodeTags(MultipartFile picture);

}
實作的類別是整個 ColorCodeTag 的核心,若眼尖的小夥伴可能會在這裡發現一點小問題,這裡先賣個關子。
@Slf4j
@Service
public class ColorCodeServiceImpl implements ColorCodeService {

	@Override
	public List<String> getColorCodeTags(MultipartFile picture) {

        List<String> rgbList = scanWholePicture(picture);
		List<String> hexList = rgbToHexList(rgbList);

		return hexList;
	}

	/**
	 * 掃描照片並解析顏色
	 *
	 * @param picture
	 * @return
	 */
	private List<String> scanWholePicture(MultipartFile picture) {

		float[] rgb = new float[3];

		BufferedImage bi = null;

		try {
			FileInputStream in = (FileInputStream) picture.getInputStream();
			bi = javax.imageio.ImageIO.read(in);
		} catch (IOException e) {
			log.info("照片轉換失敗");
		}

		int width = bi.getWidth();
		int height = bi.getHeight();
		int minx = bi.getMinX();
		int miny = bi.getMinY();

		ArrayList<float[]> dataSet = new ArrayList<float[]>();

		for (int i = minx; i < width; i++) {
			for (int j = miny; j < height; j++) {

				int pixel = bi.getRGB(i, j);

				rgb[0] = (pixel & 0xff0000) >> 16;
				rgb[1] = (pixel & 0xff00) >> 8;
				rgb[2] = (pixel & 0xff);

				dataSet.add(new float[] { rgb[0], rgb[1], rgb[2] });
			}
		}

		KMeansRunner kRunner = new KMeansRunner(5, dataSet);

		Set<Cluster> clusterSet = kRunner.run();
		List<String> rtnList = new ArrayList<String>();
		List<ColorTag> colorlist = new LinkedList<ColorTag>();

		for (Cluster cluster : clusterSet) {

			float[] colors = cluster.getCenter().getlocalArray();

			StringBuffer sb = new StringBuffer("");

			sb.append((int) Math.floor(colors[0]));
			sb.append(",");
			sb.append((int) Math.floor(colors[1]));
			sb.append(",");
			sb.append((int) Math.floor(colors[2]));

			String rgbString = sb.toString();
			float diatance = this.getDistance(colors[0], colors[1], colors[2]);
			ColorTag temp = new ColorTag(rgbString, diatance);

			colorlist.add(temp);

		}

		Collections.sort(colorlist);

		for (ColorTag tag : colorlist) {
			rtnList.add(tag.getColorTag());
		}
		return rtnList;
	}

	/**
	 * 計算與原點的歐氏距離
	 * @param x
	 * @param y
	 * @param z
	 * @return
	 */
	private float getDistance(float x, float y, float z) {

		float diatance = (float) Math.sqrt(Math.pow((x - 0), 2) + Math.pow((y - 0), 2) + Math.pow((x - 0), 2));

		return diatance;
	}

	/**
	 * 將 RGB 座標轉換為十六進制
	 *
	 * @param rgbList
	 * @return
	 */
	private List<String> rgbToHexList(List<String> rgbList) {

		List<String> hexList = new ArrayList<String>();

		for (String rgb : rgbList) {

			String[] split = rgb.split(",");

			int r = Integer.parseInt(split[0]);
			int g = Integer.parseInt(split[1]);
			int b = Integer.parseInt(split[2]);

			Color rgbColor = new Color(r, g, b);
			String hexCode = "#" + Integer.toHexString(rgbColor.getRGB()).substring(2);

			hexList.add(hexCode);
		}
		return hexList;
	}
}
@Data
@NoArgsConstructor
@AllArgsConstructor
public class ColorTag implements Comparable<ColorTag> {

	private String colorTag;
	private float distance;

	public int compareTo(ColorTag colorTag) {
		return (int) (colorTag.getDistance() - this.getDistance());
	}
}
@CrossOrigin(origins = "*", allowedHeaders = "*")
@RestController
public class ColorCodeTagController {

	@Autowired
	private ColorCodeService colorCodeService;

	@PostMapping("/getColorTags")
	@ResponseBody
	public List<String> getColorTag(@RequestParam("file") MultipartFile picture) {

		List<String> rtnTagsList = colorCodeService.getColorCodeTags(picture);

		return rtnTagsList;
	}
}
在後端完成後,我們來使用 postman 測試,對 localhost:8080/getColorTags 發送 HTTP POST 請求,將照片傳送到後端解析。若是大型專案,也能夠使用 Swagger 來執行 API 的測試。

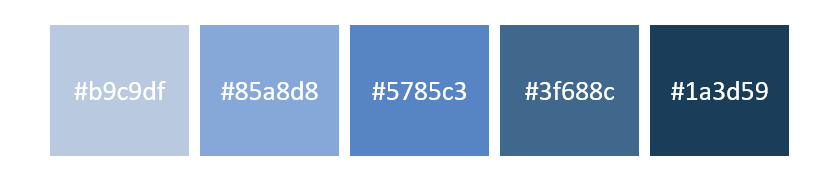
發送後,照片的色碼就成功的回傳了一組五個顏色,並依照由淺到深排序,另外來看看實體顏色呈現的樣子。
在皆大歡喜前,大夥是否看到了在 200 OK 旁邊那驚為天人的響應時間:
1 m 19.44 s ! (後端的資料正在查,你名義 PM 在你後面,他非常火)
一般而言,用戶的響應時間超過兩秒就會帶來糟糕的使用者體驗,這裡我們分析一下響應時間過高的原因:
for (int i = minx; i < width; i++) {
	for (int j = miny; j < height; j++) {
大家可能已經發現了,在實踐照片掃描 pixel 時,是掃描 "每一個" 點,並執行分群,隨著照片解析度的增加,分群的計算與迭代次數也會指數性的提升,這時負責開發的工程師可以將問題與解法測試紀錄,並及時或是於 Daily Scrum 時向團隊報告:
在開發的過程中,常常會遇到非預期、或是規劃上未預料的問題,而部份的問題則與交付的程度有關,如提出的解決方法有可能會降低照片分群顏色的代表性,這時就應該由 Product Owner 進行定奪。
今天,我們實作了 ColorCodeTag 後端的程式,並用 Postman 測試成功獲取了一組五個照片的漸層顏色,也發掘了實作上帶來的問題;明天,讓我們一同審視優化的方法,來扮演 Product Owner 為這個議題定下結論,並準備結束第二期的 Sprint。


 iThome鐵人賽