Container的職責在於創建、配置與組裝bean,昨天我們學到了如何設置工廠方法來產生物件
今日將討論Spring如何設定有生命週期的bean與如何在bean初始化前後再加工bean
讓container在創建與銷毀時調用該物件所擁有的初始化方法與銷毀方法
初始化與銷毀方法不能有參數但可以拋Exception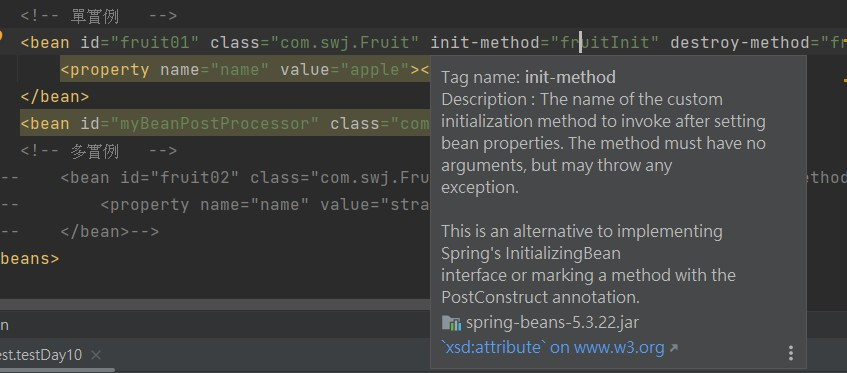
單例生命週期
容器啟動 --> 調用constructor --> 調用初始化方法 --> 容器關閉 --> 調用銷毀方法
多實例生命週期
getBean --> 調用constructor --> 調用初始化方法 > 容器關閉 (不會調用銷毀方法)
public class Fruit {
    private String name;

   public Fruit() {
        System.out.println("創建Fruit...");
    }
    private void fruitInit(){
        System.out.println("Fruit初始化方法..."+name);
    }
    private void fruitDestroy(){
        System.out.println("Fruit銷毀方法..."+name);
    }
    //getter settet toString略
}
<?xml version="1.0" encoding="UTF-8"?>
<beans xmlns="http://www.springframework.org/schema/beans"
       xmlns:xsi="http://www.w3.org/2001/XMLSchema-instance"
       xsi:schemaLocation="http://www.springframework.org/schema/beans http://www.springframework.org/schema/beans/spring-beans.xsd">

    <bean id="fruit01" class="com.swj.Fruit" init-method="fruitInit" destroy-method="fruitDestroy">
        <property name="name" value="apple"></property>
    </bean>
</beans>
@Test
public void testDay10(){
    //使用這個ConfigurableApplicationContext接口才可以調用close方法(容器關閉)
    ConfigurableApplicationContext ioc = new ClassPathXmlApplicationContext("bean10.xml");
    System.out.println("容器啟動完成....");
    Fruit fruit01 = ioc.getBean("fruit01",Fruit.class);
    System.out.println(fruit01);
    System.out.println("容器關閉");
    ioc.close();
}
Result
<?xml version="1.0" encoding="UTF-8"?>
<beans xmlns="http://www.springframework.org/schema/beans"
       xmlns:xsi="http://www.w3.org/2001/XMLSchema-instance"
       xsi:schemaLocation="http://www.springframework.org/schema/beans http://www.springframework.org/schema/beans/spring-beans.xsd">

    <!-- 多實例   -->
    <bean id="fruit02" class="com.swj.Fruit" init-method="fruitInit" destroy-method="fruitDestroy" scope="prototype">
        <property name="name" value="strawberry"></property>
    </bean>
</beans>
@Test
public void testDay10(){
    //使用這個ConfigurableApplicationContext接口才可以調用close方法(容器關閉)
        ConfigurableApplicationContext ioc = new ClassPathXmlApplicationContext("bean10.xml");
        System.out.println("容器啟動完成....");
        Fruit fruit02 = ioc.getBean("fruit02",Fruit.class);
        System.out.println(fruit02);
        System.out.println("容器關閉");
        ioc.close();
}
Result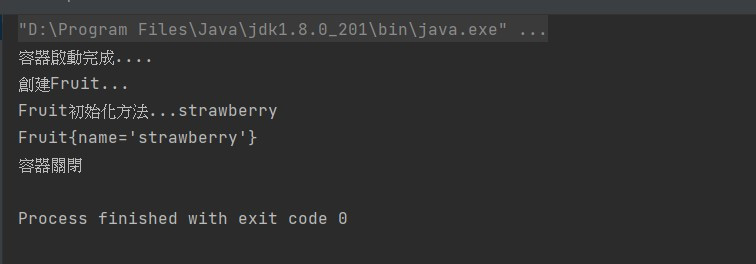
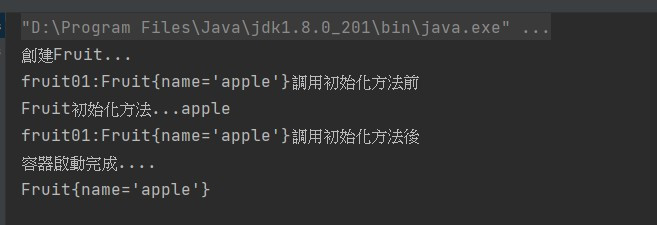
Spring的一個Interface,可以在bean初始化前後調用方法
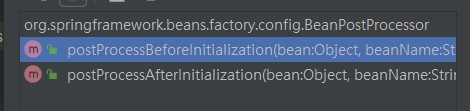
public class MyBeanProcessor implements BeanPostProcessor {
    @Override
    public Object postProcessBeforeInitialization(Object bean, String beanName) throws BeansException {
        System.out.println(beanName+":"+bean+"調用初始化方法前");
        return BeanPostProcessor.super.postProcessBeforeInitialization(bean, beanName);
    }
    @Override
    public Object postProcessAfterInitialization(Object bean, String beanName) throws BeansException {
        System.out.println(beanName+":"+bean+"調用初始化方法後");
        return BeanPostProcessor.super.postProcessAfterInitialization(bean, beanName);
    }
}
<?xml version="1.0" encoding="UTF-8"?>
<beans xmlns="http://www.springframework.org/schema/beans"
       xmlns:xsi="http://www.w3.org/2001/XMLSchema-instance"
       xsi:schemaLocation="http://www.springframework.org/schema/beans http://www.springframework.org/schema/beans/spring-beans.xsd">
    <!-- 單實例   -->
    <bean id="fruit01" class="com.swj.Fruit" init-method="fruitInit" destroy-method="fruitDestroy">
        <property name="name" value="apple"></property>
    </bean>
    <bean id="myBeanPostProcessor" class="com.swj.MyBeanProcessor"></bean>
</beans>
@Test
public void testDay10(){
    ConfigurableApplicationContext ioc = new ClassPathXmlApplicationContext("bean10.xml");
    System.out.println("容器啟動完成....");
    Fruit fruit01 = ioc.getBean("fruit01",Fruit.class);
    System.out.println(fruit01);
}
Result