今天和大家一起來看佈局原理以及佈局相關元件,分為幾個部分說明:
好的,那我們就開始吧!
Container( // parent widget
    color: Colors.blue,
    child: Container(color:Colors.red), // child widget
)
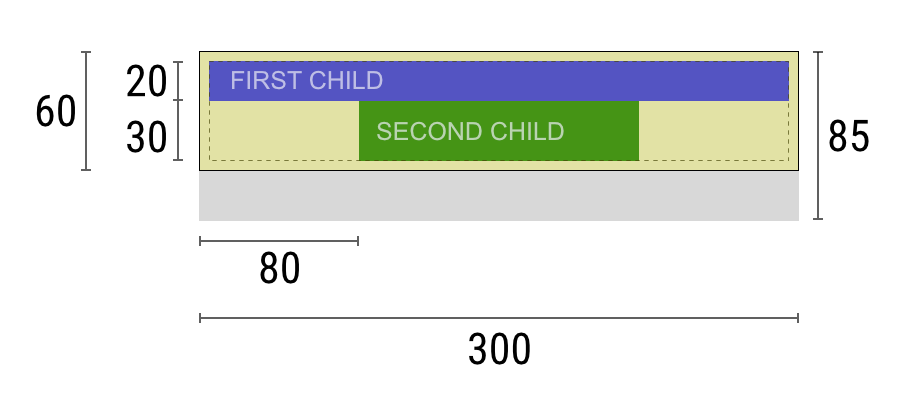
在flutter裡面,佈局須依循以下原則,
Constraints go down.
Sizes go up.
Parent sets position.
也就是
1.約束條件是由上層傳遞至下層
2.組件大小由下層提供給上層
3.最後由上層決定下層的位置

如圖,黃色組件會
接下來我們來介紹一些接受單一child widget的佈局組件:
Align:將組件對齊,由Alignment class指定對齊位置
Center(
  child: Container(
    height: 120.0,
    width: 120.0,
    color: Colors.blue[50],
    child: const Align(
      alignment: Alignment.topRight, // 對齊右上角
      child: FlutterLogo(
        size: 60,
      ),
    ),
  )
)
AspectRatio:試圖讓組件呈現一定的比例,如16:9
AspectRatio(
    aspectRatio: 16 / 9,
    child: Container(
      color: Colors.green,
    ),
),
Center:讓組件置中
Center(
    child: Container(color: Colors.green)
)
ConstrainedBox: 對組件施加額外的限制,例如:最小高度50px
寫法:
ConstrainedBox(
  constraints: const BoxConstraints(minHeight:50.0),
  child: const Card(child: Text('Hello World!')),
)
Container:簡單的容器組件,可以在內部放任何東西並排版,類似HTML的<div>
Container(
    margin: const EdgeInsets.all(10.0),
    color: Colors.amber[600],
    width: 48.0,
    height: 48.0,
),
Expanded:在與其他組件共享固定空間的同時,試圖擴展並填滿剩餘的空間
Column(
  children: <Widget>[
    Container(
      color: Colors.blue,
      height: 100,
      width: 100,
    ),
    Expanded(
    // 視剩下的空間有多少,盡可能填滿
      child: Container(
        color: Colors.amber,
        width: 100,
      ),
    ),
    Container(
      color: Colors.blue,
      height: 100,
      width: 100,
    ),
  ],
),
Padding: 在組件加上padding(組件和外框的間隙)
const Card(
  child: Padding(
    padding: EdgeInsets.all(16.0),
    child: Text('Hello World!'),
  ),
)
EdgeInsets來決定要設置哪邊的間隙
EdgeInsets.all(8.0):上下左右皆空出8.0
EdgeInsets.symmetric(vertical:8.0):垂直方向空出8.0
EdgeInset.only(top:8.0):只在上方空出8.0
SingleChildScrollView: 讓單一組件可以滑動。scrollview相關組件可以透過滑動讓頁面延伸,並得以放進更內容;通常搭配其他佈局元件使用。
SingleChildScrollView(
    child: ConstrainedBox(
      constraints: BoxConstraints(
        minHeight: viewportConstraints.maxHeight,
      ),
      child: Column(
        mainAxisSize: MainAxisSize.min,
        mainAxisAlignment: MainAxisAlignment.spaceAround,
        children: <Widget>[
          Container(
            // A fixed-height child.
            color: const Color(0xffeeee00), // Yellow
            height: 120.0,
            alignment: Alignment.center,
            child: const Text('Fixed Height Content'),
          ),
          Container(
            // Another fixed-height child.
            color: const Color(0xff008000), // Green
            height: 120.0,
            alignment: Alignment.center,
            child: const Text('Fixed Height Content'),
          ),
        ],
      ),
    ),
);
如上例,SingleChildScrollView內部先包了一層ConstrainedBox限制最小高度,ConstraintBox內層又包了Column用於垂直排列其他兩個Container children。就算在SingelChildScrollView內部塞入的組件總高度已經「超出螢幕高度」,仍然可以透過滾動捲軸查看完整畫面,不會有破版問題。
此外還有接受多個child widget的佈局組件
Column:表示垂直方向的多個child widget佈局
mainAxisAlignment: 主軸(y軸)的對齊方式
center: 所有child垂直置中start:所有child靠上方(主軸起始處)放置end:所有child靠下方(主軸末端處)放置spaceAround:所有child之間留相等的間距,第一個和最後一個child與邊界的距離是1/2的間距spaceBetween: 所有child之間留相等的間距,但第一個和最後一個child與邊界不留間距spaceEvenly: child和child之間、child和邊界之間的間距相等crossAxisAlignment: 副軸(x軸)的對齊方式
center:所有child水平置中start:所有child靠左方(副軸起始處)放置end:所有child靠右方(副軸末端處)放置stretch:延伸child使其填滿寬度baseline: 所有child對齊baseline寫法:
Column(
  mainAxisAlignment: MainAxisAlignment.spaceBetween,
  children: const <Widget>[
    Text('Deliver features faster'),
    Text('Craft beautiful UIs'),
    Expanded(
      child: FittedBox(
        child: FlutterLogo(),
      ),
    ),
  ],
)
GridView:網格佈局,呈現2D維度的格子且包含捲軸
GridView.count(
  primary: false,
  padding: const EdgeInsets.all(20),
  crossAxisSpacing: 10,
  mainAxisSpacing: 10,
  crossAxisCount: 2,
  children: <Widget>[
    Container(
      padding: const EdgeInsets.all(8),
      color: Colors.teal[100],
      child: const Text("He'd have you all unravel at the"),
    ),
    Container(
      padding: const EdgeInsets.all(8),
      color: Colors.teal[200],
      child: const Text('Heed not the rabble'),
    ),
    Container(
      padding: const EdgeInsets.all(8),
      color: Colors.teal[300],
      child: const Text('Sound of screams but the'),
    ),
    Container(
      padding: const EdgeInsets.all(8),
      color: Colors.teal[400],
      child: const Text('Who scream'),
    ),
  ],
)
ListView:列表佈局,呈現垂直/水平的列表且包含捲軸
ListView(
  padding: const EdgeInsets.all(8),
  children: <Widget>[
    Container(
      height: 50,
      color: Colors.amber[600],
      child: const Center(child: Text('Entry A')),
    ),
    Container(
      height: 50,
      color: Colors.amber[500],
      child: const Center(child: Text('Entry B')),
    ),
    Container(
      height: 50,
      color: Colors.amber[100],
      child: const Center(child: Text('Entry C')),
    ),
  ],
)
Row:表示水平方向的多個child widget的佈局,和Column相反
mainAxisAlignment: 主軸(x軸),properties同Column mainAxisAlignment
crossAxisAlignment: 副軸(y軸),properties同Column crossAxisAlignment
Row(
  mainAxisAlignment: MainAxisAlignment.spaceBetween,
  children: const <Widget>[
    Expanded(
      child: Text('Deliver features faster', textAlign: TextAlign.center),
    ),
    Expanded(
      child: Text('Craft beautiful UIs', textAlign: TextAlign.center),
    ),
    Expanded(
      child: FittedBox(
        child: FlutterLogo(),
      ),
    ),
  ],
)
Stack:堆疊佈局,設定組件的child相對於組件邊界的位置
Stack(
  children: <Widget>[
    Container(
      width: 100,
      height: 100,
      color: Colors.red,
    ),
    Container(
      width: 90,
      height: 90,
      color: Colors.green,
    ),
    Container(
      width: 80,
      height: 80,
      color: Colors.blue,
    ),
  ],
)
更多關於佈局組件的用法,詳見官方文件。
我們昨天已經預先跟負責垂直排列元件的Column打過招呼了,今天試著透過佈局組件來排除破版的問題吧:
在頁面主體加入SingleChildScrollView,讓頁面得以滑動並解決說明文字超出版面的問題。
SingleChildScrollView,或者透過IDE flutter extension提供的方法
Column按下右鍵,選取:Refactor
Wrap with widget...
SingleChildScrollView即可,用這個方法會比手打方便許多在Image外層包上Container,並設置對Image的constraint: 寬度為螢幕寬、最小高度為螢幕寬。當下螢幕寬度可以透過 MediaQuery.of(context).size.width取得
Container(
  constraints: BoxConstraints(minHeight: deviceWidth),
  width: deviceWidth,
  child: Image.network(
      'https://apod.nasa.gov/apod/image/2209/WaterlessEarth2_woodshole_2520.jpg',
      loadingBuilder: (BuildContext context, Widget child,
          ImageChunkEvent? loadingProgress) {
    if (loadingProgress == null) {
      return child;
    }
    return Center(
      child: CircularProgressIndicator(
        value: loadingProgress.expectedTotalBytes != null
            ? loadingProgress.cumulativeBytesLoaded /
                loadingProgress.expectedTotalBytes!
            : null,
      ),
    );
  }),
),
將「favorite」Button和主要的Image 以 Stack的形式重疊,Button要在Image的右上角
Stack(
  children: [
    Container(
      constraints: BoxConstraints(minHeight: deviceWidth),
      width: deviceWidth,
      child: Image.network(
          'https://apod.nasa.gov/apod/image/2209/WaterlessEarth2_woodshole_2520.jpg',
          loadingBuilder: (BuildContext context, Widget child,
              ImageChunkEvent? loadingProgress) {
        if (loadingProgress == null) {
          return child;
        }
        return Center(
          child: CircularProgressIndicator(
            value: loadingProgress.expectedTotalBytes != null
                ? loadingProgress.cumulativeBytesLoaded /
                    loadingProgress.expectedTotalBytes!
                : null,
          ),
        );
      }),
    ),
    ElevatedButton(
        onPressed: () {
          print('add to favorite');
        },
        child: const Text('favorite')),
  ],
),
在ElevatedButton 外層加上Position,將其定位在Image的右上角距離邊框10.0的位置。Position在這邊是搭配Stack layout定位使用的Widget
Positioned(
  top: 10.0, // 相對上方距離10.0
  right: 10.0, // 相對右方距離10.0
  child: ElevatedButton(
      onPressed: () {
        print('add to favorite');
      },
      child: const Text('favorite')),
),
畫面呈現如下:
Day12相關commit今天看到了佈局相關的規則以及許多佈局組件,總結如下:
Align:對齊AspectRatio:指定比例Center:置中ConstratinedBox:長寬限制Container:外框容器Expanded:盡可能佔據剩餘空間Padding:與外框的間隙SingleChildScrollView:加上頁面捲軸Column:垂直排列GridView:網格式排列ListView:列表式排列Row:水平排列Stack:堆疊排列內容蠻多的呢!明天我們要來創建新的頁面,
並看看如何在APP內導頁~
