
殺死一個 container 還有千千萬萬個 container 等著~ (並沒有)
圖片來源:Docker (@Docker) / Twitter
上一篇簡單列出從 Docker 轉換到 Kubernetes 需要注意的項目 (Image, Volume, Network)
這篇先透過簡單的方案來練習一下 Kubernetes resource,之後的篇章會慢慢拆解各個部分,最後調整成適合的部署方案
以下會根據不同 resource 分開描述
resource 完整檔案可以到 github ithome2022/mcs.yaml 查看
yaml 檔案使用
---分隔不同段,可以用來分隔多個 resource
# resource 1
apiVersion: v1
kind: Namespace
...

---
# resource 2
apiVersion: apps/v1
kind: Deployment
...
這次練習的背景環境如下
image: 使用社群提供的 image itzg/minecraft-server
voluem: PersistentVolume 使用簡單的 hostPath 練習network: 對外的 Service 指定使用某一台機器的額外 ip (下方以 10.2.0.1 為例)docker run -d -it --name mcs \
-v /home/mcs:/data \
-p 25565:25565 \
--ip 10.2.0.1 \
-e EULA="TRUE" \
-e VERSION=1.19.2 \
-e MEMORY=2G \
-e TZ=Asia/Taipei \
itzg/minecraft-server
Namespace 可以將 resource 分群組,跟 cluster 內部權限設定 (ServiceAccount) 有關,基本上不能跨 Namespace 存取資源
先簡單建立 Namespace 讓 Minecraft Server 的資源都能放在一起
apiVersion: v1
kind: Namespace
metadata:
  name: mcs
可以參考下圖架構,Deployment 透過宣告式 (Declaratively) 的方式向下管控 Pod,從 Deployment 可以透過宣告部署的版本、更版的部署策略自動化更版流程
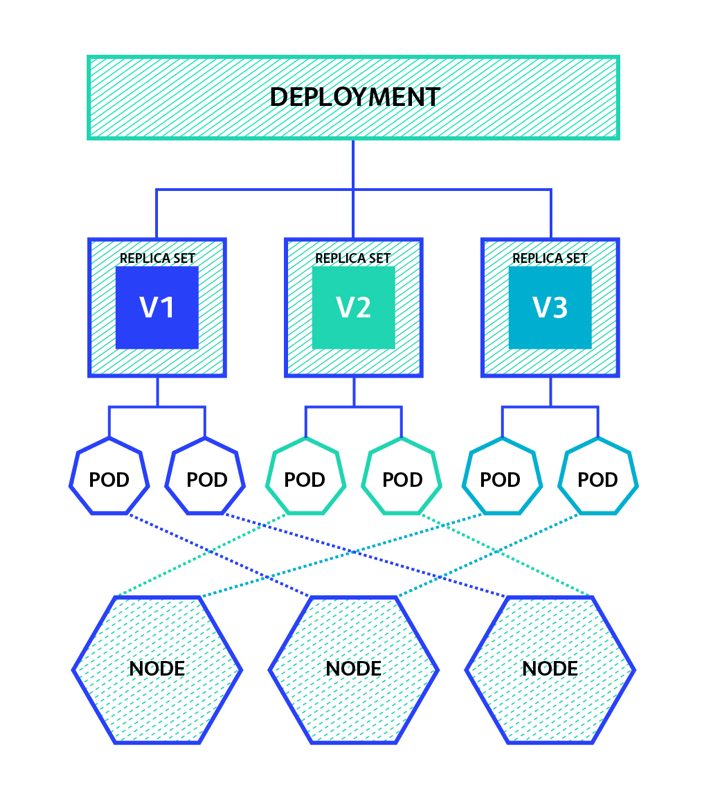
圖片來源:[Kubernetes] Deployment Overview | 小信豬的原始部落
內容有點長,拆分一下...
resource 基本設定
apiVersion: apps/v1
kind: Deployment
metadata:
  namespace: mcs
  name: mcs
部署相關設定
spec:
  selector:
    matchLabels:
      app: mcs
  replicas: 1
  strategy:
    type: Recreate
  template:
    metadata:
      labels:
        app: mcs
    spec:
      ...
selector: 篩選要控制的 Pod,template 必須符合這項規則replicas: 可以設定一次部署多個 Pod,這篇是使用 Minecraft Server 所以只設定 1 個strategy: 設定更版的策略,可設定 RollingUpdate 或 Recreate,在設定多個 replicas 才會有差別,RollingUpdate 會依序將 Pod 一個一個更新版本template 設定部署的 Pod 模板spec > template > volumes,宣告使用 whale3 上的 /home/mcs 做為 hostPath volume
spec:
  ...
  template:
    ...
    spec:
      nodeName: whale3
      volumes:
      - name: mcs-data
        hostPath:
          path: /home/mcs
spce > template > containers 詳細設定
spec:
  ...
  template:
    ...
    spec:
      containers:
      - name: mcs
        image: itzg/minecraft-server
        tty: true
volumeMounts 使用上一部宣告的 volume # volume
volumeMounts:
- name: mcs-data
mountPath: /data
resources 限制 Pod 最大資源使用量,防止大量佔用資源 # resource
resources:
requests:
memory: "1Gi"
cpu: "1000m"
limits:
memory: "2.5Gi2"
cpu: "2500m"
ports 公開 port 25565 # port
ports:
- containerPort: 25565
name: mcs-port
Probe 用於測試健康度,這裡透過 image 提供的指令 mc-health 測試 # probes
startupProbe: # 測試 initialze
exec:
command:
- mc-health
initialDelaySeconds: 300
timeoutSeconds: 1
successThreshold: 1
failureThreshold: 3
periodSeconds: 10
livenessProbe: # 測試 Pod 健康度
tcpSocket:
port: 25565
initialDelaySeconds: 10
timeoutSeconds: 1
successThreshold: 1
failureThreshold: 3
periodSeconds: 10
readinessProbe: # 測試服務健康度
exec:
command:
- mc-health
initialDelaySeconds: 10
timeoutSeconds: 1
successThreshold: 1
failureThreshold: 3
periodSeconds: 10
env 設定環境參數 # env
env:
- name: EULA
value: "TRUE"
- name: VERSION
value: 1.19.2
- name: MEMORY
value: 2G
- name: TZ
value: Asia/Taipei
Service 用來設定公開服務,這裡直接使用 external IP 指定
apiVersion: v1
kind: Service
metadata:
  namespace: mcs
  name: mcs
spec:
  selector:
    app: mcs
  ports:
  - name: mcs-port
    protocol: TCP
    port: 25565
    targetPort: mcs-port    # 對接 deployment template Port
  externalIPs:
  - 10.2.0.1
kubectl apply -f mcs.yaml
logs...
測試連線
telnet 10.2.0.1 25565


成功~
今天練習利用基本的 Kubernetes resource 架起服務,只能稱得上堪用,面對不同的服務架設還需要更通盤的部署方法,接下來的篇章會針對部署的架構再進一步加強吧~