像影音平台依樣呈現一系列的電影或是音樂,而 Recyclerview 跟 ListView 有什麼不一樣呢?我們今天就來了解一下什麼是 Recyclerview 吧!以下如有解釋不清或是描述錯誤的地方還請大家多多指教:
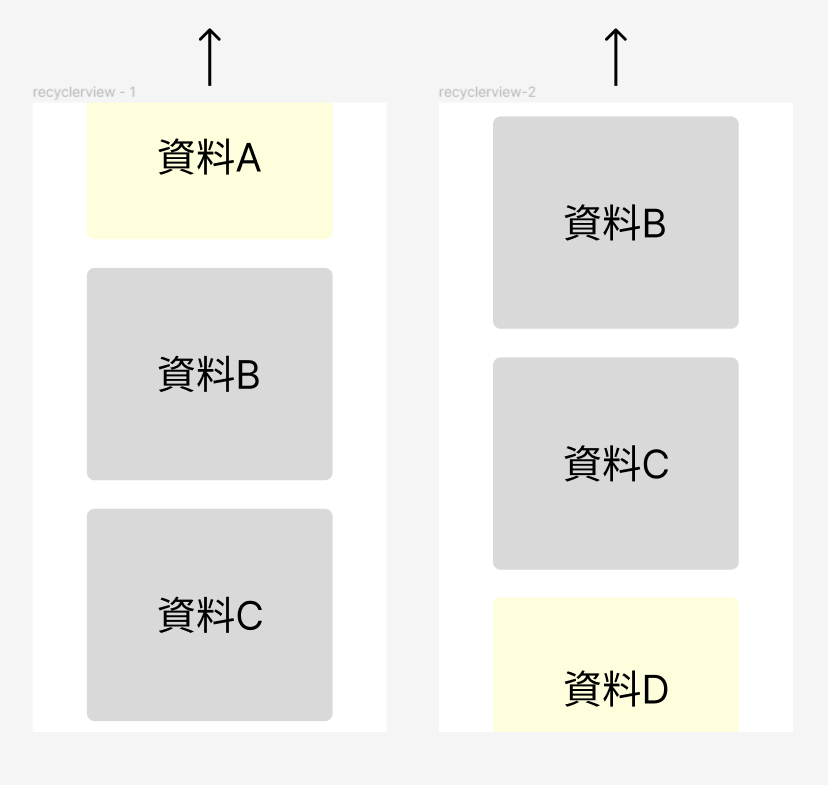
從他的名字直翻成中文會變成回收的視圖,也就是說在我們畫面的可是範圍中會產出足夠的 view 並呈現資料,當資料 A 離開畫面時,離開的 view 就會重複利用提供給資料 D:
那這個機制有什麼好處呢?當你的資料數有 100 個,view 也很複雜時,你不會希望因為產出 100 個複雜的 view 而讓你操作的體驗變差。
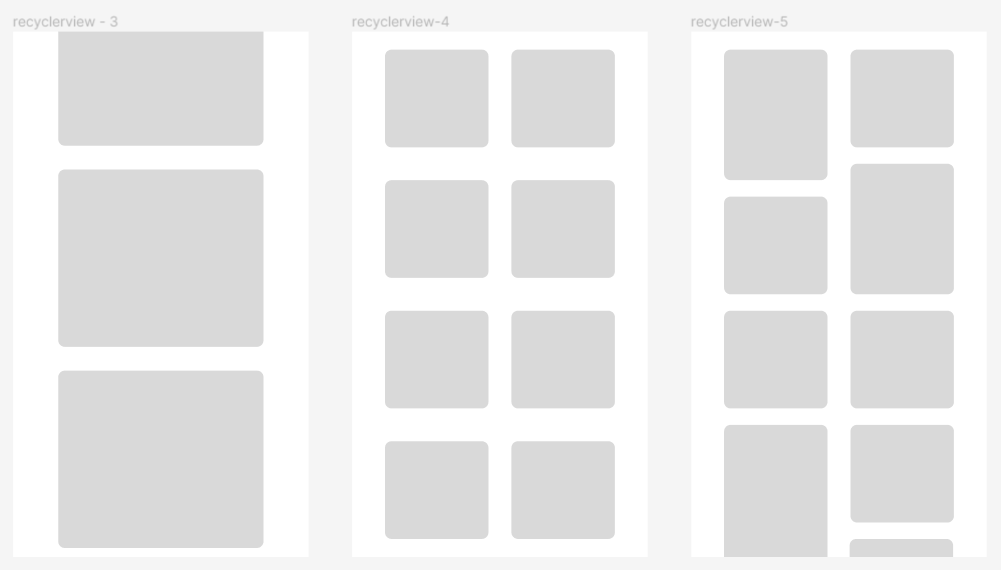
recyclerview 總共提供三種呈現方式及兩種滑動方向,而呈現方式是由 LayoutManager 所控制的,可以選擇要垂直滑動還是橫向,可在 XML 或是直接在 Fragment 及 Activity 中設定 :
<androidx.recyclerview.widget.RecyclerView
        android:id="@+id/cityList"
        android:layout_width="match_parent"
        android:layout_height="0dp"
				app:layoutManager="androidx.recyclerview.widget.LinearLayoutManager"
        app:layout_constraintBottom_toBottomOf="parent"
        app:layout_constraintEnd_toEndOf="parent"
        app:layout_constraintStart_toStartOf="parent"
        app:layout_constraintTop_toTopOf="parent" />
cityList.apply {
    layoutManager = LinearLayoutManager(context)
    ...
}
GridLayoutManager (固定格狀)
spanCount 是設定要切成幾格<androidx.recyclerview.widget.RecyclerView
android:id="@+id/cityList"
android:layout_width="match_parent"
android:layout_height="0dp"
app:layoutManager="androidx.recyclerview.widget.GridLayoutManager"
app:spanCount="2"
app:layout_constraintBottom_toBottomOf="parent"
app:layout_constraintEnd_toEndOf="parent"
app:layout_constraintStart_toStartOf="parent"
app:layout_constraintTop_toTopOf="parent" />
cityList.apply {
    layoutManager = GridLayoutManager(context, 2)
    ...
}
StaggeredGridLayoutManager (非固定格狀)
spanCount 是設定要切成幾格<androidx.recyclerview.widget.RecyclerView
android:id="@+id/cityList"
android:layout_width="match_parent"
android:layout_height="0dp"
app:layoutManager="androidx.recyclerview.widget.StaggeredGridLayoutManager"
app:spanCount="2"
app:layout_constraintBottom_toBottomOf="parent"
app:layout_constraintEnd_toEndOf="parent"
app:layout_constraintStart_toStartOf="parent"
app:layout_constraintTop_toTopOf="parent" />
cityList.apply {
    layoutManager = StaggeredGridLayoutManager(2,StaggeredGridLayoutManager.VERTICAL)
    ...
}
可以利用 tool 提供的方法來預視我們的 view 長完後的樣子:
tools:itemCount="2"
tools:listitem="@layout/item_city_list"
我們透過實作 Adapter 來將資料轉換成我們實作好的介面上,而 Adapter 又是一種設計模式,也被稱作 wrapper,可以讓一個介面轉換成期望中的樣子,使原本不能協作的類別可以執行,這句話可能有點抽象,簡單來說呢!如果要將我們客製化的造型放入 recyclerview 就需要一個轉接器讓他可以和原有設計進行溝通,就像你到國外會需要一個插頭轉換器,讓你的電器可以在不同電壓的插座上使用。
第一個步驟依樣要加入 library
dependencies {
	...
    implementation "androidx.recyclerview:recyclerview:1.2.1"
	...
}
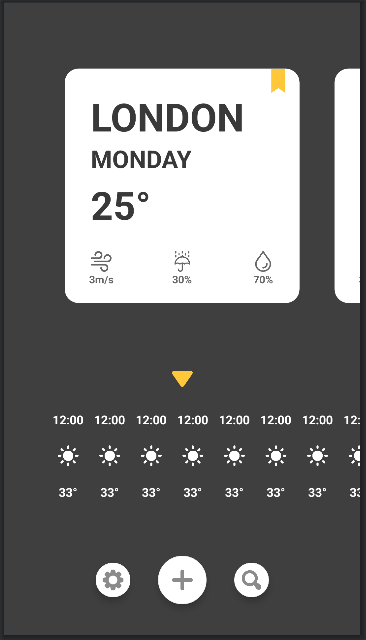
我們利用 tool 將先前製作的 item view 放置在 preview 上,並且設定 clipToPadding = false 讓整個 list 的 item 可以往內縮,換完後我們預視圖會呈現這樣:
<androidx.recyclerview.widget.RecyclerView
        android:id="@+id/cityList"
        android:layout_width="match_parent"
        android:layout_height="0dp"
        android:clipToPadding="false"
        android:paddingStart="50dp"
        android:paddingEnd="50dp"
        android:orientation="horizontal"
        app:layoutManager="androidx.recyclerview.widget.LinearLayoutManager"
        app:layout_constraintTop_toTopOf="parent"
        app:layout_constraintStart_toStartOf="parent"
        app:layout_constraintEnd_toEndOf="parent"
        app:layout_constraintBottom_toTopOf="@+id/arrowSign"
        tools:itemCount="3"
        tools:listitem="@layout/item_city_card"/>

<androidx.recyclerview.widget.RecyclerView
        android:id="@+id/cityTemList"
        android:layout_width="match_parent"
        android:layout_height="0dp"
        android:layout_marginBottom="24dp"
        android:clipToPadding="false"
        android:paddingStart="50dp"
        android:paddingEnd="50dp"
        android:orientation="horizontal"
        app:layoutManager="androidx.recyclerview.widget.LinearLayoutManager"
        app:layout_constraintStart_toStartOf="parent"
        app:layout_constraintEnd_toEndOf="parent"
        app:layout_constraintBottom_toTopOf="@+id/addButton"
        tools:itemCount="10"
        tools:listitem="@layout/item_city_tem" />
接下來實作 Adapter 吧!我們會實作 ListAdapter 並搭配 DiffUtil ,這個有什麼作用呢?當我們同一個 id 的資料做更動時,並不想要整個 list view 都要重刷,這個時候 DiffUtil 就會幫我們做檢查,同一個 id 資料有不一樣時只會更新那筆資料的狀態,這種情況我們可以用在更新單一筆數個別做 loading 或是下載進度的畫面。
先在各個頁面的資料夾中建立 Class,以主頁為範例進行實作,建立一個 OnClickListener 的 function 將點擊的資料往外傳給 fragment,並加入 diffUtil 來比較更新的資料,以 ViewBinding 來綁定元件,(後天會介紹到 ViewBinding ) :
class HomeCityAdapter(private val onClickListener: OnClickListener) : ListAdapter<CityCard, HomeCityAdapter.CityViewHolder>(DiffCallback) {

    class OnClickListener(val clickListener: (city: CityCard) -> Unit) {
        fun onClick(city: CityCard) = clickListener(city)
    }

    override fun onCreateViewHolder(parent: ViewGroup, viewType: Int): CityViewHolder {
        return CityViewHolder(ItemCityCardBinding.inflate(LayoutInflater.from(parent.context), parent, false))
    }

    override fun onBindViewHolder(holder: CityViewHolder, position: Int) {
        holder.setupView(currentList[position])
    }

    inner class CityViewHolder(private val binding: ItemCityCardBinding): RecyclerView.ViewHolder(binding.root) {
        fun setupView(city: CityCard) = binding.apply {
            cityName.text = city.cityName
            weekName.text = city.day
            cityTem.text = city.temp
            cityWindy.text = city.wind
            cityWet.text = city.wet
            cityRainy.text = city.rain
            root.setOnClickListener {
                onClickListener.onClick(city)
            }
        }
    }

    companion object DiffCallback : DiffUtil.ItemCallback<CityCard>() {
        override fun areItemsTheSame(oldItem: CityCard, newItem: CityCard): Boolean {
            return oldItem === newItem
        }
        override fun areContentsTheSame(oldItem: CityCard, newItem: CityCard): Boolean {
            return oldItem.id == newItem.id
        }
    }
}
建立好的 Adapter 要 assign 給 RecyclerView,並先預塞一個設定好的假資料:
...
private val cardAdapter by lazy { HomeCityAdapter(
    HomeCityAdapter.OnClickListener { it: CityCard // system display
       //
    }
)}

...

private fun setupView() = binding.apply {
      val fakeData = CityCard(
          0,
          "LONDON",
          "MONDAY",
          "30°",
          "15m/s",
          "30%",
          "50%",
          false,
          listOf(
              CityDayTemp(
              "Tue",
              IconType.SUN,
              "30°",
              "25°"
          ), CityDayTemp(
              "Wed",
              IconType.SUN,
              "30°",
              "30°"
          ))
        )
        cityList.adapter = cardAdapter
        cardAdapter.submitList(listOf(fakeData))
}
