演算法中有個經典的問題:樹狀結構,要把它的每個節點都拜訪一次呢?
用途:[day-17] 的樹狀結構,走訪每個 node 就可以將每個 node 的 attrStr 轉換成 attrs
( •̀ ω •́ )✧

我們可以用 DFS - 深度優先搜尋,或是 BFS - 廣度優先搜尋,來解決這個問題。
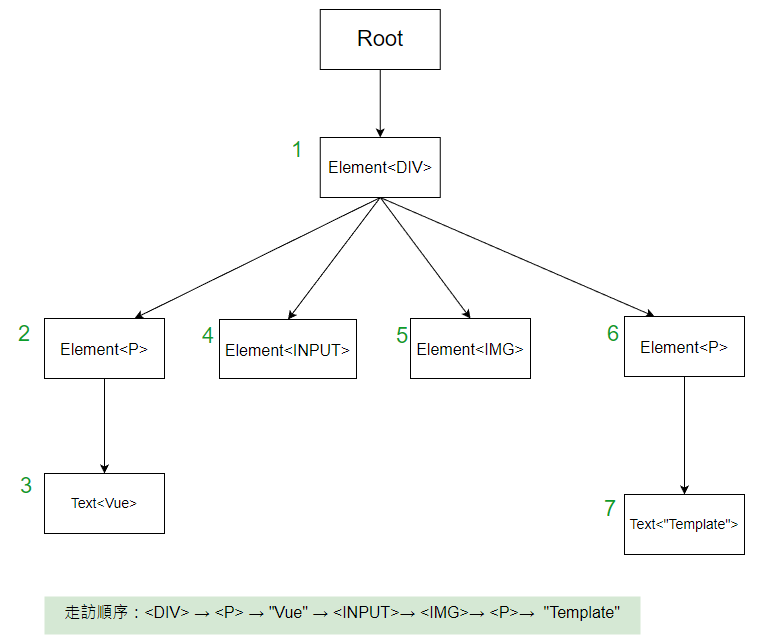
深度優先搜尋,就是遇到 node 時,往 child node 走,一直往下走,直到走不下去為止,然後再回頭,往下一個根節點走,直到走完所有的節點。
const logger = node => {
  if (node.type === 'text')
    console.log('currentNode=', node.content)
  else
    console.log('currentNode=', node.type)
};

function dfs(ast) {
  // 當前節點,第一次進入時 ast 也就是 ROOT 節點
  const currentNode = ast;

  //  console.log 當前節點
  logger(currentNode);

  if (currentNode.children?.length > 0) {
    // 如果當前節點有 child node,就遞迴走訪
    for (const childNode of currentNode.children) {
      dfs(childNode);
    }
  }
}
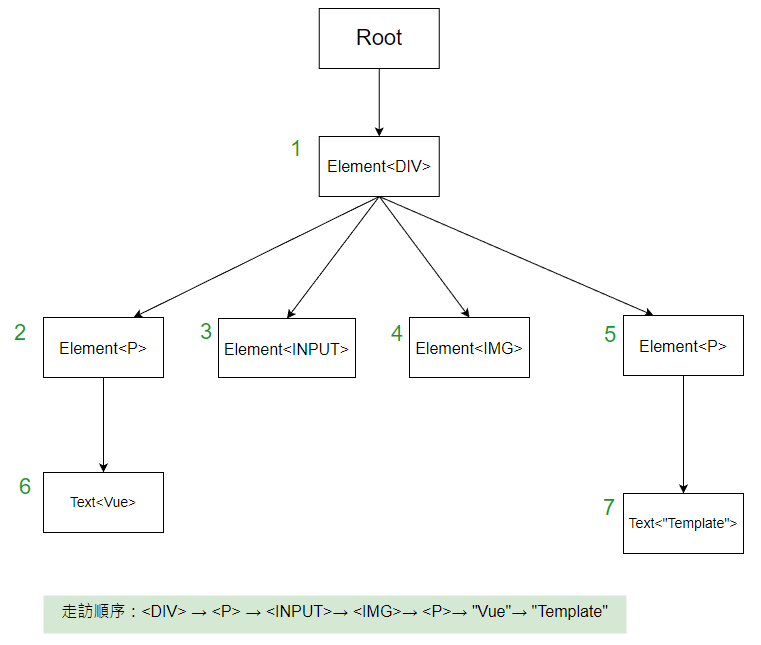
廣度優先搜尋,就是每個 node,走完當前 node 的所有的 child node,才往孫節點走,直到走完所有的節點。
const logger = node => {
  if (node.type === 'text')
    console.log('currentNode=', node.content)
  else
    console.log('currentNode=', node.type)
};

function bfs(ast) {
  // 當前節點,第一次進入時 ast 也就是 ROOT 節點
  const currentNode = ast;
  const stack = [currentNode];

  while (stack.length > 0) {
    // 取出 stack 的第一個節點
    const currentNode = stack.shift();

    //  console.log 當前節點
    logger(currentNode);

    if (currentNode.children?.length > 0) {
      // 如果當前節點有 child node,就把 child node 放入 stack
      for (const childNode of currentNode.children) {
        stack.push(childNode);
      }
    }
  }
}
NOTE: logger 這個函式每次遇到新的 node 時,都會被呼叫一次
如果將 logger 改成 transformer 的話,就可以在每次遇到一個 node 時,執行我們想要那個 node 多做的事情,例如將 attrStr 做 tokenize。
+ const transformer = require("./transformer");

function dfs(ast) {
  ...

   // 改成 transformer
+  transformer(currentNode);
-  logger(currentNode);

  ...
}
transformer 與 PluginManager 的實作
// pluginManager.js
class PluginManager {
  plugins = [];

  add(plugin) {
    this.plugins.push(plugin);
  }

  setPlugins(plugins) {
    this.plugins = plugins;
  }

  get() {
    return this.plugins;
  }
}

const pluginManager = new PluginManager();
module.exports = pluginManager;
// transformer.js
const transformer = node => {
  const plugins = pluginManager.get();

  for (const plugin of plugins) {
    const {visitor} = plugin;
    const {ALL: allHandler, [node.type]: typeHandler} = visitor;

    // 先執行 ALL 通用的處理函式
    allHandler && allHandler(node);

    // 再執行對應 type 的處理函式
    typeHandler && typeHandler(node);
  }
};
我們來執行一下 O(∩_∩)O
// app.js
const AttrTokenizer = require("../day-18/attrStr-tokenizer");
const pluginManager = require("./pluginManager");
const dfs = require("./dfs");

const plugin = () => ({
  visitor: {
    ALL(node) {
      // 所有類型的 node 都會進入此函示處理
      if (node.type !== 'text' && node.attrStr) {
        node.attrs = new AttrTokenizer(node.attrStr).tokenize();
      }
    },
    text(node) {
      // 只有 type = "text" 的 node 會進入此函示處理
      console.log('text node=', node.content);
    }
  }
});

pluginManager.add(plugin);

const ast = require("./ast.json");
const newAST = dfs(ast);
console.log('newAST=', JSON.stringify(newAST, null, 2));
如果我們查看 BABEL 撰寫你的第一個 Babel 外掛 的範例,
可以看到他們是這樣寫的:
export default function ({types: t}) {
  return {
    visitor: {
      Identifier(path, state) {
      },
      ASTNodeTypeHere(path, state) {
      }
    }
  };
};
看過上面的解說,我們大致上可以理解 BABEL 的 Plugin 是如何運作的 []~( ̄▽ ̄)~*
今天我們只是大概提了一下,如何遍歷 (Traverse)樹狀結構 TREE,如果想要更詳細的說明。
可以查看這篇邦友的文章:【Day33】[演算法]-深度優先搜尋DFS與廣度優先搜尋BFS

 iThome鐵人賽