上一篇我們已經安裝好了 Kali Linux,需要的朋友可以參考一下。
接下來我們要在 Kali Linux 安裝 OpenVAS,架構圖如下。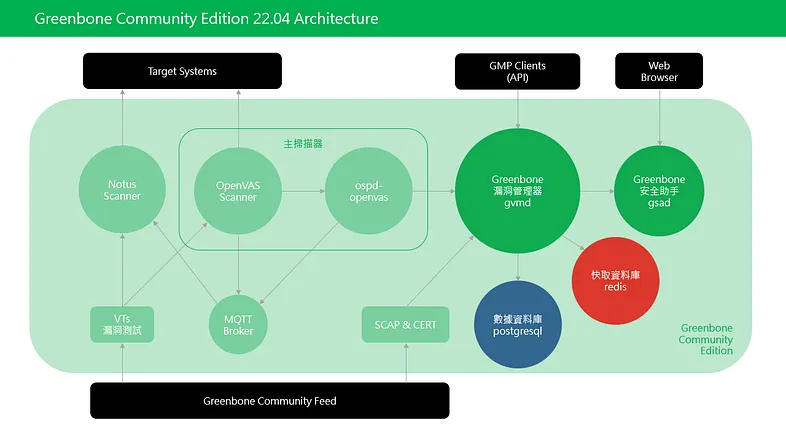
Community 與 Enterprise Feed 的差異如下
先檢查是否有可用更新並升級
sudo apt update
sudo apt dist-upgrade
OpenVAS 安裝
相較於透過源代碼構建,透過 Kali Linux 安裝 OpenVAS 非常簡單。
sudo apt install gvm
Greenbone 已經將自家的 OpenVAS 改名為 Greenbone Vulnerability Management (GVM),避免與市場上的品牌混淆。
https://greenbone.github.io/docs/latest/background.html#history-of-the-openvas-project
Using the term Greenbone Vulnerability Management (GVM) instead of “OpenVAS framework” for the releases.
接下來的安裝過程,我們統一使用 GVM 這個名詞。
GVM 會幫我們安裝 PostgreSQL 儲存用戶數據與檢驗結果,檢查服務是否正常運行。
sudo systemctl status postgresql.service
sudo systemctl enable postgresql.service
● postgresql.service - PostgreSQL RDBMS
     Loaded: loaded (/lib/systemd/system/postgresql.service; enabled; preset: disabled)
     Active: active (exited) since Fri 2023-06-09 23:23:10 CST; 5 days ago
   Main PID: 753 (code=exited, status=0/SUCCESS)
        CPU: 2ms
GVM 會幫我們安裝 Redis 作為快取使用,檢查服務是否正常運行。
sudo systemctl status redis-server@openvas.service
sudo systemctl enable redis-server@openvas.service
● redis-server@openvas.service - Advanced key-value store (openvas)
     Loaded: loaded (/lib/systemd/system/redis-server@.service; enabled; preset: disabled)
     Active: active (running) since Fri 2023-06-09 23:23:07 CST; 5 days ago
       Docs: http://redis.io/documentation,
             man:redis-server(1)
   Main PID: 696 (redis-server)
     Status: "Ready to accept connections"
      Tasks: 5 (limit: 9470)
     Memory: 263.6M
        CPU: 18min 51.125s
     CGroup: /system.slice/system-redis\x2dserver.slice/redis-server@openvas.service
             └─696 "/usr/bin/redis-server unixsocket:/run/redis-openvas/redis-server.sock"
首先要進行 GVM 的初始設定
sudo gvm-setup
[>] Starting PostgreSQL service

[>] Creating GVM's certificate files

[>] Creating PostgreSQL database

[*] Creating database user

[*] Creating database

[*] Creating permissions
CREATE ROLE

[*] Applying permissions
GRANT ROLE

[*] Creating extension uuid-ossp
CREATE EXTENSION

[*] Creating extension pgcrypto
CREATE EXTENSION

[*] Creating extension pg-gvm
CREATE EXTENSION

[>] Migrating database

[>] Checking for GVM admin user
[*] Creating user admin for gvm
[*] Please note the generated admin password
[*] User created with password '796f5d2b-7792-43a0-aedb-53e563ef4925'.
[*] Configure Feed Import Owner
[*] Define Feed Import Owner

[>] Updating GVM feeds
[*] Updating NVT (Network Vulnerability Tests feed from Greenbone Security Feed/Community Feed)
...(略)...
[+] GVM feeds updated
[*] Checking Default scanner
[*] Modifying Default Scanner
Scanner modified.

[+] Done
[*] Please note the password for the admin user
[*] User created with password '9aceeb89-7cfe-42c6-85bd-c3b9da9ac76a'.

[>] You can now run gvm-check-setup to make sure everything is correctly configured
請務必記住 admin 的密碼,稍後登入頁面會使用到。
運行檢查指令,確認安裝沒有問題。
sudo gvm-check-setup
gvm-check-setup 22.4.1
  Test completeness and readiness of GVM-22.4.1
Step 1: Checking OpenVAS (Scanner)...
        OK: OpenVAS Scanner is present in version 22.4.1.
        OK: Notus Scanner is present in version 22.4.4.
        OK: Server CA Certificate is present as /var/lib/gvm/CA/servercert.pem.
Checking permissions of /var/lib/openvas/gnupg/*
        OK: _gvm owns all files in /var/lib/openvas/gnupg
        OK: redis-server is present.
        OK: scanner (db_address setting) is configured properly using the redis-server socket: /var/run/redis-openvas/redis-server.sock
        OK: redis-server is running and listening on socket: /var/run/redis-openvas/redis-server.sock.
        OK: redis-server configuration is OK and redis-server is running.
        OK: the mqtt_server_uri is defined in /etc/openvas/openvas.conf
        OK: _gvm owns all files in /var/lib/openvas/plugins
        OK: NVT collection in /var/lib/openvas/plugins contains 85636 NVTs.
        OK: The notus directory /var/lib/notus/products contains 430 NVTs.
Checking that the obsolete redis database has been removed
        OK: No old Redis DB
        OK: ospd-OpenVAS is present in version 22.4.6.
Step 2: Checking GVMD Manager ...
        OK: GVM Manager (gvmd) is present in version 22.4.2.
Step 3: Checking Certificates ...
        OK: GVM client certificate is valid and present as /var/lib/gvm/CA/clientcert.pem.
        OK: Your GVM certificate infrastructure passed validation.
Step 4: Checking data ...
        OK: SCAP data found in /var/lib/gvm/scap-data.
        OK: CERT data found in /var/lib/gvm/cert-data.
Step 5: Checking Postgresql DB and user ...
        OK: Postgresql version and default port are OK.
 gvmd      | _gvm     | UTF8     | en_US.UTF-8 | en_US.UTF-8 |            | libc            |
16435|pg-gvm|10|2200|f|22.4.0||
        OK: At least one user exists.
Step 6: Checking Greenbone Security Assistant (GSA) ...
        OK: Greenbone Security Assistant is present in version 22.04.1~git.
Step 7: Checking if GVM services are up and running ...
        Starting ospd-openvas service
        Waiting for ospd-openvas service
        OK: ospd-openvas service is active.
        Starting gvmd service
        Waiting for gvmd service
        OK: gvmd service is active.
        Starting gsad service
        Waiting for gsad service
        OK: gsad service is active.
Step 8: Checking few other requirements...
        OK: nmap is present.
        OK: ssh-keygen found, LSC credential generation for GNU/Linux targets is likely to work.
        OK: nsis found, LSC credential package generation for Microsoft Windows targets is likely to work.
        OK: xsltproc found.
        WARNING: Your password policy is empty.
        SUGGEST: Edit the /etc/gvm/pwpolicy.conf file to set a password policy.
Step 9: Checking greenbone-security-assistant...
        OK: greenbone-security-assistant is installed

It seems like your GVM-22.4.1 installation is OK.
檢查 gvmd 服務是否正常運行
sudo systemctl status gvmd
sudo systemctl enable gvmd
● gvmd.service - Greenbone Vulnerability Manager daemon (gvmd)
     Loaded: loaded (/lib/systemd/system/gvmd.service; enabled; preset: disabled)
     Active: active (running) since Wed 2023-06-14 10:40:43 CST; 1 day 3h ago
       Docs: man:gvmd(8)
   Main PID: 156609 (gvmd)
      Tasks: 1 (limit: 9470)
     Memory: 686.4M
        CPU: 9min 23.961s
     CGroup: /system.slice/gvmd.service
             └─156609 "gvmd: gvmd: Wa" --osp-vt-update=/run/ospd/ospd.sock --listen-group=_gvm
檢查 ospd-openvas 服務是否正常運行
sudo systemctl status ospd-openvas
sudo systemctl enable ospd-openvas
● ospd-openvas.service - OSPd Wrapper for the OpenVAS Scanner (ospd-openvas)
     Loaded: loaded (/lib/systemd/system/ospd-openvas.service; enabled; preset: disabled)
     Active: active (running) since Wed 2023-06-14 10:40:40 CST; 1 day 3h ago
       Docs: man:ospd-openvas(8)
             man:openvas(8)
   Main PID: 156596 (ospd-openvas)
      Tasks: 5 (limit: 9470)
     Memory: 139.2M
        CPU: 7min 35.265s
     CGroup: /system.slice/ospd-openvas.service
             ├─156596 /usr/bin/python3 /usr/bin/ospd-openvas --config /etc/gvm/ospd-openvas.conf --log-config /etc/gvm/ospd-logging.conf
             └─156599 /usr/bin/python3 /usr/bin/ospd-openvas --config /etc/gvm/ospd-openvas.conf --log-config /etc/gvm/ospd-logging.conf
檢查 gsad 服務是否正常運行
sudo systemctl status greenbone-security-assistant
sudo systemctl enable greenbone-security-assistant
● gsad.service - Greenbone Security Assistant daemon (gsad)
     Loaded: loaded (/lib/systemd/system/gsad.service; enabled; preset: disabled)
     Active: active (running) since Wed 2023-06-14 10:40:48 CST; 1 day 3h ago
       Docs: man:gsad(8)
             https://www.greenbone.net
   Main PID: 156644 (gsad)
      Tasks: 5 (limit: 9470)
     Memory: 42.3M
        CPU: 7.085s
     CGroup: /system.slice/gsad.service
             ├─156644 /usr/sbin/gsad --foreground --listen 0.0.0.0 --port 9392
             └─156648 /usr/sbin/gsad --foreground --listen 0.0.0.0 --port 9392
手動更新漏洞資料庫,需要一點時間等它更新完。
sudo gvm-feed-update
[>] Updating GVM feeds

[*] Updating NVT (Network Vulnerability Tests feed from Greenbone Security Feed/Community Feed)
...(略)...
[*] Updating GVMD Data
...(略)...
[*] Updating Scap Data
...(略)...
[*] Updating Cert Data
...(略)...

[+] GVM feeds updated
預設 gsad 只會監聽本機 9392 埠號,只能從本機登入 GVM。
netstat -tnpl | grep LISTEN
(Not all processes could be identified, non-owned process info will not be shown, you would have to be root to see it all.)
tcp        0      0 127.0.0.1:6010          0.0.0.0:*               LISTEN      -
tcp        0      0 127.0.0.1:1883          0.0.0.0:*               LISTEN      -
tcp        0      0 127.0.0.1:5432          0.0.0.0:*               LISTEN      -
tcp        0      0 127.0.0.1:9392          0.0.0.0:*               LISTEN      -
tcp        0      0 0.0.0.0:22              0.0.0.0:*               LISTEN      -
tcp        0      0 127.0.0.1:80            0.0.0.0:*               LISTEN      -
tcp6       0      0 ::1:6010                :::*                    LISTEN      -
tcp6       0      0 ::1:1883                :::*                    LISTEN      -
tcp6       0      0 :::22                   :::*                    LISTEN      -
tcp6       0      0 ::1:5432                :::*                    LISTEN      -
瀏覽 https://your_gvm_ip:9392 會顯示找不到網頁,對 127.0.0.1 進行 curl 會發現網頁其實是正常運作的。
curl -k https://localhost:9392
<!doctype html>
<html>
   <head>
      <link rel="icon" href="/img/favicon.png" type="image/png"/>
      <title>Greenbone Security Assistant</title>
      <meta charset="UTF-8">
      <meta name="viewport" content="width=device-width,initial-scale=1">
      <script type="text/javascript" src="/config.js"></script><script defer="defer" src="/static/js/main.7232151a.js"></script>
      <link href="/static/css/main.8aca95b1.css" rel="stylesheet">
   </head>
   <body>
      <div id="app"></div>
      <div id="portals"></div>
   </body>
</html>
先關閉 GVM 服務並修改 gsad 服務組態
sudo gvm-stop
sudo vi /lib/systemd/system/greenbone-security-assistant.service
將 127.0.0.1 改為 0.0.0.0,開放外部登入 OpenVAS。
[Unit]
Description=Greenbone Security Assistant daemon (gsad)
Documentation=man:gsad(8) https://www.greenbone.net
After=network.target gvmd.service
Wants=gvmd.service

[Service]
Type=exec
User=_gvm
Group=_gvm
RuntimeDirectory=gsad
RuntimeDirectoryMode=2775
PIDFile=/run/gsad/gsad.pid
ExecStart=/usr/sbin/gsad --foreground --listen 0.0.0.0 --port 9392
Restart=always
TimeoutStopSec=10

[Install]
WantedBy=multi-user.target
Alias=greenbone-security-assistant.service
開啟 GVM 服務
sudo systemctl daemon-reload
sudo gvm-start
確認是否有修改成功
netstat -tnpl | grep LISTEN
(Not all processes could be identified, non-owned process info will not be shown, you would have to be root to see it all.)
tcp        0      0 127.0.0.1:6010          0.0.0.0:*               LISTEN      -
tcp        0      0 127.0.0.1:1883          0.0.0.0:*               LISTEN      -
tcp        0      0 0.0.0.0:9392            0.0.0.0:*               LISTEN      -
tcp        0      0 127.0.0.1:5432          0.0.0.0:*               LISTEN      -
tcp        0      0 0.0.0.0:22              0.0.0.0:*               LISTEN      -
tcp        0      0 0.0.0.0:80              0.0.0.0:*               LISTEN      -
tcp6       0      0 ::1:6010                :::*                    LISTEN      -
tcp6       0      0 ::1:1883                :::*                    LISTEN      -
tcp6       0      0 :::22                   :::*                    LISTEN      -
tcp6       0      0 ::1:5432                :::*                    LISTEN      -
瀏覽 https://your_gvm_ip:9392 終於正常顯示登入頁面
預設帳號為 admin 並輸入 gvm-check-setup 幫我們產生的密碼
[>] Checking for GVM admin user
[*] Creating user admin for gvm
[*] Please note the generated admin password
[*] User created with password '796f5d2b-7792-43a0-aedb-53e563ef4925'.
若真的找不到了,可以使用下列指令重置 admin 密碼。
sudo runuser -u _gvm -- gvmd --user=admin --new-password=your_new_password
登入後畫面如下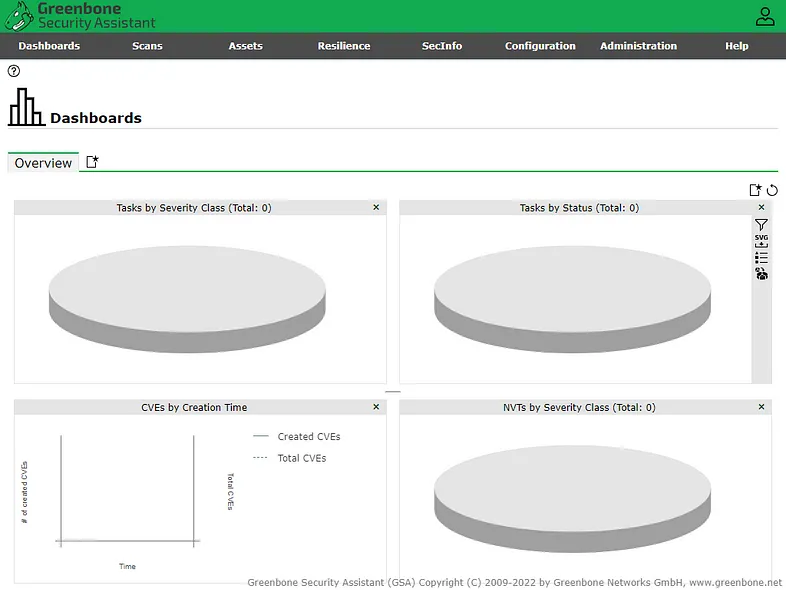
點選 SecInfo 的頁面,錯誤提示 SCAP 資料庫不存在。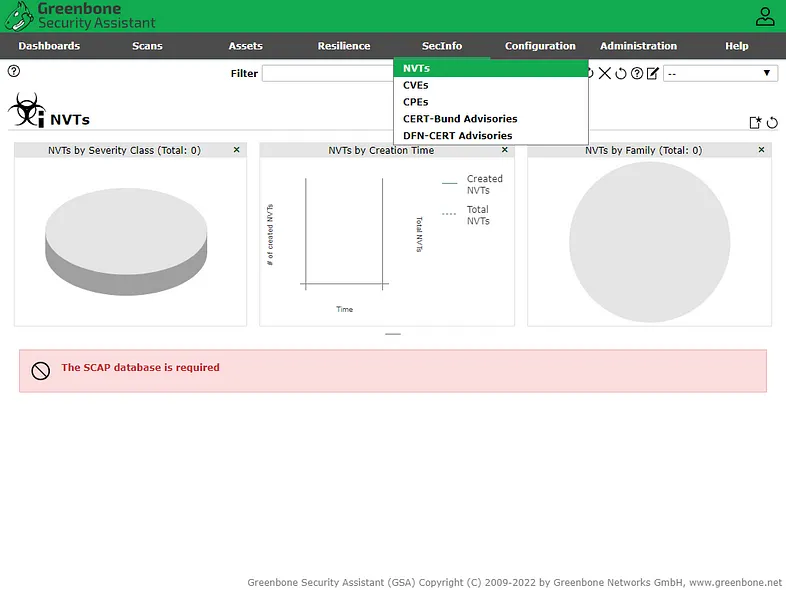
手動更新漏洞資料庫
sudo gvm-stop
sudo runuser -u _gvm -- greenbone-nvt-sync --rsync
sudo runuser -u _gvm -- greenbone-scapdata-sync --rsync
sudo runuser -u _gvm -- greenbone-certdata-sync --rsync
sudo reboot
注意 Community 版本對於 Feed 更新做了限制,每次只能執行一個 Sync,否則會暫時封鎖來源 IP。
Only one sync per time, otherwise the source ip will be temporarily blocked.
https://forum.greenbone.net/t/how-many-times-i-can-sync-nvts-scapdata-certdata/1978
點選 Administration 的 Feed Status 會發現狀態為 Update in progress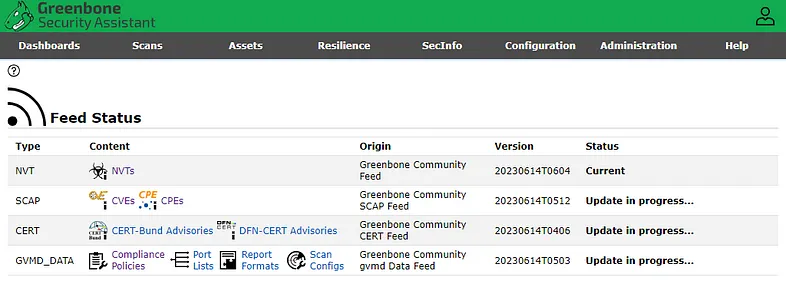
等待一些時間,狀態就會變成 Current。
似乎是 Community 版本的關係,SCAP 通常不會是最新,只要狀態不要是 Too Old 就可以了。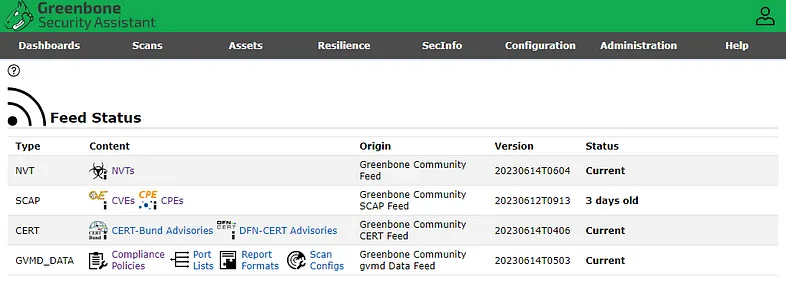
點選 SecInfo 的頁面,可以正常顯示了。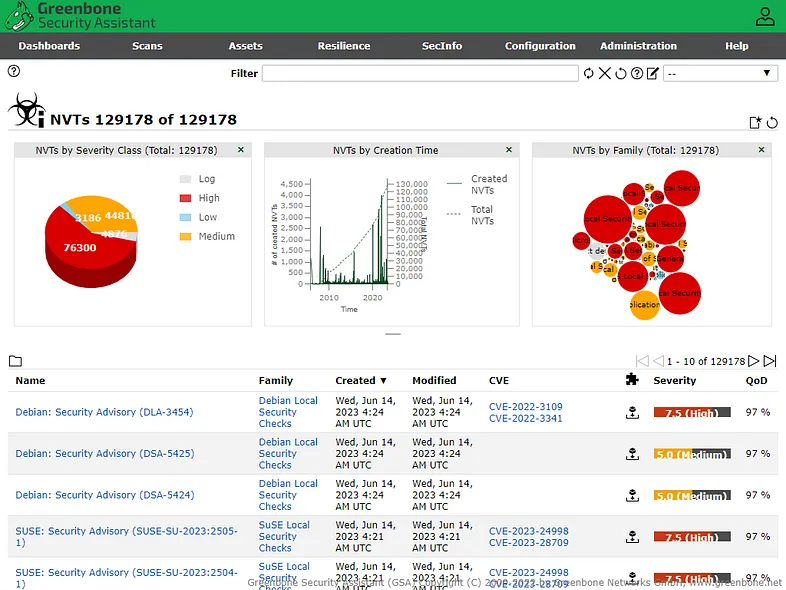
每天更新漏洞資料庫,加入 Crontab 排程。
crontab -e
# For example, you can run a backup of all your user accounts
# at 5 a.m every week with:
# 0 5 * * 1 tar -zcf /var/backups/home.tgz /home/
#
# For more information see the manual pages of crontab(5) and cron(8)
#
# m h  dom mon dow   command
0  0  * * * sudo gvm-feed-update > /tmp/log/greenbone-feed-update.log 2>&1
允許 sudo gvm-feed-update 不用輸入密碼
sudo -i
cp /etc/sudoers /root/sudoers.bak
visudo
在檔案底部添加下列這行即可
your_account_name ALL=(ALL) NOPASSWD: /usr/bin/gvm-feed-update
安裝的部分到這邊就完成了,下一篇我們將介紹如何使用 GVM 進行弱點掃描,感謝收看。
參考文件
 Ivan Cheng
