我們會把 Loki 的警報規則發送到 Alertmanager 來進行管理,包括靜音、刪除重複數據與分組,並將它們路由到正確的接收器,例如電子郵件或 LINE Notify。
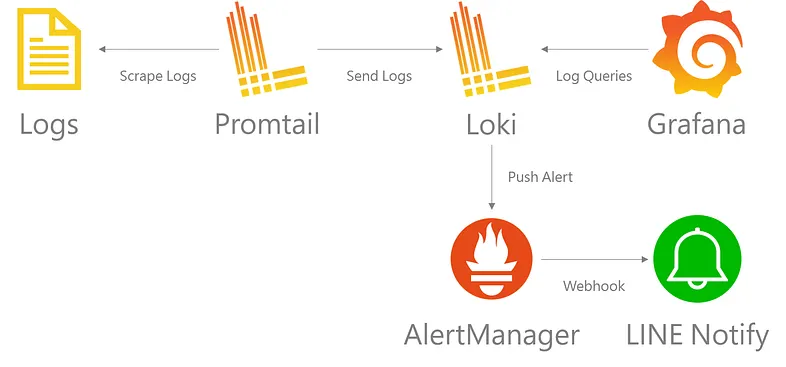
設置警報和通知的主要步驟如下
設置 Alertmanager
如何安裝 Alertmanager 可以參考這篇文章
修改 alertmanager.yml 配置文件
sudo vi /opt/alertmanager/alertmanager-0.25.0.linux-amd64/alertmanager.yml
新增一組接收器 team-infra-mails,透過電子郵件來發送警報。
global:
  smtp_smarthost: 'your_smtp_ip:your_port'
  smtp_from: 'your_from_mail_address'
  smtp_require_tls: false

route:
  group_by: ['alertname']
  group_wait: 30s
  group_interval: 5m
  repeat_interval: 1h
  receiver: 'team-infra-mails'

receivers:
  - name: 'team-infra-mails'
    email_configs:
      - to: 'your_to_mail_address'
        send_resolved: true

# Inhibition rules allow to mute a set of alerts given that another alert is firing.
# We use this to mute any warning-level notifications if the same alert is already critical.
inhibit_rules:
  - source_match:
      severity: 'critical'
    target_match:
      severity: 'warning'
    # Apply inhibition if the alertname is the same.
    # CAUTION:
    #   If all label names listed in `equal` are missing
    #   from both the source and target alerts,
    #   the inhibition rule will apply!
    equal: ['alertname', 'dev', 'instance']
記得重啟 Alertmanager 服務
sudo service alertmanager restart
配置 Loki 與 Alertmanager 對話
編輯 Loki 的配置文件
sudo vi /opt/loki/loki-local-config.yaml
修改 rules_directory 指向您存放警報規則的資料夾
common:
  path_prefix: /tmp/loki
  storage:
    filesystem:
      chunks_directory: /tmp/loki/chunks
      rules_directory: /tmp/loki/rules
  replication_factor: 1
  ring:
    instance_addr: 127.0.0.1
    kvstore:
      store: inmemory
注意 filesystem 的 chunks_directory 與 rules_directory 的路徑為 /tmp,代表重開後資料就會消失,若需要保留的數據記得自行修改。
修改 alertmanager_url 指向您安裝的伺服器
ruler:
  alertmanager_url: http://localhost:9093
記得重啟 Loki 服務
sudo service loki restart
在 /tmp/loki/rules 底下建立 fake 資料夾
sudo mkdir /tmp/loki/rules/fake
為什麼要建立 fake 資料夾?
主要是因為 Loki 支援多租戶模式,單租戶模式下 fake 是預設的用戶名稱。若您開啟多租戶模式,請記得透過用戶名稱區隔開來。
建立警報規則
我們使用資料庫或者資料表執行 CREATE、ALTER 或 DROP 作為演示範例。
sudo vi /tmp/loki/rules/fake/mssql-ddl-alert.yml
文件內容如下
groups:
  - name: mssql-object-created
    rules:
      - alert: mssql-object-created
        expr: |
          count_over_time({computer=~"your_mssql_server", source="MSSQLSERVER", eventID="33205"}
            | pattern `<_>event_time:<event_time>\n<_>`
            | pattern `<_>action_id:<action_id>\n<_>`
            | label_format action_id=`{{.action_id | trim | replace "CR" "CREATE" | replace "AL" "ALTER" | replace "DR" "DROP"}}`
            | action_id ="CREATE"
            | pattern `<_>class_type:<class_type>\n<_>`
            | label_format class_type=`{{.class_type | trim | replace "DB" "DATABASE" | replace "U" "TABLE" | replace "V" "VIEW" | replace "P" "STORED PROCEDURE"}}`
            | pattern `<_>database_name:<database_name>\n<_>`
            | database_name !~`(tempdb)`
            | pattern `<_>object_name:<object_name>\n<_>`
            | pattern `<_>schema_name:<schema_name>\n<_>`
            | pattern `<_>server_instance_name:<server_instance_name>\n<_>`
            | pattern `<_>server_principal_name:<server_principal_name>\n<_>`
            | pattern `<_>statement:<statement>\nadditional_information<_>`
            | label_format statement=`{{.statement | replace "\\r\\n" " " | replace "\\r" " " | replace "\\n" " " | replace "\u005c\u005c" "\u005c" | replace "[" "" | replace "]" ""}}` [1m]) > 0
        for: 0m
        labels:
          severity: critical
        annotations:
          summary: "主機名稱: {{ $labels.computer }}\n警示訊息: {{ $labels.object_name }} has been created.\n敘述句: {{ $labels.statement }}\n"
  - name: mssql-object-alerted
    rules:
      - alert: mssql-object-alerted
        expr: |
          count_over_time({computer=~"your_mssql_server", source="MSSQLSERVER", eventID="33205"}
            | pattern `<_>event_time:<event_time>\n<_>`
            | pattern `<_>action_id:<action_id>\n<_>`
            | label_format action_id=`{{.action_id | trim | replace "CR" "CREATE" | replace "AL" "ALTER" | replace "DR" "DROP"}}`
            | action_id ="ALTER"
            | pattern `<_>class_type:<class_type>\n<_>`
            | label_format class_type=`{{.class_type | trim | replace "DB" "DATABASE" | replace "U" "TABLE" | replace "V" "VIEW" | replace "P" "STORED PROCEDURE"}}`
            | pattern `<_>database_name:<database_name>\n<_>`
            | database_name !~`(tempdb)`
            | pattern `<_>object_name:<object_name>\n<_>`
            | pattern `<_>schema_name:<schema_name>\n<_>`
            | pattern `<_>server_instance_name:<server_instance_name>\n<_>`
            | pattern `<_>server_principal_name:<server_principal_name>\n<_>`
            | pattern `<_>statement:<statement>\nadditional_information<_>`
            | label_format statement=`{{.statement | replace "\\r\\n" " " | replace "\\r" " " | replace "\\n" " " | replace "\u005c\u005c" "\u005c" | replace "[" "" | replace "]" ""}}` [1m]) > 0
        for: 0m
        labels:
          severity: critical
        annotations:
          summary: "主機名稱: {{ $labels.computer }}\n警示訊息: {{ $labels.object_name }} has been alerted.\n敘述句: {{ $labels.statement }}\n"
  - name: mssql-object-dropped
    rules:
      - alert: mssql-object-dropped
        expr: |
          count_over_time({computer=~"your_mssql_server", source="MSSQLSERVER", eventID="33205"}
            | pattern `<_>event_time:<event_time>\n<_>`
            | pattern `<_>action_id:<action_id>\n<_>`
            | label_format action_id=`{{.action_id | trim | replace "CR" "CREATE" | replace "AL" "ALTER" | replace "DR" "DROP"}}`
            | action_id ="DROP"
            | pattern `<_>class_type:<class_type>\n<_>`
            | label_format class_type=`{{.class_type | trim | replace "DB" "DATABASE" | replace "U" "TABLE" | replace "V" "VIEW" | replace "P" "STORED PROCEDURE"}}`
            | pattern `<_>database_name:<database_name>\n<_>`
            | database_name !~`(tempdb)`
            | pattern `<_>object_name:<object_name>\n<_>`
            | pattern `<_>schema_name:<schema_name>\n<_>`
            | pattern `<_>server_instance_name:<server_instance_name>\n<_>`
            | pattern `<_>server_principal_name:<server_principal_name>\n<_>`
            | pattern `<_>statement:<statement>\nadditional_information<_>`
            | label_format statement=`{{.statement | replace "\\r\\n" " " | replace "\\r" " " | replace "\\n" " " | replace "\u005c\u005c" "\u005c" | replace "[" "" | replace "]" ""}}` [1m]) > 0
        for: 0m
        labels:
          severity: critical
        annotations:
          summary: "主機名稱: {{ $labels.computer }}\n警示訊息: {{ $labels.object_name }} has been dropped.\n敘述句: {{ $labels.statement }}\n"
利用下列的 T-SQL 指令碼來觸發警報規則
USE [Database_1]
GO

CREATE VIEW [dbo].[View_1118]
AS
SELECT *
FROM [dbo].[Table_1]
GO

ALTER VIEW [dbo].[View_1118]
AS
SELECT *
FROM [dbo].[Table_2]
GO

DROP VIEW [dbo].[View_1118]
GO
查看 Alermanager 是否接收到警報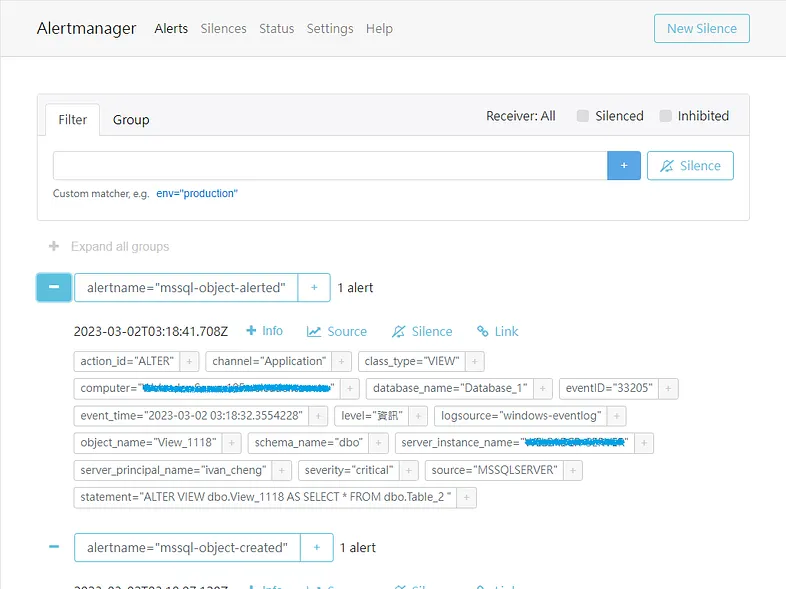
檢視郵件伺服器,Alermanager 有確實的透過電子郵件進行發送。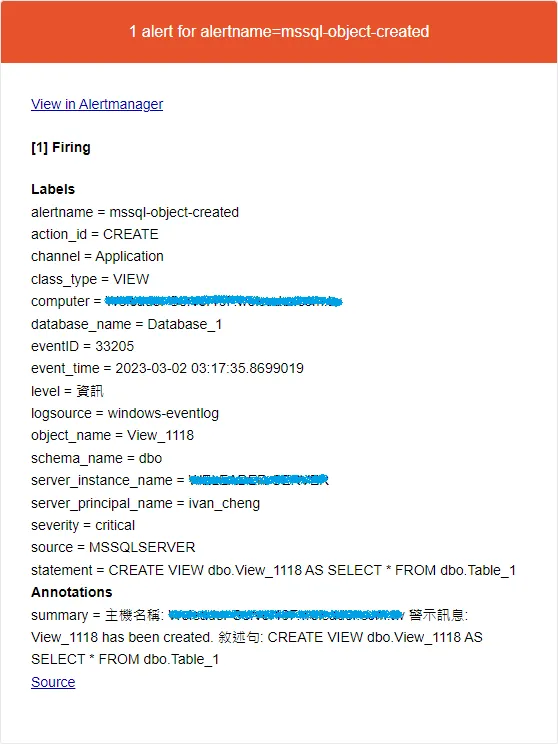
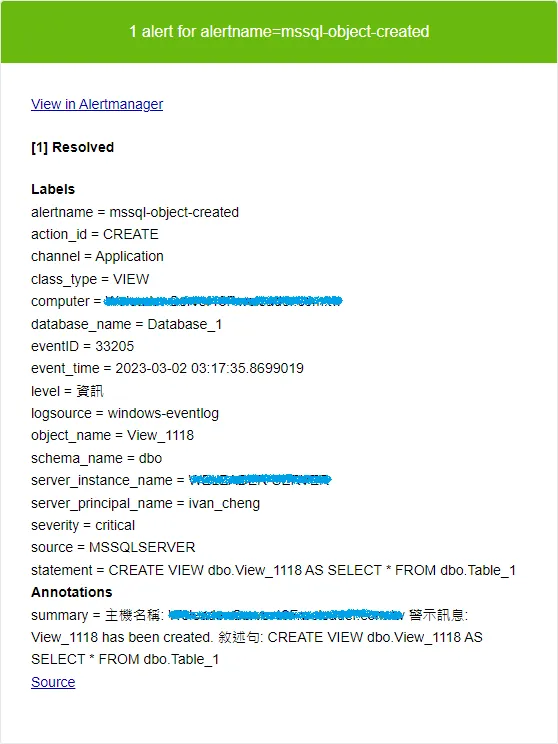
若有設定 send_resolved,Alermanager 也會發送警報解除的通知。
receivers:
  - name: 'team-infra-mails'
    email_configs:
      - to: 'your_to_mail_address'
        send_resolved: true
使用 LINE Notify
由於目前公司主要還是透過 LINE 來進行協同合作,因此把警報推播到 LINE Notify 來進行警告吧。
如何申請 LINE Notify 發行存取權杖可以參考這篇文章
很可惜的是目前 Alermanager 的 Receiver 並不支援 LINE Notify
# The unique name of the receiver.
name: <string>
# Configurations for several notification integrations.
email_configs:
  [ - <email_config>, ... ]
opsgenie_configs:
  [ - <opsgenie_config>, ... ]
pagerduty_configs:
  [ - <pagerduty_config>, ... ]
pushover_configs:
  [ - <pushover_config>, ... ]
slack_configs:
  [ - <slack_config>, ... ]
sns_configs:
  [ - <sns_config>, ... ]
victorops_configs:
  [ - <victorops_config>, ... ]
webhook_configs:
  [ - <webhook_config>, ... ]
wechat_configs:
  [ - <wechat_config>, ... ]
telegram_configs:
  [ - <telegram_config>, ... ]
webex_configs:
  [ - <webex_config>, ... ]
不過還好可以使用 webhook 的方式來串接 LINE Notify
感謝泰國曼谷的大大已經幫我們種好樹了
https://github.com/be99inner/line-notify-gateway/
不過 message 是寫死在 app.py 裡面有些可惜
def firing_alert(request):
    if request.json['status'] == 'firing':
        icon = "⛔⛔⛔ 😡 ⛔⛔⛔"
        status = "Firing"
        time = reformat_datetime(request.json['alerts'][0]['startsAt'])
    else:
        icon = "🔷🔷🔷 😎 🔷🔷🔷"
        status = "Resolved"
        time = str(datetime.now().date()) + ' ' + str(datetime.now().time().strftime('%H:%M:%S'))
    header = {'Authorization':request.headers['AUTHORIZATION']}
    for alert in request.json['alerts']:
        msg = "Alertmanger: " + icon + "\nStatus: " + status + "\nSeverity: " + alert['labels']['severity'] + "\nTime: " + time + "\nSummary: " + alert['annotations']['summary'] + "\nDescription: " + alert['annotations']['description']
        msg = {'message': msg}
        response = requests.post(LINE_NOTIFY_URL, headers=header, data=msg)
改成僅透過 alert[‘annotations’][‘summary’] 當作參數傳入
https://github.com/jieshiun/line-notify-gateway
如此一來,我們只要專心在 summary 修改告警訊息即可。
def firing_alert(request):
    if request.json['status'] == 'firing':
        status = "Firing"
        time = reformat_datetime(request.json['alerts'][0]['startsAt'])
    else:
        status = "Resolved"
        time = str(datetime.now().date()) + ' ' + str(datetime.now().time().strftime('%H:%M:%S'))
    header = {'Authorization':request.headers['AUTHORIZATION']}
    for alert in request.json['alerts']:
        msg = "\n發生時間: " + time + "\n" + alert['annotations']['summary'] + "當前狀態: " + status
        msg = {'message': msg}
        response = requests.post(LINE_NOTIFY_URL, headers=header, data=msg)
如何安裝 Docker 與 Docker Compose 可以參考這篇文章
透過 Docker Compose 啟動容器
cd /opt
sudo git clone https://github.com/jieshiun/line-notify-gateway.git
cd line-notify-gateway
sudo docker compose up -d
[+] Building 15.7s (9/9) FINISHED
 => [internal] load build definition from Dockerfile                                                                                                                                                                                                        0.1s
 => => transferring dockerfile: 179B                                                                                                                                                                                                                        0.0s
 => [internal] load .dockerignore                                                                                                                                                                                                                           0.2s
 => => transferring context: 2B                                                                                                                                                                                                                             0.0s
 => [internal] load metadata for docker.io/library/python:3.8-slim                                                                                                                                                                                          0.0s
 => [1/4] FROM docker.io/library/python:3.8-slim                                                                                                                                                                                                            0.0s
 => [internal] load build context                                                                                                                                                                                                                           0.1s
 => => transferring context: 10.85kB                                                                                                                                                                                                                        0.0s
 => CACHED [2/4] WORKDIR /usr/app                                                                                                                                                                                                                           0.0s
 => [3/4] COPY ./ /usr/app                                                                                                                                                                                                                                  0.6s
 => [4/4] RUN pip install -r requirements.txt                                                                                                                                                                                                              13.9s
 => exporting to image                                                                                                                                                                                                                                      1.0s
 => => exporting layers                                                                                                                                                                                                                                     1.0s
 => => writing image sha256:56e0ab49d94ae2b7fe9995b8d1e266780ed06dcd533806b6ff39f5096efae7d1                                                                                                                                                                0.0s
 => => naming to docker.io/library/line-notify-gateway-line-notify-gateway                                                                                                                                                                                  0.0s
[+] Running 1/1
 ⠿ Container line-notify-gateway-line-notify-gateway-1  Started
查詢該服務開放 5000 埠號
sudo docker compose ps
SERVICE               CREATED             STATUS              PORTS
line-notify-gateway   30 seconds ago      Up 28 seconds       0.0.0.0:5000->5000/tcp, :::5000->5000/tcp
映像檔我也有上傳到 Docker Hub,需要的朋友可以直接使用。
sudo docker run -d -p 5000:5000 -v /etc/localtime:/etc/localtime:ro --restart always --name line-notify-gateway jieshiun/line-notify-gateway
瀏覽 http://your_host_ip:5000/webhook
瀏覽 http://your_host_ip:5000/logs
如此一來我們的 Webhook Receiver 就建置好了
配置 Alertmanager
修改 alertmanager.yml 配置文件
sudo vi /opt/alertmanager/alertmanager-0.25.0.linux-amd64/alertmanager.yml
新增一組接收器 team-infra-line-notify 使用 webhook_configs
新增一組路由規則
global:
  smtp_smarthost: 'your_smtp_ip:your_port'
  smtp_from: 'your_from_mail_address'
  smtp_require_tls: false

route:
  group_by: ['alertname']
  group_wait: 1m
  group_interval: 15m
  repeat_interval: 4h
  receiver: 'team-infra-mails'
  routes:
    - receiver: "team-infra-line-notify"
      group_wait: 10s
      match_re:
        source: MSSQLSERVER
      continue: true

receivers:
  - name: 'team-infra-mails'
    email_configs:
      - to: 'your_to_mail_address'
        send_resolved: true
  - name: 'team-infra-line-notify'
    webhook_configs:
      - url: 'http://localhost:5000/webhook'
        send_resolved: true
        http_config:
          bearer_token: 'your_line_notify_access_token'

# Inhibition rules allow to mute a set of alerts given that another alert is firing.
# We use this to mute any warning-level notifications if the same alert is already critical.
inhibit_rules:
  - source_match:
      severity: 'critical'
    target_match:
      severity: 'warning'
    # Apply inhibition if the alertname is the same.
    # CAUTION:
    #   If all label names listed in `equal` are missing
    #   from both the source and target alerts,
    #   the inhibition rule will apply!
    equal: ['alertname', 'dev', 'instance']
記得重啟 Alertmanager 服務
sudo service alertmanager restart
利用下列的 T-SQL 指令碼來觸發警報規則
USE [Database_1]
GO

CREATE VIEW [dbo].[View_0240]
AS
SELECT *
FROM [dbo].[Table_1]
GO

ALTER VIEW [dbo].[View_0240]
AS
SELECT *
FROM [dbo].[Table_2]
GO

DROP VIEW [dbo].[View_0240]
GO
查看 Alermanager 是否接收到警報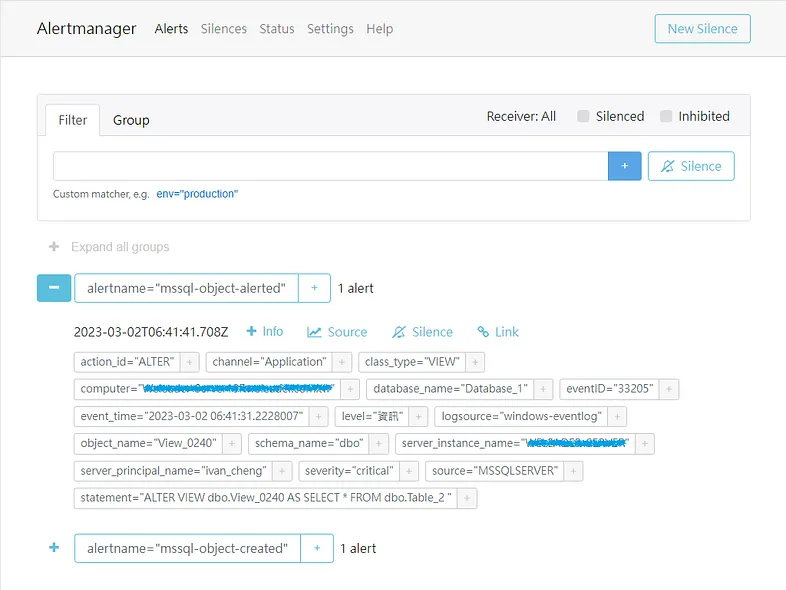
檢視 LINE 聊天群組,Alermanager 有成功發送告警無誤。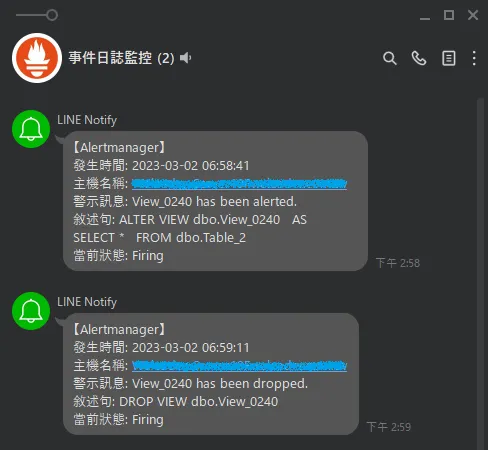

也可以從 Webhook Receiver 查看呼叫 Notify API 是否成功
瀏覽 http://your_host_ip:5000/logs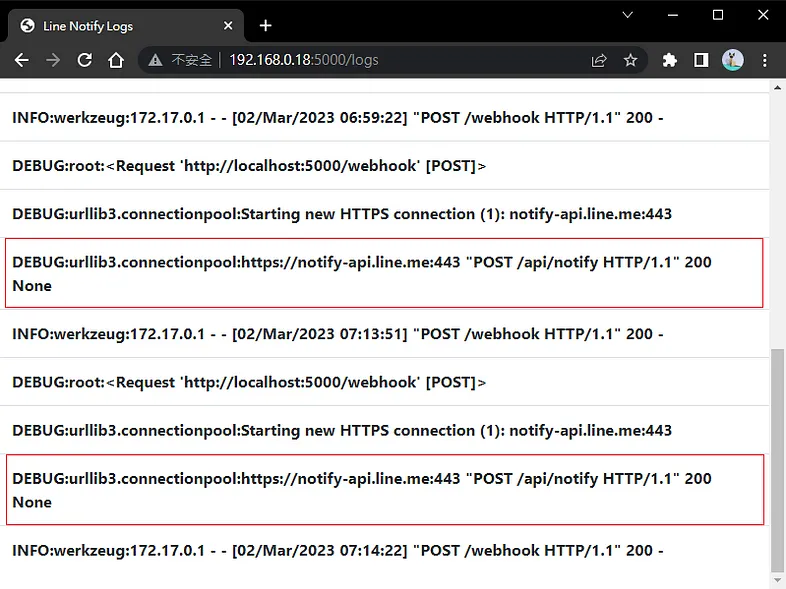
建立一個登入失敗的警報規則來測試
sudo vi /tmp/loki/rules/fake/mssql-login-alert.yml
文件內容如下
groups:
  - name: mssql-login-failed-alert
    rules:
      - alert: mssql-login-failed
        expr: |
          count_over_time({computer=~"your_mssql_server", source="MSSQLSERVER", eventID="33205"}
            | pattern `<_>action_id:<action_id>\n<_>`
            | label_format action_id =`{{.action_id | trim | replace "LGIF" "LOGIN FAILED"}}`
            | pattern `<_>statement:<statement>\nadditional_information<_>`
            | action_id ="LOGIN FAILED" [1m]) > 3
        for: 0m
        labels:
          severity: critical
        annotations:
          summary: "主機名稱: {{ $labels.computer }}\n警示訊息: Too many login failed in mssql.\n敘述句: {{ $labels.statement }}\n"
檢視 LINE 聊天群組,Alermanager 有成功發送告警無誤。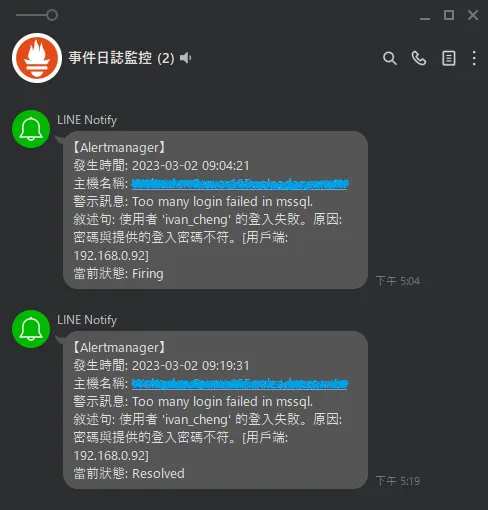
建立一個刪除數據的警報規則來測試
sudo vi /tmp/loki/rules/fake/mssql-dml-alert.yml
文件內容如下
groups:
  - name: mssql-object-deleted
    rules:
      - alert: mssql-object-deleted
        expr: |
          count_over_time({computer=~"your_mssql_server", source="MSSQLSERVER", eventID="33205"}
            | pattern `<_>event_time:<event_time>\n<_>`
            | pattern `<_>action_id:<action_id>\n<_>`
            | label_format action_id=`{{.action_id | trim | replace "SL" "SELECT" | replace "IN" "INSERT" | replace "UP" "UPDATE" | replace "DL" "DELETE"}}`
            | action_id ="DELETE"
            | pattern `<_>class_type:<class_type>\n<_>`
            | label_format class_type=`{{.class_type | trim | replace "DB" "DATABASE" | replace "U" "TABLE" | replace "V" "VIEW" | replace "P" "STORED PROCEDURE"}}`
            | pattern `<_>database_name:<database_name>\n<_>`
            | database_name !~`(tempdb)`
            | pattern `<_>object_name:<object_name>\n<_>`
            | pattern `<_>server_principal_name:<server_principal_name>\n<_>`
            | pattern `<_>statement:<statement>\nadditional_information<_>`
            | label_format statement=`{{.statement | replace "\\r\\n" " " | replace "\\r" " " | replace "\\n" " "}}` [1m]) > 0
        for: 0m
        labels:
          severity: critical
        annotations:
          summary: "主機名稱: {{ $labels.computer }}\n警示訊息: {{ $labels.object_name }} has been deleted.\n使用者名稱: {{ $labels.server_principal_name }}\n敘述句: {{ $labels.statement }}\n"
檢視 LINE 聊天群組,Alermanager 有成功發送告警無誤。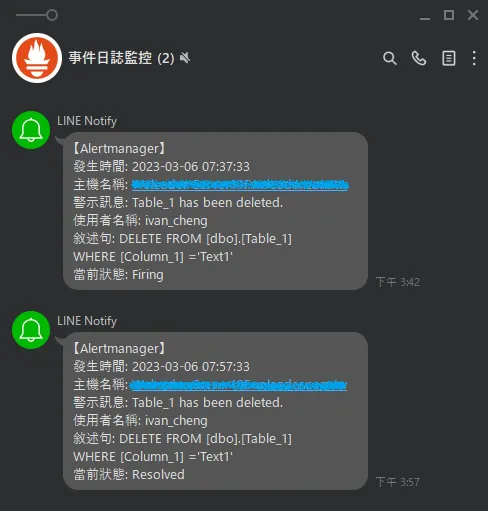
相信大家已經學會如何建立 Loki 警報規則並透過 Alertmanager 串接 LINE Notify 發送警告。
今天的分享就到這邊,希望有幫助到大家。
參考文件
