圖像轉換(Style transfer)一直是個讓人感到新穎的主題,本文利用CNN(Convolutional Neural Networks)的方式進行圖片的風格轉換,並藉由調整參數來決定原圖像與轉換風格後的相似程度,細節將在本文陸續說明,這裡分享自己實作上的過程與結果
圖像轉換(Style transfer)最早可追溯到2015年Gatys 等人所發表的 A Neural Algorithm of Artistic Style,
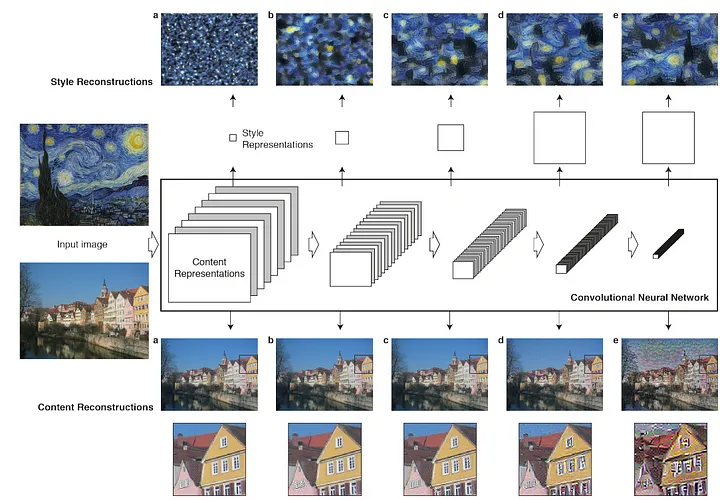
他們所採用的方式是利用VGG(Visual Geometry Group)模型進行圖像的特徵提取,關鍵在於提取出來的特徵分為content 和 style features,所謂 content是指一張圖像的大致輪廓,而style是指圖像中更細節的資訊(像是紋理、對比度、方向性等),因此只要將原圖像的content成分取出,搭配欲產生的風格照片之style進行結合,透過loss函數的設計在這兩著間達成平衡,便能合成出具有content和style成分的圖象。
整個模型的主要核心在於如何體取出圖像中的content和style的特徵,接著透過增加圖像預處理(image preprocessing),以及嘗試不同的模型架構、learning rate的選擇、調整loss參數達到最佳的合成效果
(引用自參考資料[3])
這裡嘗試先將圖像進行縮放和歸一化,使用pytorch中的transform套件進行縮放,並轉為tensor的形式,接著在image 的部分即是將原圖像套用到transform定義好的縮放方式,並從原來的(512,512,3)在第0維上新增一個維度,形成(1,512,512,3)的四維向量,目的是為了方便後續進行特徵(features)的堆疊。另外這裡的(512,512,3)分別代表圖像的512x512的像素及RGB三顏色(通道數)。
def image_loader(path,is_cuda=False):
    image=Image.open(path)
    loader=transforms.Compose([transforms.Resize((512,512)),transforms.ToTensor()])
    image=loader(image).unsqueeze(0)
    return image.to(device,torch.float)
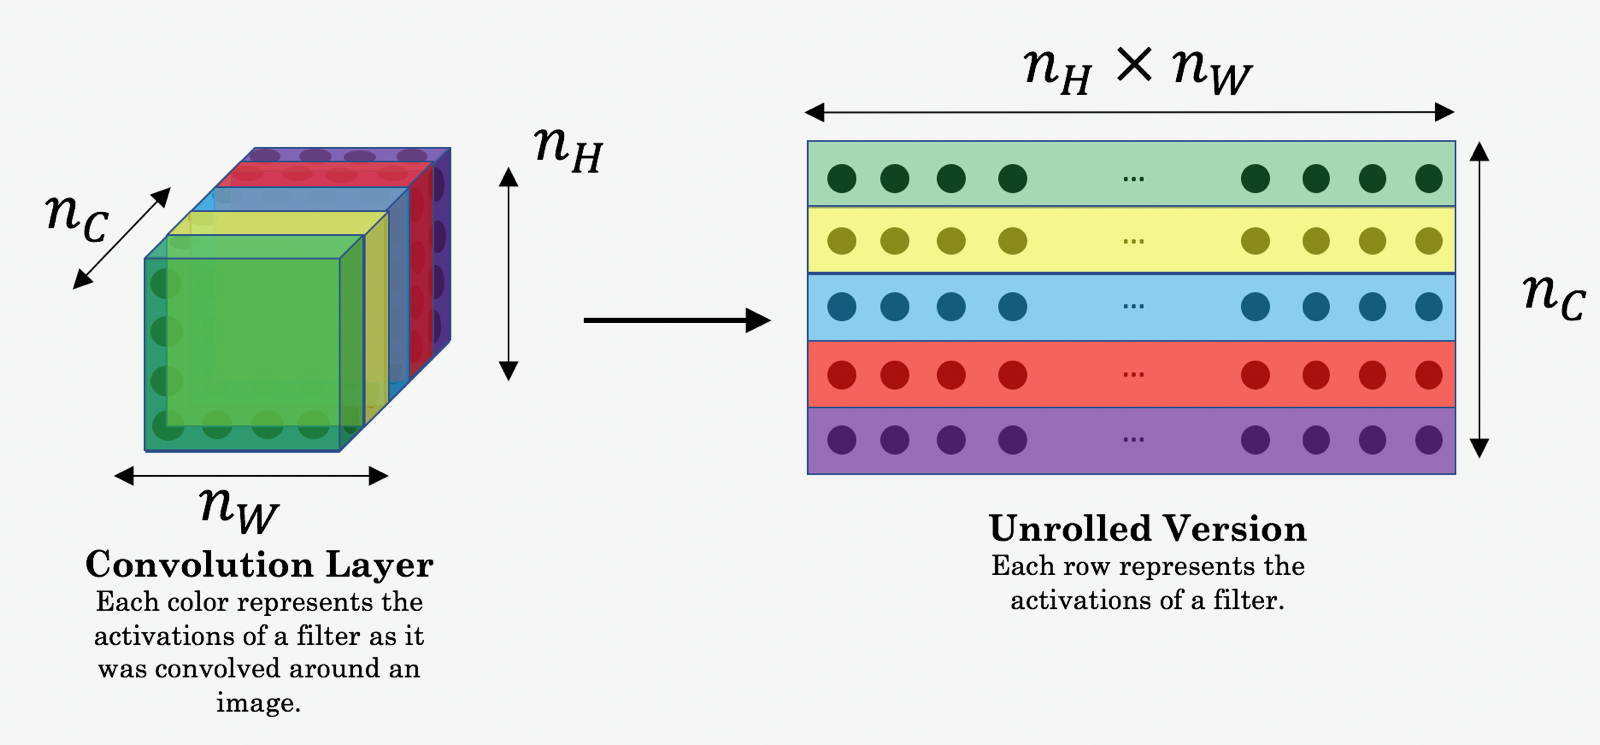
首先從模型架構來說,我採用VGG19的預訓練(pre-training)模型,直接利用前一大段的CNN架構來加快模型收斂時間。這裡只保留VGG前30層[3],其中把有需要處理的層別其對應的索引值分別為'1','3','8','13','20','29'(relu1_1,relu1_2,relu2_2,relu3_2,relu4_2,relu5_2)來提取特徵,原因是希望特徵在線性激活後更譨購抓出圖像中重要的部分,依序取出圖像的特徵(features)並存在feature box中,直觀上可以想像為了讓機器學會辨識一張圖像的特徵(例如:紋理、邊緣等等資訊),在VGG模型中透過不同層濾波器(filter)所產生的不同特徵圖,又稱為feature map,而feature box就是收集這些feature map的過程。如下示意圖
(引用自參考資料[4])
class VGG(nn.Module):
    def __init__(self):
        super(VGG,self).__init__()
        self.layer_names= ['3','8','13','20']
        #Since we need only the 5 layers in the model so we will be dropping all the rest layers from the features of the model
        self.model=models.vgg19(pretrained=True).features[:29] #model will contain the first 29 layers

    # x holds the input tensor(image) that will be feeded to each layer
    def forward(self,x):
        features=[]
        # features={}
        for layer_num,layer in enumerate(self.model):
            #activation of the layer will stored in x
            x=layer(x)
            #appending the activation of the selected layers and return the feature array
            if (str(layer_num) in self.layer_names):
                features.append(x)
        return features
由於VGG卷積層能夠有效提取出各層特徵,並將圖像轉換為四維向量層層堆疊形成features map,接著進一步定義content loss為原圖與content image的均方誤差(MSE),而這裡之所以採用MSE的理由是希望計算如下

其中的content image 會預先採用複製原圖的方式,並迭代更新content loss。
實作代碼如下:
def calc_content_loss(gen_feat,orig_feat):
    content_l=torch.mean((gen_feat-orig_feat)**2) #*0.5
    return content_l
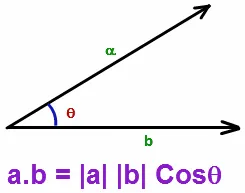
在計算圖像的style時,採用餘弦相似性(Cosine similarity)來計算圖像本身的"相似性",若將圖像的各特徵向量化後,那麼要評估任意向量間的相似度會變得非常有用。因此,當考慮任意兩向量在向量空間中,可透過計算向量的內積來知道,當兩向量成90度時,內積為零,意味此兩向量彼此毫無相關。
(引用自參考資料[1])

(引用自參考資料[7])
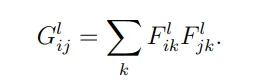
將上述提及的cosine similarity推廣到圖像處理,相當於進一步計算圖像的特徵相關性分布,而這個分布形成的二維方陣稱作格拉姆矩陣(Gram matrix),細節可參考[6]
這裡提到的gram matrix是指針對圖像在不同通道、像素下(nw,nh,nc)進行相關性(correlation)的計算,也就是說從Gram matrix中的數值大小,能夠看出合成圖和原圖在那些特徵的關係強弱,具體公式如下
對於style loss 的計算,同樣計算和原圖的均方誤差(MSE)估算變異量。代碼中使用torch.mm 將先前每一層所儲存的feature map進行矩陣相乘運算
代碼如下
def calc_style_loss(gen,style):
    #Calculating the gram matrix for the style and the generated image
    batch,channel,height,width=gen.shape
    G=torch.mm(gen.view(channel,height*width),gen.view(channel,height*width).t())
    A=torch.mm(style.view(channel,height*width),style.view(channel,height*width).t())
    style_l=torch.mean((G-A)**2) #/(4*channel*(height*width)**2)
    return style_l
為了讓合成的圖樣產生最佳的效果,勢必在content loss和style loss間須取得平衡,因此分別引入α和β作為決定合成圖像中content 和style的成分多寡,在求解total loss 的最佳解過程採用梯度下降法(Gradient descent)搭配Adam優化器實現。

代碼中首先初始化loss後,去進一步原圖分別和content/style image的差異,最初由於
def calculate_loss(gen_features, orig_feautes, style_featues):
    style_loss=content_loss=0
    for gen,cont,style in zip(gen_features,orig_feautes,style_featues):
    content_loss+=calc_content_loss(gen,cont)
    style_loss+=calc_style_loss(gen,style)
    total_loss=alpha*content_loss + beta*style_loss
    return total_loss
整體來說,為求加速訓練,而非重頭去隨機產生我們要的合成圖,所以這裡採用origin_img.clone().requires_grad_(True)將原圖直接複製一份作為最終預產生合成圖的"範本",而optimizer決定了"圖像"本身的訓練,而非"模型",過程中不斷修正調整圖像的loss達到收斂,找到最佳的α和β的組合。
gen_img=origin_img.clone().requires_grad_(True)
    optimizer=optim.Adam([gen_img],lr=opt.lr)
    epoch=200
    for e in range (epoch):
        gen_features=model(gen_img)
        orig_features=model(origin_img)
        style_features=model(style_img)
        total_loss=calculate_loss(gen_features, orig_features, style_features)
        #optimize the pixel values of the generated image and back-propagate the loss
        optimizer.zero_grad()
        total_loss.backward()
        optimizer.step() # update gen_img parameters
經過迭代更新200次後,其實合成出來的圖象已經達到不錯的效果,由於α和β的權重來決定原圖偏向style的程度,若要使合成圖更多style的部分,除了調大調β同時也必須增價epoch的訓練回合才能達到預期的效果,可觀察到訓練7000回後,圖像主體的顏色及紋路出現大幅度改變,確實效果也更像梵谷星空圖風格了
另外,針對不同風格k效果在下圖展示了epoch=7000設置α/β=0.01下產生的風格圖
最後,完整代碼可參考操考資料[5],歡迎互相交流,不吝指教
 AaronLu

