連結: Day 2 - Colab
為了避免大家環境和版本不一致的問題, 並避免需要額外下載或安裝程式
本系列會提供 Google Colab 環境讓大家實際操作
詳細操作方式請參考文件: Project Jupyter Documentation
當然, Google Colab 不是一個很好的開發環境
所以若自己有 Docker, VM, 或是想在自己電腦上 (MacOS, Windows) 操作, 請確保環境和 Colab 一致
未來 Colab 連結都會放在 本日內容 的最後
在 Day 2 - Colab 中, 請先執行到第二個 cell 以下載 project

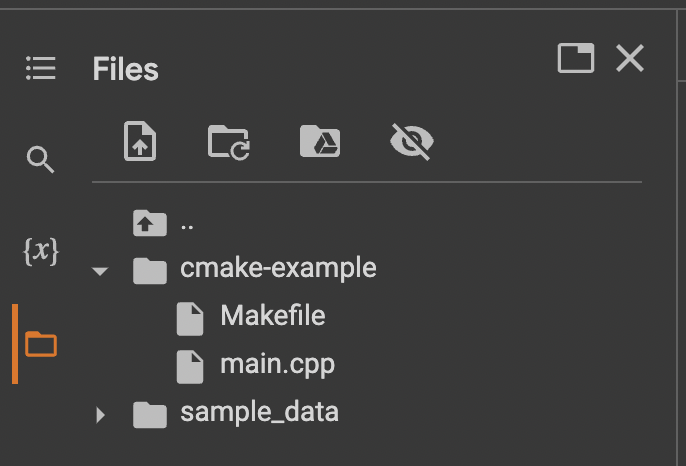
等待下載完後, 點選左側資料夾 icon 展開目錄
sample_data 是 Colab 環境內建的, 我們不管他 :p
來看看 cmake-example/main.cpp
#include <iostream>

int main() {
  std::cout << "Hello World!" << std::endl;
  return 0;
}
我們將 iostream 的 headers 拉進來
並用 std::cout 印出訊息到 terminal
我們先用大家比較常用的 make 來 build
可以看到 cell 中有個指令: make main
執行後就可以看到我們的第一個執行檔 main 了!
接著執行該執行檔, 就可以看到在 cell 底下印出 Hello World!
./main
Hello World!
就這樣, 我們 build 出了第一支程式:)
當然, 你可能會好奇 make 是什麼東西?
從人類可讀的程式碼 (source code) 到可執行檔 (executable) 中間發生了什麼事情?
make 是什麼?make 可以用來產生可執行檔等程式
也可以看看官網的敘述
GNU Make
GNU Make is a tool which controls the generation of executables and other non-source files of a program from the program's source files.
Make gets its knowledge of how to build your program from a file called the makefile, which lists each of the non-source files and how to compute it from other files. When you write a program, you should write a makefile for it, so that it is possible to use Make to build and install the program.
可以看到, 官方建議要搭配 Makefile 使用
Makefile 是什麼?Makefile 會告訴 make 要如何 compile 你的程式
比如, 我們在 Colab 新增了一個 Makefile
CXX = g++
CXXFLAGS = -Wall -Wextra

main: main.cpp
	$(CXX) $(CXXFLAGS) -o $@ $<
然後再指定該 Makefile 並執行 make
make -f Makefile
或是直接 make 也行, 他會在同層資料夾找叫做 Makefile 的檔案
並根據該檔案得知要 build 什麼 target
本系列不會介紹 Makefile 怎麼寫, 看不懂也不影響閱讀之後內容
大家看過即可
假設今天有同事請我們幫忙寫一支程式, 我們花了一些時間寫好程式並依照上面的方式, 在 Linux 上產出了 binary, 確認在 Linux 上可以順利執行後交給同事
同事把程式放到 Windows 後卻沒辦法執行?
為什麼我在 Linux 測試可以執行的程式, 到了 Windows 等其他系統卻不能執行呢?
這就牽涉到 source code 變成 binary 的 compile 過程了
大家常說的 compile, 大多是指涵蓋了從 source code 到產生 binary 的整個流程
為了避免混淆, 後續我們會統一用 build 或是 build code 稱呼這整個流程
該流程包含了幾個工具: preprocessor, compiler, assembler 和 linker
由這些工具合作, 最終才將 source file 變成 binary
由於 build code 的過程是根據 processor architecture 產生 binary, 且程式會被讀進 CPU 執行, 所以由於 Linux processor architecture 和 Windows, MacOS 的不相容, 就產生了奇怪的行為
簡單來說, 就是因為 Windows, MacOS "看不懂" Linux 的程式
上面提到的工具: preprocessor, compiler, assembler 和 linker 分別代表什麼呢?
記得前面我們寫的 Makefile 嗎?
其中的 g++ 就是用來 compile C++ 的 compiler
至於其他工具, 由於本系列的重點是 CMake, 後續章節可能會帶過相關概念, 但不會深入介紹
如果有興趣請參考 C++ Primer
撇除虛擬環境的話, 答案是 "build Windows 版本"
以剛剛的例子來說, 唯一的辦法就是重新 build code
為了讓 Windows 能夠看懂可執行檔, 我們必須在 build code 的過程中使用 Windows 提供的開發工具, 比如 Visual Studio, 這樣 build 出來的 binary 才能在 Windows 執行
所以, 我們需要把 source code 放到 Windows 上再 build 一次
那要怎麼做呢?
GnuWin32同樣的, 由於 GNU Make 也是 Linux 的程式, 是沒辦法在 Windows 上執行的
所以我們需要下載 Windows 版本的 make 執行檔: GnuWin32
這邊就不深入討論
來看看到目前為止我們做了哪些事情
make build 出 binaryGnuWin32
GnuWin32 再 build 一次可想而知, 如果我們想讓程式在其他平台執行, 有多少平台就需要重複 3. ~ 5. 的動作多少次 (假設 processor architecture 不同)
然而, 不是每個平台都有 make 可以用, 以 Apple 系列來說, 你還需要學會 Xcode 😫
所以, 如果想要讓程式跨平台
對於開發者來說, 要學的東西太多, 感覺永遠學不完
對於公司來說, 要招的人太多, 感覺薪水付不起
這就是為什麼我們需要 Cross Compile, 這就是為什麼我們需要 CMake!
如果今天說的內容讓你感到很混亂, 別擔心! 這不會影響到你理解本系列接下來的內容
接下來, 讓我們進入 CMake 的世界吧!
