當我們想要談一場轟轟烈烈的戀愛時,由我們主動出擊尋找生命中的她/他。
例如我喜歡金髮碧眼翹臀女孩,或者我喜歡狂野大胸肌男孩。
此時,誰依賴誰:我依賴於金髮碧眼翹臀女孩 or 我依賴於狂野大胸肌男孩。
我要主動找他,我還要跟他安排見面,什麼事情都只能自己來,我和金髮碧眼翹臀女孩 or 我和狂野大胸肌男孩產生了高度耦合。
這樣實在太累了,於是我們找到了婚友社......
告訴婚友社我們的理想對象,金髮/碧眼/翹臀 or 狂野/大胸肌。
專業顧問可能會白眼你,但他還是會盡責地幫你達成你的願望(應該吧)。
我們只要耐心的等待顧問幫我們安排見面,然後專心的戀愛就可以了!
此時,誰依賴誰:我依賴於婚友社。
我們將控制權(生殺大權QQ)交給了婚友社,降低了耦合度。
那我們要如何實現控制反轉,則是依靠依賴注入。
依賴注入意味著為物件提供其實例變數。
用上述的例子此處的物件為我們,嗯好吧,只有我。
實例變數則是婚友社幫我找的金髮碧眼翹臀女孩,或者狂野大胸肌男孩。
org.springframework.beans 和 org.springframework.context 套件是 Spring Framework 的 IoC 容器的基礎。
在 Spring 中,構成應用程式主幹並由 Spring IoC 容器管理的物件稱為 Bean。
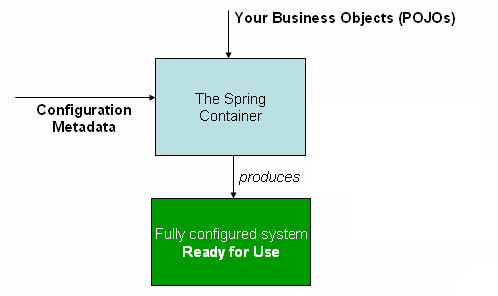
Bean 以及它們之間的依賴關係定義在 Configuration metadata。
Spring IoC 容器透過 Configuration metadata 如何實例化、配置和組裝應用程式中的物件。
由你來告訴 Spring 容器你的理想對象要如何,控制權反轉至 Spring 容器。
Spring IoC 容器的職責

Spring Framework 提供兩種不同類型的容器
下表列出了 BeanFactory 和 ApplicationContext 介面和其實作所提供的功能。
| Feature | BeanFactory |
ApplicationContext |
|---|---|---|
| Bean instantiation/wiring | Yes | Yes |
自動註冊 BeanPostProcessor |
No | Yes |
自動註冊 BeanFactoryPostProcessor |
No | Yes |
方便的 MessageSource 訊息處理 (i18n 多語系) |
No | Yes |
ApplicationEvent 發佈 |
No | Yes |
我們有三種方式可以提供給 Spring IoC 容器 Configuration metadata:
<?xml version="1.0" encoding="UTF-8"?>
<beans xmlns="http://www.springframework.org/schema/beans"
       xmlns:xsi="http://www.w3.org/2001/XMLSchema-instance"
       xsi:schemaLocation="http://www.springframework.org/schema/beans
           http://www.springframework.org/schema/beans/spring-beans-3.0.xsd">

  <bean id="..." class="...">
    <!-- collaborators and configuration for this bean go here -->
  </bean>

  <bean id="..." class="...">
    <!-- collaborators and configuration for this bean go here -->
  </bean>

  <!-- more bean definitions go here -->

</beans>
// create and configure beans
ApplicationContext context =
    new ClassPathXmlApplicationContext(new String[] {"services.xml", "daos.xml"});

// retrieve configured instance
PetStoreServiceImpl service = context.getBean("petStore", PetStoreServiceImpl.class);

// use configured instance
List userList service.getUsernameList();
<?xml version = "1.0" encoding = "UTF-8"?>
<beans xmlns = "http://www.springframework.org/schema/beans"
   xmlns:xsi = "http://www.w3.org/2001/XMLSchema-instance"
   xmlns:context = "http://www.springframework.org/schema/context"
   xsi:schemaLocation = "http://www.springframework.org/schema/beans
   http://www.springframework.org/schema/beans/spring-beans-3.0.xsd
   http://www.springframework.org/schema/context
   http://www.springframework.org/schema/context/spring-context-3.0.xsd">

   <context:annotation-config/>
   <!-- bean definitions go here -->

</beans>
配置完畢後,就可以使用以下 Annotation 。
@Configuration
public class AppConfig {
  @Bean
  public MyService myService() {
      return new MyServiceImpl();
  }
}
那其實這樣的配置就如同下面的 XML 定義方式是等價的
<beans>
  <bean id="myService" class="com.acme.services.MyServiceImpl"/>
</beans>
不僅如此,還可以尬在一起組合 Java 與 XML 設定。
<context:component-scan/> 來掃描 @Configuration 類別