連結: Day 6 - Colab
在 Day 3 我們看過了 CMake 在當前系統支援哪些 generators
今天會再深入一點, 介紹 generator 到底是什麼, 為什麼重要?
主要會著重在 Makefile, Ninja 和 Ninja Multi-Config
我們已經知道每個 build tools 都有自己的 build scripts, 比如
*.make)*.ninja).vcxproj
.xcodeproj
Note: 本系列不會介紹如何 cross compile Apple series, 知道有這個關係即可
先不提 build scripts 很難寫, 每個人有自己喜好的寫法也會造成管理困難, 所以建議用工具自動產生這些 build scripts
Ninja 也在 Design Goals 直接挑明了建議使用者自動產生 Ninja files
You should generate your ninja files using another program. This is how we can sidestep many policy decisions.
而 Generator 就是 CMake 內建的 工具, 可以幫我們產生上述這些 build scripts, 所以我們就不需要再去找能幫我們產生 build scripts 的工具了
Note: 說 CMake generator 是工具其實不太準確, 應該說他是 CMake 內建的一連串邏輯, 會根據我們指定的 generator 產生對應的 build scripts, 但當成是工具比較好理解, 就像大家習慣把 gcc 稱作 compiler 一樣XD
Note: 今天為了介紹 Multi-Config Generator, 在 Colab 中有安裝 ninja-build, 歡迎大家去玩~
Build type, 又叫做 build config, 或是 build scheme, 是用來決定 build code 的過程中是否需要額外的操作, 通常會加上 compiler flags 或是 linker flags, 本系列不會詳細介紹有哪些 flags, 有興趣的人可以看 C++ Primer~
CMake 提供以下幾種 build type, 分別列出特性
| type | build times | debug symbol |
|---|---|---|
| Debug | 快 | 有 |
| Release | 慢 | 沒 |
| RelWithDebInfo | 中 | 有 |
| MinSizeRel | 慢 | 沒 |
CMake 已經幫我們在每個內建的 build type 加上基本的 compiler flags 和 linker flags, 這些 flags 會在 CMake 使用 compiler 或是 linker 的時候根據 build type 自動加入
當然, 我們也可以基於這些 flags 額外加入自己的, 這會在 Day 8 介紹
Build type 由 cache variable CMAKE_BUILD_TYPE 控制
需要注意的是, single-config generator 和 multi-config generator 會在不同階段決定 build type, 來看看兩者的差別
Note: 可以去 官網 - GENERATOR_IS_MULTI_CONFIG 看有哪些 generators 是 multi-config, 但是此變數僅 CMake 3.9 以上才支援
Note: 建議搭配今日 Colab 更好懂噢噢~
記得我們在 Day 3 看過的 CMake build code 的流程嗎? 從 configure, build, test, 到 pack
對於 single-config generator 來說, build type 在 configure 階段就要決定了! 是由 CMAKE_BUILD_TYPE cache variable 控制
就像下面的 code
cmake -G Ninja -DCMAKE_BUILD_TYPE:STRING=<build-type> <source-dir>
cmake --build .
呃...聽起來沒什麼問題啊?
缺點在於, 通常我們在開發時會 build Debug 版, 保留 symbols 也不讓 compiler 優化我們的 code, 方便 debug
當我們開發完成就會 build Release 版, 讓 compiler 用各種手段優化使最終的程式能夠有效率的執行
所以對於 single-config generator 來說, 我們的開發流程會像
Debug 版Debug build 的產物 👈Release 版Release build 的產物 👈這個流程本身沒有什麼問題, 但是注意到了嗎?
我們每次切換 build type 就需要清掉舊的 build directory, 再用新版的 build 一次
如果是簡單的專案還好, 但隨著專案越來越複雜, 越來越大包, build 會花很多很多時間 (ex. 20分鐘 以上😱)
當然, CMake 有幫我們用 cache 做加速, 那為什麼還會這麼久呢?
沒錯! 因為我們切換 build type 時, 清掉舊的 build directory 的同時也把 cache 清光啦!!!
雖然我們還沒有開始寫我們的 CMake 專案, 但是從前幾天的 Colab 可以看到, 我們使用 cmake --build <build-dir> 指令的時候會產出 build 資料夾
cmake-example/
├─ build/ 👈
├─ src/
│  ├─ CMakeLists.txt
要解決這個問題, 最簡單的方法就是 不要清掉舊的 build directory
所以, 我們只要針對不同的 build type 用不同的 build directory 就好啦
比如, 我們可以在 build 底下新增兩個資料夾 Debug, Release
cmake-example/
├─ build/
│  ├─ Release/ 👈
│  ├─ Debug/ 👈
├─ src/
│  ├─ CMakeLists.txt
然後我們先 cd 到 Debug 資料夾後, build debug 版本
cmake -G Ninja -DCMAKE_BUILD_TYPE:STRING=Debug ../../src
cmake --build .
再 cd 到 Release 的資料夾後, build release 版本
cmake -G Ninja -DCMAKE_BUILD_TYPE:STRING=Release ../../src
cmake --build .
就大功告成啦!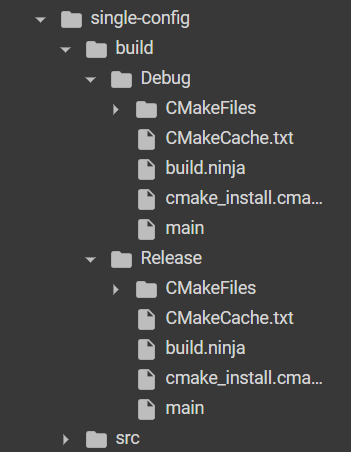
是說相當麻煩啊...
那麼 Multi-Config Generator 又是怎麼做的呢?
和 Single-Config Generator 在 configure 階段就要決定 build type 不同
Multi-Config Generator 是在 build 階段才決定!
所以, 使用方式是加上 cache variable CMAKE_CONFIGURATION_TYPES, 字如其名, 就是允許我們 一次指定多個 build types, 指令如下
cmake -G "Ninja Multi-Config" -DCMAKE_CONFIGURATION_TYPES "Debug;Release" <source-dir>
cmake --build . --config=<build-type> 👈
結果會和上面優化後的 single-config generator 的專案結構一樣 (我故意設計成一樣的, 方便大家理解)
只是這次我們
Debug 和 Release 資料夾cd 到對應的 build type 資料夾底下是不是方便很多呢?
cmake-example/
├─ build/
│  ├─ Release/ 👈
│  ├─ Debug/ 👈
├─ src/
│  ├─ CMakeLists.txt
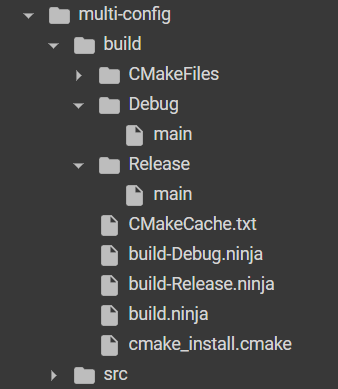
從實際的專案可以看到, Ninja Multi-Config generator 在 configure 階段幫我們根據指定的每種 build types 都產出了 build-<build-type>.ninja 的檔案
但是在 single-config generator 都是產生在 build type 對應的資料夾底下
根據 官網, CMake 有以下幾個 multi-config generators, 各自由不同的 config 控制
CMAKE_DEFAULT_BUILD_TYPE
到目前為止, 我們了解了 CMake Generators 是什麼, Single-config generator 和 Multi-config generators 的差別
好啦, 相信大家腦袋已經快要爆炸了 (至少我已經要爆炸了:p)
但是你可能會有個疑問: 如果 build scripts 在 configure 階段就產生了, 但是 multi-config generators 的 build types 是在 build 階段才會決定, 那 build scripts 要怎麼根據現在的 build type 決定要增加哪些 compiler flags 和 linker flags 呢😕
這個我們會在 Day 26 介紹
終於, 在了解了複雜的 generators 的機制後, 下一篇, 我們會進入比較輕鬆的環節, 來看看如何 Debug 我們的 CMake script 吧!


 iThome鐵人賽