在過去的一周,我們都著著重在如何透過OVN建立邏輯網路,並且理解邏輯網路間是否能夠連通。但是如果一個邏輯網路如果無法連上Internet,在目前的世界上,無法連到Internet的話,也沒多大的功用。在虛擬網路裡,要連到Internet上,都是採用NAT,而NAT又分為SNAT與DNAT。今天我們就要來學習一下,在OVN的架構下,一個虛擬網路,要如何用SNAT與DNAT連到Internet。
延續之前幾天的實驗環境,今天的架構會將前幾天的觀念全部統整起來,要完成的環境如圖。主要有幾個步驟
我們的實驗環境是透用Vagrant和VirtualBox建立二個VM做測試。建立的二個VM對外連線都是依靠eth0,而VM的eth0是採用VirtualBox的NAT網路模式。在這個模式下,二個VM都有自己的NAT網路與gateway,所以二個VM是無法透過eth0互相通信,細節可以參考VirtualBox的官方對於 Virtual Networking的比較。也是因為這個因素,稍後的NAT實驗,會有一些地方稍微要多想一下。
再來,我們就一步一步來了解每一個動作的原理吧。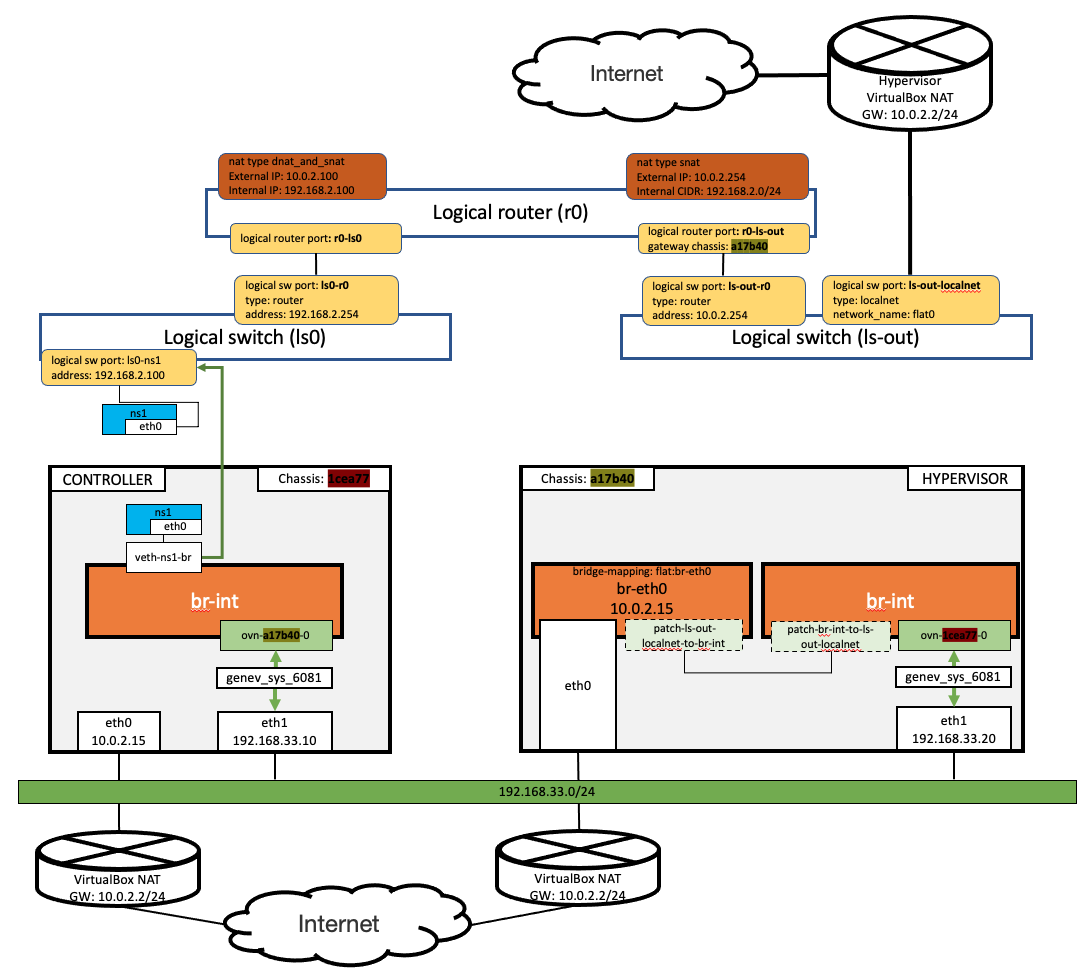
這一步是建立一個虛擬網路用的logical switch, 從第一天開始,每天都在做一樣的事,應該不默生了。忘了的話,可以回去複習Day-02: 虛擬機器網路卡連至邏輯交換器的內容喔。
這一步要注意的是,因為要讓虛擬網路的namespace能夠上網,所以,在建立namespace時,要指定default gateway. 而這個default gateway就是等下要建立的logical router。如此一來,namespace要上網時,就會把logical router當做gateway出去。這是不是和一般的網路知識沒什麼二樣呢?
create-ns ns1 192.168.2.100 192.168.2.254
create-ovn-ls-and-lsp ls0 ns1
assign-iface-to-ovn-lsp ls0 ns1
因為要讓在邏輯網路上的namespace可以上網,必需要透過可以對外連線的實體網路幫我們達到這件事。所以,我們建立一個localnet的logical switch, 用來連接hypervisor上的eth0。如果忘了localnet是什麼,一樣可以回去複習昨天才提過的Day-06: 連接虛擬與實體網路的localnet switch
。
create-ovn-ls-and-lsp ls-out
add-localnet-port ls-out flat0

#run on hypervisor
add-bridge-mapping eth0 flat0
今天建立bridge-mapping的動作,只有在hypervisor上進行,controller上則不做;而昨天的在建立localnet時,我們是在所有的節點上都做bridge-mapping。原因是因為我們今天的架構,只打算透過一個hypervisor出去Internet,所以只在Hypervisor上做即可。
另一個原因則是稍早提到的,因為二個VM的eth0實際上是無法互通,讓controller也做bridge-mapping,對於這個實驗沒什麼差別,這邊就不做了,有興趣的夥伴可以試試看,看看能不能體會間的差異,這就留給大家做練習吧。
在做這一步時,請特別注意,一定不要用eth0連到hypervisor。如果你是用
vagrant ssh hypervisor,就是用eth0連線,請務必用別的interface連到hypervisor再執行這一步。因為這一步會將eth0放到be-eth0這個新建的bridge上,一旦放到上去後,原先在eth0的連線就會中斷。在add-bridge-mapping這個function,做了... ifconfig $1 0 dhclient $br_name這是移除eth0的IP後,再讓br-eth0重新取得10.0.2.0/24網段的IP,hypervisor才有正常上網的功能,否則,等一下namespace是無法上網的喔。
再來,就是建立一個logical router將二個logical switch連起來。與ls0相連的那端,要使用第一步所用的192.168.2.0/24 這個網段;與ls-out相連的那端,則要使用VirtualBox的eth0所使用的10.0.2.0/24 。
create-ovn-lr r0
connect-ovn-lr-to-ls r0 ls0    192.168.2.254
connect-ovn-lr-to-ls r0 ls-out 10.0.2.254
再來,要設定logical router的default route。這裡可以看到,我們將10.0.2.2設為default gateway,而這個IP就是VirtualBox NAT的default gateway。另外,也設定logical router會將hypervisor這個節點做出口的chassis。
到這一步,已經將整個邏輯網路都設定好了,但還差最後一個設定,就是NAT的規則。在 OVN的NAT機制,有支援SNAT與DNAT,我們來看要如何設定。
set_outgoing_chassis r0 ls-out hypervisor 10.0.2.2

#實際上ovn-nbctl的指令
#CHASSIS=`ovn-sbctl --columns=name -f json find chassis hostname=$3 | jq -r .data[][]`
#ovn-nbctl lrp-set-gateway-chassis $1-$2 ${CHASSIS}
#ovn-nbctl lr-route-add $1 "0.0.0.0/0" $4
SNAT可以將一整個網段透過一個External IP做為出口上網,行為就像是家裡的IP分享器一樣。這邊就是將VirtualBox NAT 的10.0.2.0/24這個網段中,取10.0.2.254做為External IP。
set_snat_rule r0 192.168.2.0/24 10.0.2.200

#實際上的ovn-nbctl 指令
#ovn-nbctl -- --id=@nat create nat type="snat" logical_ip=$2 external_ip=$3 -- add logical_router $1 nat @nat
設定好後,可以查目前logical router上的nat規則。
ovn-nbctl lr-nat-list r0

TYPE             EXTERNAL_IP        LOGICAL_IP            EXTERNAL_MAC         LOGICAL_PORT
snat             10.0.2.200         192.168.100.0/24
在controller上的ns1裡面,確認可以對外連線。
#on controller
ip netns exec ns1 ping 8.8.8.8
DNAT可以將指定一個External IP對應到一個內部的IP,如此一來,除了可以上網之外,外部也可以透過這個External IP進行連線。DNAT的設定和SNAT非常類似,但最大的差異再於,DNAT是將一個External IP對應到一個內部IP。
set_dnat_rule r0 192.168.2.100 10.0.2.100

#實際上的ovn-nbctl 指令
#ovn-nbctl -- --id=@nat create nat type="dnat_and_snat" logical_ip=$2 external_ip=$3 -- add logical_router $1 nat @nat
設定好後,可以查目前logical router上的nat規則,多了一個DNAT將10.0.2.200對應至192.168.100.100。
ovn-nbctl lr-nat-list r0

TYPE             EXTERNAL_IP        LOGICAL_IP            EXTERNAL_MAC         LOGICAL_PORT
dnat_and_snat    10.0.2.100         192.168.2.100
snat             10.0.2.200         192.168.2.0/24
在controller上的ns1裡面,確認可以對外連線。在hypervisor上,確認可以透過DNAT的10.0.2.200連通。
#在 controller 上測試 ns1 可以對外
ip netns exec ns1 ping 8.8.8.8

#在 hypervisor 上測試可由 DNAT的external ip連到ns1
ping -c 4 10.0.2.100
在測試DNAT時,一定要從hypervisor,從controller一定不會通喔。原因在於,現在是將hypervisor做為gateway chassis,所以hypervisor的eth0對於namespace ns1來說,才是實質意義上的External Network。所以從controller上去進DNAT的IP是不會通的。當然,如果你要將controller做為gateway chassis,也是可以的,就讓你自己試試看。
依今天的實驗架構,在controller上的ns1, 必需經過hypervisor上的eth0,才能連到Internet. 再依前幾天的說明,controller和hypervisor間,是透過GENEVE來傳送封裝後的封包,我們在controller與hypervisor上透過tcpdump來驗證吧。
在controller上的ns1,可和Internet通信。
#controller
ovs-tcpdump -i veth-ns1-br  icmp

13:27:43.945275 IP 192.168.2.100 > dns.google: ICMP echo request, id 12998, seq 1, length 64
13:27:44.014730 IP dns.google > 192.168.2.100: ICMP echo reply, id 12998, seq 1, length 64
在controller上的eth1,確實有看到由ns1要往Internet的GEVENE封包,要送往hypervisor
#controller

tcpdump -vvneei eth1 'udp port 6081'

13:27:43.945304 08:00:27:2d:eb:c5 > 08:00:27:83:ca:fe, ethertype IPv4 (0x0800), length 156: (tos 0x0, ttl 64, id 47229, offset 0, flags [DF], proto UDP (17), length 142)
    192.168.33.10.17070 > 192.168.33.20.6081: [bad udp cksum 0xc3fa -> 0xe79c!] Geneve, Flags [C], vni 0x6, proto TEB (0x6558), options [class Open Virtual Networking (OVN) (0x102) type 0x80(C) len 8 data 00010003]
	02:00:c9:18:b0:5d > 52:54:00:12:35:02, ethertype IPv4 (0x0800), length 98: (tos 0x0, ttl 63, id 34113, offset 0, flags [DF], proto ICMP (1), length 84)
    192.168.2.100 > 8.8.8.8: ICMP echo request, id 12998, seq 1, length 64

13:27:44.011388 08:00:27:83:ca:fe > 08:00:27:2d:eb:c5, ethertype IPv4 (0x0800), length 156: (tos 0x0, ttl 64, id 43126, offset 0, flags [DF], proto UDP (17), length 142)
    192.168.33.20.23544 > 192.168.33.10.6081: [udp sum ok] Geneve, Flags [C], vni 0x4, proto TEB (0x6558), options [class Open Virtual Networking (OVN) (0x102) type 0x80(C) len 8 data 00020001]
	02:00:cc:fa:fb:3d > 4e:26:4a:c5:a9:55, ethertype IPv4 (0x0800), length 98: (tos 0x0, ttl 61, id 3591, offset 0, flags [DF], proto ICMP (1), length 84)
    8.8.8.8 > 192.168.2.100: ICMP echo reply, id 12998, seq 1, length 64
在hypervisor上收到controller送過來的GEVENE封包。
#hypervisor
tcpdump -vvneei eth1 'udp port 6081'

13:27:48.488846 08:00:27:2d:eb:c5 > 08:00:27:83:ca:fe, ethertype IPv4 (0x0800), length 156: (tos 0x0, ttl 64, id 47229, offset 0, flags [DF], proto UDP (17), length 142)
    192.168.33.10.17070 > 192.168.33.20.6081: [udp sum ok] Geneve, Flags [C], vni 0x6, proto TEB (0x6558), options [class Open Virtual Networking (OVN) (0x102) type 0x80(C) len 8 data 00010003]
	02:00:c9:18:b0:5d > 52:54:00:12:35:02, ethertype IPv4 (0x0800), length 98: (tos 0x0, ttl 63, id 34113, offset 0, flags [DF], proto ICMP (1), length 84)
    192.168.2.100 > 8.8.8.8: ICMP echo request, id 12998, seq 1, length 64

13:27:48.553949 08:00:27:83:ca:fe > 08:00:27:2d:eb:c5, ethertype IPv4 (0x0800), length 156: (tos 0x0, ttl 64, id 43126, offset 0, flags [DF], proto UDP (17), length 142)
    192.168.33.20.23544 > 192.168.33.10.6081: [bad udp cksum 0xc3fa -> 0xc6b8!] Geneve, Flags [C], vni 0x4, proto TEB (0x6558), options [class Open Virtual Networking (OVN) (0x102) type 0x80(C) len 8 data 00020001]
	02:00:cc:fa:fb:3d > 4e:26:4a:c5:a9:55, ethertype IPv4 (0x0800), length 98: (tos 0x0, ttl 61, id 3591, offset 0, flags [DF], proto ICMP (1), length 84)
    8.8.8.8 > 192.168.2.100: ICMP echo reply, id 12998, seq 1, length 64
在hypervisor的eth0,抓到送到Internet的封包,注意到這裡的來源IP, 已經被換成SNAT中設定的External IP。
#hypervisor
tcpdump -i eth0 icmp

13:27:48.492478 IP 10.0.2.200 > dns.google: ICMP echo request, id 12998, seq 1, length 64
13:27:48.552449 IP dns.google > 10.0.2.200: ICMP echo reply, id 12998, seq 1, length 64
和SNAT完全相同的驗證,可以看到DNAT模式的封包,也是由hypervisor送出。唯獨External IP,是換成DNAT時所設定的External IP。
#controller

ovs-tcpdump -i veth-ns1-br  icmp

13:41:24.391918 IP 192.168.2.100 > dns.google: ICMP echo request, id 2285, seq 1, length 64
13:41:24.467388 IP dns.google > 192.168.2.100: ICMP echo reply, id 2285, seq 1, length 64
#controller

tcpdump -vvneei eth1 'udp port 6081'

13:41:24.391942 08:00:27:2d:eb:c5 > 08:00:27:83:ca:fe, ethertype IPv4 (0x0800), length 156: (tos 0x0, ttl 64, id 62260, offset 0, flags [DF], proto UDP (17), length 142)
    192.168.33.10.28509 > 192.168.33.20.6081: [bad udp cksum 0xc3fa -> 0x29c5!] Geneve, Flags [C], vni 0x5, proto TEB (0x6558), options [class Open Virtual Networking (OVN) (0x102) type 0x80(C) len 8 data 00010003]
	02:00:ba:fe:50:a0 > 52:54:00:12:35:02, ethertype IPv4 (0x0800), length 98: (tos 0x0, ttl 63, id 7277, offset 0, flags [DF], proto ICMP (1), length 84)
    192.168.2.100 > 8.8.8.8: ICMP echo request, id 2285, seq 1, length 64

13:41:24.462684 08:00:27:83:ca:fe > 08:00:27:2d:eb:c5, ethertype IPv4 (0x0800), length 156: (tos 0x0, ttl 64, id 35889, offset 0, flags [DF], proto UDP (17), length 142)
    192.168.33.20.39302 > 192.168.33.10.6081: [udp sum ok] Geneve, Flags [C], vni 0x3, proto TEB (0x6558), options [class Open Virtual Networking (OVN) (0x102) type 0x80(C) len 8 data 00020001]
	02:00:da:c1:50:36 > 16:80:0d:09:d2:9b, ethertype IPv4 (0x0800), length 98: (tos 0x0, ttl 61, id 61, offset 0, flags [DF], proto ICMP (1), length 84)
    8.8.8.8 > 192.168.2.100: ICMP echo reply, id 2285, seq 1, length 64
#hypervisor
tcpdump -vvneei eth1 'udp port 6081'

13:41:23.840551 08:00:27:2d:eb:c5 > 08:00:27:83:ca:fe, ethertype IPv4 (0x0800), length 156: (tos 0x0, ttl 64, id 62260, offset 0, flags [DF], proto UDP (17), length 142)
    192.168.33.10.28509 > 192.168.33.20.6081: [udp sum ok] Geneve, Flags [C], vni 0x5, proto TEB (0x6558), options [class Open Virtual Networking (OVN) (0x102) type 0x80(C) len 8 data 00010003]
	02:00:ba:fe:50:a0 > 52:54:00:12:35:02, ethertype IPv4 (0x0800), length 98: (tos 0x0, ttl 63, id 7277, offset 0, flags [DF], proto ICMP (1), length 84)
    192.168.2.100 > 8.8.8.8: ICMP echo request, id 2285, seq 1, length 64

13:41:23.910323 08:00:27:83:ca:fe > 08:00:27:2d:eb:c5, ethertype IPv4 (0x0800), length 156: (tos 0x0, ttl 64, id 35889, offset 0, flags [DF], proto UDP (17), length 142)
    192.168.33.20.39302 > 192.168.33.10.6081: [bad udp cksum 0xc3fa -> 0x7387!] Geneve, Flags [C], vni 0x3, proto TEB (0x6558), options [class Open Virtual Networking (OVN) (0x102) type 0x80(C) len 8 data 00020001]
	02:00:da:c1:50:36 > 16:80:0d:09:d2:9b, ethertype IPv4 (0x0800), length 98: (tos 0x0, ttl 61, id 61, offset 0, flags [DF], proto ICMP (1), length 84)
    8.8.8.8 > 192.168.2.100: ICMP echo reply, id 2285, seq 1, length 64
#hypervisor
tcpdump -i eth0 icmp

13:41:23.853145 IP 10.0.2.100 > dns.google: ICMP echo request, id 2285, seq 1, length 64
13:41:23.906749 IP dns.google > 10.0.2.100: ICMP echo reply, id 2285, seq 1, length 64
最後一步,我們來驗證從hypervisor上,是如何和controller上的ns1通訊。在hypervisor上要和10.0.2.100 這個IP通訊時,我們可以看到hypervisor上的GEVENE封包,在送出前,已經被轉換回192.168.2.100這個內部的IP。
#hypervisor
tcpdump -vvneei eth1 'udp port 6081'

13:48:43.716118 08:00:27:83:ca:fe > 08:00:27:2d:eb:c5, ethertype IPv4 (0x0800), length 156: (tos 0x0, ttl 64, id 30362, offset 0, flags [DF], proto UDP (17), length 142)
    192.168.33.20.40555 > 192.168.33.10.6081: [bad udp cksum 0xc3fa -> 0x6ea2!] Geneve, Flags [C], vni 0x3, proto TEB (0x6558), options [class Open Virtual Networking (OVN) (0x102) type 0x80(C) len 8 data 00020001]
	02:00:da:c1:50:36 > 16:80:0d:09:d2:9b, ethertype IPv4 (0x0800), length 98: (tos 0x0, ttl 63, id 33295, offset 0, flags [DF], proto ICMP (1), length 84)
    10.0.2.15 > 192.168.2.100: ICMP echo request, id 7, seq 1, length 64

13:48:43.726039 08:00:27:2d:eb:c5 > 08:00:27:83:ca:fe, ethertype IPv4 (0x0800), length 156: (tos 0x0, ttl 64, id 27441, offset 0, flags [DF], proto UDP (17), length 142)
    192.168.33.10.6132 > 192.168.33.20.6081: [udp sum ok] Geneve, Flags [C], vni 0x5, proto TEB (0x6558), options [class Open Virtual Networking (OVN) (0x102) type 0x80(C) len 8 data 00010003]
	02:00:ba:fe:50:a0 > 08:00:27:44:4c:ed, ethertype IPv4 (0x0800), length 98: (tos 0x0, ttl 63, id 62716, offset 0, flags [none], proto ICMP (1), length 84)
    192.168.2.100 > 10.0.2.15: ICMP echo reply, id 7, seq 1, length 64
#controller

tcpdump -vvneei eth1 'udp port 6081'

13:48:44.387843 08:00:27:83:ca:fe > 08:00:27:2d:eb:c5, ethertype IPv4 (0x0800), length 156: (tos 0x0, ttl 64, id 30362, offset 0, flags [DF], proto UDP (17), length 142)
    192.168.33.20.40555 > 192.168.33.10.6081: [udp sum ok] Geneve, Flags [C], vni 0x3, proto TEB (0x6558), options [class Open Virtual Networking (OVN) (0x102) type 0x80(C) len 8 data 00020001]
	02:00:da:c1:50:36 > 16:80:0d:09:d2:9b, ethertype IPv4 (0x0800), length 98: (tos 0x0, ttl 63, id 33295, offset 0, flags [DF], proto ICMP (1), length 84)
    10.0.2.15 > 192.168.2.100: ICMP echo request, id 7, seq 1, length 64

13:48:44.394261 08:00:27:2d:eb:c5 > 08:00:27:83:ca:fe, ethertype IPv4 (0x0800), length 156: (tos 0x0, ttl 64, id 27441, offset 0, flags [DF], proto UDP (17), length 142)
    192.168.33.10.6132 > 192.168.33.20.6081: [bad udp cksum 0xc3fa -> 0x8c65!] Geneve, Flags [C], vni 0x5, proto TEB (0x6558), options [class Open Virtual Networking (OVN) (0x102) type 0x80(C) len 8 data 00010003]
	02:00:ba:fe:50:a0 > 08:00:27:44:4c:ed, ethertype IPv4 (0x0800), length 98: (tos 0x0, ttl 63, id 62716, offset 0, flags [none], proto ICMP (1), length 84)
    192.168.2.100 > 10.0.2.15: ICMP echo reply, id 7, seq 1, length 64
在controller上的ns1裡,我們可以看到來自hypervisor的10.0.2.15的封包。
#controller

ovs-tcpdump -i veth-ns1-br  icmp

13:48:21.366638 IP 10.0.2.15 > 192.168.2.100: ICMP echo request, id 6, seq 1, length 64
13:48:21.367617 IP 192.168.2.100 > 10.0.2.15: ICMP echo reply, id 6, seq 1, length 64
到此,我們已經把目前學過的所有OVN的觀念都結合起來,再搭配上今天學到的在OVN裡怎麼設定NAT,就可以完成一個基本功能都有的虛擬網路。這樣一步一步拆解下來,是不是清楚多了呢?


 iThome鐵人賽