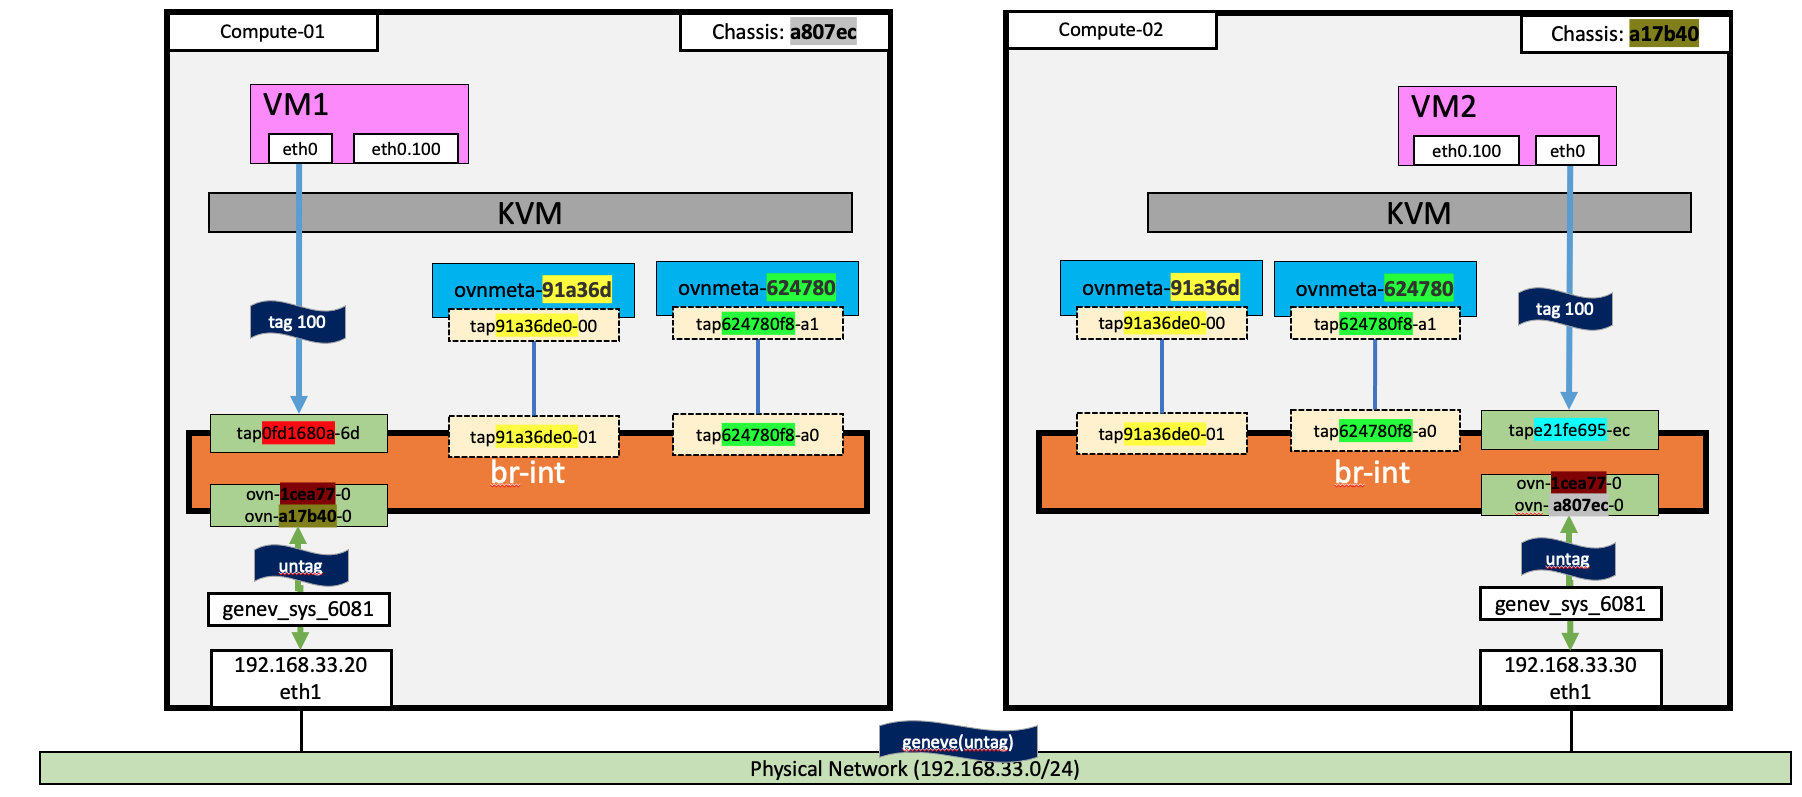
昨天已經建立了二個VM,各別有一個VLAN trunk,今天就來理解VM之間如何透過trunk進行通訊。
昨天的二個VM,都有連在二個Network 上,所以在compute node上,都可以看到二個Network對應的ovnmeta namespace。再來,我們來看一下,VM1和VM2透過child network網段通訊時,封包是如何由compute-01走到compute-02。整個過程如下:
genev_sys_6081都是處理untagged packet,這代表在br-int上會執行VLAN id的處理genev_sys_6081解出untagged packetbr-int加上VM2對應的VLAN id後,送給VM2 的tap
我們可以在二個VM的eth0與eth0.100,以及compute node上的 genev_sys_6081 上分別裝封包來驗證。
在 VM1 instance上,eth0 收到tagged packet,VLAN ID是100
$ sudo tcpdump -vvnee -i eth0

01:04:31.875926 fa:16:3e:d5:3c:74 > fa:16:3e:47:ae:23, ethertype 802.1Q (0x8100), length 102: vlan 100, p 0, ethertype IPv4 (0x0800), (tos 0x0, ttl 64, id 8403, offset 0, flags [DF], proto ICMP (1), length 84)
    10.0.22.181 > 10.0.22.58: ICMP echo request, id 14411, seq 1, length 64
01:04:31.875959 fa:16:3e:47:ae:23 > fa:16:3e:d5:3c:74, ethertype 802.1Q (0x8100), length 102: vlan 100, p 0, ethertype IPv4 (0x0800), (tos 0x0, ttl 64, id 25626, offset 0, flags [none], proto ICMP (1), length 84)
    10.0.22.58 > 10.0.22.181: ICMP echo reply, id 14411, seq 1, length 64
但在 VM1的 eth0.100 ,也是收到untagged packet.
$ sudo tcpdump -vvnee -i eth0.100

01:04:31.875929 fa:16:3e:d5:3c:74 > fa:16:3e:47:ae:23, ethertype IPv4 (0x0800), length 98: (tos 0x0, ttl 64, id 8403, offset 0, flags [DF], proto ICMP (1), length 84)
    10.0.22.181 > 10.0.22.58: ICMP echo request, id 14411, seq 1, length 64
01:04:31.875956 fa:16:3e:47:ae:23 > fa:16:3e:d5:3c:74, ethertype IPv4 (0x0800), length 98: (tos 0x0, ttl 64, id 25626, offset 0, flags [none], proto ICMP (1), length 84)
    10.0.22.58 > 10.0.22.181: ICMP echo reply, id 14411, seq 1, length 64
在 VM2 instance上,eth0 收到tagged packet,VLAN ID是100
$ sudo tcpdump -vvnee -i eth0
00:33:56.429769 fa:16:3e:47:ae:23 > fa:16:3e:d5:3c:74, ethertype 802.1Q (0x8100), length 102: vlan 100, p 0, ethertype IPv4 (0x0800), (tos 0x0, ttl 64, id 918, offset 0, flags [DF], proto ICMP (1), length 84)
    10.0.22.58 > 10.0.22.181: ICMP echo request, id 22293, seq 1, length 64
00:33:56.429796 fa:16:3e:d5:3c:74 > fa:16:3e:47:ae:23, ethertype 802.1Q (0x8100), length 102: vlan 100, p 0, ethertype IPv4 (0x0800), (tos 0x0, ttl 64, id 23588, offset 0, flags [none], proto ICMP (1), length 84)
    10.0.22.181 > 10.0.22.58: ICMP echo reply, id 22293, seq 1, length 64
但在 VM2的 eth0.100 ,是收到untagged packet.
$ sudo tcpdump -vvnee -i eth0.100
tcpdump: listening on eth0.200, link-type EN10MB (Ethernet), snapshot length 262144 bytes
00:33:56.429773 fa:16:3e:47:ae:23 > fa:16:3e:d5:3c:74, ethertype IPv4 (0x0800), length 98: (tos 0x0, ttl 64, id 918, offset 0, flags [DF], proto ICMP (1), length 84)
    10.0.22.58 > 10.0.22.181: ICMP echo request, id 22293, seq 1, length 64
00:33:56.429793 fa:16:3e:d5:3c:74 > fa:16:3e:47:ae:23, ethertype IPv4 (0x0800), length 98: (tos 0x0, ttl 64, id 23588, offset 0, flags [none], proto ICMP (1), length 84)
    10.0.22.181 > 10.0.22.58: ICMP echo reply, id 22293, seq 1, length 64
在compute node,收到的都是untaged 封包
tcpdump -i genev_sys_6081  icmp

08:45:16.464234 IP 10.0.22.58 > 10.0.22.181: ICMP echo request, id 52097, seq 1, length 64
08:45:16.464758 IP 10.0.22.181 > 10.0.22.58: ICMP echo reply, id 52097, seq 1, length 64
在compute node上的br-int bridge,是如何修改封包的tag呢? 這都是br-int 上的openflow在實現這些功能。以使用VLAN id 100的 VM2為例,我們把compute-02上的flow dump出來看一下,就可以發覺進出br-int時,會對封包的tag做手腳,而達到VM收到的是tagged封包;而br-int收到的是untagged 封包。
in_port=74), 如果 VLAN id是100 (dl_vlan=100), 把vlan id移除 (strip_vlan)
ovs-ofctl可得 port 74是tape21fe695-ec
$ ovs-ofctl  dump-flows br-int  | head -n 2
NXST_FLOW reply (xid=0x4):
 cookie=0xff2192df, duration=80424.614s, table=0, n_packets=1135, n_bytes=57078, idle_age=14115, hard_age=65534, priority=150,in_port=74,dl_vlan=100 actions=load:0x1->NXM_NX_REG10[5],strip_vlan,load:0x6->NXM_NX_REG13[],load:0x5->NXM_NX_REG11[],load:0x4->NXM_NX_REG12[],load:0x2->OXM_OF_METADATA[],load:0x2->NXM_NX_REG14[],resubmit(,8)

$ ovs-ofctl show br-int  | grep 74
 74(tape21fe695-ec): addr:fe:16:3e:d5:3c:74
output:74) 送出時,加上VLAN ID 100 (actions=mod_vlan_vid:100)$ ovs-ofctl dump-flows br-int | grep mod_vlan
cookie=0xff2192df, duration=80631.571s, table=65, n_packets=1113, n_bytes=50960, idle_age=14322, hard_age=65534, priority=100,reg15=0x2,metadata=0x2 actions=mod_vlan_vid:100,output:74,strip_vlan
上一個例子,二個VM所用的trunk的parent port屬於同一個Network;使用的child port也屬於同一個Child network,而且二個VM的child port都屬用相同的VLAN ID。我們仔細思考下列三個使用trunk的情況,VM之間能不能正常通訊呢:
下面這個例子,2個VM所用的Trunk parent port在不同的Network,而child port在同一個Network。但是二個VM是使用不同的VLAN。

建立二個parent network,一個child network
openstack network create  parent1
openstack network create  parent2
openstack network create  child

openstack subnet create --network parent1 --subnet-range 10.0.11.0/24 parent1_subnet
openstack subnet create --network parent2 --subnet-range 10.0.22.0/24 parent2_subnet
openstack subnet create --network child   --subnet-range 10.0.33.0/24 child_subnet
建立在child network使用VLAN 100的VM
# port
openstack port create --network parent1 parent1
parent_mac="$( openstack port show parent1 | awk '/ mac_address / { print $4 }' )"

openstack port create --network child --mac-address "$parent_mac" child1

# trunk, use VLAN 100
openstack network trunk create --parent-port parent1 trunk1
openstack network trunk set --subport port=child1,segmentation-type=vlan,segmentation-id=100 trunk1

# vm
IMAGE_ID=$(openstack image show cirros --format json | jq -r .id)
parent_port_id=`openstack port list --name parent1 -f value -c ID`
openstack server create --nic port-id=${parent_port_id} --flavor m1.nano --image $IMAGE_ID vm_1

# sub interface
ip link add link eth0 name eth0.100 type vlan id 100
ip link set eth0.100 up
建立在child network使用VLAN 200的VM
# port
openstack port create --network parent2 parent2
parent_mac="$( openstack port show parent2 | awk '/ mac_address / { print $4 }' )"

openstack port create --network child --mac-address "$parent_mac" child2

# trunk, use VLAN 200
openstack network trunk create --parent-port parent2 trunk2
openstack network trunk set --subport port=child2,segmentation-type=vlan,segmentation-id=200 trunk2

# vm
IMAGE_ID=$(openstack image show cirros --format json | jq -r .id)
parent_port_id=`openstack port list --name parent2 -f value -c ID`
openstack server create --nic port-id=${parent_port_id} --flavor m1.nano --image $IMAGE_ID vm_2

# sub interface
ip link add link eth0 name eth0.200 type vlan id 200
ip link set eth0.200 up
以下圖為例,中間的OpenStack Network a070b3 可以視為一個switch , 且連接二個VM instance的port可以視為 VLAN的Trunk Port。

另外如果是下面的情況,
