今天我主要是把 Tensorflow的官方教學拿過來,讓一般人能花ㄧ到兩個小時跑完整個教學,之後假如要做 Tensorflow Based 的模型訓練跟 debug就相對比較容易一點,雖然目前 Tensorflow 2跟 1 是有點差別的,感覺 Tensorflow 1 是 Tensorflow 1,而 Tensorflow 2 就是跟 Keras 結婚後的 Tensorflow,官方基本入門教學的 API 都是以 Keras 為主。雖然姓沒改也沒跟丈母娘住。
##1.載入TensorFlow
下面的程式碼就只是載入 Tensorflow並 print 出版本
import tensorflow as tf
print("TensorFlow version:",tf.__version__)
TensorFlow version: 2.13.0
下一個做的是加載並準備 MNIST 數據集。 圖像的像素值範圍為 0 到 255。通過將這些值除以 255.0,將這些值縮放到 0 到 1 的範圍。 這還將樣本數據從整數轉換為浮點數:
mnist = tf.keras.datasets.mnist

(x_train, y_train), (x_test, y_test) = mnist.load_data()
x_train, x_test = x_train / 255.0, x_test / 255.0
Downloading data from https://storage.googleapis.com/tensorflow/tf-keras-datasets/mnist.npz
11490434/11490434 [==============================] - 1s 0us/step
這邊使用Keras的 API tf.keras.Sequential 建立模型。
model = tf.keras.models.Sequential([
  tf.keras.layers.Flatten(input_shape=(28, 28)),
  tf.keras.layers.Dense(128, activation='relu'),
  tf.keras.layers.Dropout(0.2),
  tf.keras.layers.Dense(10)
])
Sequential 順序模型 很適合用於每一層都有一個輸入張量tensors 和一個輸出張量tensor的堆疊中。 層是具有已知數學結構的函數,可以重複使用並具有可訓練的變量。 大多數 TensorFlow 模型都是由層組成的。 而目前使用的模型是由 Flatten、Dense 和 Dropout 層組成。
對於每個示例,模型都會返回一個 logits 或 log-odds 得分向量,每個類別一個。
predictions = model(x_train[:1]).numpy()
predictions
array([[ 0.8779398 , 0.00164929, -0.03386223, -0.47464126, 0.29235008,
0.10495356, 0.10805553, 0.05728681, -0.11782514, 0.00382781]],
dtype=float32)
tf.nn.softmax 函數將這些 logits 轉換為每個類別的概率:
tf.nn.softmax(predictions).numpy()
array([[0.20898686, 0.08700632, 0.08397081, 0.05403815, 0.11635917,
0.09647512, 0.09677485, 0.09198435, 0.07720826, 0.08719608]],
dtype=float32)
注意:可以將 tf.nn.softmax 函數運用到網絡最後一層的激活函數中。 雖然這可以使模型輸出更直接地可解釋,但不鼓勵使用這種方法,因為在使用 softmax 輸出時不可能為所有模型提供精確且數值穩定的損失計算。
這邊我們可使用loss.SparseCategoricalCrossentropy定義訓練損失函數:loss_fn = tf.keras.losses.SparseCategoricalCrossentropy(from_logits=True)
損失函數會以實際的向量值和邏輯向量(vector of logits)作為輸入,並返回每個示例的存量損失(scalar loss)。 該損失等於真實類別的負對數概率:如果模型確定類別正確,則損失為零。
這個未經訓練的模型給出的概率接近隨機(每個類別為 1/10),因此初始損失應該接近 -tf.math.log(1/10) ~= 2.3。
loss_fn(y_train[:1], predictions).numpy()
2.3384702
在你開始訓練之前,請先使用 Keras Model.compile 配置並編譯模型。 將優化器類設置為 adam,將損失設置為之前定義的 loss_fn 函數,並通過將metrics參數設置為accuracy來指定要為模型評估的指標。
model.compile(optimizer='adam',
              loss=loss_fn,
              metrics=['accuracy'])
使用 Model.fit 方法調整模型參數並最小化損失:
model.fit(x_train, y_train, epochs=5)
Epoch 1/5
1875/1875 [==============================] - 9s 4ms/step - loss: 0.3015 - accuracy: 0.9131
Epoch 2/5
1875/1875 [==============================] - 11s 6ms/step - loss: 0.1451 - accuracy: 0.9572
Epoch 3/5
1875/1875 [==============================] - 11s 6ms/step - loss: 0.1093 - accuracy: 0.9675
Epoch 4/5
1875/1875 [==============================] - 8s 4ms/step - loss: 0.0889 - accuracy: 0.9720
Epoch 5/5
1875/1875 [==============================] - 9s 5ms/step - loss: 0.0769 - accuracy: 0.9762
<keras.src.callbacks.History at 0x7d2b009d88b0>
Model.evaluate 方法能在驗證集或測試集上檢查模型的性能。
model.evaluate(x_test, y_test, verbose=2)
313/313 - 1s - loss: 0.0727 - accuracy: 0.9765 - 662ms/epoch - 2ms/step
[0.07270487397909164, 0.9764999747276306]
圖像分類器現已在此數據集上訓練到約 98% 的準確度。
如果你要把你的模型返回的參數設為概率值,
你可以將訓練好的模型連接上 softmax 層並輸出:
probability_model = tf.keras.Sequential([
  model,
  tf.keras.layers.Softmax()
])
probability_model(x_test[:5])
<tf.Tensor: shape=(5, 10), dtype=float32, numpy=
array([[1.82685866e-08, 1.42363303e-08, 1.57705181e-05, 2.48316355e-04,
8.45058329e-11, 1.37725110e-07, 1.01222294e-13, 9.99696732e-01,
1.83930126e-07, 3.88945882e-05],
[2.48847325e-08, 3.79420794e-06, 9.99916911e-01, 6.74340336e-05,
9.05668803e-15, 1.15808398e-05, 2.94504310e-10, 7.93890032e-14,
2.19264734e-07, 3.25387971e-16],
[6.71458565e-07, 9.99052703e-01, 3.50374525e-04, 1.64495123e-05,
1.14455681e-04, 3.07868868e-05, 7.46894148e-05, 2.19679787e-04,
1.38792835e-04, 1.32049752e-06],
[9.99742329e-01, 2.14054352e-09, 1.63777600e-04, 3.72857727e-07,
4.74953090e-08, 3.43821853e-06, 5.84897789e-05, 2.92717741e-05,
5.47572441e-08, 2.23949451e-06],
[9.76116212e-07, 8.91221941e-09, 2.07390985e-05, 3.86971912e-08,
9.20697153e-01, 2.56521548e-06, 3.12259772e-06, 1.26377519e-04,
2.97981410e-06, 7.91461542e-02]], dtype=float32)>
恭喜! 您已經學會了使用 Keras API 使用預構建的數據集訓練了機器學習模型。
有關使用 Keras 的更多示例,請查看Keras 教學。 要了解有關使用 Keras 構建模型的更多信息,請閱讀指南。 如果您想了解有關加載和準備數據的更多信息,請參閱有關圖像數據加載或 CSV 數據加載的教程。
1.請嘗試一下,下面的程式碼就只是載入 Tensorflow 的相關套件並 print 出版本
import tensorflow as tf
print("TensorFlow version:", tf.__version__)

from tensorflow.keras.layers import Dense, Flatten, Conv2D
from tensorflow.keras import Model
TensorFlow version: 2.13.0
Load 跟設定 the MNIST dataset.
mnist = tf.keras.datasets.mnist

(x_train, y_train), (x_test, y_test) = mnist.load_data()
x_train, x_test = x_train / 255.0, x_test / 255.0

# Add a channels dimension
x_train = x_train[..., tf.newaxis].astype("float32")
x_test = x_test[..., tf.newaxis].astype("float32")
使用 tf.data 對數據集進行批處理和隨機掉換跟抽取:
train_ds = tf.data.Dataset.from_tensor_slices(
    (x_train, y_train)).shuffle(10000).batch(32)

test_ds = tf.data.Dataset.from_tensor_slices((x_test, y_test)).batch(32)
使用 Keras 模型子類化 API 構建 tf.keras 模型:
class MyModel(Model):
  def __init__(self):
    super().__init__()
    self.conv1 = Conv2D(32, 3, activation='relu')
    self.flatten = Flatten()
    self.d1 = Dense(128, activation='relu')
    self.d2 = Dense(10)

  def call(self, x):
    x = self.conv1(x)
    x = self.flatten(x)
    x = self.d1(x)
    return self.d2(x)

# Create an instance of the model
model = MyModel()
選擇用於訓練的優化器和損失函數:
loss_object = tf.keras.losses.SparseCategoricalCrossentropy(from_logits=True)

optimizer = tf.keras.optimizers.Adam()
選擇指標來衡量模型的損失和準確性。 這些指標在每個 epoch 內累加數值,然後在結束時print出總體結果。
train_loss = tf.keras.metrics.Mean(name='train_loss')
train_accuracy = tf.keras.metrics.SparseCategoricalAccuracy(name='train_accuracy')

test_loss = tf.keras.metrics.Mean(name='test_loss')
test_accuracy = tf.keras.metrics.SparseCategoricalAccuracy(name='test_accuracy')
這邊使用 tf.GradientTape 來訓練模型:
@tf.function
def train_step(images, labels):
  with tf.GradientTape() as tape:
    # training=True is only needed if there are layers with different
    # behavior during training versus inference (e.g. Dropout).
    predictions = model(images, training=True)
    loss = loss_object(labels, predictions)
  gradients = tape.gradient(loss, model.trainable_variables)
  optimizer.apply_gradients(zip(gradients, model.trainable_variables))

  train_loss(loss)
  train_accuracy(labels, predictions)
測試模型:
@tf.function
def test_step(images, labels):
  # training=False is only needed if there are layers with different
  # behavior during training versus inference (e.g. Dropout).
  predictions = model(images, training=False)
  t_loss = loss_object(labels, predictions)

  test_loss(t_loss)
  test_accuracy(labels, predictions)
EPOCHS = 5

for epoch in range(EPOCHS):
  # Reset the metrics at the start of the next epoch
  train_loss.reset_states()
  train_accuracy.reset_states()
  test_loss.reset_states()
  test_accuracy.reset_states()

  for images, labels in train_ds:
    train_step(images, labels)

  for test_images, test_labels in test_ds:
    test_step(test_images, test_labels)

  print(
    f'Epoch {epoch + 1}, '
    f'Loss: {train_loss.result()}, '
    f'Accuracy: {train_accuracy.result() * 100}, '
    f'Test Loss: {test_loss.result()}, '
    f'Test Accuracy: {test_accuracy.result() * 100}'
  )
Epoch 1, Loss: 0.1383129060268402, Accuracy: 95.87332916259766, Test Loss: 0.07072325795888901, Test Accuracy: 97.5999984741211
Epoch 2, Loss: 0.04188443720340729, Accuracy: 98.70166778564453, Test Loss: 0.055002838373184204, Test Accuracy: 98.1199951171875
Epoch 3, Loss: 0.02171938680112362, Accuracy: 99.31832885742188, Test Loss: 0.05481348931789398, Test Accuracy: 98.38999938964844
Epoch 4, Loss: 0.013397102244198322, Accuracy: 99.57333374023438, Test Loss: 0.0664379745721817, Test Accuracy: 98.29000091552734
Epoch 5, Loss: 0.009549243375658989, Accuracy: 99.68333435058594, Test Loss: 0.06598173826932907, Test Accuracy: 98.38999938964844
圖像分類器現已在此數據集上訓練到約 98% 的準確度。 要了解更多信息,請閱讀 TensorFlow 教學。
本指南訓練神經網絡模型來對服裝圖像(例如運動鞋和襯衫)進行分類。 如果您不理解所有細節也沒關係; 這是對完整 TensorFlow 程序的快速概述,並隨您進行詳細說明。
本指南使用 tf.keras,這是一種在 TensorFlow 中構建和訓練模型的高級 API。
# TensorFlow and tf.keras
import tensorflow as tf

# Helper libraries
import numpy as np
import matplotlib.pyplot as plt

print(tf.__version__)
2.13.0
本指南使用 Fashion MNIST 數據集,其中包含 10 個類別的 70,000 張灰度圖像。 這些圖像以低分辨率(28 x 28 像素)顯示單件服裝,
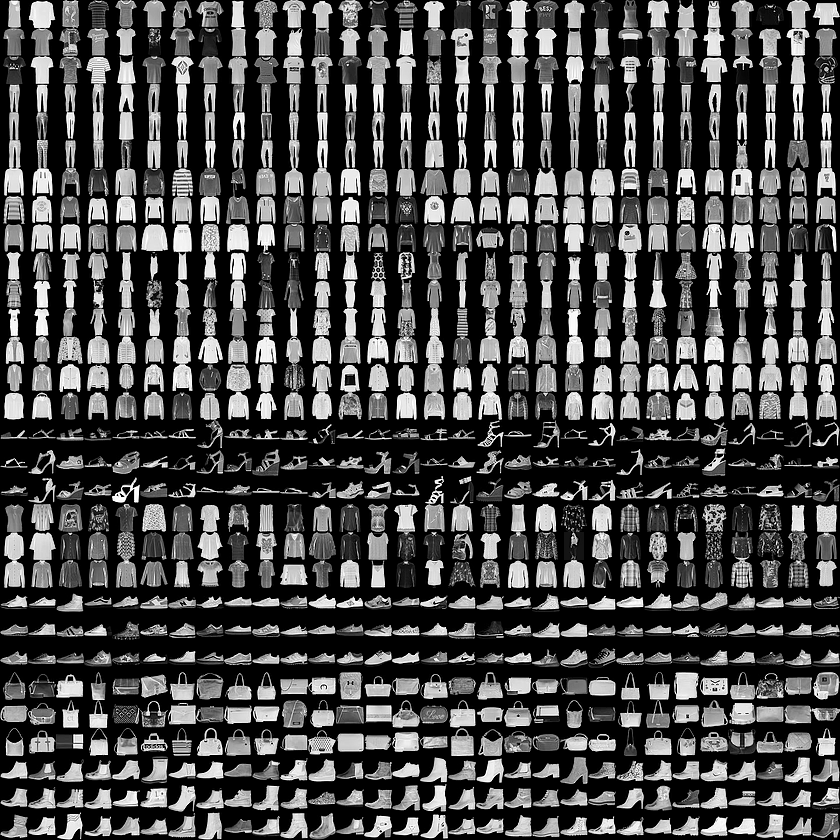
Figure 1. Fashion-MNIST samples (by Zalando, MIT License).
Fashion MNIST 旨在作為經典 MNIST 數據集的直接替代品——通常用作計算機視覺機器學習程序的“Hello, World”。 MNIST 數據集包含手寫數字(0、1、2 等)的圖像,其格式與您將在此處使用的衣物的格式相同。
本指南使用 Fashion MNIST 是為了實現多樣性,因為它是一個比常規 MNIST 更具挑戰性的問題。 這兩個數據集都相對較小,用於驗證算法是否按預期工作。 它們是測試和調試代碼的良好起點。
此處,使用 60,000 張圖像來訓練網絡,並使用 10,000 張圖像來評估網絡學習分類圖像的準確度。 您可以直接從 TensorFlow 訪問 Fashion MNIST。 直接從 TensorFlow 導入並加載 Fashion MNIST 數據:
fashion_mnist = tf.keras.datasets.fashion_mnist

(train_images, train_labels), (test_images, test_labels) = fashion_mnist.load_data()
Downloading data from https://storage.googleapis.com/tensorflow/tf-keras-datasets/train-labels-idx1-ubyte.gz
29515/29515 [==============================] - 0s 0us/step
Downloading data from https://storage.googleapis.com/tensorflow/tf-keras-datasets/train-images-idx3-ubyte.gz
26421880/26421880 [==============================] - 1s 0us/step
Downloading data from https://storage.googleapis.com/tensorflow/tf-keras-datasets/t10k-labels-idx1-ubyte.gz
5148/5148 [==============================] - 0s 0us/step
Downloading data from https://storage.googleapis.com/tensorflow/tf-keras-datasets/t10k-images-idx3-ubyte.gz
4422102/4422102 [==============================] - 1s 0us/step
加載數據集返回四個 NumPy 數組:
這些圖像是 28x28 NumPy 數組,像素值範圍從 0 到 255。標籤是整數數組,範圍從 0 到 9。它們對應於圖像代表的服裝類別:
| Label | Class |
|---|---|
0 |
T-shot/top |
1 |
Trouser |
2 |
Pullover |
3 |
Dress |
4 |
Coat |
5 |
Sandal |
6 |
Shirt |
7 |
Sneaker |
8 |
Bag |
9 |
Ankle boot |
每個圖像都映射到一個標籤。 由於類名稱不包含在數據集中,因此將它們存儲在此處以便稍後在繪製圖像時使用:
class_names = ['T-shirt/top', 'Trouser', 'Pullover', 'Dress', 'Coat',
               'Sandal', 'Shirt', 'Sneaker', 'Bag', 'Ankle boot']
在訓練模型之前,讓我們先探討一下數據集的格式。 下圖顯示訓練集中有 60,000 張圖像,每張圖像表示為 28 x 28 像素:
train_images.shape
(60000, 28, 28)
同樣來說,訓練集中有 60,000 個標籤:
len(train_labels)
60000
每個標籤都是 0 到 9之間的數字
train_labels
array([9, 0, 0, ..., 3, 0, 5], dtype=uint8)
測試集中有 10,000 張圖像。 同樣,每個圖像都表示為 28 x 28 像素:
test_images.shape
(10000, 28, 28)
測試集包含 10,000 個圖像標籤:
len(test_labels)
10000
在訓練網絡之前必須對數據進行預處理。 如果檢查訓練集中的第一張圖像,您將看到像素值落在 0 到 255 的範圍內:
plt.figure()
plt.imshow(train_images[0])
plt.colorbar()
plt.grid(False)
plt.show()
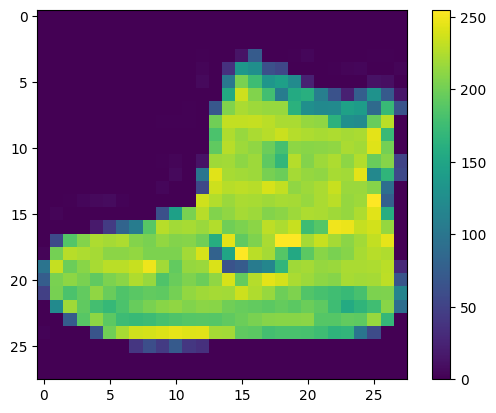
在將這些值輸入神經網絡模型之前,將它們縮放到 0 到 1 的範圍。 為此,請將值除以 255。重要的是訓練集和測試集以相同的方式進行預處理:
train_images = train_images / 255.0

test_images = test_images / 255.0
為了驗證數據的格式是否正確以及您是否已準備好構建和訓練網絡,讓我們顯示訓練集中的前 25 個圖像,並在每個圖像下方顯示類名稱。
plt.figure(figsize=(10,10))
for i in range(25):
    plt.subplot(5,5,i+1)
    plt.xticks([])
    plt.yticks([])
    plt.grid(False)
    plt.imshow(train_images[i], cmap=plt.cm.binary)
    plt.xlabel(class_names[train_labels[i]])
plt.show()

構建神經網絡需要配置模型的層,然後編譯模型。
神經網絡的基本構建塊是層layer。 層從輸入的數據中提取表徵(類似特徵)。 通常來說這些表徵對於當前的問題特別有用。
大多數深度學習都是由將簡單層鏈接在一起組成的。 大多數層(例如 tf.keras.layers.Dense)都具有在訓練期間學習的參數(參數會在訓練時調整)。
model = tf.keras.Sequential([
    tf.keras.layers.Flatten(input_shape=(28, 28)),
    tf.keras.layers.Dense(128, activation='relu'),
    tf.keras.layers.Dense(10)
])
該網絡中的第一層 tf.keras.layers.Flatten 將圖像格式從二維數組(28 x 28 像素)轉換為一維數組(28 * 28 = 784 像素)。 此層將圖像中的像素行拆開並將它們排列起來。 該層沒有需要學習或調整的參數; 它僅重新格式化數據。
像素被展平後,網絡由兩個 tf.keras.layers.Dense 層的序列組成。 這些是密集連接或完全連接的神經層。 第一個 Dense 層有 128 個節點(或神經元)。 第二(也是最後)層返回長度為 10 的 機率數組。每個節點包含一個分數,表示當前圖像屬於每個類別的可能性。
在模型訓練之前,還需要進行一些設置。 下列這些是需要在模型的編譯步驟中添加的:
model.compile(optimizer='adam',
              loss=tf.keras.losses.SparseCategoricalCrossentropy(from_logits=True),
              metrics=['accuracy'])
訓練神經網絡模型需要以下步驟:
要開始訓練,請調用 model.fit 方法——如此稱呼是因為它將模型“擬合”到訓練數據:
model.fit(train_images, train_labels, epochs=10)
Epoch 1/10
1875/1875 [==============================] - 19s 10ms/step - loss: 0.4952 - accuracy: 0.8254
Epoch 2/10
1875/1875 [==============================] - 8s 4ms/step - loss: 0.3700 - accuracy: 0.8656
Epoch 3/10
1875/1875 [==============================] - 9s 5ms/step - loss: 0.3355 - accuracy: 0.8778
Epoch 4/10
1875/1875 [==============================] - 9s 5ms/step - loss: 0.3112 - accuracy: 0.8859
Epoch 5/10
1875/1875 [==============================] - 13s 7ms/step - loss: 0.2941 - accuracy: 0.8911
Epoch 6/10
1875/1875 [==============================] - 9s 5ms/step - loss: 0.2814 - accuracy: 0.8961
Epoch 7/10
1875/1875 [==============================] - 12s 7ms/step - loss: 0.2665 - accuracy: 0.9004
Epoch 8/10
1875/1875 [==============================] - 9s 5ms/step - loss: 0.2574 - accuracy: 0.9036
Epoch 9/10
1875/1875 [==============================] - 7s 4ms/step - loss: 0.2485 - accuracy: 0.9074
Epoch 10/10
1875/1875 [==============================] - 8s 4ms/step - loss: 0.2394 - accuracy: 0.9114
<keras.src.callbacks.History at 0x7d2afd2c46d0>
當模型訓練時,會顯示損失和準確性指標。 該模型在訓練數據上的準確率約為 0.91(或 91%)。
接下來,比較模型在測試數據集上的表現:
test_loss, test_acc = model.evaluate(test_images,  test_labels, verbose=2)

print('\nTest accuracy:', test_acc)
313/313 - 1s - loss: 0.3473 - accuracy: 0.8751 - 631ms/epoch - 2ms/step
Test accuracy: 0.8751000165939331
事實證明,測試數據集的準確性略低於訓練數據集的準確性。 訓練精度和測試精度之間的差距代表了過度擬合。 當機器學習模型在新的、以前未見過的輸入上的表現比在訓練數據上的表現更差時,就會發生過度擬合。 過度擬合的模型會“記住”訓練數據集中的噪聲和細節,從而對模型在新數據上的性能產生負面影響。 有關詳細信息,請參閱以下內容:
訓練好模型後,您可以使用它來對某些圖像進行預測。 附加一個 softmax 層將模型的線性輸出(logits)轉換為概率,這應該更容易解釋。
probability_model = tf.keras.Sequential([model,
                                         tf.keras.layers.Softmax()])
predictions = probability_model.predict(test_images)
313/313 [==============================] - 2s 5ms/step
在這裡,模型預測了測試集中每個圖像的標籤。 我們先看一下第一個預測:
predictions[0]
array([2.7662320e-06, 1.1043885e-09, 1.7121243e-07, 2.8262542e-10,
7.4509124e-08, 3.0867248e-03, 1.6947333e-06, 1.0210138e-01,
1.9623305e-06, 8.9480531e-01], dtype=float32)
預測是一個由 10 個數字組成的數組。 它們代表了模特對圖像對應 10 件不同服裝中每件的“信心”,簡單來說就是單一測試圖像對應到類別的可能機率。 您可以看到哪個標籤具有最高的置信度值:
np.argmax(predictions[0])
9
因此,模型最確定該圖像是踝靴或 class_names[9]。 檢查測試標籤表明此分類是正確的:
test_labels[0]
9
繪製此圖表以查看完整的 10 類預測集。
def plot_image(i, predictions_array, true_label, img):
  true_label, img = true_label[i], img[i]
  plt.grid(False)#不顯示網格。
  plt.xticks([]) #不顯示 x 和 y 軸的標籤。
  plt.yticks([])

  plt.imshow(img, cmap=plt.cm.binary) #使用灰階(binary)的顏色映射來顯示圖片。

  predicted_label = np.argmax(predictions_array) #找出 predictions_array 中最大值的索引,作為預測的標籤。
  if predicted_label == true_label:
    color = 'blue'
  else:
    color = 'red'
  # 在 x 軸下方添加標籤,顯示預測標籤、預測機率和真實標籤。
  plt.xlabel("{} {:2.0f}% ({})".format(class_names[predicted_label],
                                100*np.max(predictions_array),
                                class_names[true_label]),
                                color=color)

def plot_value_array(i, predictions_array, true_label):
  true_label = true_label[i] #從傳入的 true_label 陣列中取出第 i 個元素。
  plt.grid(False)#不顯示網格。
  plt.xticks(range(10))# 設定 x 軸的標籤為 0 到 9。
  plt.yticks([]) #不顯示 y 軸的標籤。
  #繪製一個柱狀圖來表示預測的機率。
  thisplot = plt.bar(range(10), predictions_array, color="#777777")
  plt.ylim([0, 1])#設定 y 軸的範圍為 0 到 1。
  predicted_label = np.argmax(predictions_array)
  #找出 predictions_array 中最大值的索引。
  thisplot[predicted_label].set_color('red')#設定柱狀圖中預測標籤和真實標籤的顏色。
  thisplot[true_label].set_color('blue')
訓練好模型後,您可以使用它來對某些圖像進行預測。
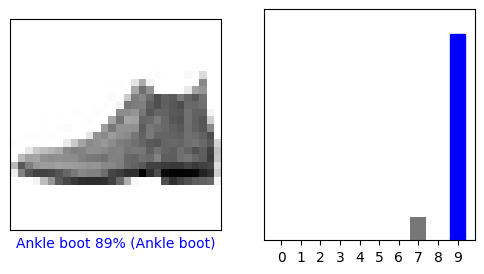
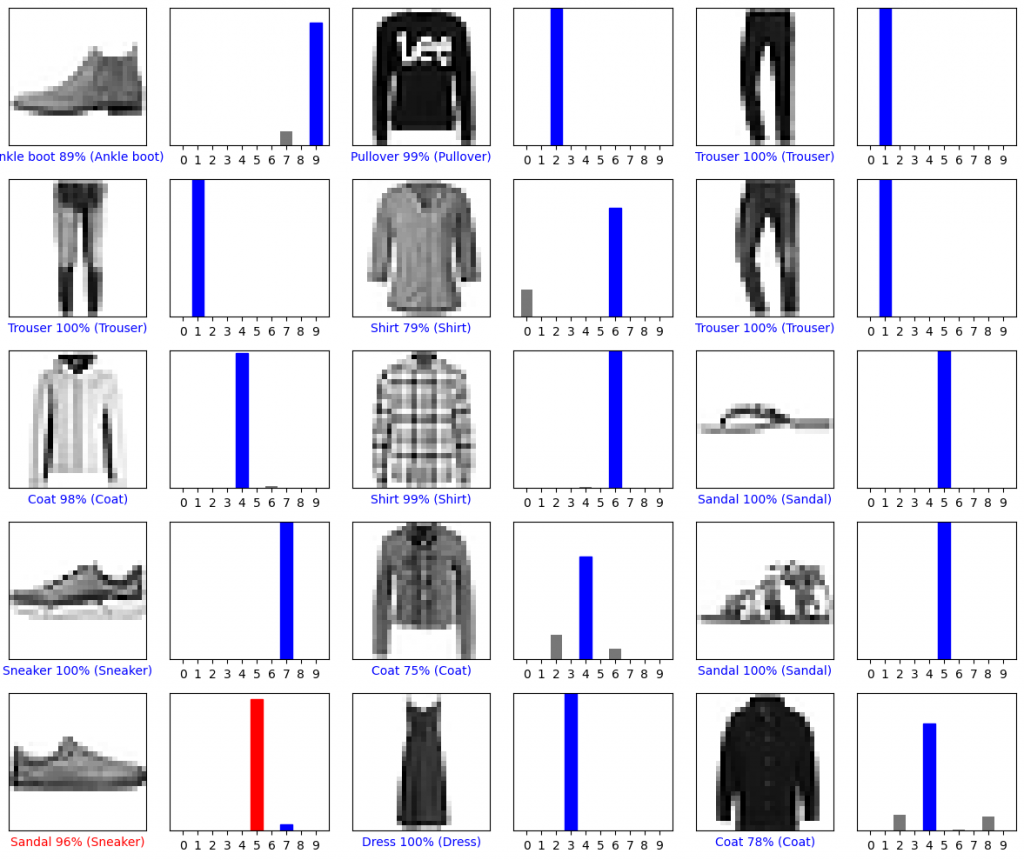
讓我們看看第 0 個圖像、預測和預測數組。 正確的預測標籤為藍色,錯誤的預測標籤為紅色。 該數字給出了預測標籤的百分比(滿分 100)。
i = 0
plt.figure(figsize=(6,3))
plt.subplot(1,2,1)
plot_image(i, predictions[i], test_labels, test_images)
plt.subplot(1,2,2)
plot_value_array(i, predictions[i],  test_labels)
plt.show()
i = 12
plt.figure(figsize=(6,3))
plt.subplot(1,2,1)
plot_image(i, predictions[i], test_labels, test_images)
plt.subplot(1,2,2)
plot_value_array(i, predictions[i],  test_labels)
plt.show()
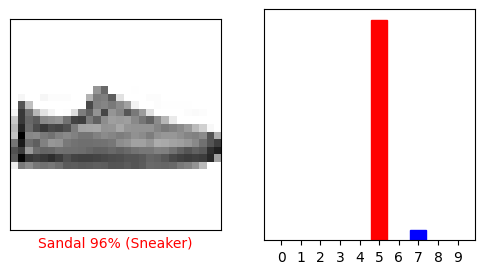
讓我們繪製幾張圖像及預測。 請注意,即使預測的機率數值非常高,模型也可能是錯誤的。
# Plot the first X test images, their predicted labels, and the true labels.
# Color correct predictions in blue and incorrect predictions in red.
num_rows = 5
num_cols = 3
num_images = num_rows*num_cols
plt.figure(figsize=(2*2*num_cols, 2*num_rows))
for i in range(num_images):
  plt.subplot(num_rows, 2*num_cols, 2*i+1)
  plot_image(i, predictions[i], test_labels, test_images)
  plt.subplot(num_rows, 2*num_cols, 2*i+2)
  plot_value_array(i, predictions[i], test_labels)
plt.tight_layout()
plt.show()
最後,我們可以使用經過訓練的模型對單個圖像進行預測。
# Grab an image from the test dataset.
img = test_images[1]

print(img.shape)
(28, 28)
tf.keras 模型經過優化,可以立即對一批或一組示例進行預測。 因此,即使您使用單個圖像,您也需要將其添加到列表中:
# Add the image to a batch where it's the only member.
img = (np.expand_dims(img,0))

print(img.shape)
(1, 28, 28)
現在預測該圖像的正確標籤:
predictions_single = probability_model.predict(img)

print(predictions_single)
1/1 [==============================] - 0s 24ms/step
[[4.8071754e-05 3.4830345e-09 9.9480164e-01 6.5042338e-10 2.1169260e-03
6.7292096e-17 3.0333586e-03 2.8044415e-20 4.8259452e-10 3.5823039e-14]]
plot_value_array(1, predictions_single[0], test_labels)
_ = plt.xticks(range(10), class_names, rotation=45)
plt.show()
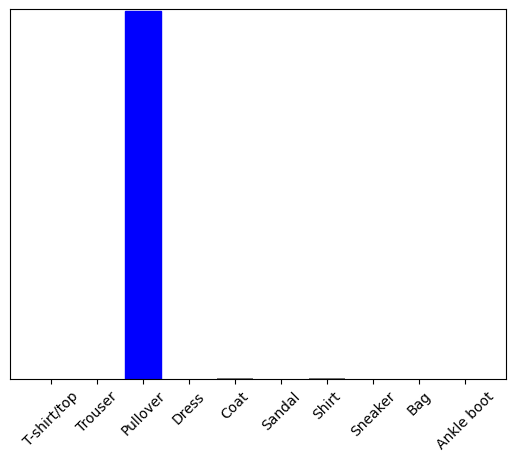
tf.keras.Model.predict 返回一個列表列表 - 批次數據中的每個圖像都有一個列表。 獲取批次中我們(唯一)圖像的預測:
np.argmax(predictions_single[0])
2
本教程演示從存儲在磁盤上的純文本文件開始的文本分類。 您將訓練二元分類器以對 IMDB 數據集執行情感分析。 在本節的末尾,有一個練習供您嘗試,您將在其中訓練多類分類器來預測 Stack Overflow 上的編程問題的標籤。
import matplotlib.pyplot as plt
import os
import re
import shutil
import string
import tensorflow as tf

from tensorflow.keras import layers
from tensorflow.keras import losses
print(tf.__version__)
2.13.0
該筆記本訓練情感分析模型,根據評論文本將電影評論分類為正面或負面。 這是二元分類(或二類分類)的一個示例,是一種重要且廣泛適用的機器學習問題。
您將使用大型電影評論數據集,其中包含來自 Internet 電影數據庫的 50,000 條電影評論文本。 這些評論分為 25,000 條用於訓練的評論和 25,000 條用於測試的評論。 訓練和測試集是平衡的,這意味著它們包含相同數量的正面和負面評論。
讓我們下載並提取數據集,然後探索目錄結構。
url = "https://ai.stanford.edu/~amaas/data/sentiment/aclImdb_v1.tar.gz"

dataset = tf.keras.utils.get_file("aclImdb_v1", url,
                                    untar=True, cache_dir='.',
                                    cache_subdir='')

dataset_dir = os.path.join(os.path.dirname(dataset), 'aclImdb')
Downloading data from https://ai.stanford.edu/~amaas/data/sentiment/aclImdb_v1.tar.gz
84125825/84125825 [==============================] - 12s 0us/step
os.listdir(dataset_dir)
['test', 'README', 'imdbEr.txt', 'train', 'imdb.vocab']
train_dir = os.path.join(dataset_dir, 'train')
os.listdir(train_dir)
['urls_neg.txt',
'unsupBow.feat',
'urls_unsup.txt',
'labeledBow.feat',
'unsup',
'urls_pos.txt',
'neg',
'pos']
aclImdb/train/pos 和 aclImdb/train/neg 目錄包含許多文本文件,每個文件都是一個電影評論。 讓我們看一下其中的一個。
sample_file = os.path.join(train_dir, 'pos/1181_9.txt')
with open(sample_file) as f:
  print(f.read())
Rachel Griffiths writes and directs this award winning short film. A heartwarming story about coping with grief and cherishing the memory of those we've loved and lost. Although, only 15 minutes long, Griffiths manages to capture so much emotion and truth onto film in the short space of time. Bud Tingwell gives a touching performance as Will, a widower struggling to cope with his wife's death. Will is confronted by the harsh reality of loneliness and helplessness as he proceeds to take care of Ruth's pet cow, Tulip. The film displays the grief and responsibility one feels for those they have loved and lost. Good cinematography, great direction, and superbly acted. It will bring tears to all those who have lost a loved one, and survived.
接下來,您將從磁盤加載數據並將其準備為適合訓練的格式。 為此,您將使用有用的 text_dataset_from_directory 功能,該實用功能會顯示如下所示的目錄結構。
'''
main_directory/
...class_a/
......a_text_1.txt
......a_text_2.txt
...class_b/
......b_text_1.txt
......b_text_2.txt
'''
要準備用於二元分類的數據集,您需要磁盤上的兩個文件夾,分別對應於 class_a 和 class_b。 這些將是正面和負面的電影評論,可以在 aclImdb/train/pos 和 aclImdb/train/neg 中找到。 由於 IMDB 數據集包含其他文件夾,因此您需要在使用此功能之前刪除它們。
remove_dir = os.path.join(train_dir, 'unsup')
shutil.rmtree(remove_dir)
接下來,您將使用 text_dataset_from_directory 功能創建帶標籤的 tf.data.Dataset。 tf.data 是一個強大的數據處理工具集合。
運行機器學習實驗時,最佳實踐是將數據集分為三個部分:訓練、驗證和測試。
IMDB數據集已經分為訓練集和測試集,但缺少驗證集。 讓我們通過使用下面的validation_split參數,使用80:20的訓練數據分割來創建一個驗證集。
batch_size = 32
seed = 42

raw_train_ds = tf.keras.utils.text_dataset_from_directory(
    'aclImdb/train',
    batch_size=batch_size,
    validation_split=0.2,
    subset='training',
    seed=seed)
Found 25000 files belonging to 2 classes.
Using 20000 files for training.
正如您在上面看到的,訓練文件夾中有 25,000 個示例,您將使用其中 80%(或 20,000 個)進行訓練。 正如您稍後將看到的,您可以通過將數據集直接傳遞給 model.fit 來訓練模型。 如果您是 tf.data 的新手,您還可以迭代數據集並打印出一些示例,如下所示。
for text_batch, label_batch in raw_train_ds.take(1):
  for i in range(3):
    print("Review", text_batch.numpy()[i])
    print("Label", label_batch.numpy()[i])
Review b'"Pandemonium" is a horror movie spoof that comes off more stupid than funny. Believe me when I tell you, I love comedies. Especially comedy spoofs. "Airplane", "The Naked Gun" trilogy, "Blazing Saddles", "High Anxiety", and "Spaceballs" are some of my favorite comedies that spoof a particular genre. "Pandemonium" is not up there with those films. Most of the scenes in this movie had me sitting there in stunned silence because the movie wasn't all that funny. There are a few laughs in the film, but when you watch a comedy, you expect to laugh a lot more than a few times and that's all this film has going for it. Geez, "Scream" had more laughs than this film and that was more of a horror film. How bizarre is that?*1/2 (out of four)'
Label 0
Review b"David Mamet is a very interesting and a very un-equal director. His first movie 'House of Games' was the one I liked best, and it set a series of films with characters whose perspective of life changes as they get into complicated situations, and so does the perspective of the viewer.So is 'Homicide' which from the title tries to set the mind of the viewer to the usual crime drama. The principal characters are two cops, one Jewish and one Irish who deal with a racially charged area. The murder of an old Jewish shop owner who proves to be an ancient veteran of the Israeli Independence war triggers the Jewish identity in the mind and heart of the Jewish detective.This is were the flaws of the film are the more obvious. The process of awakening is theatrical and hard to believe, the group of Jewish militants is operatic, and the way the detective eventually walks to the final violent confrontation is pathetic. The end of the film itself is Mamet-like smart, but disappoints from a human emotional perspective.Joe Mantegna and William Macy give strong performances, but the flaws of the story are too evident to be easily compensated."
Label 0
Review b'Great documentary about the lives of NY firefighters during the worst terrorist attack of all time.. That reason alone is why this should be a must see collectors item.. What shocked me was not only the attacks, but the"High Fat Diet" and physical appearance of some of these firefighters. I think a lot of Doctors would agree with me that,in the physical shape they were in, some of these firefighters would NOT of made it to the 79th floor carrying over 60 lbs of gear. Having said that i now have a greater respect for firefighters and i realize becoming a firefighter is a life altering job. The French have a history of making great documentary's and that is what this is, a Great Documentary.....'
Label 1
請注意,評論包含原始文本(帶有標點符號和偶爾的 HTML 標籤,例如 )。 您將在下一節中展示如何處理這些問題。
標籤為 0 或 1。要查看其中哪些對應於正面和負面的電影評論,您可以檢查數據集上的 class_names 屬性。
print("Label 0 corresponds to", raw_train_ds.class_names[0])
print("Label 1 corresponds to", raw_train_ds.class_names[1])
Label 0 corresponds to neg
Label 1 corresponds to pos
接下來,您將創建驗證和測試數據集。 您將使用訓練集中剩餘的 5,000 條評論進行驗證。
注意:使用validation_split和subset參數時,請確保指定隨機種子,或傳遞shuffle=False,以便驗證和訓練分割沒有重疊。
raw_val_ds = tf.keras.utils.text_dataset_from_directory(
    'aclImdb/train',
    batch_size=batch_size,
    validation_split=0.2,
    subset='validation',
    seed=seed)
Found 25000 files belonging to 2 classes.
Using 5000 files for validation.
raw_test_ds = tf.keras.utils.text_dataset_from_directory(
    'aclImdb/test',
    batch_size=batch_size)
Found 25000 files belonging to 2 classes.
接下來,您將使用有用的 tf.keras.layers.TextVectorization 層對數據進行標準化、標記化和矢量化。
標準化是指對文本進行預處理,通常是刪除標點符號或 HTML 元素以簡化數據集。 標記化是指將字符串拆分為標記(例如,通過空格拆分將句子拆分為單個單詞)。 矢量化是指將標記轉換為數字,以便將它們輸入神經網絡。 所有這些任務都可以通過這一層完成。
正如您在上面看到的,評論包含各種 HTML 標籤,例如 。 這些標籤不會被 TextVectorization 層中的默認標準化器刪除(默認將文本轉換為小寫並去除標點符號,但不會去除 HTML)。 您將編寫一個自定義標準化函數來刪除 HTML。
注意:為了防止訓練-測試偏差(也稱為訓練-服務偏差),在訓練和測試時對數據進行相同的預處理非常重要。 為了實現這一點,可以將 TextVectorization 層直接包含在模型中,如本教程後面所示。
def custom_standardization(input_data):
  lowercase = tf.strings.lower(input_data)
  stripped_html = tf.strings.regex_replace(lowercase, '<br />', ' ')
  return tf.strings.regex_replace(stripped_html,
                                  '[%s]' % re.escape(string.punctuation),
                                  '')
接下來,您將創建一個 TextVectorization 圖層。 您將使用該層來標準化、標記化和矢量化我們的數據。 您將output_mode 設置為int 來為每個標記創建唯一的整數索引。
請注意,您正在使用默認的 split 函數和上面定義的自定義標準化函數。 您還將為模型定義一些常量,例如顯式的最大sequence_length,這將導致層將序列填充或截斷為精確的sequence_length值。
max_features = 10000
sequence_length = 250

vectorize_layer = layers.TextVectorization(
    standardize=custom_standardization,
    max_tokens=max_features,
    output_mode='int',
    output_sequence_length=sequence_length)
接下來,您將調用adapt以使預處理層的狀態適合數據集。 這將導致模型構建字符串到整數的索引。 注意:在調用adapt時僅使用訓練數據非常重要(使用測試集會洩漏信息)。
# Make a text-only dataset (without labels), then call adapt
train_text = raw_train_ds.map(lambda x, y: x)
vectorize_layer.adapt(train_text)
讓我們創建一個函數來查看使用該層預處理一些數據的結果。
def vectorize_text(text, label):
  text = tf.expand_dims(text, -1)
  return vectorize_layer(text), label

# retrieve a batch (of 32 reviews and labels) from the dataset
text_batch, label_batch = next(iter(raw_train_ds))
first_review, first_label = text_batch[0], label_batch[0]
print("Review", first_review)
print("Label", raw_train_ds.class_names[first_label])
print("Vectorized review", vectorize_text(first_review, first_label))
Review tf.Tensor(b'Great movie - especially the music - Etta James - "At Last". This speaks volumes when you have finally found that special someone.', shape=(), dtype=string)
Label neg
Vectorized review (<tf.Tensor: shape=(1, 250), dtype=int64, numpy=
array([[ 86, 17, 260, 2, 222, 1, 571, 31, 229, 11, 2418,
1, 51, 22, 25, 404, 251, 12, 306, 282, 0, 0,
0, 0, 0, 0, 0, 0, 0, 0, 0, 0, 0,
0, 0, 0, 0, 0, 0, 0, 0, 0, 0, 0,
0, 0, 0, 0, 0, 0, 0, 0, 0, 0, 0,
0, 0, 0, 0, 0, 0, 0, 0, 0, 0, 0,
0, 0, 0, 0, 0, 0, 0, 0, 0, 0, 0,
0, 0, 0, 0, 0, 0, 0, 0, 0, 0, 0,
0, 0, 0, 0, 0, 0, 0, 0, 0, 0, 0,
0, 0, 0, 0, 0, 0, 0, 0, 0, 0, 0,
0, 0, 0, 0, 0, 0, 0, 0, 0, 0, 0,
0, 0, 0, 0, 0, 0, 0, 0, 0, 0, 0,
0, 0, 0, 0, 0, 0, 0, 0, 0, 0, 0,
0, 0, 0, 0, 0, 0, 0, 0, 0, 0, 0,
0, 0, 0, 0, 0, 0, 0, 0, 0, 0, 0,
0, 0, 0, 0, 0, 0, 0, 0, 0, 0, 0,
0, 0, 0, 0, 0, 0, 0, 0, 0, 0, 0,
0, 0, 0, 0, 0, 0, 0, 0, 0, 0, 0,
0, 0, 0, 0, 0, 0, 0, 0, 0, 0, 0,
0, 0, 0, 0, 0, 0, 0, 0, 0, 0, 0,
0, 0, 0, 0, 0, 0, 0, 0, 0, 0, 0,
0, 0, 0, 0, 0, 0, 0, 0, 0, 0, 0,
0, 0, 0, 0, 0, 0, 0, 0]])>, <tf.Tensor: shape=(), dtype=int32, numpy=0>)
正如您在上面看到的,每個標記已被替換為一個整數。 您可以通過調用圖層上的 .get_vocabulary() 來查找每個整數對應的標記(字符串)。
print("1287 ---> ",vectorize_layer.get_vocabulary()[1287])
print(" 313 ---> ",vectorize_layer.get_vocabulary()[313])
print('Vocabulary size: {}'.format(len(vectorize_layer.get_vocabulary())))
1287 ---> silent
313 ---> night
Vocabulary size: 10000
您幾乎已準備好訓練您的模型。 作為最後的預處理步驟,您將把之前創建的 TextVectorization 圖層應用到訓練、驗證和測試數據集。
train_ds = raw_train_ds.map(vectorize_text)
val_ds = raw_val_ds.map(vectorize_text)
test_ds = raw_test_ds.map(vectorize_text)
這是加載數據時應使用的兩種重要方法,以確保 I/O 不會阻塞。
.cache() 將數據從磁盤加載後保留在內存中。 這將確保數據集在訓練模型時不會成為瓶頸。 如果您的數據集太大而無法放入內存,您還可以使用此方法創建高性能的磁盤緩存,這比許多小文件的讀取效率更高。
.prefetch() 在訓練時重疊數據預處理和模型執行。
您可以在數據性能指南中了解有關這兩種方法的更多信息,以及如何將數據緩存到磁盤。
AUTOTUNE = tf.data.AUTOTUNE

train_ds = train_ds.cache().prefetch(buffer_size=AUTOTUNE)
val_ds = val_ds.cache().prefetch(buffer_size=AUTOTUNE)
test_ds = test_ds.cache().prefetch(buffer_size=AUTOTUNE)
是時候創建你的神經網路了
embedding_dim = 16
model = tf.keras.Sequential([
  layers.Embedding(max_features + 1, embedding_dim),
  layers.Dropout(0.2),
  layers.GlobalAveragePooling1D(),
  layers.Dropout(0.2),
  layers.Dense(1)])

model.summary()
Model: "sequential_4"
embedding (Embedding) (None, None, 16) 160016
dropout_1 (Dropout) (None, None, 16) 0
global_average_pooling1d ( (None, 16) 0
GlobalAveragePooling1D)
dropout_2 (Dropout) (None, 16) 0
dense_6 (Dense) (None, 1) 17
=================================================================
Total params: 160033 (625.13 KB)
Trainable params: 160033 (625.13 KB)
Non-trainable params: 0 (0.00 Byte)
這些層按順序堆疊以構建分類器:
模型需要損失函數和優化器來進行訓練。 由於這是一個二元分類問題,並且模型輸出一個概率(具有 sigmoid 激活的單單元層),因此您將使用 Loss.BinaryCrossentropy 損失函數。
現在,我們可以開始配置模型以使用優化器和損失函數:
model.compile(loss=losses.BinaryCrossentropy(from_logits=True),
              optimizer='adam',
              metrics=tf.metrics.BinaryAccuracy(threshold=0.0))
您將通過將數據集對像dataset object傳遞給 fit 方法來訓練模型。
epochs = 10
history = model.fit(
    train_ds,
    validation_data=val_ds,
    epochs=epochs)
Epoch 1/10
625/625 [==============================] - 10s 15ms/step - loss: 0.6629 - binary_accuracy: 0.6987 - val_loss: 0.6128 - val_binary_accuracy: 0.7758
Epoch 2/10
625/625 [==============================] - 7s 12ms/step - loss: 0.5465 - binary_accuracy: 0.8045 - val_loss: 0.4960 - val_binary_accuracy: 0.8244
Epoch 3/10
625/625 [==============================] - 7s 11ms/step - loss: 0.4426 - binary_accuracy: 0.8457 - val_loss: 0.4185 - val_binary_accuracy: 0.8480
Epoch 4/10
625/625 [==============================] - 5s 8ms/step - loss: 0.3764 - binary_accuracy: 0.8681 - val_loss: 0.3724 - val_binary_accuracy: 0.8612
Epoch 5/10
625/625 [==============================] - 10s 15ms/step - loss: 0.3344 - binary_accuracy: 0.8793 - val_loss: 0.3440 - val_binary_accuracy: 0.8682
Epoch 6/10
625/625 [==============================] - 7s 11ms/step - loss: 0.3037 - binary_accuracy: 0.8896 - val_loss: 0.3250 - val_binary_accuracy: 0.8740
Epoch 7/10
625/625 [==============================] - 5s 8ms/step - loss: 0.2794 - binary_accuracy: 0.8980 - val_loss: 0.3119 - val_binary_accuracy: 0.8736
Epoch 8/10
625/625 [==============================] - 6s 10ms/step - loss: 0.2605 - binary_accuracy: 0.9058 - val_loss: 0.3029 - val_binary_accuracy: 0.8752
Epoch 9/10
625/625 [==============================] - 6s 9ms/step - loss: 0.2444 - binary_accuracy: 0.9125 - val_loss: 0.2962 - val_binary_accuracy: 0.8774
Epoch 10/10
625/625 [==============================] - 5s 7ms/step - loss: 0.2304 - binary_accuracy: 0.9166 - val_loss: 0.2918 - val_binary_accuracy: 0.8788
讓我們看看模型的表現如何。 模型將返回兩個值。 損失(這數值越低越好)和準確性。
loss, accuracy = model.evaluate(test_ds)

print("Loss: ", loss)
print("Accuracy: ", accuracy)
782/782 [==============================] - 5s 7ms/step - loss: 0.3100 - binary_accuracy: 0.8732
Loss: 0.3100220263004303
Accuracy: 0.8732399940490723
這種相對簡單方法的準確率約為 87%。
model.fit() 會傳回一個 History 對象,其中包含一個資料集,這個資料集包含訓練期間發生的所有事情:
history_dict = history.history
history_dict.keys()
dict_keys(['loss', 'binary_accuracy', 'val_loss', 'val_binary_accuracy'])
這裡面有四個條目:每個條目對應訓練和驗證期間監控的指標。 您可以使用這些來繪製訓練和驗證損失以進行比較,以及訓練和驗證準確性:
acc = history_dict['binary_accuracy']
val_acc = history_dict['val_binary_accuracy']
loss = history_dict['loss']
val_loss = history_dict['val_loss']

epochs = range(1, len(acc) + 1)

# "bo" is for "blue dot"
plt.plot(epochs, loss, 'bo', label='Training loss')
# b is for "solid blue line"
plt.plot(epochs, val_loss, 'b', label='Validation loss')
plt.title('Training and validation loss')
plt.xlabel('Epochs')
plt.ylabel('Loss')
plt.legend()

plt.show()
plt.plot(epochs, acc, 'bo', label='Training acc')
plt.plot(epochs, val_acc, 'b', label='Validation acc')
plt.title('Training and validation accuracy')
plt.xlabel('Epochs')
plt.ylabel('Accuracy')
plt.legend(loc='lower right')

plt.show()
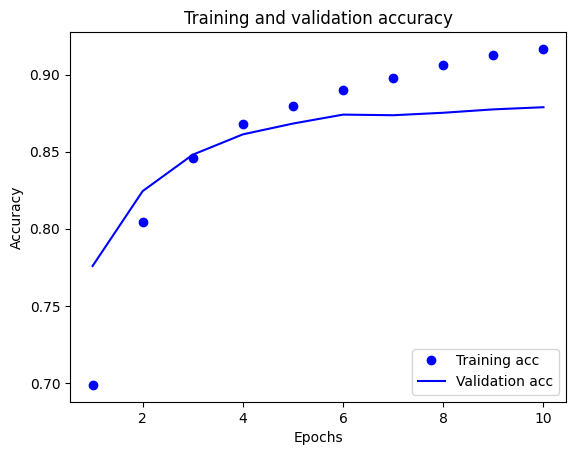
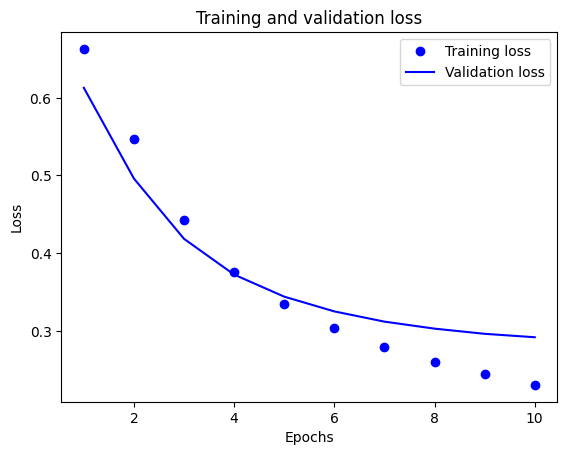
在此圖中,點表示訓練損失和準確性,實線表示驗證損失和準確性。
請注意,訓練集的損失隨著每個 Epoch的增加而減少,而訓練準確性隨著每個Epoch 的增加而增加。 這在使用梯度下降優化器時,都是可預期的——而且它應該最小化每次 Epoch 的必需數量。
但驗證集的損失和準確性的情況並非如此——它們似乎在訓練集的準確性登頂前達到峰值。 這就是一個過擬合的典型例子:模型在訓練數據上的表現比在以前從未見過的數據上的表現更好。 此後,模型會過度優化並學習特定於訓練數據的表徵,而這些表徵不會泛化到測試數據。
對於這種特殊情況,您可以通過在驗證準確性不再增加時停止訓練來防止過度擬合。 這可以是使用 tf.keras.callbacks.EarlyStopping 回調函數做到。
在上面的程式碼中,您在將文本輸入到模型之前將 TextVectorization 圖層應用到數據集。 如果您想讓模型能夠處理原始字符串(例如,為了簡化部署),您可以在模型中加入 TextVectorization 層。 為此,您可以使用剛剛訓練的權重創建一個新模型。
export_model = tf.keras.Sequential([
  vectorize_layer,
  model,
  layers.Activation('sigmoid')
])

export_model.compile(
    loss=losses.BinaryCrossentropy(from_logits=False), optimizer="adam", metrics=['accuracy']
)

# Test it with `raw_test_ds`, which yields raw strings
loss, accuracy = export_model.evaluate(raw_test_ds)
print(accuracy)
782/782 [==============================] - 6s 6ms/step - loss: 0.3100 - accuracy: 0.8732
0.8732399940490723
要獲得新資料的預測,您只需調用 model.predict() 即可。
examples = [
  "The movie was great!",
  "The movie was okay.",
  "The movie was terrible..."
]

export_model.predict(examples)
1/1 [==============================] - 0s 494ms/step
array([[0.60314596],
[0.42407987],
[0.3441671 ]], dtype=float32)
在模型中包含文本預處理邏輯使您能夠導出用於生產的模型,從而簡化部署並減少訓練/測試偏差的可能性。
選擇應用 TextVectorization 圖層的位置時,需要記住性能差異。 在模型外部使用它使您能夠在 GPU 上訓練時進行異步 CPU 處理和數據緩衝。 因此,如果您在 GPU 上訓練模型,您可能希望使用此選項在開發模型時獲得最佳性能,然後在準備好部署時切換到在模型中包含 TextVectorization 層。
訪問本教程以了解有關保存模型的更多信息。
本教程展示了如何在 IMDB 數據集上從頭開始訓練二元分類器。 作為練習,您可以修改此筆記本來訓練多類分類器來預測 Stack Overflow 上編程問題的標籤。
已準備好一個數據集供您使用,其中包含發佈到 Stack Overflow 的數千個編程問題的正文(例如,“如何在 Python 中按值對字典進行排序?”)。 其中每一個都只用一個標籤(Python、CSharp、JavaScript 或 Java)進行標記。 您的任務是將問題作為輸入,並預測適當的標籤,在本例中為 Python。
您將使用的數據集包含從 BigQuery 上更大的公共 Stack Overflow 數據集提取的數千個問題,該數據集包含超過 1700 萬條帖子。
下載數據集後,您會發現它的目錄結構與您之前使用的 IMDB 數據集類似:
'''
train/
...python/
......0.txt
......1.txt
...javascript/
......0.txt
......1.txt
...csharp/
......0.txt
......1.txt
...java/
......0.txt
......1.txt
'''
注意:為了增加分類問題的難度,編程問題中出現的單詞 Python、CSharp、JavaScript 或 Java 已替換為單詞空白(因為許多問題都包含它們所涉及的語言)。
要完成此練習,您應該通過進行以下修改來修改此筆記本以使用 Stack Overflow 數據集:
在筆記本頂部,將下載 IMDB 數據集的代碼更新為下載已準備好的 Stack Overflow 數據集的代碼。 由於 Stack Overflow 數據集具有類似的目錄結構,因此您不需要進行太多修改。
將模型的最後一層修改為 Dense(4),因為現在有四個輸出類。
編譯模型時,將損失更改為 tf.keras.losses.SparseCategoricalCrossentropy(from_logits=True)。 當每個類的標籤都是整數(在本例中,它們可以是 0、1、2 或 3)時,這是用於多類分類問題的正確損失函數。 另外,將指標更改為metrics=['accuracy'],因為這是一個多類分類問題(tf.metrics.BinaryAccuracy僅用於二元分類器)。
繪製隨時間變化的準確度時,請將 binary_accuracy 和 **val_binary_accuracy **分別更改為 precision 和 val_accuracy。
一旦這些更改完成,您將能夠訓練多類分類器。
本教程從頭開始介紹了文本分類。 要了解有關文本分類工作流程的更多信息,請查看 Google Developers 的文本分類指南。
