完成上半部分部分後,可以看到聊天室的框架
接下來要完成
建立HTML for room.html
chat/templates/chat/room.html
<!-- chat/templates/chat/room.html -->
<!DOCTYPE html>
<html>
<head>
    <meta charset="utf-8"/>
    <title>Chat Room</title>
</head>
<body>
    <textarea id="chat-log" cols="100" rows="20"></textarea><br>
    <input id="chat-message-input" type="text" size="100"><br>
    <input id="chat-message-submit" type="button" value="Send">
    {{ room_name|json_script:"room-name" }}
    <script>
        const roomName = JSON.parse(document.getElementById('room-name').textContent);

        const chatSocket = new WebSocket(
            'ws://'
            + window.location.host
            + '/ws/chat/'
            + roomName
            + '/'
        );

        chatSocket.onmessage = function(e) {
            const data = JSON.parse(e.data);
            document.querySelector('#chat-log').value += (data.message + '\n');
        };

        chatSocket.onclose = function(e) {
            console.error('Chat socket closed unexpectedly');
        };

        document.querySelector('#chat-message-input').focus();
        document.querySelector('#chat-message-input').onkeyup = function(e) {
            if (e.key === 'Enter') {  // enter, return
                document.querySelector('#chat-message-submit').click();
            }
        };

        document.querySelector('#chat-message-submit').onclick = function(e) {
            const messageInputDom = document.querySelector('#chat-message-input');
            const message = messageInputDom.value;
            chatSocket.send(JSON.stringify({
                'message': message
            }));
            messageInputDom.value = '';
        };
    </script>
</body>
</html>
上述有看到 Websocket 關鍵字,主要是初始化元件與訂閱 /ws/chat/rootname/ 的 topic ,所以可以收到透過此topic 傳遞的訊息
至於 ws 這字眼哪來的? 此關鍵字已被哪來當作保留字,所有主目錄都必須要掛在此目錄下
有了html ,則接下來就是做html 與 網址的關聯
# chat/views.py
from django.shortcuts import render


def index(request):
    return render(request, "chat/index.html")


def room(request, room_name):
    return render(request, "chat/room.html", {"room_name": room_name})
上述為宣告 room 回傳為 chat/room.html 對應,並且帶入 room_name 對應
# chat/urls.py
from django.urls import path

from . import views

urlpatterns = [
    path("", views.index, name="index"),
    path("<str:room_name>/", views.room, name="room"),
]
上述為定義 呼叫 /chat/[xxx]/ 時,呼叫 views.room 這個函式, [xxx]=字串的名稱
python3 manage.py runserver
Go to http://127.0.0.1:8000/chat/
輸入任何文字或數字,提交後則會導向屬於自己的聊天室
這時候輸入任何字,結果都無反應,這是預期的,應為尚未建立後端傳遞訊息系統
當Django接受HTTP請求時,它會查閱根URLconf來查找視圖函數,然後調用視圖函數來處理請求。 類似地,當 Channels 接受 WebSocket 連接時,它會查閱根路由配置來查找使用者,然後調用使用者上的各種函數來處理來自連接的事件。
Consumer 就是為了上述查找部分而抽離出來的
建立 http 與 websocket 關聯
# chat/consumers.py
import json

from channels.generic.websocket import WebsocketConsumer


class ChatConsumer(WebsocketConsumer):
    def connect(self):
        self.accept()

    def disconnect(self, close_code):
        pass

    def receive(self, text_data):
        text_data_json = json.loads(text_data)
        message = text_data_json["message"]

        self.send(text_data=json.dumps({"message": message}))
上述可以發現有三個函式
connect: 建立連線
disconnect: 斷開鎖鏈
receive: 接收訊息並透過 send 達到發送的動作
# chat/routing.py
from django.urls import re_path

from . import consumers

websocket_urlpatterns = [
    re_path(r"ws/chat/(?P<room_name>\w+)/$", consumers.ChatConsumer.as_asgi()),
]
上述建立 websocket 的路徑對應,這樣 channels 才知道傳訊息給誰
這裡與 HTTP 的寫法不一樣, HTTP 是 .as_views(), 上面的寫法為 .as_asgi(), 用來接受 websocket 的非同步寫法
# django_channels/asgi.py
import os

from channels.auth import AuthMiddlewareStack
from channels.routing import ProtocolTypeRouter, URLRouter
from channels.security.websocket import AllowedHostsOriginValidator
from django.core.asgi import get_asgi_application

from chat.routing import websocket_urlpatterns

os.environ.setdefault("DJANGO_SETTINGS_MODULE", "mysite.settings")
# Initialize Django ASGI application early to ensure the AppRegistry
# is populated before importing code that may import ORM models.
django_asgi_app = get_asgi_application()

import chat.routing

application = ProtocolTypeRouter(
    {
        "http": django_asgi_app,
        "websocket": AllowedHostsOriginValidator(
            AuthMiddlewareStack(URLRouter(websocket_urlpatterns))
        ),
    }
)
在此新增 websocket 的對應連結,這樣才能透過 websocket 傳遞訊息
then
Django’s session framework needs the database
# 建立資料庫表格
python3 manage.py migrate

python3 manage.py runserver
Django中的“通道層”概念是Django Channels的重要功能,它擴展了Django以處理實時功能和異步通信。它允許多個使用者實例(異步使用者)以實時、事件驅動的方式相互通信,並與應用程序的不同部分進行通信。以下是通道層提供的主要抽象概念:
通道(Channel):通道類似於郵箱或通信端點,可以將消息發送到其中。每個通道都有唯一的名稱。知道通道名稱的任何人都可以向該特定通道發送消息。通道用於在應用程序的不同部分或不同消費者之間發送和接收消息。
群組(Group):群組是一組相關的通道。群組有名稱,任何人知道群組的名稱都可以與之交互。您可以按名稱將通道添加到群組中,也可以從群組中刪除通道。發送到群組的消息將廣播到屬於該群組的所有通道。這對於希望向多個消費者同時發送消息而不知道其各自通道名稱的情況非常有用。需要注意的是,無法列舉群組中的具體通道。
消費者實例(Consumer Instance):每個消費者實例,代表一個用戶或連接的客戶端,都會由Django Channels自動分配一個唯一的通道名稱。此唯一通道名稱允許應用程序的其他部分或其他消費者與這個特定的消費者實例進行通信。這是實現Django Channels中的實時、雙向通信的方式。當您向消費者發送消息時,使用他們的唯一通道名稱。
總之,Django中的通道層允許在應用程序的不同部分之間實現實時通信和協調。它使您能夠以異步和事件驅動的方式在不同的消費者和消費者群組之間發送消息,非常適用於構建聊天應用程序、通知和其他實時功能。
接下來需要建立 redis-> 參考 [Day 06] Redis 介紹 & docker 安裝
安裝完後啟動 redis
docker run --rm -p 6379:6379 redis:7
# django_channels/settings.py
# Channels
...
# 新增 channel layers 設定
CHANNEL_LAYERS = {
    "default": {
        "BACKEND": "channels_redis.core.RedisChannelLayer",
        "CONFIG": {
            "hosts": [("127.0.0.1", 6379)],
        },
    },
}
...
上面講 Redis 功能,他可以讓程式原本只接收一對一的通道變成可接受一對多的通道,換句話說,多個接收端對一個發送端。
接下來再修改 consumer.py 讓功能接受一對多的發送。
# chat/consumers.py
import json

from asgiref.sync import async_to_sync
from channels.generic.websocket import WebsocketConsumer


class ChatConsumer(WebsocketConsumer):
    def connect(self):
        self.room_name = self.scope["url_route"]["kwargs"]["room_name"]
        self.room_group_name = f"chat_{self.room_name}"

        # Join room group
        async_to_sync(self.channel_layer.group_add)(
            self.room_group_name, self.channel_name
        )

        self.accept()

    def disconnect(self, close_code):
        # Leave room group
        async_to_sync(self.channel_layer.group_discard)(
            self.room_group_name, self.channel_name
        )

    # Receive message from WebSocket
    def receive(self, text_data):
        text_data_json = json.loads(text_data)
        message = text_data_json["message"]

        # Send message to room group
        async_to_sync(self.channel_layer.group_send)(
            self.room_group_name, {"type": "chat.message", "message": message}
        )

    # Receive message from room group
    def chat_message(self, event):
        message = event["message"]

        # Send message to WebSocket
        self.send(text_data=json.dumps({"message": message}))
在上述範例已加上註解
接下來執行
python3 manage.py runserver
開啟瀏覽器: http://127.0.0.1:8000/chat/
即可看到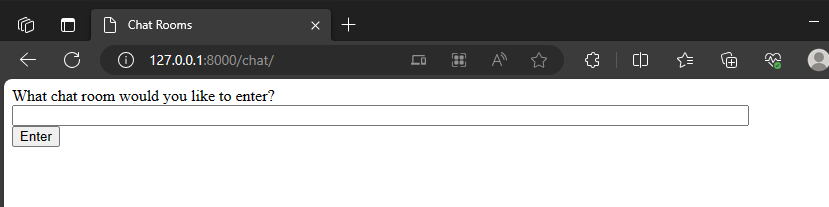
輸入 2330 進入到下一個頁面,如下框所示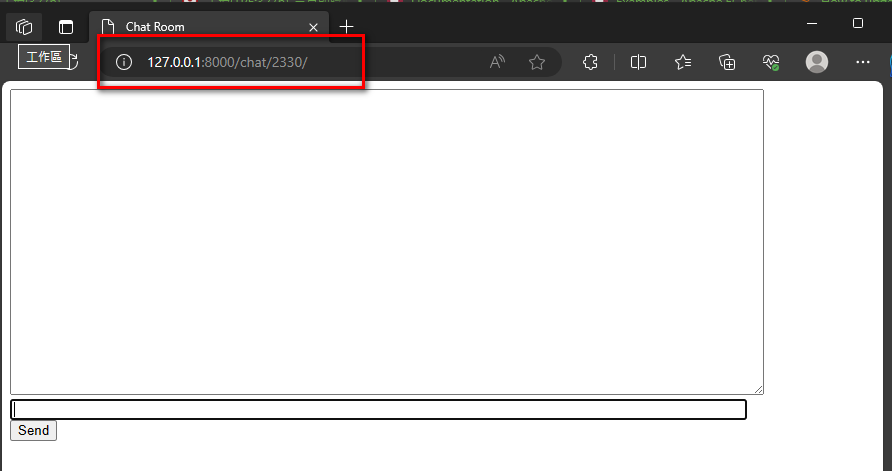
輸入任何字串,則會在上方顯示輸入字串,代表傳送訊息到 2330 這個 channels 上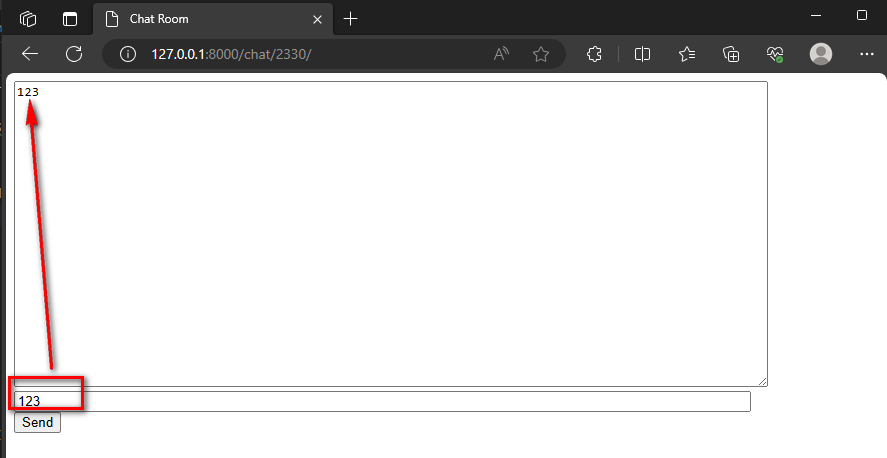
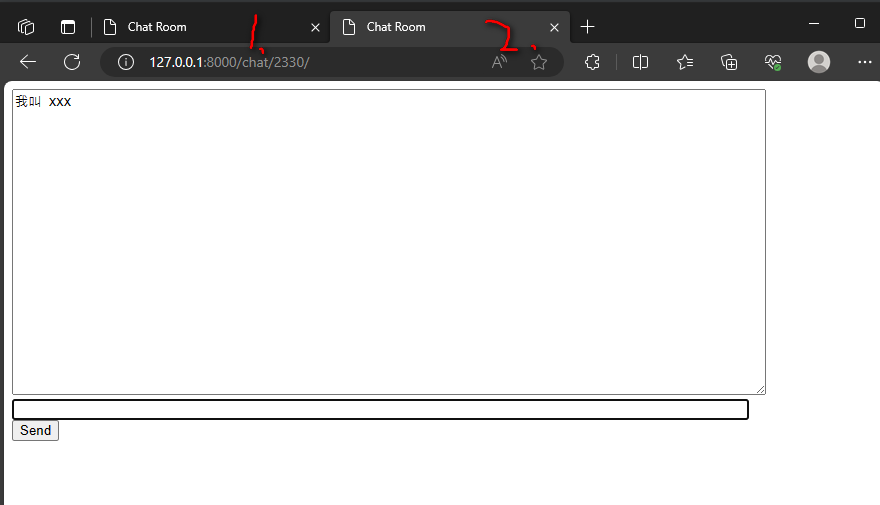
延伸題:
開第二個一樣的 room name, 如 2330
在第一個輸入字串, 可以在第二個顯示框上顯示輸入訊息
以上
恭喜達成聊天室的功能