網站如餐廳,提供多樣「數位料理」供使用者選擇。在這虛擬餐廳,Navigation 就像精心排列的菜單,列舉所有「餐點」,助使用者快速找到所需。而當使用者做出選擇後,Data fetching(數據提取)則扮演著服務生的角色,迅速地到「廚房」中取得所需的「料理」。這篇文章中會讓讀者們了解在更新後,Nextjs 的 Navigation 和 Data Fetching 提供了什麼新功能,以及與舊版有什麼變化?同樣的也會帶這滿滿的範例讓讀著們了解!
Nextjs 提供開發者兩種導覽的方法
<Link> component - 可以 server 及 client component 中調用在 Nextjs13 中兩個功能都進行了一些改版,下面讓我們分別看看有什麼不同,以及在專案中的使用吧!
不再麻煩了! 我自己就是 a 標籤
在 13 之前如果要使用 <Link> component ,必須將 <Link> 包覆在 <a> 標籤的模式使用,在 13 優化後,<Link> 本身就是 <a> 標籤了!
<Link href="/portal/basic">基本設定</Link>

// Output
<a href="/portal/basic">基本設定</a>
除了必填的 href 屬性,也提供 replace、scroll、prefetch 等屬性,並且繼承 標籤的 className 以及 _target 屬性,可以讓我們調整樣式或是設定打開轉跳網頁的位置,接下來介紹一下各個屬性的功能!
href - 必填
除了字串使用,也可以 object 形式設定,第一個參數為 path 網址,第二個參數可以設定 query string
// Navigate to /about?name=test
<Link
  href={{
    pathname: '/about',
    query: { name: 'test' },
  }}
>
  About
</Link>
replace - 預設為 false
使用方法
<Link href="/portal/basic" replace>基本設定</Link>
scroll - 預設為 true
這個屬性是決定在轉跳之後定位是在頁面最上方還是維持在轉跳前的位置
使用方法
<Link href="/portal/basic" scroll={false}>基本設定</Link>
prefetch - 預設為 true
此屬性只會在 production 中有作用,目的是預加載頁面,只要有加上這個屬性的 Link 都會被預先加載。
使用方法
<Link href="/portal/basic" prefetch={false}>基本設定</Link>
引入的 package 不一樣了!
首先 useRouter 是個 hook 所以只能在 client component 中使用,在 13 版中最大的不同,如果是使用 app route 引用的 package 要設定 next/navigation,而 page route 則是 next/router ,如果 compile 出現錯誤要注意是不是 import 錯啦~
如同 Link component 有 **router.replace() 和 router.prefetch() 功能,**還想介紹一下一些獨有的功能!
router.push()
參數:href: string, { scroll: boolean }
執行到 href 指定的 path。會在瀏覽器的歷史紀錄中添加新當前頁面。
scroll 屬性與 link 的相同,預設為 true 可以不用設置。
<button
  type="button"
  onClick={() => router.push('/login', { scroll: false })}
 >
  Login
</button>
router.refresh()
刷新當前 path 。會向 server 發出新的請求且重新獲得數據請求,並重新渲染 server component。client 端只會更新有更動的部分,不會置換 useState 的資料。
router.back()
導回到瀏覽器歷史紀錄中的上一個 path。
router.forward()
導前進到瀏覽器歷史紀錄中的下一頁。
原本在 next/router 引入的 useRouter 有許多關於 path 的屬性,但換到 next/navigation 後則是換由其他 hook 來實現
pathname : 需要調用 usePathname()
query : 以 useSearchParams() 調用不用再使用
getServerSideProps()和getStaticProps()取得資料了

在官方文件中,介紹了 Server Component 和 Client Component 的 Data Fetching 方法,各自有兩種方法:
fetch() apifetch() API 呼叫 Router Handler 的資料接著就從 Server Component 的方法開始
在 app route 的使用下,要在 server component 中進行 data fetching 輕鬆且直覺許多,最大的改變有二:
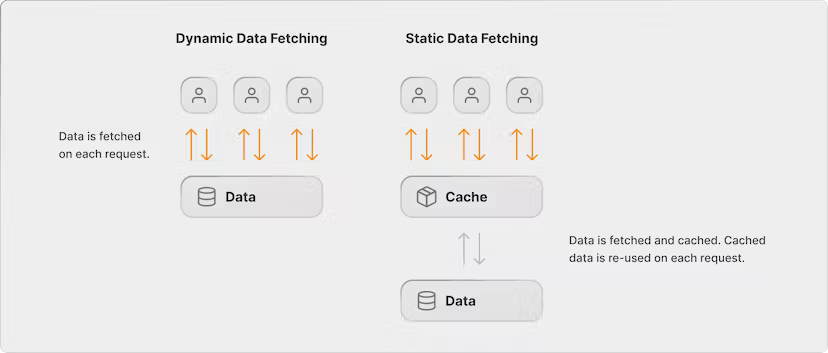
getServerSideProps() 和 getStaticProps() ,並以 config 設定 cache 類型Nextjs 提供的 fetch() api 是繼承原生 Web fetch() API,並且讓每一個單獨的請求都可以設定和控制自己的 cache 規則,這讓開發者在資料取得時可以簡單用 fetch 搭配 async await 來完成。對照 page route 的方法可以參考以下:
getServerSideProps() → fetch('https://...', { cache: 'no-store' })
cache: 'no-store'代表不做任何的緩存,讓每次 fetch 都會進行一次請求
// app/home/page.js
async function getTestData() {
  const res = await fetch('https://api/test-api', { cache: 'no-store' })
  const data = await res.json()

  return data
}

export default async function Home() {
  const data = await getTestData()

  return (
    <div>{data}</div>
  )
}
getStaticProps → fetch('https://...')
Nextjs 對 fetch 的預設就是強制進行緩存 (
cache: 'force-cache'),意思是在頁面 build 時期就會取得資料並傳遞給頁面
async function getTestData() {
  const res = await fetch('https://api/test-api')
  const data = await res.json()

  return data
}
getStaticPaths → fetch('https://...') + generateStaticParams
當頁面是動態路徑並且想取得靜態數據時,以
generateStaticParams取代原本的getStaticPaths, > 並以dynamicParams代替 fallback 屬性,預設為 true 可省略
// true:未包含在 generateStaticParams 中的動態路徑,會按需進行請求生成頁面
// false:未包含在 generateStaticParams 中的動態路徑,會返回 404 頁面
export const dynamicParams = true;

export async function generateStaticParams() {
	const users = await getUsers()
  return users.map((user) => ({
    id: user.id,
  }))
}

async function getTestDataById(params) {
  const res = await fetch(`https://api/test-api/${params.id}`)
  const data = await res.json()

  return data
}
getStaticProps with revalidate → fetch('https://...', { next: { revalidate: 60 } })
可以在設定的時間間隔後自動重新生成頁面
// revalidate: false | 0 | number
// false : 將資源無限期地緩存,隨著時間的流逝和緩存中的新資源增加,較舊的資源可能會被移除
// 0 : 不進行 cache

async function getTestData() {
  const res = await fetch('https://api/test-api', { next: { revalidate: 60 } })
  const data = await res.json()

  return data
}
在使用不支持或不公開 fetch 的第三方套件,例如:database、CMS 或 ORM 客戶端。而我的專案中正是這個例子,所以必須封裝成 action 直接從 ORM client 取得資料
而若要設置 cache 的機制,則是定義 Nextjs 提供的 Route Segment Config 搭配 React 的
cache功能。以下範例中,getLinks 設置了 cache 機制,所以在專案中調用了數次也只會對資料庫進行一次的查詢。
// actions/getLinks.ts

import prisma from '@/libs/prismadb'
import { cache } from 'react'

export const revalidate = 3600

export const getLinks = cache(async (id: string) => {
	const links = await prisma.link.findMany({
    where: {
      userId: currentUser.id
    },
    orderBy: {
      order: 'asc'
    }
  })

  return links
})

// app/preview/layout.tsx

import { getLinks } from '@/actions/getLinks'

export default async function Layout() {
  const item = await getLinks()
  // ...
}
如果是在 Client Component 需要獲取資料,可以調用 Route Handler ,Route Handler 會在 server 端執行並回傳資料給前端,下面直接來範例:
import { NextResponse } from 'next/server'

export async function GET() {
  try {
    const data = 'Hello World!'

    return NextResponse.json({ data, message: 'success' })
  } catch (error) {
    return null
  }
}
const handleGet = async () => {
    const res = await fetch('/api/test-api', {
      method: 'GET',
      headers: {
        'Content-Type': 'application/json'
      }
    })
    const { data } = await res?.json()
    console.log(data)
  }
除了用原生的 fetch 當然也可以用 SWR, React-Query, React toolkit query 等套件實作 data fetching,因為他們都會提供 cache, revalidate, mutate, loading, error 等功能,這邊極力推薦同為 Vercel 家的產品:SWR,如果理解 Nextjs 的 fetch api ,在使用 SWR 就可以如魚得水:
const fetcher = (...args) => fetch(...args).then(res => res.json())
const { data, isLoading } = useSWR(["/api/test-api"], fetcher)
Navigation 與 Data Fetching 在升級後都讓開發體驗也跟著 Level Up 了,從各種層面來說除了維持原本的功能精神,也更貼近原生的功能,不用再拐彎抹角的使用。明天是為什麼使用 Nextjs 的最終篇,也是四篇中最核心的 Rendering,也就是引起非常多討論的 Server Component,同時也可以搭配本篇文章進行參閱!
https://vercel.com/blog/nextjs-app-router-data-fetching
https://nextjs.org/docs/app/building-your-application/routing/linking-and-navigating
https://nextjs.org/docs/app/building-your-application/data-fetching

