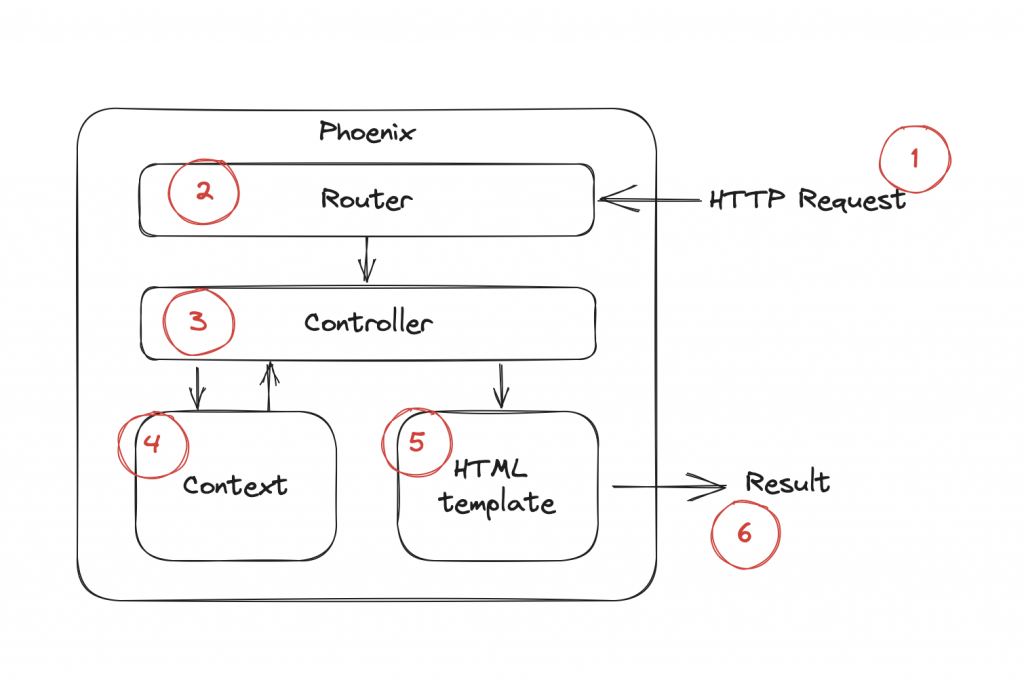
在開始寫 html 之前,我們先來看看 Phoenix 從收到請求到回傳 html 的流程。

router.ex 的設定,找到對應的 controller我們就依照這個順序,把該有的零件建立起來。
Router 的工作是解析所有請求的網址,並把他們發送到正確的地方,有電話總機的感覺。
我們可以在 /lib/gratitude_web/router.ex 找到我們的 router 檔案。
我們先看到中間有一個 scope "/"
scope "/", GratitudeWeb do
  pipe_through :browser

  get "/", PageController, :home
end
目前裡面有一個預設的 get "/",他會被導到 PageController 的 home 函式。
這個就是我們專案剛建好時,預設的 Phoenix 介紹頁。
裡面的 pipe_through :browser 代表這一個 scope 裡面的請求,都會經過 :browser 這個 pipeline。 Pipeline :browser 定義在檔案上面一點:
pipeline :browser do
  plug :accepts, ["html"]
  plug :fetch_session
  plug :fetch_live_flash
  plug :put_root_layout, html: {GratitudeWeb.Layouts, :root}
  plug :protect_from_forgery
  plug :put_secure_browser_headers
end
Phoenix 建立在 Plug 這個套件上,Plug 把請求的處理流程分成好幾個步驟,每個步驟都可以做一些事情,然後把請求傳給下一個步驟。
這個模式跟我們用 pipe 串接函式很像,進入 :browser pipeline 的請求,會由上至下依序經過這些步驟。
但我們可以先不用細看各個 plug 的內容,先知道從請求裡面取 session 資料、防止 CSRF 攻擊等等基本的網頁框架要有的機制都在這邊完成就可以了。
Phoenix.Router 提供了以下依照 Restful 的 HTTP 動詞相對應的函式,讓我們可以快速的設定路徑。
在我們的例子裡面,我們需要:
列表頁面:GET /gratitudes
新增頁面:GET /gratitudes/new
新增資料:POST /gratitudes
編輯頁面:GET /gratitudes/:id/edit
更新資料:PATCH /gratitudes/:id
刪除資料:DELETE /gratitudes/:id
我們可以在 router 裡面加上這些路徑:
scope "/", GratitudeWeb do
  pipe_through :browser

  get "/", PageController, :home

  get "/notes", NoteController, :index
  get "/notes/new", NoteController, :new
  post "/notes", NoteController, :create
  get "/notes/:id/edit", NoteController, :edit
  patch "/notes/:id", NoteController, :update
  delete "/notes/:id", NoteController, :delete
end
對於我們這種全部的路徑都要設定的情況,Phoenix 提供了一個 resources 函式,可以幫我們快速設定這些路徑,所以我們可以改成:
scope "/", GratitudeWeb do
  pipe_through :browser

  get "/", PageController, :home

  resources "/notes", NoteController
end
不過要注意的是,其實全套還有一個 show 的路徑,但我們不需要單獨看某個 note 的路徑,所以可以把他排除掉:
scope "/", GratitudeWeb do
  pipe_through :browser

  get "/", PageController, :home

  resources "/notes", NoteController, except: [:show]
end
