
昨天介紹了 Pod 的生命週期 和 重啟策略(RestartPolicy) 與 資源(CPU/Memory)管理,今天我們來介紹其他 Pod 的功能與特型
當 Kubernetes Worker Node 出現節點壓力時,會依據 QoS 優先級,驅逐一些 Pod,來緩解節點的資源緊張。
QoS 分為三個等級
當 Node 資源耗盡時,會優先驅逐 BestEffort 的 Pod,若資源仍不足,再依序驅逐 Burstable,Guaranteed 的 Pod,直到解決結點壓力。
Pod 屬於哪個 QoS 等級是根據 Pod spec 中 CPU 和 Memory 資源 request 和 limit 來決定的。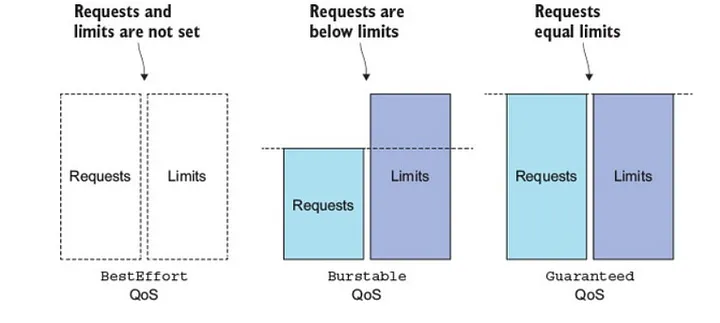
圖檔來至 Configure Quality of Service(QoS) for Pods
Guaranteed 條件Guaranteed 與 Burstable 條件
等同 Pod 中所有 container 都沒指定 CPU 或 Memory 的 request 或 limit,就是
BestEffort
可透過 kubectl 檢視 pod 的 QoS 等級
kubectl get pod ${pod-name} -o=jsonpath='{.status.qosClass}'
依據筆者的使用經驗
Guaranteed
Burstable
先前介紹了 重啟策略(RestartPolicy) 會在容器崩潰時自動重啟 Pod,來嘗試恢復服務,但有情境是容器的內部應用程序已經不可用,但容器並不會崩潰,對終端用戶來說,仍然無法正常使用該系統。
Liveness Probes 提供了一個檢測應用程序是否可用的方式,能透過 http, tcp, gRPC 甚至 command 的方式來檢測。
我們依此 Pod yaml 為例子,來看一下 存活探針 的配置項
apiVersion: v1
kind: Pod
metadata:
  labels:
    test: liveness
  name: liveness-http
spec:
  containers:
  - name: liveness
    image: registry.k8s.io/liveness
    args:
    - /server
    livenessProbe: # 存活探針配置
      httpGet: # 透過 http 檢查
        path: /healthz
        port: 8080
        httpHeaders:
        - name: Custom-Header
          value: Awesome
      initialDelaySeconds: 3 # 延遲幾秒開始探測
      periodSeconds: 3 # 探測週期
      failureThreshold: 5 # 故障閾值
livenessProbe: 存活探針配置區塊
httpGet: 使用 Http 協定來探測
path: 探測 /healthz URL path 的端點port: 指定 port/httpHeaders: 自定義的 Http headerinitialDelaySeconds: 首次檢查之前,應該等待幾秒periodSeconds: 每次探測之間要間隔幾秒failureThreshold: 故障閾值,連續幾次探測失敗時,才視為 容器不正常(預設 3)簡單來說,這個 Pod,會有以下行為
http://localhost:8080/healthz,並帶有 Custom-Header: Awesome 的 Http header,依據此端點的 Response Http status 判斷容器是否健康返回的 Http status 大於或等於 200 且小於 400 的情況都被視為健康,而其他返回的 Http status 被視為失敗。
Liveness 能在應用程序不可用的時候,讓 Kubernetes 自動重啟該 Pod,但有些時候應用程序只是需要一點時間加載數據或配置文件,這種情況下我們不希望 Pod 被重啟,但也不希望把流量發給此 Pod,直到該應用程序準備好時,才轉發流量給該 Pod。
Readiness Probes 會在第一次探測成功時,允許 Service 將流量轉發到該 Pod,直到探測失敗後,暫停將流量轉發到該 Pod,直到探測結果恢復為成功
依此 Pod yaml 為例子,來看一下 就緒探針 的配置項
apiVersion: v1
kind: Pod
metadata:
  labels:
    test: liveness
  name: liveness-http
spec:
  containers:
  - name: liveness
    image: registry.k8s.io/liveness
    args:
    - /server
    readinessProbe: # 就緒探針配置
      httpGet:
        path: /healthz
        port: 8080
        httpHeaders:
        - name: Custom-Header
          value: Awesome
      initialDelaySeconds: 3
      periodSeconds: 3
      failureThreshold: 5
能看到配置項目幾乎與 Liveness Probes 相同,只差別在 readinessProbe 或 livenessProbe 結構下進行配置
簡單來說,這個 Pod,會有以下行為
http://localhost:8080/healthz,並帶有 Custom-Header: Awesome 的 Http header,依據此端點的 Response Http status 判斷是否就緒返回的 Http status 大於或等於 200 且小於 400 的情況都被視為健康,而其他返回的 Http status 被視為失敗。
有時候,你的應用程序會需要較長的啟動時間(Ex: 從單體式服務),若僅使用 liveness 可能會在應用程序準備好之前就開始探測,導致一直誤殺該 Pod,能透過 啟動探針 來解決這個問題,
通常會與 liveness 配置同一個端點來探測,範例如下
ports:
- name: liveness-port
  containerPort: 8080
  hostPort: 8080

livenessProbe:
  httpGet:
    path: /healthz
    port: liveness-port
  failureThreshold: 1
  periodSeconds: 10

startupProbe:
  httpGet:
    path: /healthz
    port: liveness-port
  failureThreshold: 30
  periodSeconds: 10
該容器再啟動後,應用程序最多有 5 分鐘(30 * 10 = 300s) 來進行啟動程序,於此期間可能會有以下結果
成功(代表應用程序啟動完成)後,啟動探針 就不會再繼續探測,後續會由 liveness 進行探測。restartPolicy 決定是否重啟liveness 中有個
initialDelaySeconds參數也能固定延遲檢測時間,但 startupProbe 為循環調用,能更靈活的配置,假設應用程序比預期早啟動完成,也能更快的對外服務。
Spring boot 生態中有個 Spring-boot-Actuator 模組很適合作為探針檢測的端點,它提供了不同端點,供我們配置 liveness 與 readiness
/actuator/health/liveness
/actuator/health/readiness
我們依此為例,來部署一個 deployment
cat <<EOF | kubectl apply -f -
apiVersion: apps/v1
kind: Deployment
metadata:
  creationTimestamp: null
  labels:
    app: probes-demo
  name: probes-demo
spec:
  replicas: 1
  selector:
    matchLabels:
      app: probes-demo
  strategy: {}
  template:
    metadata:
      creationTimestamp: null
      labels:
        app: probes-demo
    spec:
      containers:
      - image: yihonggaotw/demo-image:v4
        name: demo-image
        ports:
        - containerPort: 8080
        resources: {}
        livenessProbe:
          httpGet:
            path: /actuator/health/liveness
            port: 8080
          failureThreshold: 1
          periodSeconds: 10
        readinessProbe:
          httpGet:
            path: /actuator/health/readiness
            port: 8080
          failureThreshold: 1
          periodSeconds: 10
EOF
部署後能看到 pod STATUS 為 Running 且 READY 為 1/1,因為 livenessProbe 與 readinessProbe 都返回 Http status 200
kubectl get pod -l app=probes-demo
返回結果
NAME                           READY   STATUS    RESTARTS   AGE
probes-demo-6c64f45669-c776m   1/1     Running   0          2m43s
我們檢查一下,livenessProbe 與 readinessProbe 是否真的返回成功
# check livenessProbe
kubectl exec -it ${pod-name} -- curl -v localhost:8080/actuator/health/liveness

# check readinessProbe
kubectl exec -it ${pod-name} -- curl -v localhost:8080/actuator/health/readiness
返回結果
(base) yihung.kao@yihungkaodeMBP deployment % k exec -it probes-demo-6c64f45669-c776m -- curl -v localhost:8080/actuator/health/liveness
*   Trying ::1:8080...
* Connected to localhost (::1) port 8080 (#0)
> GET /actuator/health/liveness HTTP/1.1
> Host: localhost:8080
> User-Agent: curl/7.76.1
> Accept: */*
>
* Mark bundle as not supporting multiuse
< HTTP/1.1 200
< Content-Type: application/vnd.spring-boot.actuator.v3+json
< Transfer-Encoding: chunked
< Date: Fri, 15 Sep 2023 17:20:08 GMT
<
* Connection #0 to host localhost left intact
{"status":"UP"}

(base) yihung.kao@yihungkaodeMBP deployment % kubectl exec -it probes-demo-6c64f45669-c776m  -- curl -v localhost:8080/actuator/health/readiness
*   Trying ::1:8080...
* Connected to localhost (::1) port 8080 (#0)
> GET /actuator/health/readiness HTTP/1.1
> Host: localhost:8080
> User-Agent: curl/7.76.1
> Accept: */*
>
* Mark bundle as not supporting multiuse
< HTTP/1.1 200
< Content-Type: application/vnd.spring-boot.actuator.v3+json
< Transfer-Encoding: chunked
< Date: Fri, 15 Sep 2023 17:20:12 GMT
<
* Connection #0 to host localhost left intact
{"status":"UP"}
能看到兩個端點都返回了 HTTP/1.1 200,所以 Kubernetes 判斷該 Pod 是正常運作的,且準備好接受流量了
想嘗試檢測失敗的讀者,能直接透過 kubectl edit 變更該 deployment 探測的端點為不存在的 URL path,就能看到探測失敗會如何處理該 Pod。
今天介紹了 QoS (Quality of Service) 能將關鍵服務配置為 Guaranteed,避免再節點遭遇資源壓力時被驅逐,而非關鍵服務的 Pod 也能配置為 Burstable 或 BestEffort 讓整體系統獲得比較好的資源利用率,因為即使被驅逐也會在其他節點重新啟動。
另外也介紹了 存活探針(Liveness), 就緒探針(Readiness) and 啟動探針(Startup Probes),讓我們服務的自我修復 與 流量控制能更精準,提高系統整體的可用性。
明天會介紹 優雅關閉 (graceful shutdown),讓服務更新時,能盡量減少服務中斷的時間。



 iThome鐵人賽
 看影片追技術