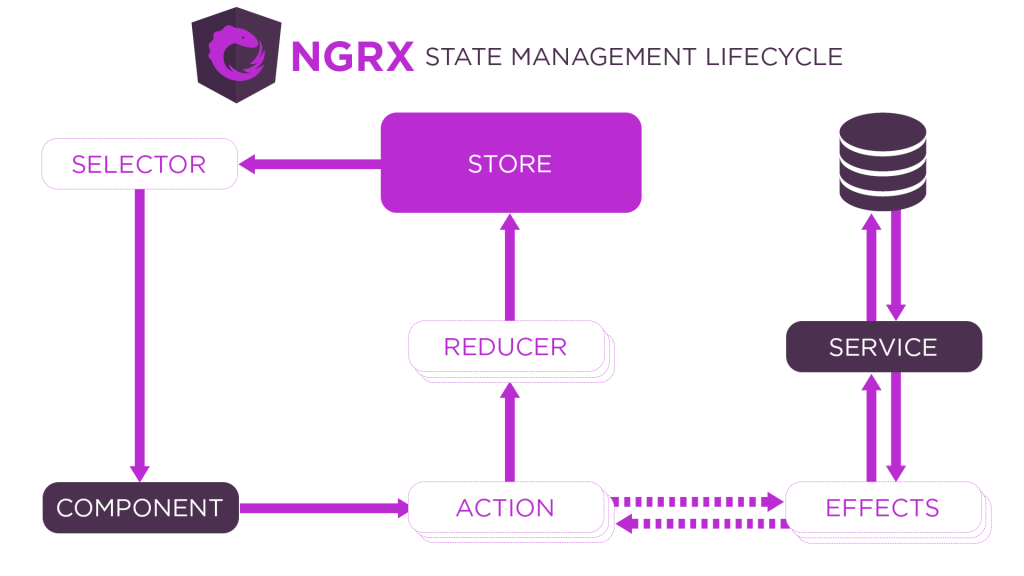
在rxjs中關於一個Action、Effect、Reducer、Selector的流程,是被稱呼為feature,我們可以看看Angular開發社群的超級大神Mike的《打通RXJS任督二脈》、《全端開發人員天梯》中對於rxjs的講解,每次看都有不同感受的全方位指南 Orz
話說回來,我們可以看看rxjs的資料迴圈圖,來一步步聽我分享實戰開發經驗與操作~

在一開始系統初始化的之後,我們可以透過Rducer與Selector來進行取用資料,以下是關於我們進行取用的程式碼
大家一定會覺得很好奇,怎麼好像哪裡怪怪的,多了一些之前沒有的物件,這個叫做 Selector class的就是Rxjs為了更加精準的從Store取得資料的實作類別,我們可以看看之前我們是透過直接取用Reducer去抓State
import { Component, OnInit, inject } from '@angular/core';
import { CommonModule } from '@angular/common';
import { Store } from '@ngrx/store';
import * as fromPagesReducers from '../../../core/store/reducers';

@Component({
  standalone: true,
  imports: [CommonModule],
  templateUrl: './shopping-home.component.html',
  styleUrls: ['./shopping-home.component.scss'],
})
export class ShoppingHomeComponent implements OnInit {
  private storeR = inject(Store<fromPagesReducers.State>);
  loading$: Observable<boolean> = this.storeR
    .select((x) => x.layout.Loading)
    .pipe(takeUntil(this.destroy$));
}
<div>
  {{ loading$ | async | json }}
</div>
不是說不行,畢竟 Selector 的宣告也是需要我們的Reducer進行注入,但隨者我們的功能逐漸增長,一旦異動層級,我需要進行注入與管理的地方也越來越多,我們不能無時無刻的期待VSCode幫我們進行自動變更,除非你有無限的記憶體
而便宜的記憶體在海上
Selector是用於從全局狀態對象中提取特定State的實作Class。它們有助於高效訪問和計算衍生狀態。選擇器會進行暫存,若值不變會將暫存資料遞送給新的訂閱需求,直至我們透過release()去釋放我們的記憶體
所以在這邊我們優化一下我們既有的程式碼,首先添加一個新的資料夾層級在我們的store之中,並命名為selector,並在裡面添加一個名叫layout.selector.ts的檔案
core/
|    |-store
|    |    |-action
|    |    |-effect
|    |    |-reducer
|    |    |-selector
|    |    |    |-layout.selector.ts
然後我們在這個檔案裏頭進行Selector的創建
import { createFeatureSelector, createSelector } from '@ngrx/store';
import * as fromLayout from '../reducers/layout.reducers';

export const selectLayoutState = createFeatureSelector<fromLayout.State>(
  fromLayout.layoutReducerKey
);
export const selectLayoutLoading = createSelector(selectLayoutState, (state) => state.Loading);
);
這個createFeatureSelector將會取用我們進行注入的reducer的state,並且讓我們接下來的createSelector有一個基礎建構式
接下來我們在根據我想要取用的select分別建立專屬於他們的選擇器
接下來讓我們回到我們的layout來優化我們自己的選擇器
import { Component, OnInit, inject } from '@angular/core';
import { CommonModule } from '@angular/common';
import { Observable, Subject, takeUntil } from 'rxjs';
import { Store } from '@ngrx/store';
import * as fromPagesReducers from '../../../core/store/reducers';

import {
  selectLayoutLoading
} from 'src/app/core/store/selector/layout.selector';
@Component({
  standalone: true,
  imports: [CommonModule],
  templateUrl: './shopping-home.component.html',
  styleUrls: ['./shopping-home.component.scss'],
})
export class ShoppingHomeComponent implements OnInit {
  private storeR = inject(Store<fromPagesReducers.State>);
  private store = inject(Store);
  private destroy$ = new Subject<void>();
  loading$: Observable<boolean> = this.storeR
    .select((x) => x.layout.Loading)
    .pipe(takeUntil(this.destroy$));
  isLoading$ = this.store.select(selectLayoutLoading);

  ngOnInit(): void {
    this.store
      .select(selectLayoutLoading) // 指定 Selector
      .subscribe((data) => console.log(data));
    this.isLoading$.subscribe((res) => {
      console.log(res);
    });
  }
}
這次的Store就可以直接注入了,不用特地傳一個State讓它幫我們做篩選
透過createFeatureSelector與createSelector我們所建立起的會是一個Observable的觀察通道,他只能透過subscribe來進行訂閱取用裡面的資料
接下來我們一樣在layout上用async pipe進行訂閱取用
這樣子我們就能看到它呈現在我們頁面上囉~
我們已經透過selector取得系統初始化的內容與資料了
但接下來要怎麼變更呢? 這就要透過action了
Actions(動作)主要是定義我們將要做什麼,後面的動作都交由reducer來做處理,也因為是宣告我們將要做什麼的狀況,通常也會貼近實際業務流程上的需求,我們可以提前先建立好相關機制等待後續的邏輯實作
[LAYOUT] UPDATE_LOADING_STATUS
[LAYOUT] UPDATE_MENU_STATUS
...
[USER] USER_LOGIN
[USER] USER_LOGIN_SUCCESS
[USER] USER_LOGIN_FAIL
...
[MAP] MAP_INFO_UPDATE
[MAP] MAP_INFO_OFFLINE
建立一個帶參數的Action函式如下
import { createAction, props } from '@ngrx/store';
import { SlideMenuStatus } from 'src/app/shared/types/layout-setting/layout';

/**
 * 更新系統遮罩狀態
 */
export const UPDATE_LOADING_STATUS = createAction(
  '[LAYOUT] UPDATE_LOADING_STATUS',
  props<{ Status: boolean }>()
);
/**
 * 更新系統選單狀態狀態
 */
export const UPDATE_MENU_STATUS = createAction(
  '[LAYOUT] UPDATE_MENU_STATUS',
  props<{ Status: SlideMenuStatus }>()
);
啟用Action的方式也很簡單,透過store.dispatch,我就可以扣下板機將我們準備好的Action擊發出去
    this.store.dispatch(
      Actions.LayoutActions.UPDATE_LOADING_STATUS({
        Status: false,
      })
    );
但擊發出去之後呢? 總不能讓子彈飛吧 不見他落地吧?
每個Action其實在擊發後是沒有改變值的,而是透過Rreducer來進行監聽這個"彈道"有沒有被擊發,程式碼如下:
import { createReducer, on } from '@ngrx/store';
import { UPDATE_LOADING_STATUS, UPDATE_MENU_STATUS } from '../actions/layout.action';
import { SlideMenuStatus } from 'src/app/shared/types/layout-setting/layout';

export const layoutReducerKey = 'layout';
export const initialState: State = {
  Loading: false,
  SlideMenuStatus: {
    isShow: true,
    isExtant: true,
    isMini: false,
  },
};
export interface State {
  Loading: boolean;
  SlideMenuStatus: SlideMenuStatus;
}
export const reducer = createReducer(
  initialState,
  on(UPDATE_LOADING_STATUS, (state, action) => {
    return {
      ...state,
      Loading: action.Status,
    };
  }),
  on(UPDATE_MENU_STATUS, (state, action) => {
    return {
      ...state,
      SlideMenuStatus: action.Status,
    };
  })
);
哎呀,這可不就巧了,這不是那個誰誰誰嗎?
至此透過on來監聽相對應的Action的Reducer終於有我們明白的意義了
每一次的Action被擊發之後,透過Reducer的監聽on來針對state進行更新
透過js的Spread保留原先的state值後,在更新想要更新的當前的值,之後再被Selector接到後更新在我們的訂閱上
當然 我們也可以在這邊做在格式化的處理,但依照我的經驗是有些東西格式化完在觸發點前對開發與維護的人們都好...
至此Action、Reducer與Selector都大概講了一些概念,明天將會說說Effect與API以及如何透過Service管理擊發流程。
