來咯來咯今天第22天,明天上班之後就要放假了,各位中秋連假已經準備好去哪裏玩了嗎。可是我們的每日學習也不要落下,我們今天就來講解Slot這個東西。
Vue 3 的插槽(Slot)是一種強大的機制,用於在組件中定義可重用的模板部分,以便父組件可以向子組件傳遞內容。插槽允許在父組件中嵌入子組件,並在子組件中定義特定部分的布局和內容,從而實現更高級的組件覆用和定制。
我翻譯翻譯:
這句話的意思就是說,只要我提前在我的子組件裏面挖了一個洞,我在父組件使用這個子組件的時候,就能夠把html模板插進去我的子組件裏面。
而Slot又可以分爲兩種:
默認插槽用於在子組件中放置不屬於任何具名插槽的內容。如果父組件沒有提供具名插槽內容,這些內容將被渲染到默認插槽中。
<!-- 子組件 MyComponent.vue -->
<template>
  <div>
    <slot>This is the default content</slot>
  </div>
</template>
<!-- 父組件 ParentComponent.vue -->
<template>
  <div>
    <my-component>
      <p>Custom content for default slot</p>
    </my-component>
  </div>
</template>
以上面的例子來説,最終顯示出來的是"Custom content for default slot",但是如果我今天沒有在 <my-component>裏面放入template的話,那就會是默認的"This is the default content"。
另外一種是:
具名插槽允許在子組件中定義多個插槽,每個插槽都有一個名稱。這樣,父組件可以根據插槽的名稱將內容傳遞給子組件的不同插槽位置。在子組件中,可以使用<slot>元素為每個插槽定義一個默認內容,如果沒有父組件提供相應插槽內容,將會顯示默認內容。
<!-- 子組件 MyComponent.vue -->
<template>
  <div>
    <slot name="header">這是默認頭部</slot>
    <div>子組件的內容</div>
    <slot name="footer">這是默認底部</slot>
  </div>
</template>
<!-- 父組件 ParentComponent.vue -->
<template>
  <div>
    <my-component>
      <template v-slot:header>
        <h1>自定義頭部</h1>
      </template>
      <p>父組件的內容</p>
      <template v-slot:footer>
        <footer>自定義底部</footer>
      </template>
    </my-component>
  </div>
</template>
有沒有看到我給兩個slot都加上name屬性,這個就是為一個slot命名的方式。
在使用slot要注意的事情:
你使用slot的時候,是無法讀取子組件的任何資料的,你只能讀取父組件裏面定義的data,method,computed……這件事情我們稱它為渲染作用域。
另外,我們在開發的時候不一定要每次都寫v-slot:name ,而是可以像v-bind的":",method的"@"一樣有縮寫。v-slot的縮寫是"#"。我們可以在父組件寫<template #footer><footer>自定義底部</footer></template>
在上面的渲染作用域中我們有提到,插槽的內容無法訪問到子組件的資料。
而我們如果有這個需求,可以使用作用域插槽。作用域插槽允許子組件向父組件傳遞資料,以便在插槽中使用。這使得父組件可以更靈活地渲染子組件的內容,根據需要對數據進行處理。
我們可以像對組件傳遞 props 那樣,向一個插槽的出口上傳遞 attributes:
<!-- 子組件 MyComponent.vue -->
<template>
  <div>
    <slot :item="item"></slot>
  </div>
</template>

<!-- 父組件 ParentComponent.vue -->
<template>
  <div>
    <my-component>
      <template v-slot="slotProps">
        <p>{{ slotProps.item.name }}</p>
      </template>
    </my-component>
  </div>
</template>
或是我們可以這樣寫:
<!-- <MyComponent> 的模板 -->
<div>
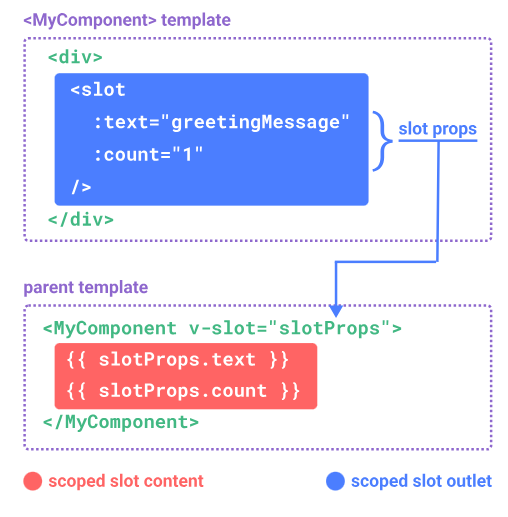
  <slot :text="greetingMessage" :count="1"></slot>
</div>
<MyComponent v-slot="{ text, count }">
  {{ text }} {{ count }}
</MyComponent>
可以看到我們用v-slot="slotProps"綁定了這個子組件傳出來的props,我們可以看官方文檔給的圖來幫助我們更加瞭解:
剛剛我們上面看到的是默認插槽,那如果是具名插槽呢?
我們可以直接這樣寫:
<MyComponent>
  <template #header="headerProps">
    {{ headerProps }}
  </template>

  <template #default="defaultProps">
    {{ defaultProps }}
  </template>

  <template #footer="footerProps">
    {{ footerProps }}
  </template>
</MyComponent>
可以發現,我們使用#header來綁定name=header的插槽,并且用"="將headerProps作爲命名帶出。這裏的headerProps,footerProps的命名方式不是一定的,你可以命名任意的名字,但需要別人一眼看到就會懂。
如果你同時使用了具名插槽與默認插槽,那你的默認插槽(Default Slot)需要加上#default的字眼,不然會出錯。
今天簡單介紹了一下Slot的基礎用法,還有其他的使用方法可以自行查閲官方文檔。但是這邊教的内容相信足以初學者使用,各位可以回去復習。
本篇終。
