中秋節快樂
這裡要先練習像是登入會顯示XX~您好!的打招呼功能
共有以下幾個城市馬
package com.tzu2.beans;

public class HelloBean {
	public String helloWorld(String who) {
		  return who+"您好";
		 }
}
解釋程式碼
這是一個簡單的 Java 類別,位於 com.tzu2.beans 包中,叫做 HelloBean。這個類別包含一個方法 helloWorld,該方法接受一個字串作為參數 who,然後將 who 與 "您好" 連接起來,最後返回結果。
讓我們來解釋這個類別的主要部分:
package com.tzu2.beans;:這是包聲明,它指定了這個類別所屬的包。包(package)是 Java 中用來組織類別的一種結構,有助於避免命名衝突。
public class HelloBean:這是類別的定義,類別名稱為 HelloBean,它被聲明為 public,表示其他類別可以訪問它。
public String helloWorld(String who):這是一個方法的定義,該方法的名稱是 helloWorld,它接受一個字串參數 who。方法的返回類型為字串(String),表示該方法會返回一個字串。
return who + "您好";:這是方法的主體。它將傳遞給方法的 who 參數與字串 "您好" 連接在一起,然後返回結果。
簡單來說,當您呼叫 helloWorld 方法時,您需要傳遞一個字串作為 who 的值,然後該方法將返回這個字串與 "您好" 組合的結果。例如,如果您呼叫 helloWorld("John"),該方法將返回 "John您好"。
package com.tzu2.config;

import org.springframework.context.annotation.Bean;
import org.springframework.context.annotation.Configuration;

import com.tzu2.beans.HelloBean;

@Configuration
public class ApplictionConfig {

 public ApplictionConfig() {
  System.out.println("Configuration Bean配置了");
 }

 @Bean
 public HelloBean getHelloBean() {
  System.out.println("Hello Bean產生了");
  HelloBean hello =new HelloBean();
  return hello;
 }

}
解釋程式碼
這個程式碼片段是一個 Java 類別,位於 com.tzu2.config 包中,名為 ApplictionConfig。它使用 Spring Framework 的注解來定義一個配置類別,並建立了一個名為 HelloBean 的 Spring Bean。
讓我們來解釋這個類別的主要部分:
package com.tzu2.config;:這是包聲明,指定了這個類別所屬的包。
import org.springframework.context.annotation.Bean; 和 import org.springframework.context.annotation.Configuration;:這些是引入 Spring Framework 中的相關類別和注解。@Bean 注解用於聲明這是一個 Spring Bean 定義,而 @Configuration 注解用於聲明這是一個 Spring 配置類別。
public class ApplictionConfig:這是類別的定義,類別名稱為 ApplictionConfig。
public ApplictionConfig():這是類別的建構函式(constructor)。當這個類別的實例被建立時,建構函式中的程式碼將被執行。在這裡,它只是簡單地輸出一條訊息到控制台,用來顯示這個配置類別已被初始化。
@Bean 注解標註的 getHelloBean 方法:這個方法是一個 Spring Bean 的定義方法。當 Spring 容器初始化時,它會呼叫這個方法來建立一個名為 hello 的 HelloBean 實例。同時,也會輸出一條訊息到控制台,用來表示 HelloBean 實例已經被建立。
總結來說,這個類別是一個 Spring 配置類別,它建立了一個名為 hello 的 Spring Bean,該 Bean 的類型為 HelloBean。當 Spring 應用程式啟動時,它將採用這個配置類別並建立相應的 Bean 實例。
要修改MywebApplication才可以啟用
package com.tzu2.myweb2;

import org.springframework.boot.SpringApplication;
import org.springframework.boot.autoconfigure.SpringBootApplication;
import org.springframework.context.annotation.ComponentScan;

@SpringBootApplication
@ComponentScan(basePackages = {"com.tzu2.controllers","com.tzu2.config"})

public class Myweb2Application {

	public static void main(String[] args) {
		SpringApplication.run(Myweb2Application.class, args);
	}

}
解釋程式碼
這個程式碼片段是一個 Spring Boot 應用程式的主啟動類別,位於 com.tzu2.myweb2 包中,名為 Myweb2Application。它使用了 Spring Boot 相關的注解,如 @SpringBootApplication 和 @ComponentScan,來配置和啟動應用程式。
以下是對這個程式碼的解釋:
package com.tzu2.myweb2;:這是包聲明,指定了這個類別所屬的包。
import 陳述句:這些是引入相關的 Spring Boot 和 Spring Framework 的類別和注解。
@SpringBootApplication:這是一個 Spring Boot 注解,它標示這是一個 Spring Boot 應用程式的主要啟動類別。它整合了 @Configuration、@EnableAutoConfiguration 和 @ComponentScan 這些注解,以簡化 Spring 應用程式的配置。
@ComponentScan:這是一個 Spring Framework 的注解,用於指示 Spring 應該掃描哪些包來尋找組件(components)。在這個程式碼中,它指示 Spring 應該掃描 com.tzu2.controllers 和 com.tzu2.config 這兩個包,以查找控制器和配置類別。
public class Myweb2Application:這是主要的啟動類別,它包含了 main 方法,該方法是應用程式的進入點。當您運行這個應用程式時,main 方法會被執行。
public static void main(String[] args):這是 main 方法的定義,它接受一個字串陣列 args 作為參數。這個方法使用 SpringApplication.run 來啟動 Spring Boot 應用程式。它傳遞了主要的啟動類別 Myweb2Application.class 和命令列參數 args 給 SpringApplication.run 方法,以啟動應用程式。
總結來說,這個程式碼片段定義了一個 Spring Boot 應用程式,它的主要啟動類別是 Myweb2Application,並配置了應用程式的基本設置,包括掃描的包以及如何啟動應用程式。當您運行這個應用程式時,它將初始化 Spring 容器並啟動您的應用程式。
目前RUN後端顯示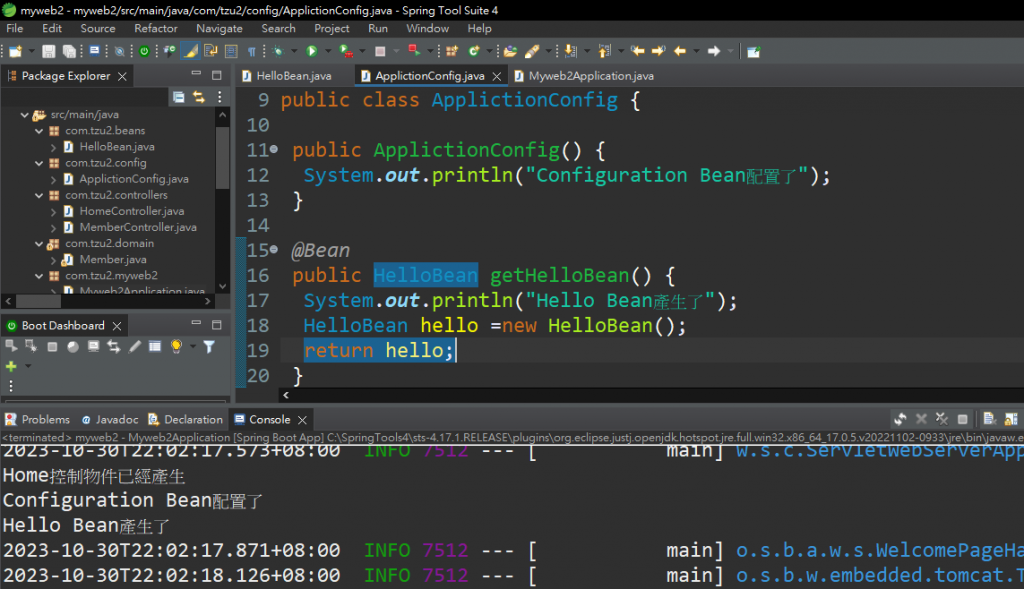
繼續新增檔案
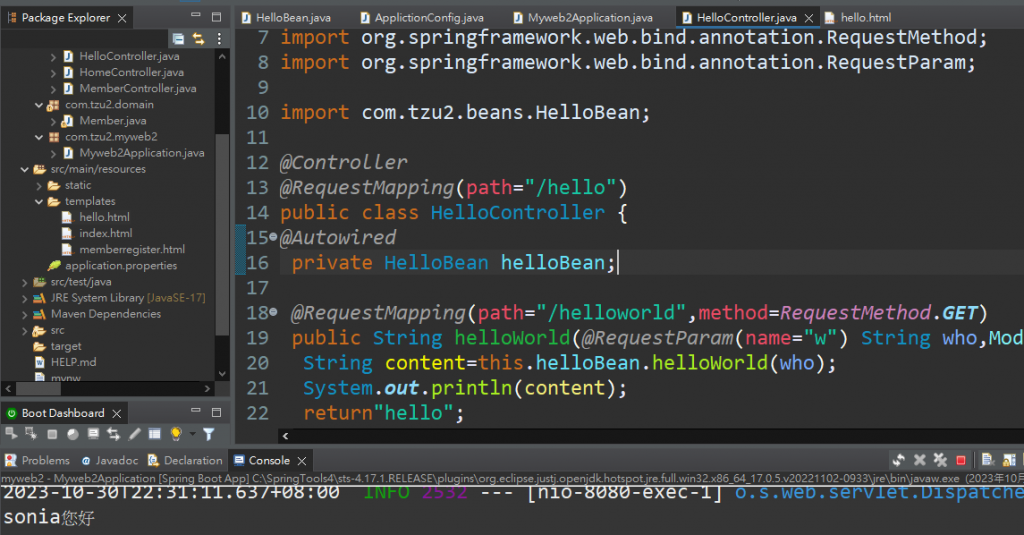
package com.tzu2.controllers;

import org.springframework.beans.factory.annotation.Autowired;
import org.springframework.stereotype.Controller;
import org.springframework.web.bind.annotation.RequestMapping;
import org.springframework.web.bind.annotation.RequestMethod;

import com.tzu2.beans.HelloBean;

@Controller
@RequestMapping(path="/hello")
public class HelloController {
@Autowired
 private HelloBean helloBean;

 @RequestMapping(path="/helloworld",method=RequestMethod.GET)
 public String helloWorld(String who) {
  String content=this.helloBean.helloWorld(who);
  System.out.println(content);
  return"hello";
 }
}
解釋程式碼
這個程式碼片段是一個 Spring 應用程式中的控制器類別,位於 com.tzu2.controllers 包中,名為 HelloController。它處理關於打招呼的請求,並依賴一個名為 HelloBean 的服務來執行實際的業務邏輯。
以下是對這個程式碼的解釋:
package com.tzu2.controllers;:這是包聲明,指定了這個類別所屬的包。
import 陳述句:這些是引入 Spring 相關的類別和注解,例如 @Controller、@RequestMapping 和 @Autowired。
@Controller:這是一個 Spring Framework 的注解,用於標示這是一個控制器類別,該類別處理 HTTP 請求並生成 HTTP 響應。
@RequestMapping(path="/hello"):這是一個控制器層次的路徑映射。它指示這個控制器處理的請求路徑應該以 /hello 開始。
@Autowired 和 private HelloBean helloBean;:這兩個元素一起用於注入 HelloBean 服務的實例到這個控制器中。通過 @Autowired 注解,Spring 將自動尋找 HelloBean 並將其注入這個控制器中。
@RequestMapping(path="/helloworld", method=RequestMethod.GET):這是一個方法層次的路徑映射,指示這個方法處理的請求路徑應該以 /hello/helloworld,並且僅處理 GET 請求。
public String helloWorld(String who):這是一個處理 HTTP GET 請求的方法。它接受一個名為 who 的參數,該參數將從 HTTP 請求的查詢字串中提取。
String content = this.helloBean.helloWorld(who);:這行程式碼呼叫了 HelloBean 服務的 helloWorld 方法,並傳遞了 who 參數,以獲得打招呼的內容。
System.out.println(content);:這行程式碼用於將打招呼的內容輸出到控制台,以用於除錯或記錄。
return "hello";:最後,這個方法返回一個字串 "hello",這個字串通常將用於查找視圖模板,以生成最終的 HTTP 響應。
總結來說,這個控制器類別 HelloController 負責處理 /hello/helloworld 路徑的 GET 請求,並依賴於 HelloBean 服務來生成打招呼的內容。根據 who 參數的值,它會輸出相應的打招呼內容並返回 "hello" 字串。
<!DOCTYPE html>
<html lang="en">
<head>
    <meta charset="UTF-8">
    <meta http-equiv="X-UA-Compatible" content="IE=edge">
    <meta name="viewport" content="width=device-width, initial-scale=1.0">
    <title>打招呼</title>
</head>
<body>

</body>
</html>
解釋程式碼
這是一個簡單的 HTML 頁面的基本結構,但目前它還是空的,沒有內容。您可以在 <body> 標籤中添加您的網頁內容,以便顯示打招呼的結果或其他內容。以下是如何擴充這個 HTML 頁面的例子:
<!DOCTYPE html>
<html lang="en">
<head>
    <meta charset="UTF-8">
    <meta http-equiv="X-UA-Compatible" content="IE=edge">
    <meta name="viewport" content="width=device-width, initial-scale=1.0">
    <title>打招呼</title>
</head>
<body>
    <h1>歡迎光臨我的網站!</h1>
    <p>請輸入您的名字:</p>
    <form action="/hello/helloworld" method="GET">
        <input type="text" name="who" placeholder="您的名字">
        <button type="submit">打招呼</button>
    </form>
    <div id="greeting">
        <!-- 這裡將顯示打招呼的結果 -->
    </div>
</body>
</html>
這個 HTML 頁面包含一個標題 <h1>,一個簡單的表單 <form>,其中用戶可以輸入名字,以及一個 <div> 區域,該區域將用於顯示打招呼的結果。當用戶輸入名字並提交表單時,它將將名字作為查詢參數傳遞到 /hello/helloworld 路徑,由您的控制器處理並返回打招呼的內容。
您可以根據需要自定義這個 HTML 頁面,以滿足您的網站需求。在 <div> 區域中,您可以使用 JavaScript 或其他前端技術來顯示您的打招呼內容,以實現更動態的網頁體驗。
使用http://localhost:8080/hello/helloworld?who=sonia 測試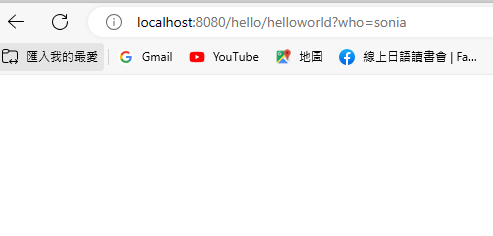
後端顯示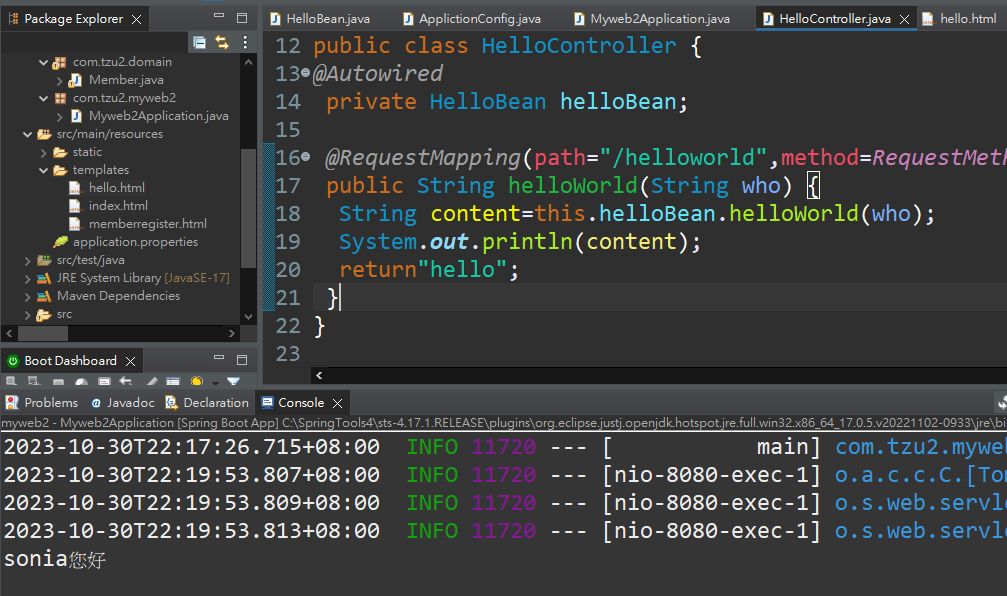
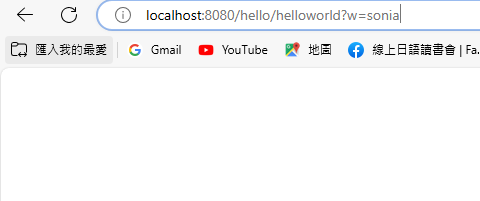
使用?來做對應,給一個w的字串做對應
再修改程式碼
package com.tzu2.controllers;

import org.springframework.beans.factory.annotation.Autowired;
import org.springframework.stereotype.Controller;
import org.springframework.ui.Model;
import org.springframework.web.bind.annotation.RequestMapping;
import org.springframework.web.bind.annotation.RequestMethod;
import org.springframework.web.bind.annotation.RequestParam;

import com.tzu2.beans.HelloBean;

@Controller
@RequestMapping(path="/hello")
public class HelloController {
@Autowired
 private HelloBean helloBean;

 @RequestMapping(path="/helloworld",method=RequestMethod.GET)
 public String helloWorld(@RequestParam(name="w") String who,Model model) {
  String content=this.helloBean.helloWorld(who);
  System.out.println(content);
  return"hello";
 }
}
解釋程式碼
這個程式碼片段是一個 Spring 應用程式中的控制器類別,與之前的程式碼相比,它添加了 Model 和 @RequestParam 注解,以更好地處理 HTTP 請求中的參數和模型。
以下是對這個程式碼的更新和解釋:
import 陳述句:這些是引入相關的 Spring 和 Spring Boot 的類別和注解,包括 Model 和 @RequestParam。
public String helloWorld(@RequestParam(name="w") String who, Model model):這是 helloWorld 方法的更新。現在它接受了一個名為 who 的參數,這個參數是由 @RequestParam 注解標註的,它指示方法應該從 HTTP 查詢參數中讀取名為 "w" 的值,並將其傳遞給方法。
Model model:這是一個參數,它允許您將模型數據傳遞給視圖。模型數據是一種在視圖中顯示或使用的數據。
String content = this.helloBean.helloWorld(who);:這行程式碼仍然用來呼叫 helloBean 服務的 helloWorld 方法,並傳遞 who 參數,以獲得打招呼的內容。
System.out.println(content);:這行程式碼用於將打招呼的內容輸出到控制台。
return "hello";:最後,這個方法返回一個字串 "hello",該字串通常用於查找視圖模板,以生成最終的 HTTP 響應。
通過使用 @RequestParam 注解,您可以指示 Spring 應該從 HTTP 請求中提取特定的參數值,這使您可以更靈活地處理用戶提交的數據。同時,Model 對象允許您將數據傳遞給視圖,以便在網頁上顯示該數據。這樣,您可以更容易地將控制器中的資訊傳遞到前端視圖,以呈現給用戶。
把打招呼的字讓畫面可以顯示~
再修改程式碼
package com.tzu2.controllers;

import org.springframework.beans.factory.annotation.Autowired;
import org.springframework.stereotype.Controller;
import org.springframework.ui.Model;
import org.springframework.web.bind.annotation.RequestMapping;
import org.springframework.web.bind.annotation.RequestMethod;
import org.springframework.web.bind.annotation.RequestParam;

import com.tzu2.beans.HelloBean;
@Controller
@RequestMapping(path="/hello")
public class HelloController {
@Autowired
 private HelloBean helloBean;

 @RequestMapping(path="/helloworld",method=RequestMethod.GET)
 public String helloWorld(@RequestParam(name="w") String who,Model model) {
  String content=this.helloBean.helloWorld(who);

  model.addAttribute("message",content);
  System.out.println(content);
  return"hello";
 }
}
解釋程式碼
這個程式碼片段是一個 Spring 應用程式中的控制器類別,類似之前的版本,但現在使用 Model 對象來傳遞打招呼的內容給視圖。以下是這個程式碼的解釋:
@RequestMapping(path="/helloworld", method=RequestMethod.GET):這個方法處理 HTTP GET 請求,並且它的路徑是 /hello/helloworld。它依然使用 @RequestParam 注解來接受名為 "w" 的查詢參數 "who",並將其傳遞到方法的 who 參數中。
model.addAttribute("message", content):這行程式碼使用 Model 對象的 addAttribute 方法,將名為 "message" 的屬性與 content 變數的值關聯起來。這意味著在視圖中,您可以通過 "message" 來訪問 content 的值。
System.out.println(content):這行程式碼仍然用於將打招呼的內容輸出到控制台。
return "hello":最後,這個方法返回一個字串 "hello",該字串通常用於查找視圖模板,以生成最終的 HTTP 響應。
這個更新的版本在 helloWorld 方法中使用了 Model 對象,以將 content 的值傳遞給視圖。這樣,在視圖模板中,您可以輕鬆地訪問 message 屬性,並將打招呼的內容顯示在網頁上,以提供更好的用戶體驗。
<!DOCTYPE html>
<html lang="en">
<head>
    <meta charset="UTF-8">
    <meta http-equiv="X-UA-Compatible" content="IE=edge">
    <meta name="viewport" content="width=device-width, initial-scale=1.0">
    <title>打招呼</title>
</head>
<body>
    <h1 th:text="${message}"></h1>


</body>
</html>
解釋程式碼
這是一個 HTML 頁面的基本結構,正在使用 Thymeleaf 模板引擎來設定動態內容。Thymeleaf 是一種用於在 HTML 頁面中嵌入動態數據的模板引擎,它與 Spring Framework 集成得很好。
以下是這個 HTML 頁面的一些重要部分:
<h1 th:text="${message}"></h1>:這是一個 <h1> 標題標籤,並且使用了 Thymeleaf 表達式 (th:text) 來設定內容。${message} 是一個 Thymeleaf 表達式,它將被替換為在控制器中使用 Model 對象添加的 "message" 屬性的值。這意味著當這個 HTML 頁面被呈現時,message 的值將被插入到 <h1> 元素中,以顯示用戶所輸入的打招呼內容。這個 HTML 頁面的主要作用是顯示由控制器傳遞的動態內容,這樣您可以將打招呼的結果或其他動態數據顯示在網頁上。 Thymeleaf 表達式使您能夠在 HTML 中動態呈現數據,提供更具互動性的用戶體驗。
測試http://localhost:8080/hello/helloworld?w=sonia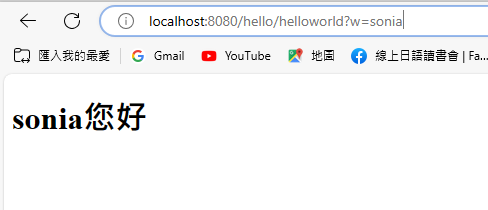
修改程式碼產生輸入框
然後顯示修改後可以跟著變更
再修改程式碼
<!DOCTYPE html>
<html lang="en">
<head>
    <meta charset="UTF-8">
    <meta http-equiv="X-UA-Compatible" content="IE=edge">
    <meta name="viewport" content="width=device-width, initial-scale=1.0">
    <title>打招呼</title>
</head>
<body>
    <h1 th:text="${message}"></h1>

    <br/>
    <input type="text" th:value="${message}"/>
</body>
</html>
解釋程式碼
這個 HTML 頁面同樣使用了 Thymeleaf 模板引擎,並具有與上一個頁面相似的結構。但這個頁面添加了一個 <input> 元素,並使用 th:value 屬性將 message 的值設定為這個 <input> 元素的值。
以下是這個 HTML 頁面的一些重要部分:
<h1 th:text="${message}"></h1>:這是一個 <h1> 標題標籤,與上一個頁面相同,使用了 Thymeleaf 表達式 (th:text) 來設定內容。 ${message} 的值將被插入到 <h1> 元素中。
<input type="text" th:value="${message}"/>:這是一個 <input> 元素,它是一個文本輸入框。th:value 屬性設定了 message 的值為這個輸入框的值。這意味著當這個 HTML 頁面被呈現時,message 的值將自動填充到輸入框中。
這個 HTML 頁面的主要作用是將 message 的值顯示在 <h1> 標題中,同時讓用戶有機會編輯這個值,因為它同時顯示在輸入框中。這種互動性可以使用戶修改打招呼的內容並提交給後端處理。 Thymeleaf 的 th:value 屬性用於將動態數據綁定到 HTML 元素,使您能夠在前端與後端之間實現雙向數據綁定。
測試http://localhost:8080/hello/helloworld?w=sonia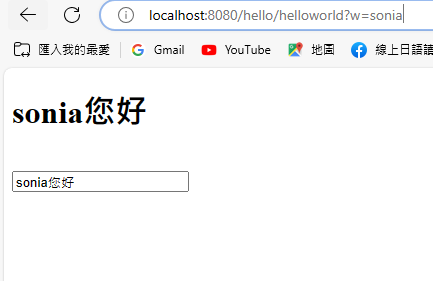
修改網址"名稱"後可以跟著變更http://localhost:8080/hello/helloworld?w=Anny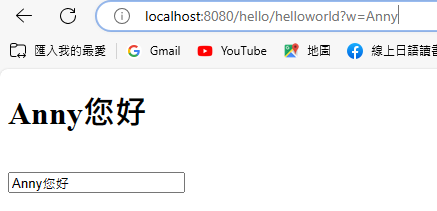
這裡要改的有"台味一點的打招呼"
新增程式碼
package com.tzu2.beans;

public interface IHello {
 public String helloWorld(String who);
}
解釋程式碼
這個程式碼片段是一個介面(interface),名為 IHello,它定義了一個方法 helloWorld,該方法接受一個字串參數 who 並返回一個字串。
介面是 Java 中一種約定,它定義了一組方法的簽名,但不提供方法的實作。其他類別可以實作這個介面,以提供方法的具體實作。
在這個特定的介面中,IHello 定義了一個方法 helloWorld,用於生成打招呼的內容。方法的簽名如下:
String helloWorld(String who);
這個方法接受一個字串 who 作為參數,並返回一個字串。具體的實作將由實現這個介面的類別提供。通常,介面用於定義一組合同,以確保實作這個介面的類別具備相應的功能。這有助於提高程式碼的可讀性和可維護性,並支持多個類別實作相同的介面以實現相同的功能。
修改程式碼
package com.tzu2.beans;

public class HelloBean implements IHello {
	public String helloWorld(String who) {
		  return who+"您好";
		 }
}
解釋程式碼
這個程式碼片段是一個 Java 類別,名為 HelloBean,並實作了名為 IHello 的介面。這表示 HelloBean 類別必須提供 IHello 介面中定義的方法 helloWorld 的具體實作。
以下是這個程式碼的解釋:
public class HelloBean implements IHello:這是 HelloBean 類別的定義,並且使用 implements 關鍵字實作了 IHello 介面。這表示 HelloBean 類別需要提供 IHello 介面中定義的所有方法。
public String helloWorld(String who):這是 helloWorld 方法的具體實作。它接受一個字串 who 作為參數,然後將 who 與 "您好" 連接在一起,並返回結果。這個方法滿足了 IHello 介面中 helloWorld 方法的簽名。
通過實作 IHello 介面,HelloBean 類別表明它可以用來生成打招呼的內容。這種結構有助於將介面和具體實作分開,並支持多個不同的類別實作相同的介面以提供相似的功能。在使用 Spring Framework 或其他框架時,這種設計模式非常常見,用於實現解耦和可擴展性。
新增程式碼
package com.tzu2.beans;

public class TWHello implements IHello{
	 @Override
	 public String helloWorld(String who) {
	  return who+"吃飽了嗎?";
	 }

	}
解釋程式碼
這個程式碼片段是另一個 Java 類別,名為 TWHello,並同樣實作了名為 IHello 的介面。不同於之前的 HelloBean 類別,TWHello 類別提供了不同的 helloWorld 方法的實作,以生成不同的打招呼內容。
以下是這個程式碼的解釋:
public class TWHello implements IHello:這是 TWHello 類別的定義,同樣使用 implements 關鍵字實作了 IHello 介面。這表示 TWHello 類別也需要提供 IHello 介面中定義的方法。
@Override:這是一個注解,用於標示方法 helloWorld 是對 IHello 介面的覆寫。這是 Java 中的一種最佳實踐,可以幫助提高程式碼的可讀性。
public String helloWorld(String who):這是 helloWorld 方法的具體實作,它接受一個字串 who 作為參數,然後將 who 與 "吃飽了嗎?" 連接在一起,並返回結果。
這個 TWHello 類別提供了一個不同的打招呼內容,與之前的 HelloBean 類別生成的內容不同。這種設計模式允許您創建多個不同的類別,實作相同的介面,以提供不同的功能或行為,而不需要更改用戶的程式碼。這是一種實現多態性和代碼可擴展性的方式。
加入Proxy代理的設計模式
package com.tzu2.beans;

public class HelloProxy implements IHello{
	 private IHello hello;
	 public HelloProxy(IHello hello) {
	  this.hello=hello;

	 }

	 @Override
	 public String helloWorld(String who) {
	  return this.hello.helloWorld(who);
	 }
	}
解釋程式碼
這個程式碼片段定義了一個名為 HelloProxy 的 Java 類別,它實作了 IHello 介面。HelloProxy 類別的主要目的是充當一個代理(proxy),它接受一個實現了 IHello 介面的對象作為參數,並透過代理將 helloWorld 方法的呼叫傳遞給這個對象。
以下是這個程式碼的解釋:
public class HelloProxy implements IHello:這是 HelloProxy 類別的定義,並實作了 IHello 介面。
private IHello hello;:這是一個私有成員變數,它存儲了實現了 IHello 介面的對象。
public HelloProxy(IHello hello):這是 HelloProxy 類別的建構子,它接受一個 IHello 對象作為參數,並將這個對象存儲在 hello 成員變數中。
@Override:這是一個注解,用於標示方法 helloWorld 是對 IHello 介面的覆寫。
public String helloWorld(String who):這是 helloWorld 方法的具體實作。當這個方法被呼叫時,它實際上是將呼叫傳遞給 hello 成員變數所引用的 IHello 對象的 helloWorld 方法,並將 who 參數傳遞給它。這使得 HelloProxy 類別充當一個代理,透明地將方法呼叫轉發給內部的 IHello 對象。
這個代理模式可用於實現不同的行為或功能的組合,以提供更高層次的抽象或控制。通常,代理模式用於實現代碼的解耦,或在不更改現有代碼的情況下添加額外的功能或處理邂逅。在這個情況下,HelloProxy 可以用於包裝不同的 IHello 實現,以實現不同的打招呼行為,而不需要更改用戶的程式碼。
加入@Bean
修改程式碼
package com.tzu2.config;

import org.springframework.context.annotation.Bean;
import org.springframework.context.annotation.Configuration;

import com.tzu2.beans.HelloBean;
import com.tzu2.beans.HelloProxy;
import com.tzu2.beans.IHello;

@Configuration
public class ApplictionConfig {

	 public ApplictionConfig() {
	  System.out.println("Configuration Bean配置了");
	 }

	 @Bean(name = "hellobean")
	 public HelloBean getHelloBean() {
	  System.out.println("Hello Bean產生了");
	  HelloBean hello = new HelloBean();
	  return hello;
	 }

	 @Bean
	 public HelloProxy getHellProxy(IHello hellobean) {
	  HelloProxy proxy = new HelloProxy(hellobean);
	  return proxy;
	 }
	}
解釋程式碼
這個程式碼片段是一個 Spring 應用程式的配置類別,通過 Spring 的注解 @Configuration 來定義。這個配置類別用於配置 Spring 容器,並定義了兩個 Bean,HelloBean 和 HelloProxy,以及它們之間的依賴關係。
以下是這個程式碼的解釋:
@Configuration:這是一個 Spring Framework 的注解,它標示這是一個配置類別,用於定義 Spring 容器中的 Bean。
public ApplictionConfig():這是配置類別的建構子,它被用來初始化配置類別。在這個建構子中,一條輸出語句用於顯示 "Configuration Bean配置了"。
@Bean(name = "hellobean"):這是一個 Bean 定義,它使用 @Bean 注解標示,並且指定了 Bean 的名稱為 "hellobean"。這個 Bean 的實作是一個 HelloBean 物件,它在方法中被建立並返回。這表示當 Spring 容器初始化時,它將建立一個名為 "hellobean" 的 HelloBean Bean。
@Bean:這是另一個 Bean 定義,它沒有指定名稱,因此將使用方法名 "getHellProxy" 作為 Bean 的名稱。這個 Bean 的實作是一個 HelloProxy 物件,它需要一個 IHello 介面的實例作為參數。通過將 IHello 介面的實例注入到這個方法,它可以建立一個 HelloProxy Bean,並將 IHello 實例注入到代理中,以實現代理模式。這表示當 Spring 容器初始化時,它將建立一個名為 "getHellProxy" 的 HelloProxy Bean。
這個配置類別設置了 Spring 容器中的兩個 Bean,一個是 HelloBean,另一個是 HelloProxy。HelloProxy Bean 使用了 HelloBean Bean 作為其內部依賴,以實現代理模式,其中 HelloProxy 類別充當代理,而 HelloBean 是真正的實作。這種配置允許 Spring 容器透明地處理依賴關係,並在需要時注入相應的 Bean。
再修改程式碼到helloworldproxy
package com.tzu2.controllers;

import org.springframework.beans.factory.annotation.Autowired;
import org.springframework.stereotype.Controller;
import org.springframework.ui.Model;
import org.springframework.web.bind.annotation.RequestMapping;
import org.springframework.web.bind.annotation.RequestMethod;
import org.springframework.web.bind.annotation.RequestParam;

import com.tzu2.beans.HelloBean;
import com.tzu2.beans.HelloProxy;
@Controller
@RequestMapping(path="/hello")
public class HelloController {
@Autowired
 private HelloBean helloBean;

@Autowired
private HelloProxy proxy;

 @RequestMapping(path="/helloworld",method=RequestMethod.GET)
 public String helloWorld(@RequestParam(name="w") String who,Model model) {
  String content=this.helloBean.helloWorld(who);

  model.addAttribute("message",content);
  System.out.println(content);
  return"hello";
 }
 @RequestMapping(path="/helloworldproxy",method=RequestMethod.GET)
 public String helloWorldIoc(@RequestParam(name="w") String who,Model model) {
  String content=this.proxy.helloWorld(who);

  model.addAttribute("message",content);
  System.out.println(content);
  return"hello";
 }
}
解釋程式碼
這似乎是一個Spring MVC控制器的Java類別。這個控制器處理兩個HTTP GET請求,一個是/hello/helloworld,另一個是/hello/helloworldproxy。讓我們來分解這段程式碼的關鍵部分:
@Controller:這個註解將類別標記為Spring MVC控制器,這表示它可以處理傳入的HTTP請求。
@RequestMapping:這個註解用於類別層級,指定了處理方法的基本路徑(/hello)。這表示這個控制器中的所有方法將處理以/hello開頭的請求。
@Autowired:這些註解用於將依賴項注入控制器中。在這裡,您有兩個被注入的依賴項:
HelloBean helloBean:這是HelloBean類別的實例,它被注入到控制器中。HelloProxy proxy:這是HelloProxy類別的實例,也被注入到控制器中。@RequestMapping(方法層級):這些註解用於將特定方法映射為處理HTTP請求。
@RequestMapping(path="/helloworld", method=RequestMethod.GET):這個方法被映射為處理/hello/helloworld的GET請求。@RequestMapping(path="/helloworldproxy", method=RequestMethod.GET):這個方法被映射為處理/hello/helloworldproxy的GET請求。public String helloWorld(@RequestParam(name="w") String who, Model model):這是處理/hello/helloworld GET請求的方法。它接受兩個參數:
@RequestParam(name="w") String who:這個參數綁定到請求URL中的查詢參數"w"。Model model:這個參數用於添加屬性,這些屬性可以在視圖中顯示。在這兩個處理方法內部,您調用一個方法(要麼是從helloBean的helloWorld,要麼是從proxy的helloWorld),並將結果設置在model的"message"屬性中,以便視圖可以訪問並顯示此消息。
System.out.println(content):這一行將內容列印到控制台。
最後,這兩個方法都返回"hello",這很可能是要呈現給客戶端作為響應的視圖的名稱。
您提供的程式碼是一個基本的Spring MVC控制器,用於處理請求,與兩個bean(HelloBean和HelloProxy)進行互動,並在模型中設置消息以在視圖中呈現。完成Spring MVC應用程序,您還需要相應的配置和視圖模板。
測試http://localhost:8080/hello/helloworldproxy?w=Anny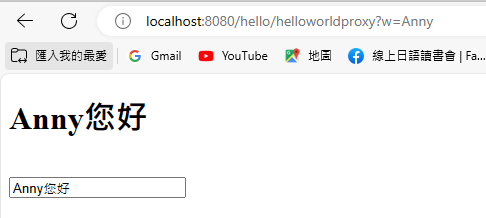
再修改
@Configuration
public class ApplictionConfig {

 public ApplictionConfig() {
  System.out.println("Configuration Bean配置了");
 }

 @Bean(name = "hellobean")
 public HelloBean getHelloBean() {
  System.out.println("Hello Bean產生了");
  HelloBean hello = new HelloBean();
  return hello;
 }

 @Bean(name = "twhello")
 public IHello getTWHello() {
  System.out.println("TW Hello Bean產生了");
  IHello hello = new TWHello();
  return hello;
 }

 @Bean
 public HelloProxy getHellProxy(IHello twhello) {
  HelloProxy proxy = new HelloProxy(twhello);
  return proxy;
 }
}
解釋程式碼
這是一個Spring的配置類(ApplictionConfig),它使用了@Configuration註解,指示Spring容器如何配置和初始化應用程式的bean。以下是該配置類的主要元件:
public ApplictionConfig(): 這是一個構造函數,當Spring容器初始化這個配置類時,會執行該構造函數,並在構造函數內部輸出"Configuration Bean配置了"的訊息。這有助於確定配置類被正確加載。
@Bean(name = "hellobean"): 這是一個@Bean註解,指示Spring容器創建名為"hellobean"的bean。當Spring容器需要一個HelloBean實例時,它會調用getHelloBean方法來獲取它。同時,getHelloBean方法內部輸出"Hello Bean產生了"的訊息,以表示該bean已經初始化。
@Bean(name = "twhello"): 這是另一個@Bean註解,指示Spring容器創建名為"twhello"的bean,這個bean的類型是IHello。同樣,當Spring容器需要一個IHello實例時,它會調用getTWHello方法來獲取它。getTWHello方法內部輸出"TW Hello Bean產生了"的訊息。
@Bean: 這個@Bean註解用於創建HelloProxy bean,它需要一個IHello bean(在這種情況下是"twhello")作為參數。當Spring容器需要一個HelloProxy實例時,它會調用getHellProxy方法,並將名為"twhello"的bean作為參數傳遞。getHellProxy方法內部創建一個HelloProxy實例,並返回它。
總結來說,這個配置類定義了三個bean:HelloBean、IHello(名為"twhello")和HelloProxy,並為每個bean提供了初始化邏輯。當Spring應用程序啟動時,它將根據這個配置類的設置來初始化這些bean。
再測試http://localhost:8080/hello/helloworldproxy?w=Anny
顯示"台式"打招呼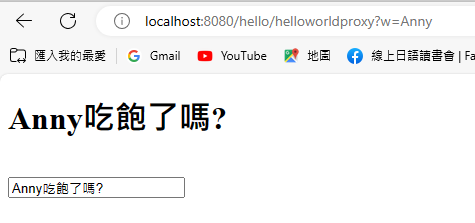
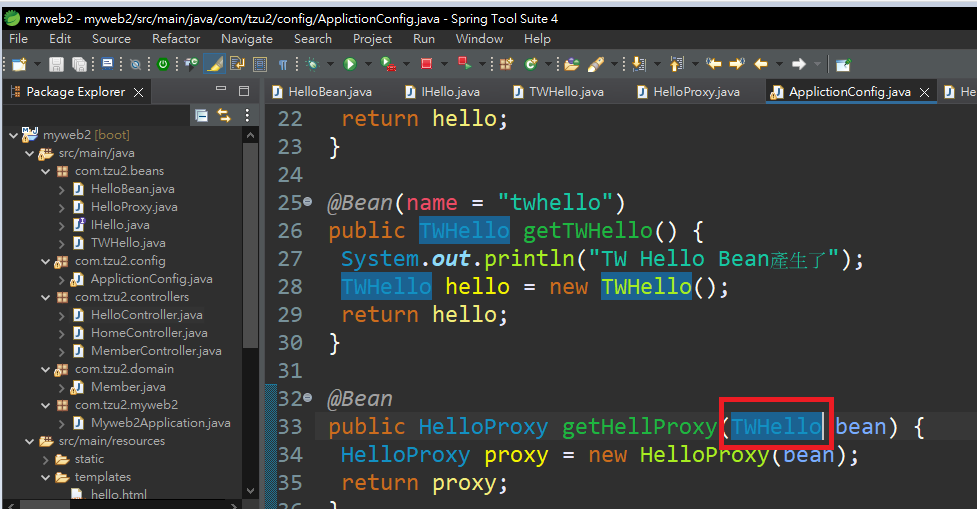
為了後面方便繼續進行程式碼修改成:
ApplictionConfig
package com.tzu2.config;

import org.springframework.context.annotation.Bean;
import org.springframework.context.annotation.Configuration;

import com.tzu2.beans.HelloBean;
import com.tzu2.beans.HelloProxy;
import com.tzu2.beans.IHello;
import com.tzu2.beans.TWHello;

@Configuration
public class ApplictionConfig {

 public ApplictionConfig() {
  System.out.println("Configuration Bean配置了");
 }

 @Bean(name = "hellobean")
 public HelloBean getHelloBean() {
  System.out.println("Hello Bean產生了");
  HelloBean hello = new HelloBean();
  return hello;
 }

 @Bean(name = "twhello")
 public TWHello getTWHello() {
  System.out.println("TW Hello Bean產生了");
  TWHello hello = new TWHello();
  return hello;
 }

 @Bean
 public HelloProxy getHellProxy(HelloBean bean) {
  HelloProxy proxy = new HelloProxy(bean);
  return proxy;
 }
}
解釋程式碼
這是一個Spring的配置類(ApplictionConfig),用於配置Spring應用程序的bean。這個配置類使用了@Configuration註解,這告訴Spring容器這是一個配置類。以下是這個配置類的主要內容:
public ApplictionConfig(): 這是一個構造函數,在Spring容器初始化這個配置類時會執行。在構造函數內部,它輸出一條訊息:"Configuration Bean配置了",這有助於確保配置類被正確載入。
@Bean(name = "hellobean"): 這個設置指示Spring容器創建一個名為"hellobean"的bean,並返回一個HelloBean的實例。當Spring容器需要一個HelloBean的實例時,它將調用getHelloBean方法以獲取它。同時,getHelloBean方法內部輸出"Hello Bean產生了"的訊息,表示該bean已經初始化。
@Bean(name = "twhello"): 這個設置指示Spring容器創建一個名為"twhello"的bean,這個bean的類型是TWHello。當Spring容器需要一個TWHello的實例時,它將調用getTWHello方法以獲取它。getTWHello方法內部輸出"TW Hello Bean產生了"的訊息。
@Bean: 這個設置用於創建一個HelloProxy的bean,它需要一個HelloBean的bean作為參數。當Spring容器需要一個HelloProxy的實例時,它將調用getHellProxy方法,並將名為"hellobean"的bean作為參數傳遞。getHellProxy方法內部創建一個HelloProxy的實例,並返回它。
總結來說,這個配置類定義了三個bean:HelloBean、TWHello(名為"twhello")和HelloProxy,並為每個bean提供了初始化邏輯。當Spring應用程序啟動時,它將根據這個配置類的設置來初始化這些bean。這個配置類在Spring應用程序中建立了bean之間的依賴關係。
最後顯示http://localhost:8080/hello/helloworldproxy?w=Anny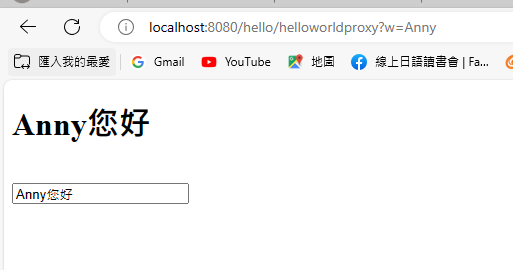

回到今天主題
安裝資料庫mysql只能裝一次~密碼要記好~不然重設會GG,因為會有隱藏檔不好刪
MySQL Community (GPL) Downloads »MySQL Community Server
No thanks, just start my download.
建議記住自己的設定
密碼一定要設定~也要自己記好
發現自己居然沒有Workbench只好自己手動增加
選Schema會看到裡面有一個sys資料庫
回到後端做環境配置:為了之後方便維護用myweb/pom.xml這個檔來加入
MySQL Connector Java:https://mvnrepository.com/artifact/mysql/mysql-connector-java
用myweb/pom.xml這個檔來加入
從側邊可以看到已加入,這樣換電腦就不會有影響
我的配置:要搭配JDK版本
<?xml version="1.0" encoding="UTF-8"?>
<project xmlns="http://maven.apache.org/POM/4.0.0" xmlns:xsi="http://www.w3.org/2001/XMLSchema-instance"
 xsi:schemaLocation="http://maven.apache.org/POM/4.0.0 https://maven.apache.org/xsd/maven-4.0.0.xsd">
 <modelVersion>4.0.0</modelVersion>
 <parent>
  <groupId>org.springframework.boot</groupId>
  <artifactId>spring-boot-starter-parent</artifactId>
  <version>3.0.2</version>
  <relativePath/> <!-- lookup parent from repository -->
 </parent>
 <groupId>com.tzu</groupId>
 <artifactId>myweb</artifactId>
 <version>0.0.1-SNAPSHOT</version>
 <name>myweb</name>
 <description>Demo project for Spring Boot</description>
 <properties>
  <java.version>17</java.version>
 </properties>
 <dependencies>
  <dependency>
   <groupId>org.springframework.boot</groupId>
   <artifactId>spring-boot-starter-web</artifactId>
  </dependency>

  <dependency>
   <groupId>org.springframework.boot</groupId>
   <artifactId>spring-boot-starter-test</artifactId>
   <scope>test</scope>
  </dependency>
  <!-- https://mvnrepository.com/artifact/org.springframework.boot/spring-boot-starter-thymeleaf -->
<dependency>
    <groupId>org.springframework.boot</groupId>
    <artifactId>spring-boot-starter-thymeleaf</artifactId>
    <version>3.0.0</version>
</dependency>
<!-- https://mvnrepository.com/artifact/mysql/mysql-connector-java -->
<dependency>
    <groupId>mysql</groupId>
    <artifactId>mysql-connector-java</artifactId>
    <version>8.0.31</version>
</dependency>

 </dependencies>

 <build>
  <plugins>
   <plugin>
    <groupId>org.springframework.boot</groupId>
    <artifactId>spring-boot-maven-plugin</artifactId>
   </plugin>
  </plugins>
 </build>

</project>
配置連接上mysql的相關
Maven配置文件(pom.xml)包含了Spring Boot的相關依賴以及MySQL連接器的依賴。
pom.xml文件中添加的依賴:
Spring Boot Web Starter依賴:
<dependency>
    <groupId>org.springframework.boot</groupId>
    <artifactId>spring-boot-starter-web</artifactId>
</dependency>
Spring Boot測試依賴(測試用):
<dependency>
    <groupId>org.springframework.boot</groupId>
    <artifactId>spring-boot-starter-test</artifactId>
    <scope>test</scope>
</dependency>
Spring Boot Thymeleaf Starter依賴:
<dependency>
    <groupId>org.springframework.boot</groupId>
    <artifactId>spring-boot-starter-thymeleaf</artifactId>
    <version>3.0.0</version>
</dependency>
MySQL Connector Java依賴:
<dependency>
    <groupId>mysql</groupId>
    <artifactId>mysql-connector-java</artifactId>
    <version>8.0.31</version>
</dependency>
這些依賴應該能夠支持開發Spring Boot應用程序,使用Thymeleaf作為模板引擎,並連接到MySQL數據庫。
IDE已經配置正確,並且Maven依賴已經下載,能夠開始開發Spring Boot應用程序。
開始打~mysql8之後url的連線變得比較複雜~就不能再看之前mysql5的教學,
舉例
sys
是建立的資料庫名稱
server.port=8080
spring.datasource.url=jdbc:mysql://localhost:3306/sys?useSSL=false&serverTimezone=UTC&characterEncoding=utf-8&allowPublicKeyRetrieval=true
spring.datasource.username=root
spring.datasource.password=1234
spring.datasource.dbcp2.driver-class-name=com.mysql.cj.jdbc.Driver
看自己mysql是否有啟動~用服務看
還有自己的workbench
建立一個新的連結
使用Test Connection
走一段測一段是最好~
先確認連結http://localhost:8080/member/registerform
Spring Boot應用程序的application.properties文件中包含了一些重要的配置信息。這些配置用於指定應用程序的端口以及與MySQL數據庫的連接信息。以下是這些配置的解釋:
server.port=8080: 這設定了的Spring Boot應用程序運行的端口,默認為8080。當訪問應用程序時,可以使用http://localhost:8080來訪問。
spring.datasource.url: 這是數據庫連接URL,它指定了如何連接到MySQL數據庫。具體來說,它指定了數據庫的URL,使用的字符編碼,時區設定,以及其他相關的連接選項。
spring.datasource.username 和 spring.datasource.password: 這些是連接MySQL數據庫所需的用戶名和密碼。在的示例中,用戶名是root,密碼是1234。你應該根據你的MySQL設置來配置正確的用戶名和密碼。
spring.datasource.dbcp2.driver-class-name: 這設定了使用的JDBC驅動程序的類名。在的示例中,它是MySQL的JDBC驅動程序類名。
這些配置信息用於設置的Spring Boot應用程序以連接到MySQL數據庫。確保這些配置與的MySQL數據庫的設置一致,以確保連接成功。
如果你希望添加更多的配置或進一步自定義的Spring Boot應用程序,你可以繼續編輯application.properties文件。這個文件通常位於src/main/resources目錄下。
新增一個資料庫
create database sakila;
修改後測試連線:
Attribute 使用spEL 就是語法${}
@Value標註取出預設組態application.properties設定項目
產生一個DataSource 是共用的物件(連接物件工廠 整個應用系統工廠只要一個即可)
@Bean
package com.tzu.config;

import javax.sql.DataSource;

import org.springframework.beans.factory.annotation.Value;
import org.springframework.context.annotation.Bean;
import org.springframework.context.annotation.Configuration;

import com.mysql.cj.jdbc.MysqlDataSource;
import com.tzu.beans.HelloBean;
import com.tzu.beans.HelloProxy;
import com.tzu.beans.IHello;
import com.tzu.beans.TWHello;

//透過方法生產Bean物件 註冊到Spring容器去
@Configuration
public class ApplictionConfig {
 //Attribute 使用spEL ${}
 //@Value標註取出預設組態application.properties設定項目
 @Value("${spring.datasource.url}")
 private String url;
 @Value("${spring.datasource.username}")
 private String userName;
 @Value("${spring.datasource.password}")
 private String password;

 public ApplictionConfig() {
  System.out.println("Configuration Bean配置了");
 }

 //生產一個HelloBean物件
 @Bean(name="hellonean")
 public HelloBean getHelloBean() {
  System.out.println("Hello Bean產生了");
  //建構HelloBean
  HelloBean hello=new HelloBean();
  return hello;
 }

 @Bean
 public TWHello getTWHello() {
  System.out.println("TW Hello Bean產生了");
  //建構HelloBean
  TWHello hello=new TWHello();
  return hello;
 }


 //參數使用定義Bean alias Name 注入依賴 隨著窗口物件注入到對方去 進行反轉物件注入
 @Bean
 public HelloProxy getHelloProxy(TWHello bean) {
  var helloProxy=new HelloProxy(bean);
  return helloProxy;
 }

 //產生一個DataSource 是共用的物件(連接物件工廠 整個應用系統工廠只要一個即可)
 @Bean
 public DataSource createDataSource() {
  System.out.println("Datasource:"+this.url);
  //建構MySQLDataSource
  MysqlDataSource datasource=new MysqlDataSource();
  //配置要件 URL/User name/password
  datasource.setUrl(url);
  datasource.setUser(userName);
  datasource.setPassword(password);

  //Driver 會進行內部使用
  return datasource;
 }
}
注入依賴物件DataSource
@Autowired
Spring Boot應用程序配置類 ApplictionConfig 使用了@Value來從application.properties文件中獲取數據源的相關配置。以下是一些主要的點:
@Configuration: 這個註解標記了這個類是一個Spring配置類。
@Value: 這個註解用於將application.properties文件中的屬性值注入到類的字段中。使用了它來注入數據源的URL、用戶名和密碼。
@Bean: 這個註解用於定義Spring Bean。定義了幾個Bean,包括HelloBean、TWHello、HelloProxy和DataSource。
createDataSource方法: 這個方法用於創建一個DataSource物件,並配置它的URL、用戶名和密碼。這個DataSource將用於連接到MySQL數據庫。
配置類已經正確地設置了Spring Bean 和數據源的相關配置。如果應用程序需要使用這些Bean,可以在其他組件中注入它們。
如果還有其他需要設置或修改的地方,可以繼續完善你的配置類。開始使用這些Bean來構建你的應用程序。
當系統正式上線跟本機的資料庫連線一定不同,改這樣寫才可以方便之後連線,開始修改程式碼:測試是否有連上資料庫,因為一定會有連不上的狀況,所以要拋另外
package com.tzu.controllers;

import java.sql.Connection;
import java.sql.SQLException;

import javax.sql.DataSource;

import org.springframework.beans.factory.annotation.Autowired;
import org.springframework.stereotype.Controller;

import org.springframework.web.bind.annotation.RequestMapping;
import org.springframework.web.bind.annotation.RequestMethod;
import org.springframework.web.bind.annotation.RequestParam;

import com.tzu.domain.Member;

//做會員註冊
@Controller
@RequestMapping(path="/member")
public class MemberController {
 //注入依賴物件DataSource
  @Autowired
  private DataSource datasource;


 //註冊Action(Method)
 @RequestMapping(path="/register",method= {RequestMethod.GET,RequestMethod.POST})
 public String register(@RequestParam(name="username")String username
   ,String password,String email,
   @RequestParam(name="realname")String realname) {
  System.out.println("register..."+username);
  //直接調用註冊表單
  return "memberregister";

 }
 //採用表單欄位進來後,自動封裝到一個物件導向去
 //註冊Action(Method)
  @RequestMapping(path="/registerform",method= {RequestMethod.GET,RequestMethod.POST})
  public String registerForm(Member member) {

   try {
    Connection connection=datasource.getConnection();
    System.out.println("資料庫:"+connection.getCatalog());
   }catch(SQLException e){
    e.printStackTrace();
   }

   System.out.println("register..."+member.getUsername());
   //直接調用註冊表單
   return "memberregister";

  }

}
MemberController 類已經準備好連線到資料來源並進行註冊操作。以下是一些主要的點:
@Autowired 註解:這個註解用於將 DataSource 依賴注入到控制器中。這樣,可以在控制器中使用 DataSource 來獲取資料庫連線。
register 方法:這個方法接收從表單中提交的使用者名稱、密碼、郵箱和真實姓名。它只是簡單地列印這些資訊,並返回 "memberregister" 檢視。
registerForm 方法:這個方法接收一個 Member 物件作為參數,Spring 會自動將表單欄位對映到 Member 物件的屬性上。然後,它嘗試獲取資料庫連線並列印資料庫的 catalog(資料庫名)。
已經成功配置了資料庫連線,並且可以從 DataSource 中獲取連線。在這個基礎上,可以繼續開發註冊邏輯,將使用者提交的註冊資訊插入到資料庫中,或者執行其他資料庫操作。
到網址測試跟資料庫連線:註冊作業http://localhost:8080/member/registerform
顯示:
如果後端抱錯Public Key 就是代表資料庫的workbench沒連線/沒開啟
在後端連線有設定也可以避免:allowPublicKeyRetrieval=true
server.port=8080
spring.datasource.url=jdbc:mysql://localhost:3306/sakila?useSSL=false&serverTimezone=UTC&characterEncoding=utf-8&allowPublicKeyRetrieval=true
spring.datasource.username=root
spring.datasource.password=1234
spring.datasource.dbcp2.driver-class-name=com.mysql.cj.jdbc.Driver
應用程式配置檔案中的資料來源配置看起來是正確的,它指定了連線的資料庫URL、使用者名稱、密碼和驅動程式類名。這些配置將允許你的Spring Boot應用程式連線到名為 "sakila" 的MySQL資料庫。
MySQL資料庫伺服器在 localhost(本地)上執行,埠為3306,並且確保 "sakila" 資料庫存在。同時,確保 MySQL 伺服器已經配置為允許遠端連線,因為在URL中使用了 allowPublicKeyRetrieval=true。
如果一切都設定正確,應用程式將能夠連線到資料庫。如果遇到連線問題,可以檢查以下幾點:
再來要來研究是POST還是GET
需要再加入東西~
https://mvnrepository.com/用Java Servlet API搜尋
https://mvnrepository.com/artifact/javax.servlet/javax.servlet-api
貼到程式碼:
<?xml version="1.0" encoding="UTF-8"?>
<project xmlns="http://maven.apache.org/POM/4.0.0" xmlns:xsi="http://www.w3.org/2001/XMLSchema-instance"
 xsi:schemaLocation="http://maven.apache.org/POM/4.0.0 https://maven.apache.org/xsd/maven-4.0.0.xsd">
 <modelVersion>4.0.0</modelVersion>
 <parent>
  <groupId>org.springframework.boot</groupId>
  <artifactId>spring-boot-starter-parent</artifactId>
  <version>3.0.2</version>
  <relativePath/> <!-- lookup parent from repository -->
 </parent>
 <groupId>com.tzu</groupId>
 <artifactId>myweb</artifactId>
 <version>0.0.1-SNAPSHOT</version>
 <name>myweb</name>
 <description>Demo project for Spring Boot</description>
 <properties>
  <java.version>17</java.version>
 </properties>
 <dependencies>
  <dependency>
   <groupId>org.springframework.boot</groupId>
   <artifactId>spring-boot-starter-web</artifactId>
  </dependency>

  <dependency>
   <groupId>org.springframework.boot</groupId>
   <artifactId>spring-boot-starter-test</artifactId>
   <scope>test</scope>
  </dependency>
  <!-- https://mvnrepository.com/artifact/org.springframework.boot/spring-boot-starter-thymeleaf -->
<dependency>
    <groupId>org.springframework.boot</groupId>
    <artifactId>spring-boot-starter-thymeleaf</artifactId>
    <version>3.0.0</version>
</dependency>
<!-- https://mvnrepository.com/artifact/mysql/mysql-connector-java -->
<dependency>
    <groupId>mysql</groupId>
    <artifactId>mysql-connector-java</artifactId>
    <version>8.0.31</version>
</dependency>
<!-- https://mvnrepository.com/artifact/javax.servlet/javax.servlet-api -->
<dependency>
    <groupId>javax.servlet</groupId>
    <artifactId>javax.servlet-api</artifactId>
    <version>4.0.1</version>
    <scope>provided</scope>
</dependency>

 </dependencies>

 <build>
  <plugins>
   <plugin>
    <groupId>org.springframework.boot</groupId>
    <artifactId>spring-boot-maven-plugin</artifactId>
   </plugin>
  </plugins>
 </build>

</project>
已經將javax.servlet-api依賴添加到Maven項目中,這是用於支援Java Servlet API的。在Spring應用程式中,這是必需的,因為它提供了支援Servlet的功能,特別是用於處理HTTP請求和響應。
以下是在pom.xml中添加的依賴:
<!-- https://mvnrepository.com/artifact/javax.servlet/javax.servlet-api -->
<dependency>
    <groupId>javax.servlet</groupId>
    <artifactId>javax.servlet-api</artifactId>
    <version>4.0.1</version>
    <scope>provided</scope>
</dependency>
這個依賴的作用是提供Servlet API的支援,而<scope>provided</scope>表明Servlet容器(例如Tomcat)將提供這個API的實現。這樣應用程序可以在Servlet容器中運行,而不需要將Servlet API打包到你的應用程序JAR中。
繼續開發Spring Boot應用程序,包括處理HTTP請求和構建Web應用程序的其他功能
再來修改程式碼,才可以成功import
import javax.servlet.http.HttpServletRequest;

package com.tzu.controllers;

import java.sql.Connection;
import java.sql.SQLException;

import javax.servlet.http.HttpServletRequest;
import javax.sql.DataSource;

import org.springframework.beans.factory.annotation.Autowired;
import org.springframework.stereotype.Controller;

import org.springframework.web.bind.annotation.RequestMapping;
import org.springframework.web.bind.annotation.RequestMethod;
import org.springframework.web.bind.annotation.RequestParam;

import com.tzu.domain.Member;

//做會員註冊
@Controller
@RequestMapping(path="/member")
public class MemberController {
 //注入依賴物件DataSource
  @Autowired
  private DataSource datasource;


 //註冊Action(Method)
 @RequestMapping(path="/register",method= {RequestMethod.GET,RequestMethod.POST})
 public String register(@RequestParam(name="username")String username
   ,String password,String email,
   @RequestParam(name="realname")String realname) {
  System.out.println("register..."+username);
  //直接調用註冊表單
  return "memberregister";

 }
 //採用表單欄位進來後,自動封裝到一個物件導向去
 //註冊Action(Method)
  @RequestMapping(path="/registerform",method= {RequestMethod.GET,RequestMethod.POST})
  public String registerForm(HttpServletRequest request,Member member) {

   try {
    Connection connection=datasource.getConnection();
    System.out.println("資料庫:"+connection.getCatalog());
   }catch(SQLException e){
    e.printStackTrace();
   }

   System.out.println("register..."+member.getUsername());
   //直接調用註冊表單
   return "memberregister";

  }

}
將javax.servlet.http.HttpServletRequest導入到MemberController類中,這是正確的,因為可能需要使用HttpServletRequest對象來處理HTTP請求的特定信息。這是常見的在Spring控制器中使用HttpServletRequest。
在registerForm方法的方法簽名中,已經將HttpServletRequest對象作為一個參數。這將允許在方法內部訪問HTTP請求的相關信息,例如請求的URL、參數等。
這個更改是正確的,並且可以在控制器方法中使用HttpServletRequest對象來處理HTTP請求的特定部分。如果你需要使用更多的HTTP相關資訊,繼續使用這個對象來滿足需求。
先再資料庫裡面建立資料表:可以用右鍵選擇後打入
也可以用語法加入,記得要資料表變粗體(點兩下)才代表有被選到
CREATE TABLE `webmember` (
  `username` varchar(30) NOT NULL,
  `password` varchar(30) NOT NULL,
  `realname` varchar(45) NOT NULL,
  `email` varchar(45) NOT NULL,

  PRIMARY KEY (`username`)
) ENGINE=InnoDB DEFAULT CHARSET=utf8mb4 COLLATE=utf8mb4_0900_ai_ci COMMENT='會員資料表';
再來要加入資料:
Insert Into webmember(username,password,email,realname) values('eric','1111','chen@cht.comn.tw','張三豐')
要再來要加入資料,username要改不然會報錯,因為是PK:
查看裡面目前有的資料:
使用資料庫CODE加入程式碼:
Insert Into webmember(username,password,email,realname) values(?,?,?,?)"
再修改跟加入POST程式碼:
package com.tzu.controllers;

import java.sql.Connection;
import java.sql.PreparedStatement;
import java.sql.SQLException;

import javax.servlet.http.HttpServletRequest;
import javax.sql.DataSource;

import org.springframework.beans.factory.annotation.Autowired;
import org.springframework.stereotype.Controller;
import org.springframework.ui.Model;
import org.springframework.web.bind.annotation.RequestMapping;
import org.springframework.web.bind.annotation.RequestMethod;
import org.springframework.web.bind.annotation.RequestParam;

import com.tzu.domain.Member;

//有關於會員操作的控制器Controller
@Controller
@RequestMapping(path="/member")
public class MemberController {
 //注入依賴物件DataSource
 @Autowired
 private DataSource datasource;


 //註冊Action(Method)
 @RequestMapping(path="/register",method= {RequestMethod.GET,RequestMethod.POST})
 public String register(@RequestParam(name="username")String userName
   ,String password,String email
   ,@RequestParam(name="realname")String realName) {
  //如何判斷傳送方式採用GET(直接調用表單頁面) or POST(進行會員註冊作業 資料???)
  System.out.println("register..."+userName);
  //直接調用表單頁面(註冊表單)
  return "memberregister";
 }
 //採用表單傳遞欄位進來之後 自動封裝到一個物件屬性去
 //註冊Action(Method)
 //參數按照型別 注入Injection該型別的物件
 //透過方法注入Servlet api-HttpServletRequest
  @RequestMapping(path="/registerform",method= {RequestMethod.GET,RequestMethod.POST})
  public String registerForm(Model model,Member member) {
   //透過注入的依賴DataSource生產一個連接物件(連接上資料庫伺服器)
   String message=null;
   if(member.getUsername()!=null && member.getPassword()!=null) {
    Connection connection=null;
    try {
     connection=datasource.getConnection();
     System.out.println("資料庫:"+connection.getCatalog());
     //借助Jdbc進行會員註冊作業
     String sql="Insert Into webmember(username,password,email,realname,phone) values(?,?,?,?,?)";
     //1.透過連接物件取出命令物件 配置新增SQL
     PreparedStatement st=connection.prepareStatement(sql);
     //2.設定參數
     st.setString(1,member.getUsername());
     st.setString(2, member.getPassword());
     st.setString(3, member.getEmail());
     st.setString(4, member.getRealname());
     st.setString(5, member.getPhone());
     //3.完成新增作業
     int affect=st.executeUpdate();

     message="註冊成功!!!";
     //4.設定訊息
    } catch (SQLException e) {
     // TODO Auto-generated catch block
     e.printStackTrace();
     //設定狀態訊息
     message="會員名稱有問題!註冊失敗!!";
    }finally {
     //例外也好 正常也好 都要來這裡執行
     if(connection!=null) {
      //有開啟 進行關閉 將連接收集到Connection Pooling
      try {
       connection.close();
      } catch (SQLException e) {
       // TODO Auto-generated catch block
       e.printStackTrace();
      }
     }
    }
    //要進行狀態持續 借助Model進行狀態持續 也就Thymeleaf template
    model.addAttribute("message", message);
    model.addAttribute("member", member);
    //如何判斷傳送方式採用GET(直接調用表單頁面) or POST(進行會員註冊作業 資料???)
    System.out.println("register..."+member.getUsername());
   }
   //直接調用表單頁面(註冊表單)
   //帶整個member到畫面渲染
   return "memberregister";
  }

}
MemberController已經加入了會員註冊的相關操作,並且使用了HttpServletRequest和Spring的Model來處理HTTP請求和狀態持續。
以下是一些主要的點:
@RequestMapping 註解:使用了這個註解來指定不同路徑的請求應該由哪個方法處理。例如,/member/register 路徑的 GET 和 POST 請求將由 register 方法處理,而 /member/registerform 路徑的 GET 和 POST 請求將由 registerForm 方法處理。
@Autowired 註解:這個註解用於自動將 DataSource 依賴注入到 MemberController 中,這樣你就可以在方法內部使用它來獲取資料庫連線。
HttpServletRequest 對象:將 HttpServletRequest 對象作為方法參數,以便在方法內部訪問HTTP請求的相關信息,例如URL和參數。
Model 對象:將 Model 對象作為方法參數,這允許你在方法內部設置模型屬性,以在視圖中顯示狀態信息。
資料庫操作:在 registerForm 方法內部,使用 JDBC 進行會員註冊操作。設置了 SQL 查詢,設定了參數,執行了查詢,並處理了可能的例外情況。如果註冊成功,設置了一個訊息以指示成功。
model.addAttribute:使用 model.addAttribute 方法將訊息和會員信息添加到模型,以便在視圖中顯示。
總的來說控制器已經準備好處理會員註冊的操作,它可以接收表單提交的數據,將數據插入到資料庫中,並在視圖中顯示相應的狀態信息。請確保資料庫配置正確,以便測試註冊功能。需要進一步的改進或擴展功能,可以繼續建立在這個基礎上。
對應檔案
package com.tzu2.domain;

public class Member implements java.io.Serializable {
 //Attribute
 private String username;
 private String password;
 private String realname;
 private String email;
 private String phone;
 public String getPhone() {
  return phone;
 }
 public void setPhone(String phone) {
  this.phone = phone;
 }
 public String getUsername() {
  return username;
 }
 public void setUsername(String username) {
  this.username = username;
 }
 public String getPassword() {
  return password;
 }
 public void setPassword(String password) {
  this.password = password;
 }
 public String getRealname() {
  return realname;
 }
 public void setRealname(String realname) {
  this.realname = realname;
 }
 public String getEmail() {
  return email;
 }
 public void setEmail(String email) {
  this.email = email;
 }

}
修改前端語法,加入:
謝謝收看