jpa繼續:目前資料庫有寫一定要填寫欄位
修改Customers,加註一定要填寫
package com.tzu.domain;

import org.springframework.data.jpa.domain.support.AuditingEntityListener;

import jakarta.persistence.Column;
import jakarta.persistence.Entity;
import jakarta.persistence.EntityListeners;
import jakarta.persistence.Id;
import jakarta.persistence.Table;

//JavaBean
//ORM Entity class

@Entity
@Table(name="customers")
@EntityListeners(AuditingEntityListener.class)
public class Customers implements java.io.Serializable{
	//封裝欄位
		@Id
		@Column(name="customerid",length=5)
		private String customerid;
		@Column(name="companyname",length=45,nullable=false)
		private String companyname;
		@Column(name="address",length=70,nullable=false)
		private String address;
		@Column(name="phone",length=35,nullable=false)
		private String phone;
	private String email;
	private String country;
	//採用Property 拿存取子去頭 customerid Property
	public String getCustomerid() {
		return customerid;
	}
	public void setCustomerid(String customerid) {
		this.customerid = customerid;
	}
	public String getCompanyname() {
		return companyname;
	}
	public void setCompanyname(String companyname) {
		this.companyname = companyname;
	}
	public String getAddress() {
		return address;
	}
	public void setAddress(String address) {
		this.address = address;
	}
	public String getPhone() {
		return phone;
	}
	public void setPhone(String phone) {
		this.phone = phone;
	}
	public String getEmail() {
		return email;
	}
	public void setEmail(String email) {
		this.email = email;
	}
	public String getCountry() {
		return country;
	}
	public void setCountry(String country) {
		this.country = country;
	}


}
在這個更新後的 Customers 類別中,你進行了一些調整:
使用 @Column 註解的 length 和 nullable 屬性,用於指定每個資料庫欄位的長度和是否可為空。
對 customerid 的 @Column 設定,指定了 length=5,表示 customerid 欄位的長度為 5 個字元。
對 companyname 的 @Column 設定,指定了 length=45 和 nullable=false,表示 companyname 欄位的長度為 45 個字元且不可為空。
對 address 和 phone 也進行了類似的設定。
這些設定有助於更精確地定義資料庫中各個欄位的約束,包括長度和是否可為空。這對於資料庫表的合理設計和有效的資料驗證非常重要。
如果你的資料庫表的欄位約束與這些設定不符,請確保對應的資料庫表進行了調整,以確保它們與這些設定一致。此外,請注意在使用這個 Customers 類別時,也需要符合這些欄位約束。
修改CustomersRepository程式碼
package com.tzu.domain;
import java.util.List;

import org.springframework.data.jpa.repository.JpaRepository;
import org.springframework.stereotype.Repository;
@Repository
public interface CustomersRepository extends JpaRepository<Customers,String>{
	//改寫方法(抽象方法)
	List<Customers> findAll();
	//單筆查詢
	Customers findByCustomerid(String customerid);

}
在 CustomersRepository 中,已經繼承了 JpaRepository 並且指定了實體類別為 Customers,以及實體的主鍵類型為 String(String 是 Customers 中 customerid 的類型)。
加入了兩個方法:
List<Customers> findAll(): 此方法繼承自 JpaRepository,用於查詢並返回所有 Customers 實體。
Customers findByCustomerid(String customerid): 這是一個自訂的查詢方法,通過 customerid 查詢並返回相對應的 Customers 實體。
這樣你的 CustomersRepository 現在擁有了通用的 CRUD(新增、讀取、更新、刪除)操作,並且可以透過自訂的查詢方法來查詢客戶資料。如果需要更多的查詢方法,你可以繼續擴展這個介面。
postman測試:http://localhost:8080/api/customers/C0006/rawdata
對照目前資料庫
修改CustomerService程式碼
package com.tzu.service;

import java.util.List;

import org.springframework.beans.factory.annotation.Autowired;
import org.springframework.dao.DataAccessException;

import org.springframework.http.HttpStatus;

import org.springframework.http.ResponseEntity;
import org.springframework.jdbc.core.JdbcTemplate;
import org.springframework.web.bind.annotation.DeleteMapping;
import org.springframework.web.bind.annotation.GetMapping;
import org.springframework.web.bind.annotation.PathVariable;
import org.springframework.web.bind.annotation.PutMapping;
import org.springframework.web.bind.annotation.RequestBody;
import org.springframework.web.bind.annotation.RequestParam;
import org.springframework.web.bind.annotation.RestController;

import com.tzu.domain.Customers;
import com.tzu.domain.CustomersRepo;
import com.tzu.domain.CustomersRepository;
import com.tzu.domain.Message;
import com.tzu.domain.StatusMessage;
@RestController
public class CustomerService {
	//Data Field注入JdbcTemplate
	@Autowired
	private JdbcTemplate jdbcTemplate;
	//注入自訂Repository
	@Autowired
	private CustomersRepo customersRepo;
	@Autowired
	private CustomersRepository customersReposit;

	//傳遞一份Json進來  進行相對客戶更新作業
	//方法參數 採用參數注入Parameter Injection
	@PutMapping(path="/api/customers/update/rawdata",
			consumes="application/json",produces="application/json")
	public Message customersUpdate(@RequestBody Customers customers) {
		Message message=new Message();
		//更新客戶資料
		String sql="update customers set companyname=?,address=?,phone=?,email=?,country=? where customerid=?";
		try {
		int affect=jdbcTemplate.update(sql,
				//Lambda PreparedStatementSetter interface
				(st)->{
					//注入PreparedStatement物件,設定參數內容
					st.setString(1, customers.getCompanyname());
					st.setString(2, customers.getAddress());
					st.setString(3, customers.getPhone());
					st.setString(4, customers.getEmail());
					st.setString(5, customers.getCountry());
					st.setString(6, customers.getCustomerid());
				}
				);
		if(affect>0) {
			message.setCode(200);
			message.setMsg("客戶資料更新成功");
		}else {
			message.setCode(200);
			message.setMsg("查無該客戶資料更新");
		}
		}catch(DataAccessException ex) {
			message.setCode(400);
			message.setMsg("客戶資料更新失敗");
		}

		return message;
	}


	//刪除相對客戶資料
	//使用傳遞客戶編號資訊架構 採用QueryString http://xxx.xxx,xxx/xxx/xxx?cid=value&...
	@DeleteMapping(path="/api/customers/delete/byid",produces="application/json")
	public ResponseEntity<Object> customersDelete(@RequestParam(name="cid") String customerid) {
		System.out.println(customersRepo.getTemplate());
		var result=customersRepo.delete(customerid);
		ResponseEntity<Object> responseEntity=null;
		//判斷
		if (result>0) {
			//刪除成功
			Message msg=new Message();
			msg.setCode(200);
			msg.setMsg("客戶資料刪除成功");
			responseEntity=new ResponseEntity<>(msg,HttpStatus.OK);

		}else {
			//刪除不到資料 回應Http status code-400
			StatusMessage msg=new StatusMessage();
			msg.setCode(400);
			msg.setMsg("沒有這一個客戶");
			msg.setErrorCode("notfound");
			responseEntity=new ResponseEntity<>(msg,HttpStatus.BAD_REQUEST);

		}
		return responseEntity;

	}

	@GetMapping(path="/api/customers/all",produces="application/json")
	public List<Customers> jpaCustomersQuery() {
		//呼叫方法 找出所有客戶資料(物件)
		List<Customers> result=this.customersReposit.findAll();
		return result;
	}
	//傳遞客戶編號 進行相對客戶查詢
		@GetMapping(path="/api/customers/{cid}/rawdata",produces="application/json")
		public Customers jpaCustomersQryById(@PathVariable("cid")String customerid) {
			//借助進來的Jpa 透過自訂的方法進行單筆資料查詢
			return this.customersReposit.findByCustomerid(customerid);

		}

}
你的 CustomerService 類別看起來已經有一些 RESTful API 方法來處理客戶資料了。讓我總結一下你目前的功能:
PUT 方法: customersUpdate 方法允許你更新客戶資料。這個方法根據傳遞的 JSON 資料執行 SQL 更新操作。如果操作成功,它會回傳一個 Message 物件,其中包含狀態碼和訊息。
DELETE 方法: customersDelete 方法用於刪除客戶資料,透過客戶的 customerid 進行刪除操作。如果成功刪除,它會回傳一個包含成功訊息的 Message 物件,否則,它會回傳一個包含錯誤訊息的 StatusMessage 物件。
GET 方法: jpaCustomersQuery 方法可以用來查詢所有客戶資料,它回傳一個包含客戶資料的 List。
GET 方法: jpaCustomersQryById 方法是用來透過客戶編號 (customerid) 查詢單一客戶資料。它透過 @PathVariable 來獲取路徑中的 customerid 參數,然後透過 customersReposit 來查詢相對應的客戶資料,最後回傳客戶資料。
以上都看起來很不錯,你已經建立了一個 RESTful Web Service 用來處理客戶資料。這些方法可以被其他應用程式或前端介面所呼叫。如果你需要進一步的功能,可以持續擴展這個 CustomerService。
用postman測試:http://localhost:8080/api/customers/C0003/rawdata
顯示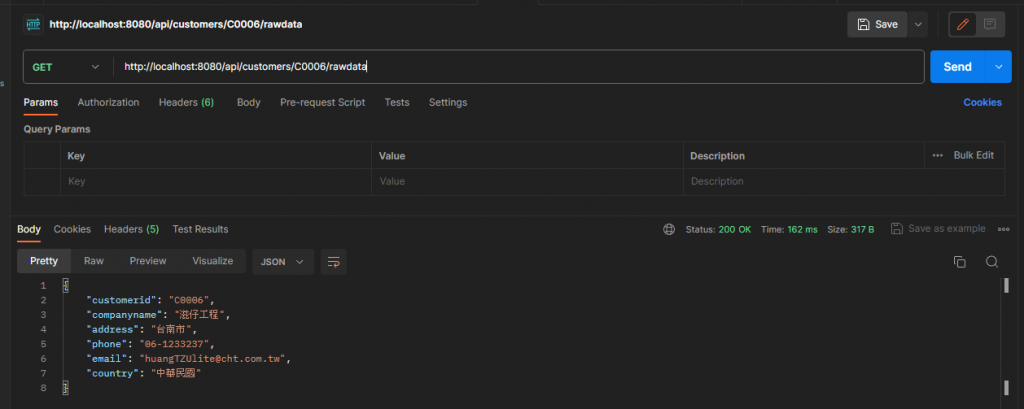
修改 CustomersRepository程式碼:照國家別查詢
package com.tzu.domain;
import java.util.List;

import org.springframework.data.jpa.repository.JpaRepository;
import org.springframework.stereotype.Repository;
@Repository
public interface CustomersRepository extends JpaRepository<Customers,String>{
	//改寫方法(抽象方法)
	List<Customers> findAll();
	//單筆查詢
	Customers findByCustomerid(String customerid);
	//依照國家別查詢
		List<Customers> findByCountry(String country);
}
CustomersRepository 現在新增了一個方法 findByCountry,用於根據客戶的國家別 (country) 進行查詢。這是一個很好的擴充,它讓你可以按照特定條件來檢索客戶資料。
現在你已經有以下方法可供使用:
findAll(): 查詢所有客戶資料。findByCustomerid(String customerid): 透過客戶編號查詢單一客戶資料。findByCountry(String country): 透過客戶國家別查詢客戶資料。這些方法可以根據你的需要在服務中使用,讓你更輕鬆地操作客戶資料。
修改 CustomerService程式碼:國家別
package com.tzu.service;

import java.util.List;

import org.springframework.beans.factory.annotation.Autowired;
import org.springframework.dao.DataAccessException;

import org.springframework.http.HttpStatus;

import org.springframework.http.ResponseEntity;
import org.springframework.jdbc.core.JdbcTemplate;
import org.springframework.web.bind.annotation.DeleteMapping;
import org.springframework.web.bind.annotation.GetMapping;
import org.springframework.web.bind.annotation.PathVariable;
import org.springframework.web.bind.annotation.PutMapping;
import org.springframework.web.bind.annotation.RequestBody;
import org.springframework.web.bind.annotation.RequestParam;
import org.springframework.web.bind.annotation.RestController;

import com.tzu.domain.Customers;
import com.tzu.domain.CustomersRepo;
import com.tzu.domain.CustomersRepository;
import com.tzu.domain.Message;
import com.tzu.domain.StatusMessage;
@RestController
public class CustomerService {
	//Data Field注入JdbcTemplate
	@Autowired
	private JdbcTemplate jdbcTemplate;
	//注入自訂Repository
	@Autowired
	private CustomersRepo customersRepo;
	@Autowired
	private CustomersRepository customersReposit;

	//傳遞一份Json進來  進行相對客戶更新作業
	//方法參數 採用參數注入Parameter Injection
	@PutMapping(path="/api/customers/update/rawdata",
			consumes="application/json",produces="application/json")
	public Message customersUpdate(@RequestBody Customers customers) {
		Message message=new Message();
		//更新客戶資料
		String sql="update customers set companyname=?,address=?,phone=?,email=?,country=? where customerid=?";
		try {
		int affect=jdbcTemplate.update(sql,
				//Lambda PreparedStatementSetter interface
				(st)->{
					//注入PreparedStatement物件,設定參數內容
					st.setString(1, customers.getCompanyname());
					st.setString(2, customers.getAddress());
					st.setString(3, customers.getPhone());
					st.setString(4, customers.getEmail());
					st.setString(5, customers.getCountry());
					st.setString(6, customers.getCustomerid());
				}
				);
		if(affect>0) {
			message.setCode(200);
			message.setMsg("客戶資料更新成功");
		}else {
			message.setCode(200);
			message.setMsg("查無該客戶資料更新");
		}
		}catch(DataAccessException ex) {
			message.setCode(400);
			message.setMsg("客戶資料更新失敗");
		}

		return message;
	}


	//刪除相對客戶資料
	//使用傳遞客戶編號資訊架構 採用QueryString http://xxx.xxx,xxx/xxx/xxx?cid=value&...
	@DeleteMapping(path="/api/customers/delete/byid",produces="application/json")
	public ResponseEntity<Object> customersDelete(@RequestParam(name="cid") String customerid) {
		System.out.println(customersRepo.getTemplate());
		var result=customersRepo.delete(customerid);
		ResponseEntity<Object> responseEntity=null;
		//判斷
		if (result>0) {
			//刪除成功
			Message msg=new Message();
			msg.setCode(200);
			msg.setMsg("客戶資料刪除成功");
			responseEntity=new ResponseEntity<>(msg,HttpStatus.OK);

		}else {
			//刪除不到資料 回應Http status code-400
			StatusMessage msg=new StatusMessage();
			msg.setCode(400);
			msg.setMsg("沒有這一個客戶");
			msg.setErrorCode("notfound");
			responseEntity=new ResponseEntity<>(msg,HttpStatus.BAD_REQUEST);

		}
		return responseEntity;

	}

	@GetMapping(path="/api/customers/all",produces="application/json")
	public List<Customers> jpaCustomersQuery() {
		//呼叫方法 找出所有客戶資料(物件)
		List<Customers> result=this.customersReposit.findAll();
		return result;
	}
	//傳遞客戶編號 進行相對客戶查詢
		@GetMapping(path="/api/customers/{cid}/rawdata",produces="application/json")
		public Customers jpaCustomersQryById(@PathVariable("cid")String customerid) {
			//借助進來的Jpa 透過自訂的方法進行單筆資料查詢
			return this.customersReposit.findByCustomerid(customerid);

		}
		//傳遞客國家別 進行相對客戶資料查詢
		@GetMapping(path="/api/customers/country/{country}/rawdata",produces="application/json")
		public List<Customers> jpaCustomersQryByCountry(@PathVariable("country")String country) {
				//借助進來的Jpa 透過自訂的方法進行單筆資料查詢
				return this.customersReposit.findByCountry(country);

		}
}
CustomerService 服務已更新,現在包含了三個新的 HTTP 端點,用於按客戶編號、國家別進行查詢:
jpaCustomersQryById(String customerid): 透過客戶編號查詢單一客戶資料。jpaCustomersQryByCountry(String country): 透過客戶國家別查詢客戶資料。這些新的端點允許你更靈活地查詢客戶資料,根據特定的條件,例如客戶編號或國家別。
POSTMAN用國家別測試:http://localhost:8080/api/customers/country/中華民國/rawdata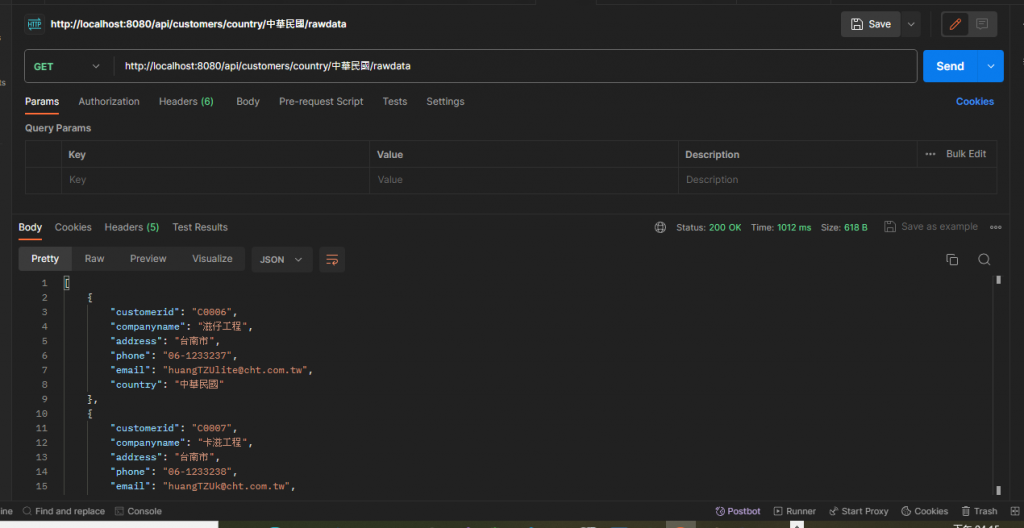
修改 CustomersRepository程式碼:做新增動作:
package com.tzu.domain;
import java.util.List;

import org.springframework.data.jpa.repository.JpaRepository;
import org.springframework.stereotype.Repository;
@Repository
public interface CustomersRepository extends JpaRepository<Customers,String>{
	//改寫方法(抽象方法)
	List<Customers> findAll();
	//單筆查詢
	Customers findByCustomerid(String customerid);
	//依照國家別查詢
		List<Customers> findByCountry(String country);
		Customers save(Customers customer);
}
將 save 方法添加到 CustomersRepository,這將允許你在資料庫中新增或更新客戶資料。通過 save 方法,你可以儲存一個新的客戶資料或更新現有客戶資料。
請注意,Spring Data JPA 會自動處理 save 方法,根據傳入的 Customers 物件是新的還是已存在的來執行適當的操作。
如果需要對 save 方法進行進一步的自定義行為,你可以在 CustomersRepository 接口中添加其他方法,以便根據你的需求進行客戶資料的操作。
修改 CustomerService程式碼:做新增動作:
package com.tzu.service;

import java.util.List;

import org.springframework.beans.factory.annotation.Autowired;
import org.springframework.dao.DataAccessException;

import org.springframework.http.HttpStatus;

import org.springframework.http.ResponseEntity;
import org.springframework.jdbc.core.JdbcTemplate;
import org.springframework.web.bind.annotation.DeleteMapping;
import org.springframework.web.bind.annotation.GetMapping;
import org.springframework.web.bind.annotation.PathVariable;
import org.springframework.web.bind.annotation.PostMapping;
import org.springframework.web.bind.annotation.PutMapping;
import org.springframework.web.bind.annotation.RequestBody;
import org.springframework.web.bind.annotation.RequestParam;
import org.springframework.web.bind.annotation.RestController;

import com.tzu.domain.Customers;
import com.tzu.domain.CustomersRepo;
import com.tzu.domain.CustomersRepository;
import com.tzu.domain.Message;
import com.tzu.domain.StatusMessage;
@RestController
public class CustomerService {
	//Data Field注入JdbcTemplate
	@Autowired
	private JdbcTemplate jdbcTemplate;
	//注入自訂Repository
	@Autowired
	private CustomersRepo customersRepo;
	@Autowired
	private CustomersRepository customersReposit;

	//傳遞一份Json進來  進行相對客戶更新作業
	//方法參數 採用參數注入Parameter Injection
	@PutMapping(path="/api/customers/update/rawdata",
			consumes="application/json",produces="application/json")
	public Message customersUpdate(@RequestBody Customers customers) {
		Message message=new Message();
		//更新客戶資料
		String sql="update customers set companyname=?,address=?,phone=?,email=?,country=? where customerid=?";
		try {
		int affect=jdbcTemplate.update(sql,
				//Lambda PreparedStatementSetter interface
				(st)->{
					//注入PreparedStatement物件,設定參數內容
					st.setString(1, customers.getCompanyname());
					st.setString(2, customers.getAddress());
					st.setString(3, customers.getPhone());
					st.setString(4, customers.getEmail());
					st.setString(5, customers.getCountry());
					st.setString(6, customers.getCustomerid());
				}
				);
		if(affect>0) {
			message.setCode(200);
			message.setMsg("客戶資料更新成功");
		}else {
			message.setCode(200);
			message.setMsg("查無該客戶資料更新");
		}
		}catch(DataAccessException ex) {
			message.setCode(400);
			message.setMsg("客戶資料更新失敗");
		}

		return message;
	}


	//刪除相對客戶資料
	//使用傳遞客戶編號資訊架構 採用QueryString http://xxx.xxx,xxx/xxx/xxx?cid=value&...
	@DeleteMapping(path="/api/customers/delete/byid",produces="application/json")
	public ResponseEntity<Object> customersDelete(@RequestParam(name="cid") String customerid) {
		System.out.println(customersRepo.getTemplate());
		var result=customersRepo.delete(customerid);
		ResponseEntity<Object> responseEntity=null;
		//判斷
		if (result>0) {
			//刪除成功
			Message msg=new Message();
			msg.setCode(200);
			msg.setMsg("客戶資料刪除成功");
			responseEntity=new ResponseEntity<>(msg,HttpStatus.OK);

		}else {
			//刪除不到資料 回應Http status code-400
			StatusMessage msg=new StatusMessage();
			msg.setCode(400);
			msg.setMsg("沒有這一個客戶");
			msg.setErrorCode("notfound");
			responseEntity=new ResponseEntity<>(msg,HttpStatus.BAD_REQUEST);

		}
		return responseEntity;

	}

	@GetMapping(path="/api/customers/all",produces="application/json")
	public List<Customers> jpaCustomersQuery() {
		//呼叫方法 找出所有客戶資料(物件)
		List<Customers> result=this.customersReposit.findAll();
		return result;
	}
	//傳遞客戶編號 進行相對客戶查詢
		@GetMapping(path="/api/customers/{cid}/rawdata",produces="application/json")
		public Customers jpaCustomersQryById(@PathVariable("cid")String customerid) {
			//借助進來的Jpa 透過自訂的方法進行單筆資料查詢
			return this.customersReposit.findByCustomerid(customerid);

		}
		//傳遞客國家別 進行相對客戶資料查詢
		@GetMapping(path="/api/customers/country/{country}/rawdata",produces="application/json")
		public List<Customers> jpaCustomersQryByCountry(@PathVariable("country")String country) {
				//借助進來的Jpa 透過自訂的方法進行單筆資料查詢
				return this.customersReposit.findByCountry(country);

		}
		//採用參數注入JavaBean
		//新增客戶資料
		@PostMapping(path="/api/customersadd",produces="application/json",consumes="application/json")
		public Customers customersInsert(@RequestBody Customers customer) {
			//新增作業 採用JPA
			Customers oldCustomer=this.customersReposit.save(customer);
			return oldCustomer;
		}

}
你已經成功添加了 customersInsert 方法,這個方法用於新增客戶資料。透過 Spring Data JPA,你可以方便地使用 save 方法來將客戶資料新增到資料庫中。
customersInsert 方法接受一個客戶物件作為輸入,並使用 save 方法將其新增到資料庫。該方法會返回已新增的客戶資料,包括自動生成的 ID 等任何更新過的資料。
現在,你可以透過呼叫 /api/customersadd 端點,並提供 JSON 格式的客戶資料來新增客戶。
postman測試http://localhost:8080/api/customersadd
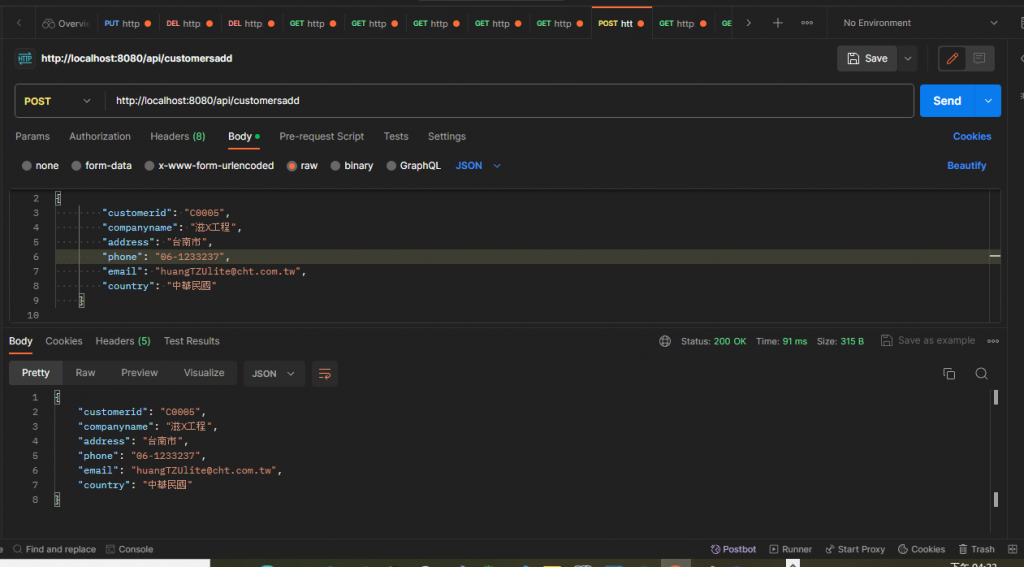
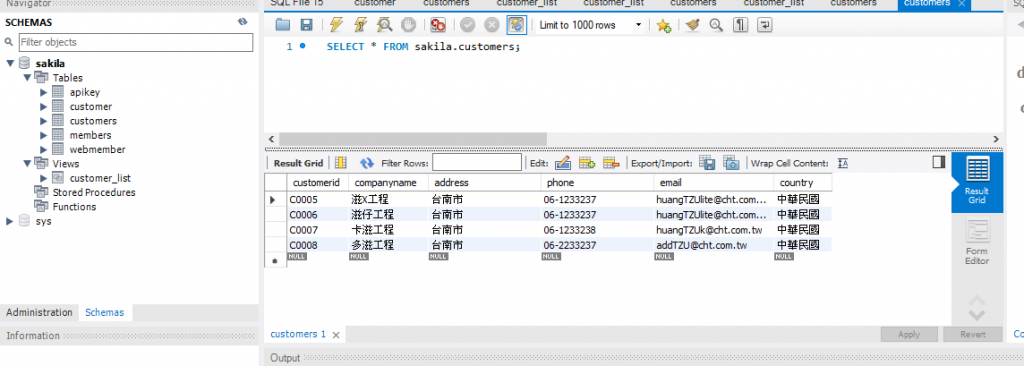
要新增CODE
{
        "customerid": "C0001",
        "companyname": "滋滋工程",
        "address": "台南市",
        "phone": "06-1233232",
        "email": "huang@cht.com.tw",
        "country": "中華民國"
    }
成功新增客戶資料,以下是新增的客戶資料內容:
選BODY的RAW還有JSON
新增:
看資料庫確認有新增:
修改CustomersController
package com.tzu.controllers;
import java.util.List;

import javax.sql.DataSource;

import org.springframework.beans.factory.annotation.Autowired;
import org.springframework.jdbc.core.BeanPropertyRowMapper;
import org.springframework.jdbc.core.JdbcTemplate;
import org.springframework.stereotype.Controller;
import org.springframework.ui.Model;
import org.springframework.web.bind.annotation.GetMapping;
import org.springframework.web.bind.annotation.RequestMapping;
import org.springframework.web.bind.annotation.RequestMethod;

import com.tzu.domain.Customer;
import com.tzu.domain.Customers;

@Controller
@RequestMapping(path="/customers")
public class CustomersController {
	//Attribute(Data Field) Field Injection
	@Autowired
	private JdbcTemplate jdbcTemplate; //DataSource會注入控制反轉

	//查詢功能設計
	@RequestMapping(path="/qry/country",
			method= {RequestMethod.GET,RequestMethod.POST})
	public String customersQry(String country,Model model) {
		//是否第一次請求 沒有傳遞國家別
		if(country==null) {
			return "customersqrycountry"; //View Page名稱
		}else {
			System.out.println("查詢國家別:"+country);
			DataSource ds=jdbcTemplate.getDataSource();
			System.out.println(ds.toString());
			//1.採用DAO設計模式(Spring Boot data jdbc)
			String sql="SELECT ID,name,address,phone,country "
					+ "FROM sakila.customer_list where country=?";
			//2.進行國家別相關客戶查詢
			List<Customer> result=jdbcTemplate.query(sql,
					//傳遞一個程序當作參數(RowMapper/maprow 介面) 使用Lambda
					//查詢符合每一筆 逐筆傳遞進來callback 自訂程序封裝結果
					(rs,num)->{
						//將相對紀錄封裝成自訂JavaBean-Customer
						Customer customer=new Customer();
						//注入相對記錄欄位於JavaBean物件中
						customer.setId(rs.getShort("ID"));
						customer.setName(rs.getString("name"));
						customer.setAddress(rs.getString("address"));
						customer.setPhone(rs.getString("phone"));
						customer.setCountry(rs.getString("country"));
						return customer;
					},
					country
					);
			System.out.println("查詢結果:"+result.size());
			//透過注入Model持續查詢結果物件到View Page
			model.addAttribute("result",result);
			model.addAttribute("country",country);
			//3.查詢結果狀態管理 調用View Page去進行查詢結果渲染(使用thymeleaf template engine)
			//採用postback 回來 要進行查詢
			return "customersqrycountry";
		}
	}

	//查詢客戶所有資料,將查詢結果產生(後端List<>) to 前端的JavaScript 陣列(封裝每一筆資料物件)
	//只要超連結方式點選到這裡 採用GET
	@GetMapping(path="/allcustomers")
	public String customesAll(Model model) {
		//1.借助注入進來的JdbcTemplate 進行客戶資料customers所有記錄查詢
		String sql="select customerid,companyname,address,phone,email,country from customers";
		List<Customers> result=
				jdbcTemplate.query(sql,
						BeanPropertyRowMapper.newInstance(Customers.class));
		System.out.println("記錄數:"+result.size());
		//2.查詢結果是一個List集合物件 如何轉換成JavaScript 陣列???
		model.addAttribute("data",result);
		//3調用頁面
		return "customersall";
	}
	//客戶新增作業(提供新增客戶資料表單)JPA
		@GetMapping(path="/add")
		public String customersInsert() {

			return "customersinsert";
		}

}
這是一個Java Spring應用程式的控制器類別,用於處理與客戶相關的網頁請求。以下是程式碼的主要元素和功能:
@Controller 和 @RequestMapping: 這個類別被標記為一個Spring MVC控制器(@Controller),它處理網頁請求。@RequestMapping 用於指定該控制器處理的請求路徑,這裡是 "/customers"。
@Autowired 和 JdbcTemplate: 使用Spring的依賴注入功能(@Autowired)注入了一個 JdbcTemplate 物件。JdbcTemplate 是 Spring JDBC 的一部分,它簡化了與資料庫的互動。
customersQry 方法: 這是一個處理客戶查詢的方法。它處理 "/customers/qry/country" 路徑的 GET 和 POST 請求。當使用者第一次請求時,它會返回一個名為 "customersqrycountry" 的視圖頁面。當使用者提供國家別資訊後,它將進行資料庫查詢,並將結果儲存在 result 中,然後透過 Model 物件將查詢結果和國家別資訊傳遞到視圖頁面。
customesAll 方法: 這是一個處理查詢所有客戶資料的方法。它處理 "/customers/allcustomers" 路徑的 GET 請求。它使用 JdbcTemplate 執行 SQL 查詢,然後將結果儲存在 result 中,最後透過 Model 物件將資料傳遞到 "customersall" 的視圖頁面。
customersInsert 方法: 這是處理客戶新增的方法,它處理 "/customers/add" 路徑的 GET 請求。它返回一個名為 "customersinsert" 的視圖頁面,可能是一個表單,用戶可以輸入新客戶的資訊。
這個控制器使用Spring框架來處理網頁請求,並通過 JdbcTemplate 與資料庫互動,以執行查詢和提供數據給視圖頁面。請注意,這個程式碼的詳細邏輯和視圖頁面的內容可能需要參考其他程式碼和配置文件。
新增檔案:客戶新增作業customersinsert.html檔
<!DOCTYPE html>
<html lang="en">
<head>
    <meta charset="UTF-8">
    <meta name="viewport" content="width=device-width, initial-scale=1.0">
    <title>客戶新增作業</title>
</head>
<body>
    <fieldset>
        <legend>客戶資料維護</legend>
        <div>
            <button>新增客戶資料...</button>

        </div>

    </fieldset>
</body>
</html>
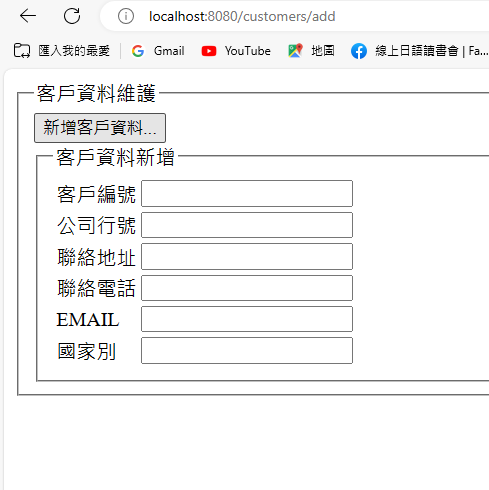
使用瀏覽器localhost:8080/customers/add測試:
再修改前端程式碼:測試vue跟jquery的掛載
<!DOCTYPE html>
<html lang="en">
<head>
    <meta charset="UTF-8">
    <meta name="viewport" content="width=device-width, initial-scale=1.0">
    <script th:src="@{/js/vue.min.js}"></script>
    <script th:src="@{/js/jquery-3.6.1.min.js}"></script>
    <title>客戶新增作業</title>
</head>
<body>
    <fieldset id="app">
        <legend>客戶資料維護</legend>
        <div>
            <button>新增客戶資料...</button>
          {{100/5}}
        </div>
    </fieldset>
<!--Vue Instance個體物件 與掛載作業-->
<script>
    //jquery selector
    $(document).ready(
        function(){
            alert('hi jquery');
        }
    );
    //Vue物件
    var app=new Vue();
     //掛載
     app.$mount('#app');

</script>
</body>
</html>
這是一個HTML頁面,看起來可能是用於客戶資料維護的部分頁面。以下是主要元素和功能:
<!DOCTYPE html>: 這是HTML文件的文檔類型聲明,它告訴瀏覽器使用HTML標準解釋該文件。
<html lang="en">: HTML文件的開始,並指定了語言設置為英文。
<head>: 這是HTML頁面的頭部部分,其中包含一些元信息和引入外部資源。
<meta charset="UTF-8">: 指定字符集為UTF-8,確保正確的文字編碼。<meta name="viewport" content="width=device-width, initial-scale=1.0">: 設定視口屬性,通常用於適應不同設備的屏幕寬度。<script th:src="@{/js/vue.min.js}"> 和 <script th:src="@{/js/jquery-3.6.1.min.js}">: 這些 <script> 元素用於引入Vue.js和jQuery JavaScript庫。th:src 似乎是Thymeleaf的屬性,它用於動態生成JavaScript文件的路徑。<title>: 標題標籤,設置頁面的標題為 "客戶新增作業"。
<body>: 這是HTML頁面的主體部分,包含頁面的內容。
<fieldset id="app">: 定義了一個包含客戶資料維護的字段集合,並設置其ID為 "app"。<legend>: 定義字段集合的標題為 "客戶資料維護"。<button>: 一個按鈕元素,上面寫著 "新增客戶資料..."。這可能是用戶單擊以觸發客戶資料新增操作的按鈕。{{100/5}}: 這似乎是Vue.js模板語法,計算並顯示100除以5的結果(20)。<script>: 這個 <script> 元素包含JavaScript代碼。這個代碼使用jQuery進行DOM操作和Vue.js來創建一個Vue實例。具體來說:
$(document).ready(): 使用jQuery,當文檔完全載入時(ready事件),執行一個匿名函數,並顯示一個警告框 "hi jquery"。var app = new Vue(): 創建一個Vue實例,這將用於Vue的數據綁定和DOM操作。app.$mount('#app'): 這將Vue實例掛載(連接)到HTML中的ID為 "app" 的元素中,這樣Vue將能夠管理該元素以實現數據綁定和互動。總體來說,這個HTML頁面包括了一個用於客戶資料維護的字段集合,引入了Vue.js和jQuery庫,以及一些JavaScript代碼來初始化Vue實例和處理DOM操作。這可能是一個用於客戶資料新增的前端頁面的一部分。
測試http://localhost:8080/customers/add
顯示
按確定
再修改前端程式碼:把前面測試的hi jquery移除,沒移除按F12開發者模式看會報錯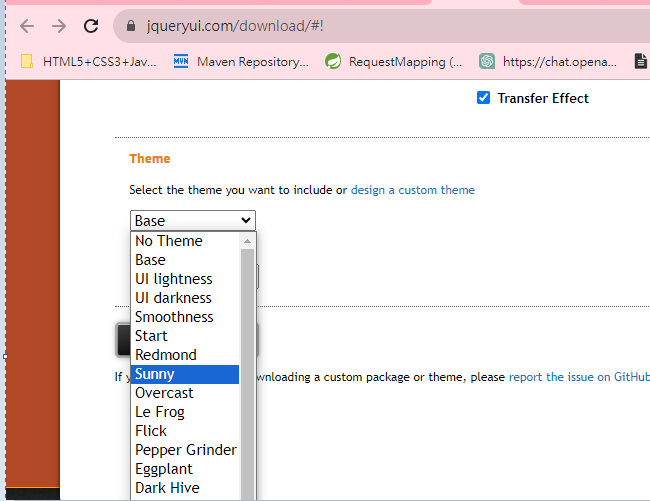
<!DOCTYPE html>
<html lang="en">
<head>
    <meta charset="UTF-8">
    <meta name="viewport" content="width=device-width, initial-scale=1.0">
    <script th:src="@{/js/vue.min.js}"></script>
    <script th:src="@{/js/jquery-3.6.1.min.js}"></script>
    <title>客戶新增作業</title>
</head>
<body>
    <fieldset id="app">
        <legend>客戶資料維護</legend>
        <div>
            <button v-on:click="qryHandler">新增客戶資料...</button>
          {{100/5}}
        </div>
    </fieldset>
<!--Vue Instance個體物件 與掛載作業-->
<script>
    //Vue物件
    var app=new Vue({

        methods:{
                    qryHandler:function(){
                        //啟動編輯資料的對話盒
                        console.log('click...');
                    }
                }
    }

    );
     //掛載
     app.$mount('#app');

</script>
</body>
</html>
這個HTML頁面類似於上一個示例,但有一些顯著的不同,這是一個使用Vue.js的前端頁面。以下是主要元素和功能:
<button v-on:click="qryHandler">新增客戶資料...</button>: 這個 <button> 元素有一個 v-on:click 屬性,它指定了一個事件處理器 "qryHandler",當按下按鈕時會觸發這個事件處理器。這表示當按下按鈕時,將執行 qryHandler 方法。
<script>: 這個 <script> 元素包含Vue.js的代碼,用於創建Vue實例和定義方法。
var app = new Vue({ ... }): 創建一個Vue實例,並在其中定義了一個 qryHandler 方法。這個方法被觸發時,將在控制台中顯示 "click..." 訊息。app.$mount('#app'): 將Vue實例掛載到HTML中ID為 "app" 的元素上,使Vue能夠管理該元素的內容。總體來說,這個HTML頁面使用了Vue.js,並定義了一個方法 qryHandler,該方法在按下按鈕時執行。當按下按鈕時,它將在控制台中輸出 "click..." 訊息。這個示例展示了Vue.js的事件處理和方法定義的基本用法,以實現互動功能。
測試http://localhost:8080/customers/add
按”新增客戶資料…”按鈕>的”開發者模式”顯示>看"主控台"
就是使用在前端程式碼的
<!DOCTYPE html>
<html lang="en">
<head>
    <meta charset="UTF-8">
    <meta http-equiv="X-UA-Compatible" content="IE=edge">
    <meta name="viewport" content="width=device-width, initial-scale=1.0">
    <script th:src="@{/js/vue.min.js}"></script>
    <script th:src="@{/js/jquery-3.6.1.min.js}"></script>
    <script th:src="@{/ui/sunny/jquery-ui.min.js}"></script>
    <!--css-->
    <link th:href="@{/ui/sunny/jquery-ui.min.css}" rel="stylesheet">
    <link th:href="@{/ui/sunny/jquery-ui.structure.min.css}" rel="stylesheet">
    <link th:href="@{/ui/sunny/jquery-ui.theme.min.css}" rel="stylesheet">
    <title>客戶新增作業</title>
下載Jquery ui主題https://jqueryui.com/download/#!
往下拉找到download>選擇sunny(如果登入發現沒有看到sunny選項refresh就又有了)
下載
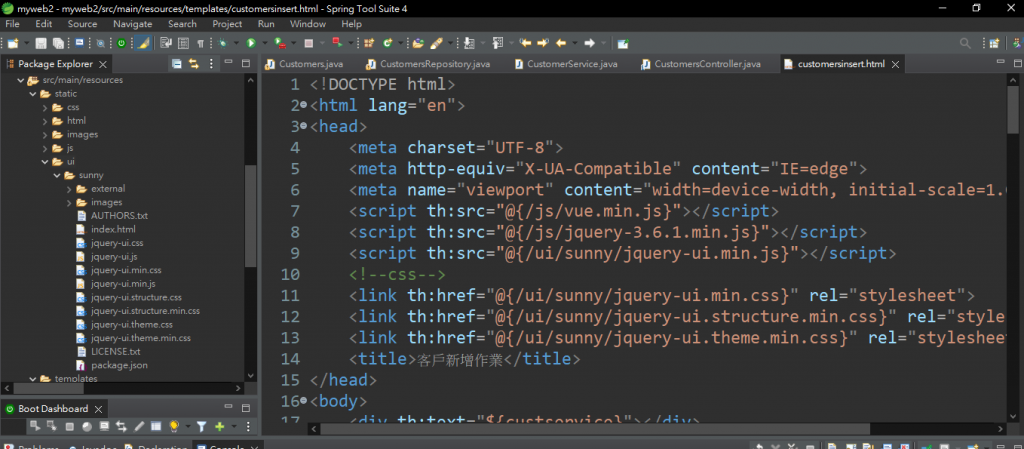
放到後端資料夾:static下面加一個ui資料夾
資料夾叫ui>再建置一個叫sunny資料夾
再放入剛剛下載的檔案
![]()
<fieldset id="addDialog" >
<!DOCTYPE html>
<html lang="en">
<head>
    <meta charset="UTF-8">
    <meta http-equiv="X-UA-Compatible" content="IE=edge">
    <meta name="viewport" content="width=device-width, initial-scale=1.0">
    <script th:src="@{/js/vue.min.js}"></script>
    <script th:src="@{/js/jquery-3.6.1.min.js}"></script>
    <script th:src="@{/ui/sunny/jquery-ui.min.js}"></script>
    <!--css-->
    <link th:href="@{/ui/sunny/jquery-ui.min.css}" rel="stylesheet">
    <link th:href="@{/ui/sunny/jquery-ui.structure.min.css}" rel="stylesheet">
    <link th:href="@{/ui/sunny/jquery-ui.theme.min.css}" rel="stylesheet">
    <title>客戶新增作業</title>
</head>
<body>
    <div th:text="${custservice}"></div>
    <fieldset id="app">
        <legend>客戶資料維護</legend>
        <div>
            <button v-on:click="qryHandler">新增客戶資料...</button>

        </div>
        <!--平面”客戶新增”-->
        <fieldset id="addDialog" >
            <!--進行新增對話盒刻版-->
        <!--<fieldset id="addDialog" style="display: none;">-->
            <legend>客戶資料新增</legend>
            <table>
                <tr>
                    <td>客戶編號</td>
                    <td><input type="text" v-model:value="customers.customerid"/></td>
                </tr>
                <tr>
                    <td>公司行號</td>
                    <td><input type="text" v-model:value="customers.companyname"/></td>
                </tr>
                <tr>
                    <td>聯絡地址</td>
                    <td><input type="text" v-model:value="customers.address"/></td>
                </tr>
                <tr>
                    <td>聯絡電話</td>
                    <td><input type="text" v-model:value="customers.phone"/></td>
                </tr>
                <tr>
                    <td>EMAIL</td>
                    <td><input type="text" v-model:value="customers.email"/></td>
                </tr>
                <tr>
                    <td>國家別</td>
                    <td><input type="text" v-model:value="customers.country"/></td>
                </tr>
            </table>
        </fieldset>
    </fieldset>
    <!--Vue Instance個體物件 與掛載作業-->
    <script>
        //Vue物件
        var app=new Vue(
            //建構物件初始化 採用JS物件
            {
                data:{
                    customers:{
                        customerid:'',
                        companyname:'',
                        address:'',
                        phone:'',
                        country:'',
                        email:''
                    }
                },
                //定義Vue物件事件模組或者功能模組
                methods:{
                    qryHandler:function(){
                        //啟動編輯資料的對話盒
                        console.log('click...');
                        $('#addDialog').dialog(
                            //對話盒細部設計
                            {
                                title:'客戶新增作業',
                                modal:true, //強佔式對話盒
                                width:350,
                                height:400,
                                //客製化按鈕
                                buttons:[
                                    {
                                        text:'關閉',
                                        click:function(){
                                            $('#addDialog').dialog('close');
                                        },
                                        class:''
                                    },
                                    {
                                        text:'新增',
                                        click:function(){
                                            //TODO進行非同步處理

                                        },
                                        class:''
                                    }

                                ]
                            }
                        );
                    }
                }
            }
        );

        //掛載
        app.$mount('#app');
    </script>
</body>
</html>
再修改前端程式碼:做雙向綁定
其實就是改
<!--<fieldset id="addDialog" >-->
<!--進行新增對話盒刻版-->
<fieldset id="addDialog" style="display: none;">

<!DOCTYPE html>
<html lang="en">
<head>
    <meta charset="UTF-8">
    <meta http-equiv="X-UA-Compatible" content="IE=edge">
    <meta name="viewport" content="width=device-width, initial-scale=1.0">
    <script th:src="@{/js/vue.min.js}"></script>
    <script th:src="@{/js/jquery-3.6.1.min.js}"></script>
    <script th:src="@{/ui/sunny/jquery-ui.min.js}"></script>
    <!--css-->
    <link th:href="@{/ui/sunny/jquery-ui.min.css}" rel="stylesheet">
    <link th:href="@{/ui/sunny/jquery-ui.structure.min.css}" rel="stylesheet">
    <link th:href="@{/ui/sunny/jquery-ui.theme.min.css}" rel="stylesheet">
    <title>客戶新增作業</title>
</head>
<body>
    <div th:text="${custservice}"></div>
    <fieldset id="app">
        <legend>客戶資料維護</legend>
        <div>
            <button v-on:click="qryHandler">新增客戶資料...</button>

        </div>
        <!--進行新增對話盒刻版-->
        <fieldset id="addDialog" style="display: none;">
            <legend>客戶資料新增</legend>
            <table>
                <tr>
                    <td>客戶編號</td>
                    <td><input type="text" v-model:value="customers.customerid"/></td>
                </tr>
                <tr>
                    <td>公司行號</td>
                    <td><input type="text" v-model:value="customers.companyname"/></td>
                </tr>
                <tr>
                    <td>聯絡地址</td>
                    <td><input type="text" v-model:value="customers.address"/></td>
                </tr>
                <tr>
                    <td>聯絡電話</td>
                    <td><input type="text" v-model:value="customers.phone"/></td>
                </tr>
                <tr>
                    <td>EMAIL</td>
                    <td><input type="text" v-model:value="customers.email"/></td>
                </tr>
                <tr>
                    <td>國家別</td>
                    <td><input type="text" v-model:value="customers.country"/></td>
                </tr>
            </table>
        </fieldset>
    </fieldset>
    <!--Vue Instance個體物件 與掛載作業-->
    <script>
        //Vue物件
        var app=new Vue(
            //建構物件初始化 採用JS物件
            {
                data:{
                    customers:{
                        customerid:'',
                        companyname:'',
                        address:'',
                        phone:'',
                        country:'',
                        email:''
                    }
                },
                //定義Vue物件事件模組或者功能模組
                methods:{
                    qryHandler:function(){
                        //啟動編輯資料的對話盒
                        console.log('click...');
                        $('#addDialog').dialog(
                            //對話盒細部設計
                            {
                                title:'客戶新增作業',
                                modal:true, //強佔式對話盒
                                width:350,
                                height:400,
                                //客製化按鈕
                                buttons:[
                                    {
                                        text:'關閉',
                                        click:function(){
                                            $('#addDialog').dialog('close');
                                        },
                                        class:''
                                    },
                                    {
                                        text:'新增',
                                        click:function(){
                                            //TODO進行非同步處理

                                        },
                                        class:''
                                    }

                                ]
                            }
                        );
                    }
                }
            }
        );

        //掛載
        app.$mount('#app');
    </script>
</body>
</html>
這是一個HTML頁面,看起來是用於客戶資料維護的前端頁面,使用了Vue.js和jQuery。以下是主要元素和功能:
<button v-on:click="qryHandler">新增客戶資料...</button>: 這個 <button> 元素具有 v-on:click 屬性,當按下按鈕時,它將觸發 qryHandler 方法。這意味著按下按鈕時,將執行 qryHandler 方法。
<fieldset id="addDialog" style="display: none;">: 這是一個字段集合,它有一個ID為 "addDialog",並且最初被設置為不可見(display: none;)。這可能是用於顯示客戶資料新增的對話框。
在 <fieldset> 中,有一個表格,其中包含一些輸入字段,例如客戶編號、公司名稱、聯絡地址、聯絡電話、EMAIL和國家別。每個輸入字段都使用 v-model:value 屬性綁定到Vue實例中的 customers 物件中的屬性,這意味著當用戶輸入數據時,這些值將在Vue實例中更新。
<script>: 這個 <script> 元素包含Vue.js的代碼,用於創建Vue實例和定義方法。具體來說:
data 區塊中定義了一個名為 customers 的數據物件,該物件包含客戶相關的各種屬性,如客戶編號、公司名稱等。methods 區塊中定義了一個方法 qryHandler,該方法在按下按鈕時被觸發。它執行了以下操作:
最後,Vue實例使用 app.$mount('#app') 將自身掛載到ID為 "app" 的元素上,使Vue能夠管理該元素中的內容。
總體來說,這個HTML頁面用於顯示客戶資料維護的前端部分,包括一個按鈕,當按下按鈕時,將顯示一個對話框,該對話框可以用於新增客戶資料。Vue.js用於實現數據綁定和互動,而jQuery則用於管理對話框的顯示和操作。
測試客戶新增作業http://localhost:8080/customers/add
未按前
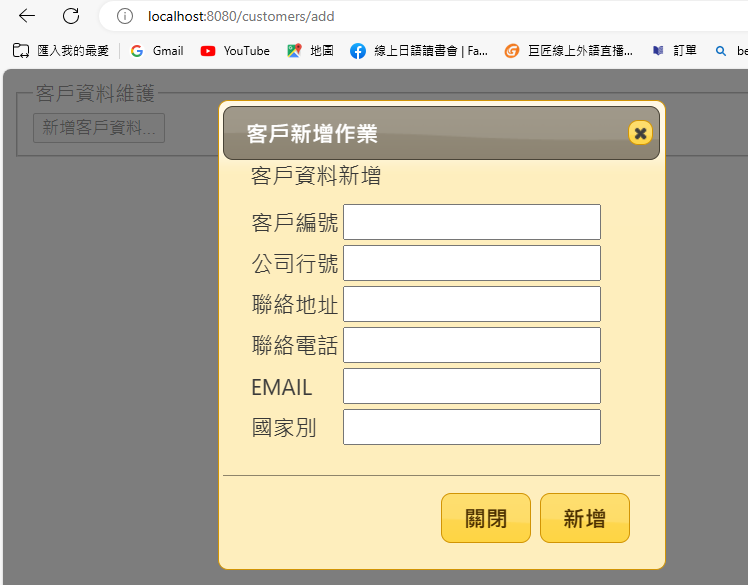
按了之後顯示對話盒,按關閉也OK
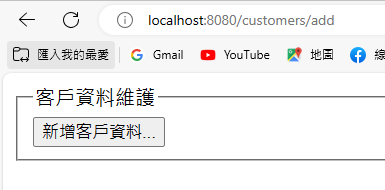
修改對話盒寬高>對應程式碼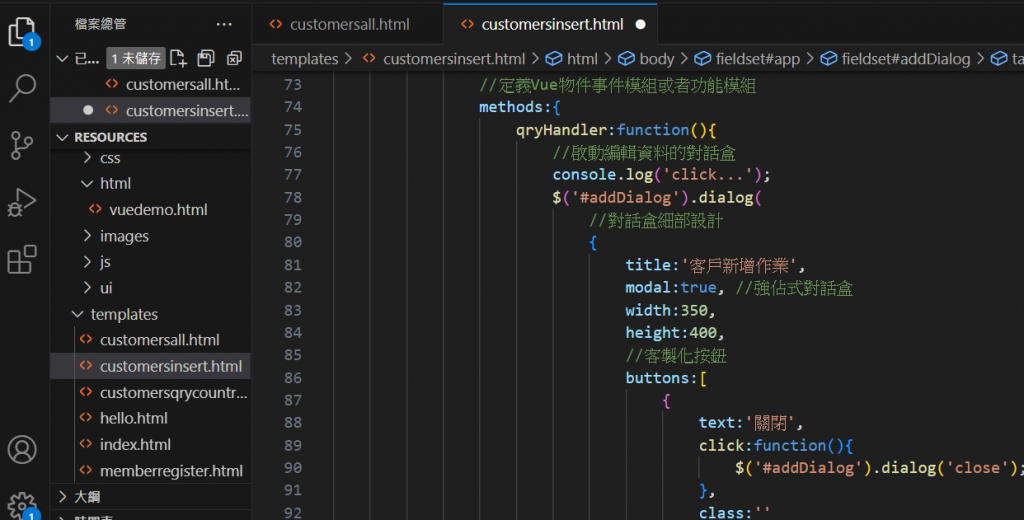
再修改後端service.properties新增app.service.customersadd=http://localhost:8080/api/customersadd
#app service url
app.service.ubikeqry=http://localhost:8080/api/ubike/%s/rawdata
app.service.ubike=https://tcgbusfs.blob.core.windows.net/dotapp/youbike/v2/youbike_immediate.json
app.service.customersadd=http://localhost:8080/api/customersadd
用於定義不同服務(Service)的URL或端點,這些服務可能用於應用程序的不同功能。讓我幫您解釋它們:
app.service.ubikeqry=http://localhost:8080/api/ubike/%s/rawdata: 這個URL可能用於查詢YouBike即時資料的服務。當應用程序需要獲取YouBike的特定資料時,它可能會向這個URL發送請求, %s 可能是一個參數,表示特定的YouBike站台編號。
app.service.ubike=https://tcgbusfs.blob.core.windows.net/dotapp/youbike/v2/youbike_immediate.json: 這個URL可能用於獲取YouBike即時資料的服務。它指向一個遠程的JSON檔案,該檔案包含YouBike站台的即時資訊。
app.service.customersadd=http://localhost:8080/api/customersadd: 這個URL可能用於向應用程序的客戶資料新增服務發送POST請求。當應用程序需要新增客戶資料時,它可能會向這個URL發送POST請求,然後服務端應該處理並儲存這些資料。
修改CustomersController後端CODE:
修改最前面跟最後面
package com.tzu.controllers;
import java.util.List;

import javax.sql.DataSource;

import org.springframework.beans.factory.annotation.Autowired;
import org.springframework.beans.factory.annotation.Value;
import org.springframework.context.annotation.PropertySource;
import org.springframework.jdbc.core.BeanPropertyRowMapper;
import org.springframework.jdbc.core.JdbcTemplate;
import org.springframework.stereotype.Controller;
import org.springframework.ui.Model;
import org.springframework.web.bind.annotation.GetMapping;
import org.springframework.web.bind.annotation.RequestMapping;
import org.springframework.web.bind.annotation.RequestMethod;

import com.tzu.domain.Customer;
import com.tzu.domain.Customers;

@Controller
@PropertySource("classpath:service.properties")
@RequestMapping(path="/customers")
public class CustomersController {
	//Attribute(Data Field) Field Injection
	@Autowired
	private JdbcTemplate jdbcTemplate; //DataSource會注入控制反轉
	//注入項目
	@Value("${app.service.customersadd}")
	private String customersAddService;
	//查詢功能設計
	@RequestMapping(path="/qry/country",
			method= {RequestMethod.GET,RequestMethod.POST})
	public String customersQry(String country,Model model) {
		//是否第一次請求 沒有傳遞國家別
		if(country==null) {
			return "customersqrycountry"; //View Page名稱
		}else {
			System.out.println("查詢國家別:"+country);
			DataSource ds=jdbcTemplate.getDataSource();
			System.out.println(ds.toString());
			//1.採用DAO設計模式(Spring Boot data jdbc)
			String sql="SELECT ID,name,address,phone,country "
					+ "FROM sakila.customer_list where country=?";
			//2.進行國家別相關客戶查詢
			List<Customer> result=jdbcTemplate.query(sql,
					//傳遞一個程序當作參數(RowMapper/maprow 介面) 使用Lambda
					//查詢符合每一筆 逐筆傳遞進來callback 自訂程序封裝結果
					(rs,num)->{
						//將相對紀錄封裝成自訂JavaBean-Customer
						Customer customer=new Customer();
						//注入相對記錄欄位於JavaBean物件中
						customer.setId(rs.getShort("ID"));
						customer.setName(rs.getString("name"));
						customer.setAddress(rs.getString("address"));
						customer.setPhone(rs.getString("phone"));
						customer.setCountry(rs.getString("country"));
						return customer;
					},
					country
					);
			System.out.println("查詢結果:"+result.size());
			//透過注入Model持續查詢結果物件到View Page
			model.addAttribute("result",result);
			model.addAttribute("country",country);
			//3.查詢結果狀態管理 調用View Page去進行查詢結果渲染(使用thymeleaf template engine)
			//採用postback 回來 要進行查詢
			return "customersqrycountry";
		}
	}

	//查詢客戶所有資料,將查詢結果產生(後端List<>) to 前端的JavaScript 陣列(封裝每一筆資料物件)
	//只要超連結方式點選到這裡 採用GET
	@GetMapping(path="/allcustomers")
	public String customesAll(Model model) {
		//1.借助注入進來的JdbcTemplate 進行客戶資料customers所有記錄查詢
		String sql="select customerid,companyname,address,phone,email,country from customers";
		List<Customers> result=
				jdbcTemplate.query(sql,
						BeanPropertyRowMapper.newInstance(Customers.class));
		System.out.println("記錄數:"+result.size());
		//2.查詢結果是一個List集合物件 如何轉換成JavaScript 陣列???
		model.addAttribute("data",result);
		//3調用頁面
		return "customersall";
	}
	//客戶新增作業(提供新增客戶資料表單)JPA
		@GetMapping(path="/add")
		public String customersInsert(Model model) {
			//透過狀態直敘到頁面 進行JS 嵌入內容
			model.addAttribute("custservice",customersAddService);
			return "customersinsert";
		}
	}
這個Java控制器類別是一個Spring MVC控制器,負責處理與客戶相關的網頁請求。這裡有一些重要的事項:
@Controller 和 @RequestMapping: 這個類別被標記為Spring MVC的控制器(@Controller),並使用@RequestMapping 指定了該控制器處理的請求路徑前綴,這裡是 "/customers"。
@Autowired 和 JdbcTemplate: 這個控制器使用Spring的依賴注入功能(@Autowired)注入了一個 JdbcTemplate 物件,用於執行資料庫操作。JdbcTemplate 是Spring JDBC的一部分,簡化了與資料庫的互動。
@Value 和 @PropertySource: 使用了 @Value 注解來讀取 service.properties 設定檔中的屬性,特別是 app.service.customersadd。這個屬性應該包含一個URL,用於客戶新增的服務。@PropertySource 用於指定屬性文件的位置。
customersQry 方法: 這是一個處理客戶查詢的方法,處理 "/customers/qry/country" 路徑的 GET 和 POST 請求。它接收國家別(country)作為輸入,執行資料庫查詢,然後將結果傳遞到視圖頁面。該方法還使用了 customersAddService 作為屬性,這是一個服務的URL。
customesAll 方法: 這是一個處理查詢所有客戶資料的方法,處理 "/customers/allcustomers" 路徑的 GET 請求。它執行一個SQL查詢,然後將結果傳遞到視圖頁面,使它可以用於顯示所有客戶資料。
customersInsert 方法: 這是一個處理客戶新增操作的方法,處理 "/customers/add" 路徑的 GET 請求。它在模型(Model)中添加 custservice 屬性,該屬性的值是 customersAddService,這應該是一個URL,可能用於客戶新增操作。該方法返回 "customersinsert" 視圖頁面。
總體來說,這個控制器用於處理與客戶相關的網頁請求,執行查詢和新增操作,並使用 JdbcTemplate 進行資料庫操作。它還使用了 @Value 注解來讀取服務URL,這些URL可能在應用程序中使用。
測試http://localhost:8080/customers/add 有顯示
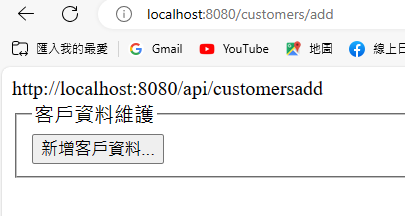
如果不想顯示就修改此行
<!--<div th:text="${custservice}"></div>-->
程式碼:
<!DOCTYPE html>
<html lang="en">
<head>
    <meta charset="UTF-8">
    <meta http-equiv="X-UA-Compatible" content="IE=edge">
    <meta name="viewport" content="width=device-width, initial-scale=1.0">
    <script th:src="@{/js/vue.min.js}"></script>
    <script th:src="@{/js/jquery-3.6.1.min.js}"></script>
    <script th:src="@{/ui/sunny/jquery-ui.min.js}"></script>
    <!--css-->
    <link th:href="@{/ui/sunny/jquery-ui.min.css}" rel="stylesheet">
    <link th:href="@{/ui/sunny/jquery-ui.structure.min.css}" rel="stylesheet">
    <link th:href="@{/ui/sunny/jquery-ui.theme.min.css}" rel="stylesheet">
    <title>客戶新增作業</title>
</head>
<body>
      <!--顯示URL-->
     <!--<div th:text="${custservice}"></div>-->
    <fieldset id="app">
        <legend>客戶資料維護</legend>
        <div>
            <button v-on:click="qryHandler">新增客戶資料...</button>

        </div>
        <!--平面”客戶新增”-->
        <!--<fieldset id="addDialog" >-->
            <!--進行新增對話盒刻版-->
      <fieldset id="addDialog" style="display: none;">
            <legend>客戶資料新增</legend>
            <table>
                <tr>
                    <td>客戶編號</td>
                    <td><input type="text" v-model:value="customers.customerid"/></td>
                </tr>
                <tr>
                    <td>公司行號</td>
                    <td><input type="text" v-model:value="customers.companyname"/></td>
                </tr>
                <tr>
                    <td>聯絡地址</td>
                    <td><input type="text" v-model:value="customers.address"/></td>
                </tr>
                <tr>
                    <td>聯絡電話</td>
                    <td><input type="text" v-model:value="customers.phone"/></td>
                </tr>
                <tr>
                    <td>EMAIL</td>
                    <td><input type="text" v-model:value="customers.email"/></td>
                </tr>
                <tr>
                    <td>國家別</td>
                    <td><input type="text" v-model:value="customers.country"/></td>
                </tr>
            </table>
        </fieldset>
    </fieldset>
    <!--Vue Instance個體物件 與掛載作業-->
    <script>
        //Vue物件
        var app=new Vue(
            //建構物件初始化 採用JS物件
            {
                data:{
                    customers:{
                        customerid:'',
                        companyname:'',
                        address:'',
                        phone:'',
                        country:'',
                        email:''
                    }
                },
                //定義Vue物件事件模組或者功能模組
                methods:{
                    qryHandler:function(){
                        //啟動編輯資料的對話盒
                        console.log('click...');
                        $('#addDialog').dialog(
                            //對話盒細部設計
                            {
                                title:'客戶新增作業',
                                modal:true, //強佔式對話盒
                                width:350,
                                height:400,
                                //客製化按鈕
                                buttons:[
                                    {
                                        text:'關閉',
                                        click:function(){
                                            $('#addDialog').dialog('close');
                                        },
                                        class:''
                                    },
                                    {
                                        text:'新增',
                                        click:function(){
                                            //TODO進行非同步處理

                                        },
                                        class:''
                                    }

                                ]
                            }
                        );
                    }
                }
            }
        );

        //掛載
        app.$mount('#app');
    </script>
</body>
</html>
就會顯示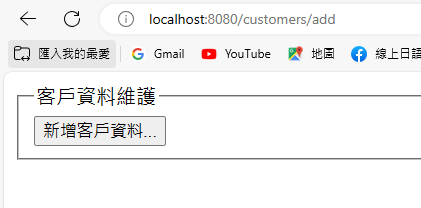
謝謝大家收看![]()
