今天要介紹的是 MVVM 的架構,當前Android應用程序開發的一個重要趨勢是使用MVVM(Model-View-ViewModel)架構,這是一種將應用程序邏輯和UI分離的模式。MVVM模式旨在簡化代碼的維護和測試,同時提供更好的用戶體驗。
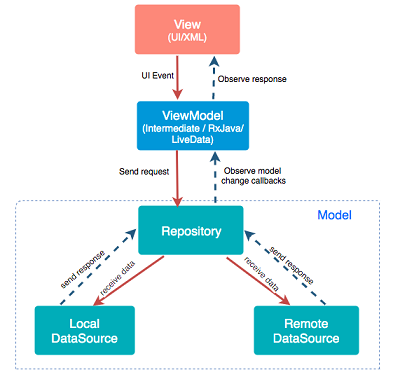
Model代表您的應用程序的數據和業務邏輯。這可以包括數據庫操作、網絡請求、文件系統操作等。Model將數據提供給ViewModel,然後通知ViewModel數據的變化。
View是用戶界面的一部分,它是在屏幕上顯示數據的地方。但是,View不應該包含任何業務邏輯。在MVVM中,View只負責顯示數據並回應用戶的輸入。
ViewModel是View和Model之間的中間人。它包含了用於處理數據和業務邏輯的代碼。ViewModel的一個重要特性是它能夠管理View的狀態。當Model的數據發生變化時,ViewModel會通知View來更新它的界面。ViewModel通常是不依賴於View的,這使得單元測試變得容易。
首先這次的範例會去打 api 去年寫過了,這裡就不贅述,但還是記得要去給依賴。
dependencies {
implementation 'com.squareup.retrofit2:retrofit:2.9.0'
implementation 'com.squareup.retrofit2:converter-gson:2.9.0'
}
簡單介紹一下畫面,當獲取資料按鈕點下就會去 View Modle 通知 Repository 去抓 API。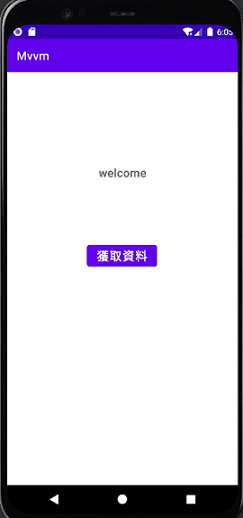
接下來 Activity 使用 ViewModel 來管理和訪問數據,並且在按鈕點擊時觸發一個操作。當ViewModel中的數據更改時,它會通過觀察者模式更新UI中的畫面,樣下面有上註解。
public class MainActivity extends AppCompatActivity {
    MyViewModel myViewModel; // 創建MyViewModel對象,用於訪問ViewModel中的數據
    Button addData; // UI元素:按鈕,用於觸發操作
    TextView number_textView; // UI元素:文本視圖,用於顯示數據

    @Override
    protected void onCreate(Bundle savedInstanceState) {
        super.onCreate(savedInstanceState);
        setContentView(R.layout.activity_main); // 設置活動的佈局

        // 初始化ViewModel,使其能夠在UI中獲取數據
        myViewModel = new ViewModelProvider(this).get(MyViewModel.class);

        // 獲取UI元素的引用
        addData = (Button) findViewById(R.id.add_1);
        number_textView = (TextView) findViewById(R.id.textView);

        // 監聽ViewModel中的MutableLiveData對象,以便在數據更改時更新UI
        myViewModel.postMutableLiveData.observe(this, new Observer<PostsResponse>() {
            @Override
            public void onChanged(PostsResponse postsResponse) {
                String responseText = postsResponse.getBody();
                number_textView.setText(responseText); // 更新文本視圖以顯示獲取的數據
            }
        });

        // 設置按鈕的點擊監聽器,當按鈕被點擊時調用ViewModel中的方法
        addData.setOnClickListener(new View.OnClickListener() {
            @Override
            public void onClick(View v) {
                myViewModel.goToGetValue(); // 調用ViewModel中的方法以觸發操作
            }
        });
    }
}
接下來 MyViewModel 類主要負責處理數據的獲取和管理,並使用MutableLiveData來通知UI層數據的變化。通過觸發goToGetValue()方法,它調用Repository中的方法來獲取數據,然後根據獲取的結果更新postMutableLiveData和isShowDialog。
public class MyViewModel extends ViewModel {
    private Repository repository = new Repository(); // 創建一個Repository對象,用於處理數據存取和業務邏輯

    // 使用MutableLiveData來保存從Repository獲取的數據
    public final MutableLiveData<PostsResponse> postMutableLiveData = new MutableLiveData<>();
    public final MutableLiveData<Boolean> isShowDialog = new MutableLiveData<>();

    // 這個方法用於觸發數據獲取操作
    public void goToGetValue() {
        // 調用Repository的方法來獲取數據,並通過回調函數處理結果
        repository.getPost(new Repository.ModelCallBack() {
            @Override
            public void getPostCallBack(PostsResponse post) {
                // 當數據獲取成功時,將數據設置到postMutableLiveData中
                postMutableLiveData.postValue(post);
            }

            @Override
            public void getPostComplete() {
                // 數據獲取完成後,設置isShowDialog為false,可以用於控制對話框的顯示狀態
                isShowDialog.setValue(false);
            }

            @Override
            public void getPostError() {
                // 當數據獲取過程中出現錯誤時,同樣設置isShowDialog為false
                isShowDialog.setValue(false);
            }
        });
    }
}
最後 Repository 類的主要目的是從網絡獲取數據,它使用了一個回調接口ModelCallBack來通知ViewModel數據的獲取結果。
public class Repository {
    private ApiClient apiClient; // 創建一個ApiClient對象,用於進行網絡請求

    public Repository() {
        apiClient = new ApiClient(); // 初始化ApiClient
    }

    // 這個方法用於從網絡獲取數據,並通過回調接口傳遞結果
    public void getPost(ModelCallBack modelCallBack) {
        // 創建一個網絡請求,並設置回調函數
        Call<PostsResponse> call = apiClient.getApiService().getPostsResponse();
        call.enqueue(new Callback<PostsResponse>() {
            @Override
            public void onResponse(Call<PostsResponse> call, Response<PostsResponse> response) {
                if (response.isSuccessful()) {
                    // 當獲取成功時,調用回調接口的getPostCallBack()方法,將數據傳遞給ViewModel
                    modelCallBack.getPostCallBack(response.body());
                }
            }

            @Override
            public void onFailure(Call<PostsResponse> call, Throwable t) {
                // 當獲取過程中出現錯誤時,調用回調接口的getPostError()方法
                modelCallBack.getPostError();
            }
        });

        // 當獲取操作完成時,不論成功或失敗,都調用回調接口的getPostComplete()方法
        modelCallBack.getPostComplete();
    }

    // 定義一個回調接口,用於通知ViewModel數據獲取的結果
    public interface ModelCallBack {
        // 傳回ViewModel
        void getPostCallBack(PostsResponse post);

        // 當數據獲取操作完成時調用
        void getPostComplete();

        // 當數據獲取過程中出現錯誤時調用
        void getPostError();
    }
}
圖片來源: https://ithelp.ithome.com.tw/articles/10267000