連假第2天
不要斷貨阿
從C:\SpringTools4\myweb\myweb\target\classes
可以看到目前的資料架構
因為app.service.ubikeqry=http://localhost:8080/api/ubike/%s/rawdata之後如果部屬位置改變也不會是這個,所以要修改前後端程式碼
修改UbikeController程式碼:
package com.tzu.controllers;

import org.springframework.beans.factory.annotation.Value;
import org.springframework.context.annotation.PropertySource;
import org.springframework.stereotype.Controller;
import org.springframework.ui.Model;
import org.springframework.web.bind.annotation.GetMapping;

@Controller
@PropertySource("classpath:service.properties") //註冊resource 來源
public class UbikeController {
	//Data Field
	@Value("${app.service.ubikeqry}")
	private String ubikeQryService;
	//提供一個View Page進行區域的Ubike即時資訊查詢
	@GetMapping(path="/ubike/qry")
	public String ubikeQry(Model model) {
		System.out.println(this.ubikeQryService);
		model.addAttribute("ubikeservice",ubikeQryService);
		return "ubikeqry";
	}

}
這個更新後的控制器增加了將 ubikeQryService 的值存儲在模型中的功能。這允許您在視圖中使用這個值。當您訪問 "/ubike/qry" 路由時,它會將 ubikeQryService 的值添加到模型,鍵名為 "ubikeservice"。
這樣,您可以在視圖中輕鬆訪問 ubikeQryService 的值,而不需要在視圖中硬編碼 URL。這提供了更好的可維護性,因為您可以在視圖中輕鬆訪問配置的服務 URL。
修改前端程式碼:
這裡在編輯器上雖然var app=new Vue(反紅但是還是可以RUN
如果後端RUN時出現8080被占用可以在cmd打netstat -ano|findstr 8080知道被誰監聽:結束工作
<!DOCTYPE html>
<html lang="en">
<head>
    <meta charset="UTF-8">
    <meta http-equiv="X-UA-Compatible" content="IE=edge">
    <meta name="viewport" content="width=device-width, initial-scale=1.0">
    <script th:src="@{/js/vue.min.js}"></script>
    <script th:src="@{/js/jquery-3.6.1.min.js}"></script>
    <script th:src="@{/js/axios.min.js}"></script>
    <script th:src="@{/js/bootstrap.bundle.min.js}"></script>
    <script th:src="@{/js/bootstrap.min.js}"></script>
    <link th:href="@{/css/bootstrap.min.css}" rel="stylesheet">
    <title>Ubike 區域 即時資訊</title>
    <!-- javascript 嵌入後端Model attribute變成前端JS variable-->
    <script th:inline="javascript">
        var serviceURL=/*[[${ubikeservice}]]*/
    </script>
</head>
<body>
    <fieldset id="app">
        <legend>區域查詢</legend>
        <div>
            <div>區域</div>
            <input type="text" v-model.lazy:value="sarea" class="text text-primary"/>
            <button v-on:click="ubikeqryHandler" class="btn-success">查詢</button>
           <div>您查詢的區域:{{sarea}}</div>
        </div>
        <fieldset v-show="isShow">
            <legend>{{sarea}} 區域及時狀態</legend>
            <table class="table table-dark table-hover">
                <thead>
                    <tr>
                        <td>區域</td>
                        <td>場站</td>
                        <td>總停車數</td>
                        <td>目前車數</td>
                        <td>空位數</td>
                        <td>時間點</td>
                    </tr>
                </thead>
                <tbody>
                    <tr v-for="item in result">

                        <td>{{item.sarea}}</td>
                        <td>{{item.sna}}</td>
                        <td>{{item.tot}}</td>
                        <td>{{item.sbi}}</td>
                        <td>{{item.bemp}}</td>
                        <td>{{item.srcUpdateTime}}</td>
                    </tr>
                </tbody>
            </table>
        </fieldset>
        <h1>查詢記錄數:{{message}}</h1>
    </fieldset>
    <script>
        //建構一個Vue Instance
        //配置Vue物件初始化 使用JS物件
        var app=new Vue(
            //配置初始化物件
            {
                //資料模組
                data:{
                    sarea:'', //空字串
                    result:[], //空陣列
                    ubikeService:'',
                    isShow:false, //呈現非同步查詢結果區段
                    message:''
                },
                //事件程序或者函數模組
                methods:{
                    ubikeqryHandler:function(){
                        //reset
                        this.isShow=false;
                        this.message='';
                        //TODO進行非同步處理 指向自行定義的服務端點
                        let ubikeSer=this.ubikeService.replace('%s',this.sarea);
                        console.log(ubikeSer);
                        //採用axios framework進行非同步(ajax)
                        axios.get(ubikeSer)
                        //success callback Http status 2xx 傳遞近來Resonse
                        .then(res => {
                            console.log(res);
                            this.result=res.data; //回應資料物件
                            if(this.result.length!==0){
                                this.isShow=true;
                                this.message=this.result.length;
                            }else{
                                this.message='查無結果!!';
                            }

                            //TODO 進行UI Render渲染
                        })
                        //Error callback 產生狀態碼為4xx or 5xx
                        .catch(err => {
                            console.log(err);
                        })

                    }
                },
                //聆聽Vue Mounted完成之後引發初始化Lifecycle  Hook
                mounted:function(){
                    this.ubikeService=serviceURL; //將JS變數內容指派給Vue物件模組
                }
            }
        );
        //掛載到特定的DOM ID
        app.$mount('#app');
    </script>
</body>
</html>
這是一個非常完整的HTML頁面,用於查詢Ubike的區域即時資訊。此頁面使用Vue.js來實現非同步數據查詢並將結果呈現在網頁上。以下是一些主要功能:
當你輸入區域名稱後,點擊 "查詢" 按鈕,Vue.js 會發出非同步請求到指定的Ubike服務URL。
如果成功接收到數據,它會在表格中顯示Ubike站點的即時資訊,包括區域、場站名稱、總停車數、目前車數、空位數和時間點。如果沒有結果,將顯示 "查無結果!!"。
在 Vue 初始化時,將JavaScript變數 serviceURL 的值傳遞給Vue實例的 ubikeService 屬性,從而設置Ubike服務URL。
經過Vue的指令,你可以輕鬆地管理視圖的顯示和數據的呈現。
這個頁面應該能夠有效地查詢並呈現Ubike的即時資訊。
測試網址http://localhost:8080/ubike/qry
測試前:這裡按鈕變綠色跟昨天的CODE是一樣的~因為剛改完要refresh改過才看的到
測試存在區域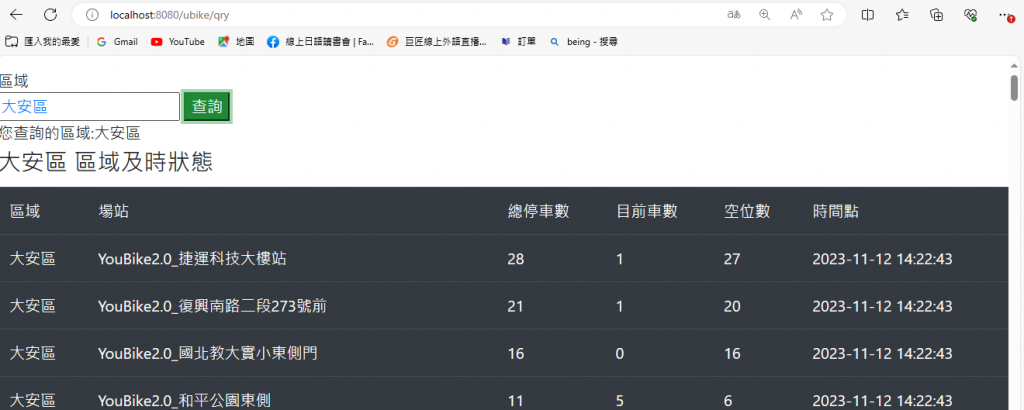
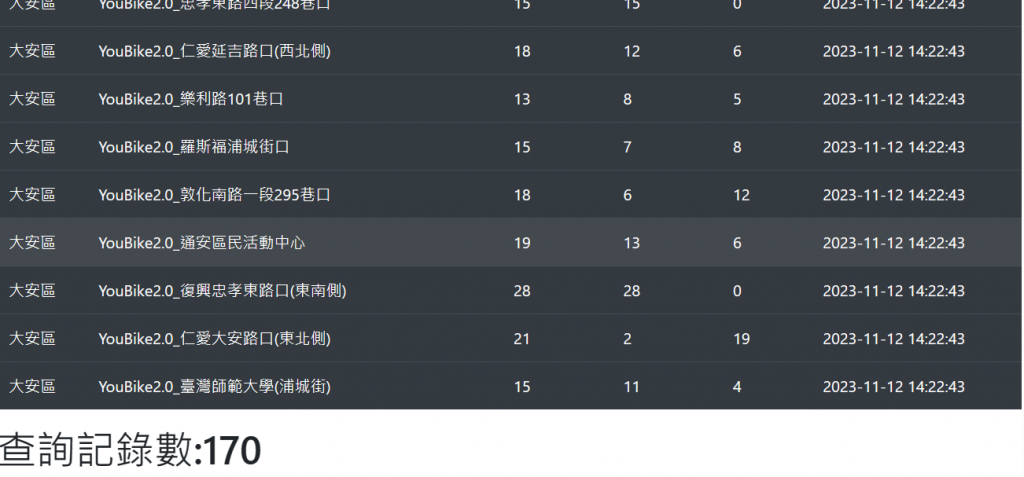
也可以測試不存在的區域
跟我一樣有程式碼反紅恐懼症~
可以改成這樣~一樣會顯示
<!DOCTYPE html>
<html lang="en">
<head>
    <meta charset="UTF-8">
    <meta http-equiv="X-UA-Compatible" content="IE=edge">
    <meta name="viewport" content="width=device-width, initial-scale=1.0">
    <script th:src="@{/js/vue.min.js}"></script>
    <script src="vue.js"></script>
    <script th:src="@{/js/jquery-3.6.1.min.js}"></script>
    <script th:src="@{/js/axios.min.js}"></script>
    <script th:src="@{/js/bootstrap.bundle.min.js}"></script>
    <script th:src="@{/js/bootstrap.min.js}"></script>
    <link th:href="@{/css/bootstrap.min.css}" rel="stylesheet">
    <title>Ubike 區域 即時資訊</title>
    <!-- javascript 嵌入後端Model attribute變成前端JS variable-->
    <script th:inline="javascript">
        var serviceURL=/*[[${ubikeservice}]]*/
    </script>
</head>
<body>
    <fieldset id="app">
        <legend>區域查詢</legend>
        <div>
            <div>區域</div>
            <input type="text" v-model.lazy:value="sarea" class="text text-primary"/>
            <button v-on:click="ubikeqryHandler" class="btn-success">查詢</button>
           <div>您查詢的區域:{{sarea}}</div>
        </div>
        <fieldset v-show="isShow">
            <legend>{{sarea}} 區域及時狀態</legend>
            <table class="table table-dark table-hover">
                <thead>
                    <tr>
                        <td>區域</td>
                        <td>場站</td>
                        <td>總停車數</td>
                        <td>目前車數</td>
                        <td>空位數</td>
                        <td>時間點</td>
                    </tr>
                </thead>
                <tbody>
                    <tr v-for="item in result">

                        <td>{{item.sarea}}</td>
                        <td>{{item.sna}}</td>
                        <td>{{item.tot}}</td>
                        <td>{{item.sbi}}</td>
                        <td>{{item.bemp}}</td>
                        <td>{{item.srcUpdateTime}}</td>
                    </tr>
                </tbody>
            </table>
        </fieldset>
        <h1>查詢記錄數:{{message}}</h1>
    </fieldset>
    <script>
        //建構一個Vue Instance
        //配置Vue物件初始化 使用JS物件
        //var反紅依然可以運行
        //var app=new Vue(
        app=new Vue(
            //配置初始化物件
            {
                //資料模組
                data:{
                    sarea:'', //空字串
                    result:[], //空陣列
                    ubikeService:'',
                    isShow:false, //呈現非同步查詢結果區段
                    message:''
                },
                //事件程序或者函數模組
                methods:{
                    ubikeqryHandler:function(){
                        //reset
                        this.isShow=false;
                        this.message='';
                        //TODO進行非同步處理 指向自行定義的服務端點
                        let ubikeSer=this.ubikeService.replace('%s',this.sarea);
                        console.log(ubikeSer);
                        //採用axios framework進行非同步(ajax)
                        axios.get(ubikeSer)
                        //success callback Http status 2xx 傳遞近來Resonse
                        .then(res => {
                            console.log(res);
                            this.result=res.data; //回應資料物件
                            if(this.result.length!==0){
                                this.isShow=true;
                                this.message=this.result.length;
                            }else{
                                this.message='查無結果!!';
                            }

                            //TODO 進行UI Render渲染
                        })
                        //Error callback 產生狀態碼為4xx or 5xx
                        .catch(err => {
                            console.log(err);
                        })

                    }
                },
                //聆聽Vue Mounted完成之後引發初始化Lifecycle  Hook
                mounted:function(){
                    this.ubikeService=serviceURL; //將JS變數內容指派給Vue物件模組
                }
            }
        );
        //掛載到特定的DOM ID
        app.$mount('#app');
    </script>
</body>
</html>
這段程式碼使用Vue.js實現了一個查詢YouBike站點資訊的網頁應用。
主要功能是:
輸入區域名稱,點選查詢按鈕
呼叫後端API獲取該區域的YouBike站點實時資訊
將查到的結果顯示在表格中
記錄總的查詢次數
主要技術點分析:
使用Vue例項app繫結#app節點
data定義了應用資料:查詢條件、查詢結果、是否顯示結果等
methods定義查詢函數ubikeqryHandler,使用axios呼叫後端API
mounted鉤子中初始化服務地址變數
v-model雙向繫結輸入框的值
v-on繫結按鈕點選事件到查詢函數
v-for迴圈渲染查詢結果
v-show控制是否顯示結果區段
使用Promise鏈式呼叫處理非同步請求結果
整體來說,這是一個典型的Vue應用,通過元件化模式實現了查詢功能的前後端互動邏輯。核心是使用Vue的資料繫結和事件處理機制,結合axios訪問後端服務。
加入spring boot starter data jpa
到https://mvnrepository.com/search?q=spring+boot+starter+data+jpa
貼上3.0.1版本https://mvnrepository.com/artifact/org.springframework.boot/spring-boot-starter-data-jpa/3.0.1
貼到pom.xml
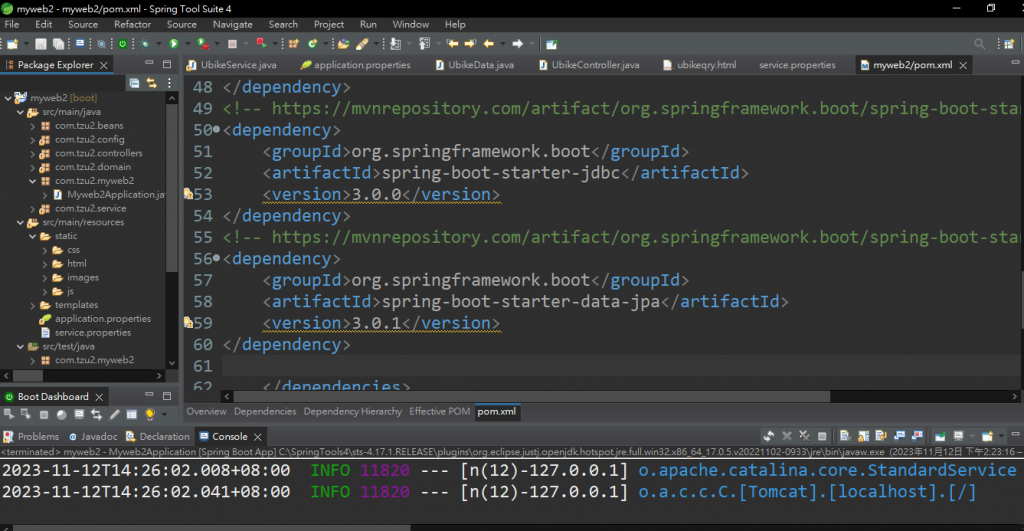
配置JPA到application.properties檔案:帳密要改自己的
server.port=8080
spring.datasource.url=jdbc:mysql://localhost:3306/sakila?useSSL=false&serverTimezone=UTC&characterEncoding=utf-8&allowPublicKeyRetrieval=true
spring.datasource.username=root
spring.datasource.password=1234
spring.datasource.dbcp2.driver-class-name=com.mysql.cj.jdbc.Driver
#監控轉譯語法
spring.jpa.show-sql=true
#設定翻譯員風格
spring.jpa.properties.hibernate.dialect=org.hibernate.dialect.MySQL8Dialect
#外部服務自訂屬性項目
outside.service.ubike=https://tcgbusfs.blob.core.windows.net/dotapp/youbike/v2/youbike_immediate.json
這些是Spring Boot應用程式的配置屬性,用於設定應用程式的數據庫連接和其他屬性。這裡有一些主要的配置項目:
server.port: 這設定了應用程式的端口號,你的應用程式將在 8080 端口上運行。
spring.datasource: 這些屬性包括了數據庫的連接信息,如URL、用戶名和密碼,以及數據庫驅動程序的類名。
spring.jpa.show-sql: 這個屬性設定為 true,它會在應用程式的日誌中顯示SQL語句,用於監控和調試。
spring.jpa.properties.hibernate.dialect: 這個屬性設定了Hibernate的SQL方言,以便與MySQL數據庫進行兼容。
outside.service.ubike: 這個屬性設定了外部服務的URL,用於Ubike即時資訊的查詢。
這些配置屬性一般用於application.properties或application.yml文件中,以供Spring Boot應用程式使用。根據你的需求,你可以根據這些配置屬性來設定你的應用程式。
打開資料庫有連接
到程式碼Customers:設定ORM Entity class,要注意import一樣不然會報錯
package com.tzu.domain;

import jakarta.persistence.Column;
import jakarta.persistence.Entity;
import jakarta.persistence.Id;
import jakarta.persistence.Table;

//JavaBean
//ORM Entity class

@Entity
@Table(name="customers")
public class Customers implements java.io.Serializable{
	//封裝欄位
	@Id
	@Column(name="customerid")
	private String customerid;
	private String companyname;
	private String address;
	private String phone;
	private String email;
	private String country;
	//採用Property 拿存取子去頭 customerid Property
	public String getCustomerid() {
		return customerid;
	}
	public void setCustomerid(String customerid) {
		this.customerid = customerid;
	}
	public String getCompanyname() {
		return companyname;
	}
	public void setCompanyname(String companyname) {
		this.companyname = companyname;
	}
	public String getAddress() {
		return address;
	}
	public void setAddress(String address) {
		this.address = address;
	}
	public String getPhone() {
		return phone;
	}
	public void setPhone(String phone) {
		this.phone = phone;
	}
	public String getEmail() {
		return email;
	}
	public void setEmail(String email) {
		this.email = email;
	}
	public String getCountry() {
		return country;
	}
	public void setCountry(String country) {
		this.country = country;
	}


}
這段程式碼定義了一個Java實體類別(Entity class)Customers,用於對應到數據庫表格中的customers表格。以下是類別的主要特點:
使用了Jakarta Persistence(先前稱為Java Persistence API,JPA)的註解,這些註解用於定義類別和屬性如何映射到數據庫表格。
@Entity 註解表示這是一個實體類別,它對應到數據庫表格。
@Table(name="customers") 註解指定了數據庫表格的名稱,即customers。
@Id 註解標記了customerid 屬性作為主鍵。
屬性和數據庫欄位之間的映射關係由 @Column 註解指定。例如,customerid 屬性對應到 customerid 數據庫欄位。
類別包括一些成員變數,分別代表了 customerid、companyname、address、phone、email 和 country 這些顧客資料的欄位。
類別還提供了 getter 和 setter 方法,用於存取這些欄位的值。這是一個常見的JavaBean樣式,用於設置和讀取物件的屬性。
這個類別的主要目的是將Java物件映射到數據庫表格,以便進行CRUD(創建、讀取、更新、刪除)操作。通常,在Spring應用程式中,你可以使用Spring Data JPA或Hibernate等框架來簡化數據庫操作。
Interface JpaRepository<T,ID>看api
新增介面檔案CustomersRepository
package com.tzu.domain;
import java.util.List;

import org.springframework.data.jpa.repository.JpaRepository;
import org.springframework.stereotype.Repository;
@Repository
public interface CustomersRepository extends JpaRepository<Customers,String>{
	//改寫方法
	List<Customers> findAll();

}
這段程式碼定義了一個Spring Data JPA的Repository介面 CustomersRepository,用於處理對 Customers 實體類別(Entity class)的數據存取。以下是這個類別的主要特點:
CustomersRepository 介面繼承自 JpaRepository<Customers, String>,這意味著它將繼承Spring Data JPA的JpaRepository介面,並使用Customers實體類別來處理名為customerid的主鍵。
@Repository 註解標記了這是一個Spring組件,用於數據存取。它通常與Spring的依賴注入一起使用。
介面中定義了一個方法 List<Customers> findAll(),這是一個自訂的方法,用於檢索所有的顧客記錄。這個方法繼承自JpaRepository,但可以被Spring Data JPA自動實現。這是一個簡單的方法,用於返回所有顧客記錄的列表。
這個Repository介面提供了一個高層次的方式來執行數據庫操作,而不需要實作低階的數據存取邏輯。Spring Data JPA會根據命名慣例自動生成SQL查詢,以執行CRUD操作。這使得數據庫操作變得更簡單且更容易維護。
你可以使用 CustomersRepository 來查詢、新增、更新或刪除 Customers 實體類別的數據,而不需要編寫具體的SQL語句。
目前RUN起來還很無感,繼續做配置,修改Customers檔案
package com.tzu.domain;

import org.springframework.data.jpa.domain.support.AuditingEntityListener;

import jakarta.persistence.Column;
import jakarta.persistence.Entity;
import jakarta.persistence.EntityListeners;
import jakarta.persistence.Id;
import jakarta.persistence.Table;

//JavaBean
//ORM Entity class

@Entity
@Table(name="customers")
@EntityListeners(AuditingEntityListener.class)
public class Customers implements java.io.Serializable{
	//封裝欄位
	@Id
	@Column(name="customerid")
	private String customerid;
	private String companyname;
	private String address;
	private String phone;
	private String email;
	private String country;
	//採用Property 拿存取子去頭 customerid Property
	public String getCustomerid() {
		return customerid;
	}
	public void setCustomerid(String customerid) {
		this.customerid = customerid;
	}
	public String getCompanyname() {
		return companyname;
	}
	public void setCompanyname(String companyname) {
		this.companyname = companyname;
	}
	public String getAddress() {
		return address;
	}
	public void setAddress(String address) {
		this.address = address;
	}
	public String getPhone() {
		return phone;
	}
	public void setPhone(String phone) {
		this.phone = phone;
	}
	public String getEmail() {
		return email;
	}
	public void setEmail(String email) {
		this.email = email;
	}
	public String getCountry() {
		return country;
	}
	public void setCountry(String country) {
		this.country = country;
	}


}
這段程式碼定義了一個名為 Customers 的實體類別(Entity class),這是一個JavaBean,同時也是一個ORM(Object-Relational Mapping)實體,它將對應到數據庫中的 customers 表。以下是這個實體類別的主要特點:
@Entity 註解標記了這是一個JPA實體類別,它對應到數據庫中的表格。
@Table(name="customers") 註解指定了這個實體類別映射到數據庫中的 customers 表。
@EntityListeners(AuditingEntityListener.class) 註解指定了監聽實體生命周期事件的實體監聽器。在這個例子中,AuditingEntityListener 用於監聽並記錄實體的變更。
@Id 註解標記了 customerid 欄位作為主鍵。
@Column(name="customerid") 註解指定了 customerid 欄位對應到數據庫表格中的 customerid 欄位。
類別內的屬性(如 companyname、address、phone 等)都具有相應的 getter 和 setter 方法,用於設定和讀取這些屬性的值。
這個實體類別代表了 customers 表的結構,並使你能夠以物件導向的方式操作該表的數據。通過JPA,你可以使用這個實體類別來執行數據庫操作,例如查詢、新增、更新和刪除 customers 表中的記錄,而不需要直接使用SQL語句。
MywebApplication.java目前CODE
package com.tzu.myweb;

import org.springframework.boot.SpringApplication;
import org.springframework.boot.autoconfigure.SpringBootApplication;
import org.springframework.context.annotation.ComponentScan;

@SpringBootApplication
@ComponentScan(basePackages = {"com.tzu.controllers","com.tzu.config","com.tzu.service","com.tzu.domain"})

public class MywebApplication {

	public static void main(String[] args) {
		SpringApplication.run(MywebApplication.class, args);
	}

}
這段程式碼是 Spring Boot 應用程式的啟動類別,它包含了 main 方法,用於啟動應用程式。以下是這個啟動類別的主要特點:
@SpringBootApplication 註解標記這是一個 Spring Boot 應用程式的啟動類別。它是 Spring Boot 應用程式的入口點,並自動配置許多必要的設定,例如組件掃描和啟用自動配置。
@ComponentScan 註解用於指定要掃描的組件的基本包名。在這個例子中,指定要掃描 "com.tzu.controllers", "com.tzu.config", "com.tzu.service", 和 "com.tzu.domain" 這些包中的組件。這確保 Spring Boot 應用程式能夠找到和註冊這些組件,以便它們能夠被正確地管理和使用。
main 方法是應用程式的入口點,通過 SpringApplication.run 方法,它啟動了 Spring Boot 應用程式。這個方法接受兩個引數,第一個引數是啟動類別的類別,第二個引數是 args,這是命令列引數,它們可以被應用程式使用。
總結來說,這個類別是 Spring Boot 應用程式的入口點,它設定了組件掃描的基本包名,並在 main 方法中啟動了應用程式。從這個點開始,應用程式將啟動並運行,處理來自客戶端的請求並提供相應的服務。
修改MywebApplication.java的CODE
package com.tzu.myweb;

import org.springframework.boot.SpringApplication;
import org.springframework.boot.autoconfigure.SpringBootApplication;
import org.springframework.boot.autoconfigure.domain.EntityScan;
import org.springframework.context.annotation.ComponentScan;
import org.springframework.data.jpa.repository.config.EnableJpaRepositories;

@SpringBootApplication
@EnableJpaRepositories(basePackages= {"com.tzu.domain"})
@EntityScan(basePackages= {"com.tzu.domain"})
@ComponentScan(basePackages = {"com.tzu.controllers","com.tzu.config","com.tzu.service","com.tzu.domain"})

public class MywebApplication {

	public static void main(String[] args) {
		SpringApplication.run(MywebApplication.class, args);
	}

}
這段程式碼是 Spring Boot 應用程式的啟動類別,額外引入了與 JPA (Java Persistence API) 相關的設定,以便處理實體類別 (Entities) 和 JPA 存儲庫 (Repositories)。以下是這個啟動類別的主要特點:
@SpringBootApplication 註解標記這是一個 Spring Boot 應用程式的啟動類別。
@EnableJpaRepositories 註解用於啟用 JPA 存儲庫,它指定了存儲庫介面的基本包名,即 {"com.tzu.domain"}。這個設定是為了使 Spring Boot 能夠自動掃描並管理 JPA 存儲庫。
@EntityScan 註解用於掃描 JPA 實體類別 (Entities),它指定了實體類別的基本包名,即 {"com.tzu.domain"}。這確保 Spring Boot 能夠識別並管理這些實體類別。
@ComponentScan 註解用於指定要掃描的組件的基本包名,包括控制器、配置類別、服務等,以及實體類別。在這個例子中,指定要掃描 "com.tzu.controllers", "com.tzu.config", "com.tzu.service", 和 "com.tzu.domain" 這些包中的組件。
main 方法是應用程式的入口點,通過 SpringApplication.run 方法,它啟動了 Spring Boot 應用程式。這個方法接受兩個引數,第一個引數是啟動類別的類別,第二個引數是 args,這是命令列引數,它們可以被應用程式使用。
總結來說,這個類別是 Spring Boot 應用程式的入口點,它設定了組件掃描的基本包名,並啟用了 JPA 存儲庫和實體類別的相關設定。從這個點開始,應用程式將啟動並運行,處理來自客戶端的請求並提供相應的服務,同時能夠使用 JPA 進行數據存取操作。
修改CustomerService檔案
package com.tzu.service;

import org.springframework.beans.factory.annotation.Autowired;
import org.springframework.dao.DataAccessException;

import org.springframework.http.HttpStatus;

import org.springframework.http.ResponseEntity;
import org.springframework.jdbc.core.JdbcTemplate;
import org.springframework.web.bind.annotation.DeleteMapping;
import org.springframework.web.bind.annotation.GetMapping;
import org.springframework.web.bind.annotation.PutMapping;
import org.springframework.web.bind.annotation.RequestBody;
import org.springframework.web.bind.annotation.RequestParam;
import org.springframework.web.bind.annotation.RestController;

import com.tzu.domain.Customers;
import com.tzu.domain.CustomersRepo;
import com.tzu.domain.CustomersRepository;
import com.tzu.domain.Message;
import com.tzu.domain.StatusMessage;
@RestController
public class CustomerService {
	//Data Field注入JdbcTemplate
	@Autowired
	private JdbcTemplate jdbcTemplate;
	//注入自訂Repository
	@Autowired
	private CustomersRepo customersRepo;
	@Autowired
	private CustomersRepository customersReposit;

	//傳遞一份Json進來  進行相對客戶更新作業
	//方法參數 採用參數注入Parameter Injection
	@PutMapping(path="/api/customers/update/rawdata",
			consumes="application/json",produces="application/json")
	public Message customersUpdate(@RequestBody Customers customers) {
		Message message=new Message();
		//更新客戶資料
		String sql="update customers set companyname=?,address=?,phone=?,email=?,country=? where customerid=?";
		try {
		int affect=jdbcTemplate.update(sql,
				//Lambda PreparedStatementSetter interface
				(st)->{
					//注入PreparedStatement物件,設定參數內容
					st.setString(1, customers.getCompanyname());
					st.setString(2, customers.getAddress());
					st.setString(3, customers.getPhone());
					st.setString(4, customers.getEmail());
					st.setString(5, customers.getCountry());
					st.setString(6, customers.getCustomerid());
				}
				);
		if(affect>0) {
			message.setCode(200);
			message.setMsg("客戶資料更新成功");
		}else {
			message.setCode(200);
			message.setMsg("查無該客戶資料更新");
		}
		}catch(DataAccessException ex) {
			message.setCode(400);
			message.setMsg("客戶資料更新失敗");
		}

		return message;
	}


	//刪除相對客戶資料
	//使用傳遞客戶編號資訊架構 採用QueryString http://xxx.xxx,xxx/xxx/xxx?cid=value&...
	@DeleteMapping(path="/api/customers/delete/byid",produces="application/json")
	public ResponseEntity<Object> customersDelete(@RequestParam(name="cid") String customerid) {
		System.out.println(customersRepo.getTemplate());
		var result=customersRepo.delete(customerid);
		ResponseEntity<Object> responseEntity=null;
		//判斷
		if (result>0) {
			//刪除成功
			Message msg=new Message();
			msg.setCode(200);
			msg.setMsg("客戶資料刪除成功");
			responseEntity=new ResponseEntity<>(msg,HttpStatus.OK);

		}else {
			//刪除不到資料 回應Http status code-400
			StatusMessage msg=new StatusMessage();
			msg.setCode(400);
			msg.setMsg("沒有這一個客戶");
			msg.setErrorCode("notfound");
			responseEntity=new ResponseEntity<>(msg,HttpStatus.BAD_REQUEST);

		}
		return responseEntity;

	}

	@GetMapping(path="/api/customers/all",produces="application/json")
	public String jpaCustomersQuery() {
		return this.customersReposit.toString();
	}
}
這個程式碼是一個 Spring Boot RESTful Web 服務的實現,主要負責處理客戶 (Customers) 資料的更新和刪除操作。以下是此服務的主要特點:
@RestController 註解標記這是一個 RESTful Web 服務的控制器。
@Autowired 註解用於依賴注入,將 JdbcTemplate、CustomersRepo 和 CustomersRepository 自動注入到這個類別中。
@PutMapping 註解用於處理 HTTP PUT 請求,路徑為 /api/customers/update/rawdata,並指定了 consumes 和 produces 的內容類型。這個方法接受客戶資料作為 JSON 請求主體 (@RequestBody Customers customers),然後使用 JdbcTemplate 更新客戶資料。如果更新成功,將返回一個成功的 Message 物件;否則,將返回錯誤訊息。
@DeleteMapping 註解用於處理 HTTP DELETE 請求,路徑為 /api/customers/delete/byid,並使用 @RequestParam 來接收客戶編號 (cid)。這個方法使用 CustomersRepo 來刪除客戶資料,並根據結果返回不同的 HTTP 回應 (HTTP status code 200 或 400)。
@GetMapping 註解用於處理 HTTP GET 請求,路徑為 /api/customers/all,用於獲取客戶資料。在這個方法中,它返回了 CustomersRepository 的字串表示形式。
總結來說,這個類別實現了客戶資料的更新、刪除和查詢功能,並且使用了 Spring Boot 的 JdbcTemplate、JPA 存儲庫來處理資料。RESTful Web 服務的各種操作都根據 HTTP 請求和回應的規範進行處理,這樣客戶端應用程式可以輕鬆與這個服務進行通信。
POSTMAN測試:http://localhost:8080/api/customers/all
修改CustomerService
package com.tzu.service;

import java.util.List;

import org.springframework.beans.factory.annotation.Autowired;
import org.springframework.dao.DataAccessException;

import org.springframework.http.HttpStatus;

import org.springframework.http.ResponseEntity;
import org.springframework.jdbc.core.JdbcTemplate;
import org.springframework.web.bind.annotation.DeleteMapping;
import org.springframework.web.bind.annotation.GetMapping;
import org.springframework.web.bind.annotation.PutMapping;
import org.springframework.web.bind.annotation.RequestBody;
import org.springframework.web.bind.annotation.RequestParam;
import org.springframework.web.bind.annotation.RestController;

import com.tzu.domain.Customers;
import com.tzu.domain.CustomersRepo;
import com.tzu.domain.CustomersRepository;
import com.tzu.domain.Message;
import com.tzu.domain.StatusMessage;
@RestController
public class CustomerService {
	//Data Field注入JdbcTemplate
	@Autowired
	private JdbcTemplate jdbcTemplate;
	//注入自訂Repository
	@Autowired
	private CustomersRepo customersRepo;
	@Autowired
	private CustomersRepository customersReposit;

	//傳遞一份Json進來  進行相對客戶更新作業
	//方法參數 採用參數注入Parameter Injection
	@PutMapping(path="/api/customers/update/rawdata",
			consumes="application/json",produces="application/json")
	public Message customersUpdate(@RequestBody Customers customers) {
		Message message=new Message();
		//更新客戶資料
		String sql="update customers set companyname=?,address=?,phone=?,email=?,country=? where customerid=?";
		try {
		int affect=jdbcTemplate.update(sql,
				//Lambda PreparedStatementSetter interface
				(st)->{
					//注入PreparedStatement物件,設定參數內容
					st.setString(1, customers.getCompanyname());
					st.setString(2, customers.getAddress());
					st.setString(3, customers.getPhone());
					st.setString(4, customers.getEmail());
					st.setString(5, customers.getCountry());
					st.setString(6, customers.getCustomerid());
				}
				);
		if(affect>0) {
			message.setCode(200);
			message.setMsg("客戶資料更新成功");
		}else {
			message.setCode(200);
			message.setMsg("查無該客戶資料更新");
		}
		}catch(DataAccessException ex) {
			message.setCode(400);
			message.setMsg("客戶資料更新失敗");
		}

		return message;
	}


	//刪除相對客戶資料
	//使用傳遞客戶編號資訊架構 採用QueryString http://xxx.xxx,xxx/xxx/xxx?cid=value&...
	@DeleteMapping(path="/api/customers/delete/byid",produces="application/json")
	public ResponseEntity<Object> customersDelete(@RequestParam(name="cid") String customerid) {
		System.out.println(customersRepo.getTemplate());
		var result=customersRepo.delete(customerid);
		ResponseEntity<Object> responseEntity=null;
		//判斷
		if (result>0) {
			//刪除成功
			Message msg=new Message();
			msg.setCode(200);
			msg.setMsg("客戶資料刪除成功");
			responseEntity=new ResponseEntity<>(msg,HttpStatus.OK);

		}else {
			//刪除不到資料 回應Http status code-400
			StatusMessage msg=new StatusMessage();
			msg.setCode(400);
			msg.setMsg("沒有這一個客戶");
			msg.setErrorCode("notfound");
			responseEntity=new ResponseEntity<>(msg,HttpStatus.BAD_REQUEST);

		}
		return responseEntity;

	}

	@GetMapping(path="/api/customers/all",produces="application/json")
	public List<Customers> jpaCustomersQuery() {
		//呼叫方法 找出所有客戶資料(物件)
		List<Customers> result=this.customersReposit.findAll();
		return result;
	}
}
這個程式碼是一個 Spring Boot RESTful Web 服務的實現,主要負責處理客戶 (Customers) 資料的更新、刪除和查詢操作。以下是此服務的主要特點:
@RestController 註解標記這是一個 RESTful Web 服務的控制器。
@Autowired 註解用於依賴注入,將 JdbcTemplate、CustomersRepo 和 CustomersRepository 自動注入到這個類別中。
@PutMapping 註解用於處理 HTTP PUT 請求,路徑為 /api/customers/update/rawdata,並指定了 consumes 和 produces 的內容類型。這個方法接受客戶資料作為 JSON 請求主體 (@RequestBody Customers customers),然後使用 JdbcTemplate 更新客戶資料。如果更新成功,將返回一個成功的 Message 物件;否則,將返回錯誤訊息。
@DeleteMapping 註解用於處理 HTTP DELETE 請求,路徑為 /api/customers/delete/byid,並使用 @RequestParam 來接收客戶編號 (cid)。這個方法使用 CustomersRepo 來刪除客戶資料,並根據結果返回不同的 HTTP 回應 (HTTP status code 200 或 400)。
@GetMapping 註解用於處理 HTTP GET 請求,路徑為 /api/customers/all,用於獲取客戶資料。在這個方法中,它使用 CustomersRepository 的 findAll 方法找出所有客戶資料,然後返回客戶的列表。
總結來說,這個類別實現了客戶資料的更新、刪除和查詢功能。不同的操作根據 HTTP 請求和回應的規範進行處理,這樣客戶端應用程式可以輕鬆與這個服務進行通信。
再用postman測試:http://localhost:8080/api/customers/all
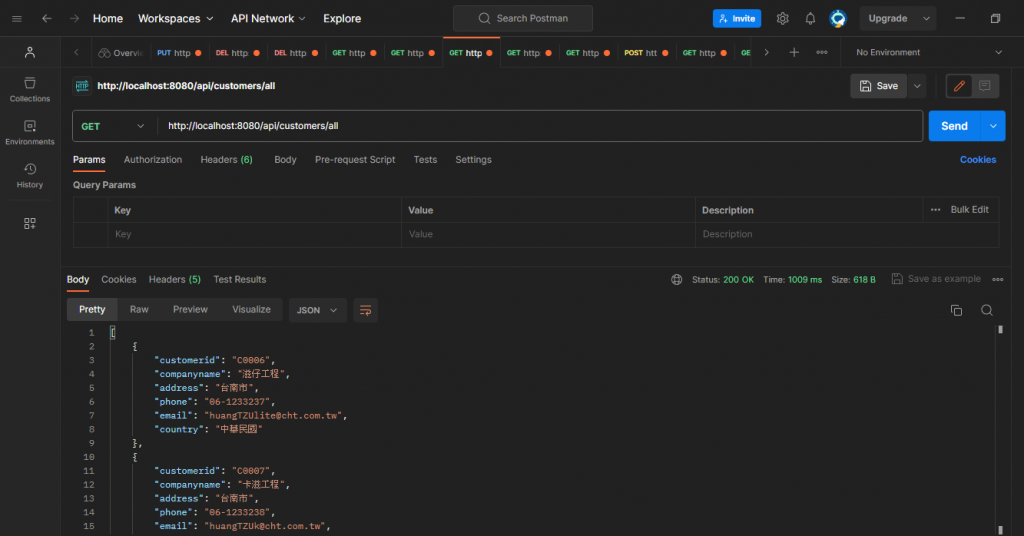
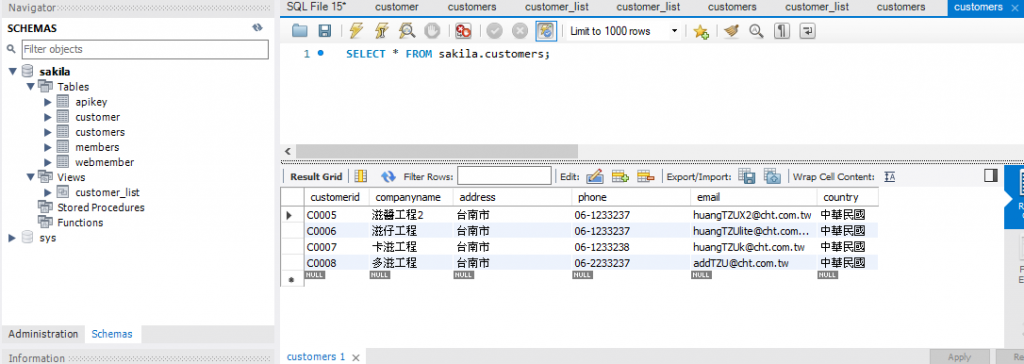
對應資料庫
謝謝大家收看![]()
